
Popular categories
Looking for a yarn?


Comments / Questions (41)
![]() Cougoul wrote:
Cougoul wrote:
Bonjour Je n'arrive pas à comprendre comment il faut faire en même temps les raglans des manches et les augmentations du devant, du dos et des manches Merci pour votre réponse P. Cougoul
26.12.2016 - 20:43DROPS Design answered:
Bonjour Mme Cougoul, vous devez augmenter en même temps au début + à la fin de chaque pièce (= devant, dos, manches) mais à un rythme différent en fonction de la taille, par ex en taille S: augmentez 20 x 1 m tous les 2 tours et 1 x 1 m tous les 4 tours (= + 2 m pour le dos / le devant à chaque augmentation) - pour les manches, augmentez 16x1 m tous les 2 tours + 3x1 m tous les 4 tours. Bon tricot!
29.12.2016 - 14:30
![]() Belen wrote:
Belen wrote:
Sigo teniendo problemas con los aumentos en el raglan, entiendo que en este trozo son 44 vueltas? Divididas en 4 vueltas hay que repetir los aumentos durante 11 bloques? Cuantos aumentos son en cada bloque? 12 aumentos en delantero y espalda y 4 en mangas?, esta explicado muy confuso, me lo pueden aclarar?
06.12.2016 - 00:17DROPS Design answered:
Hola Belen. Los aumentos empiezan al mismo tiempo en la espalda/delantero y las mangas, pero las repeticiones no son iguales, están explicadas en el patrón para todas las tallas. Tienes que elegir las de tu talla. Te recomiendo ir vuelta por vuelta controlando que aumentos hay en cada vta, ya que hay vtas con aumentos en cada parte (espalda, delantero y mangas) y hay vtas con aumentos únicamente en espalda y delantero.
10.12.2016 - 21:14
![]() Anni Mette Vang wrote:
Anni Mette Vang wrote:
Har I ændret på jeres opsætning? Jeg kan ikke længere printe en opskrift ud
01.12.2016 - 10:31DROPS Design answered:
Hej Anni. Nej, der er ikke aendret noget. Kan det mon vaere der er aendret noget i dine indstillinger / browser.
01.12.2016 - 15:55
![]() Belen wrote:
Belen wrote:
Buenas, estoy empezando el jersey y soy un poco novata, estoy empezando el canesu y creo que estoy haciendo algo mal porque me da la sensación de que no va a entrarme la cabeza, el canesu se hace en circular verdad? Seguro que 66 puntos en redondo son suficientes? He visto otros canesu y empiezan con muchos más puntos y este jersey no va pegado al cuello, gracias y un saludo
13.11.2016 - 23:47DROPS Design answered:
Hola Belen. Ten en cuenta que en la primera fila se trabajan los aumentos hasta 76 pts, el escote demasiado ancho no queda bien y el punto musgo le da elasticidad. No te olvides de controlar la tensión del tejido que indica el patrón
19.11.2016 - 18:03
![]() Rita wrote:
Rita wrote:
Vorrei realizzarlo un sol colore. Bastano 300 g per la taglia M? Grazie e buona giornata
05.11.2016 - 10:46DROPS Design answered:
Buongiorno Rita. Le consigliamo di prevedere 350 g di filato. Buon lavoro!
05.11.2016 - 11:20Adriana Raluca Gheorghe wrote:
Hi. This pattern may be knitted with Brushed Alpaca Silk? I know is the same yarn group as Air but for me is the first time I use Brushed Alpaca so I'm not totaly confident in me. Thank you.
01.11.2016 - 20:43DROPS Design answered:
Dear Mrs Gheorghe, both yarns are same group but have different textures, so that piece will look a bit different - read more here about alternatives, and remember your DROPS store will provide you any further individual assistance, even per mail or telephone. Happy knitting!
02.11.2016 - 09:46
![]() Elena wrote:
Elena wrote:
Hei. Jeg har begynt å strikke genseren i str. M. Jeg har begynt på raglanfellingen, og syntes at åpningen til hodet er veldig liten. Jeg ser på de andre oppskriftene på raglangensere at åpningen til hodet ligger på over 100 masker. Hvorfor skal det kun være 62 masker til hodeåpningen på denne genseren? Det virker så lite.
29.10.2016 - 21:58
![]() Sandrine wrote:
Sandrine wrote:
Bonsoir, je vais me lancer seule dans un premier pull et j'ai choisi ce modèle, Je dois commandé combien de pelote pour un pull en taille L ? Merci d'avance pour votre réponse.
29.10.2016 - 18:42DROPS Design answered:
Bonjour Sandrine, vous trouverez la quantité nécessaire pour chaque taille sous l'onglet "Fournitures", soit en taille L pour ce pull: 300 g Air gris perle / 50 g la pelote Air = 6 pelotes + 1 pelote Brume violette. Bon tricot!
31.10.2016 - 10:21
![]() Ángeles wrote:
Ángeles wrote:
Hola a todos. Estoy haciendo este modelo porque me encanta, aunque soy un poco novaya todavía. En los aumentos para el raglan cuando pone 0 es que no se tiene que hacer? Y hay 2 aumentos para la segunda vuelta, comienzas haciendo 1 y en la siguiente segunda vuelta el otro? Es para el delantero/espalda. Muchas gracias
22.10.2016 - 18:19DROPS Design answered:
Hola Angeles. No mencionas la talla que estás haciendo. Si es la talla S los aumentos de 2 pts cada 2ª fila, en esta talla no los hay (pone 0) y después tienes los aumentos de 1 pt a cada lado que se repiten 20 vcs. Si te refieres a los aum de 2 pts a cada lado del delantero/espalda cada 2ª vta 0-2-1-3-6-8 vcs (aquí los números se corresponden con las tallas S - M - L - XL - XXL - XXXL respectivamente).
24.10.2016 - 16:34
![]() Ingun wrote:
Ingun wrote:
Hallo zusammen, ich finde den Pullover Lilla Camilla total schön. In der Modellauswahl war neben diesem Pullover auch eine passende Jacke. Wird die Anleitung auch noch veröffentlicht, obwohl sie nicht unter den Favoriten war? Vielen Dank für ein kleines Feedback. Schöne Grüße Ingun
26.07.2016 - 12:52DROPS Design answered:
Liebe Ingun, schauen Sie immer mal wieder unter den neuen Anleitungen nach. Die meisten Anleitungen werden im Laufe des Jahres noch als Extra Modell veröffentlicht.
26.07.2016 - 13:20
|
|
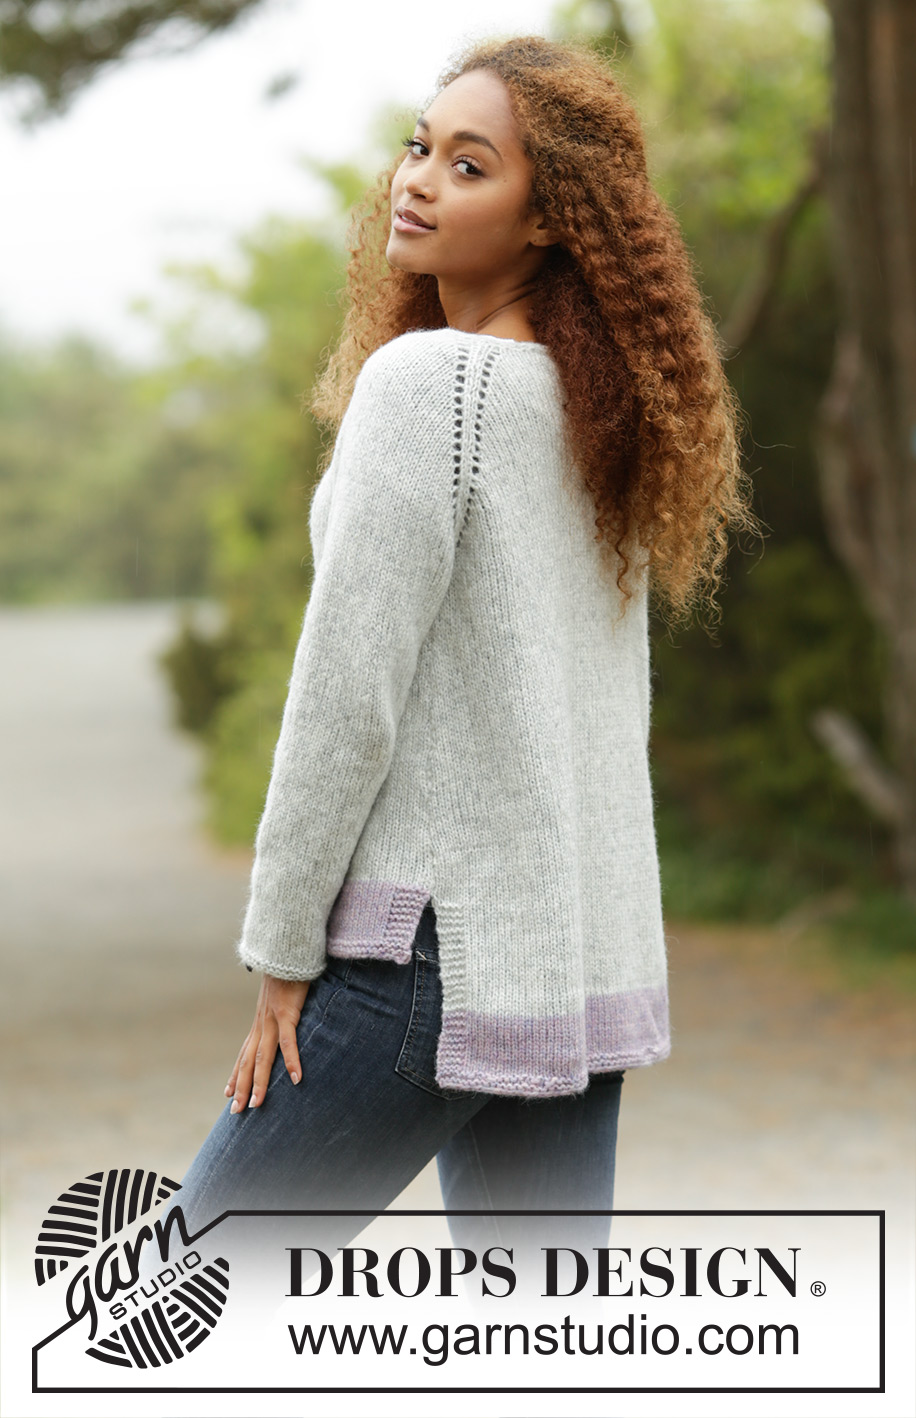
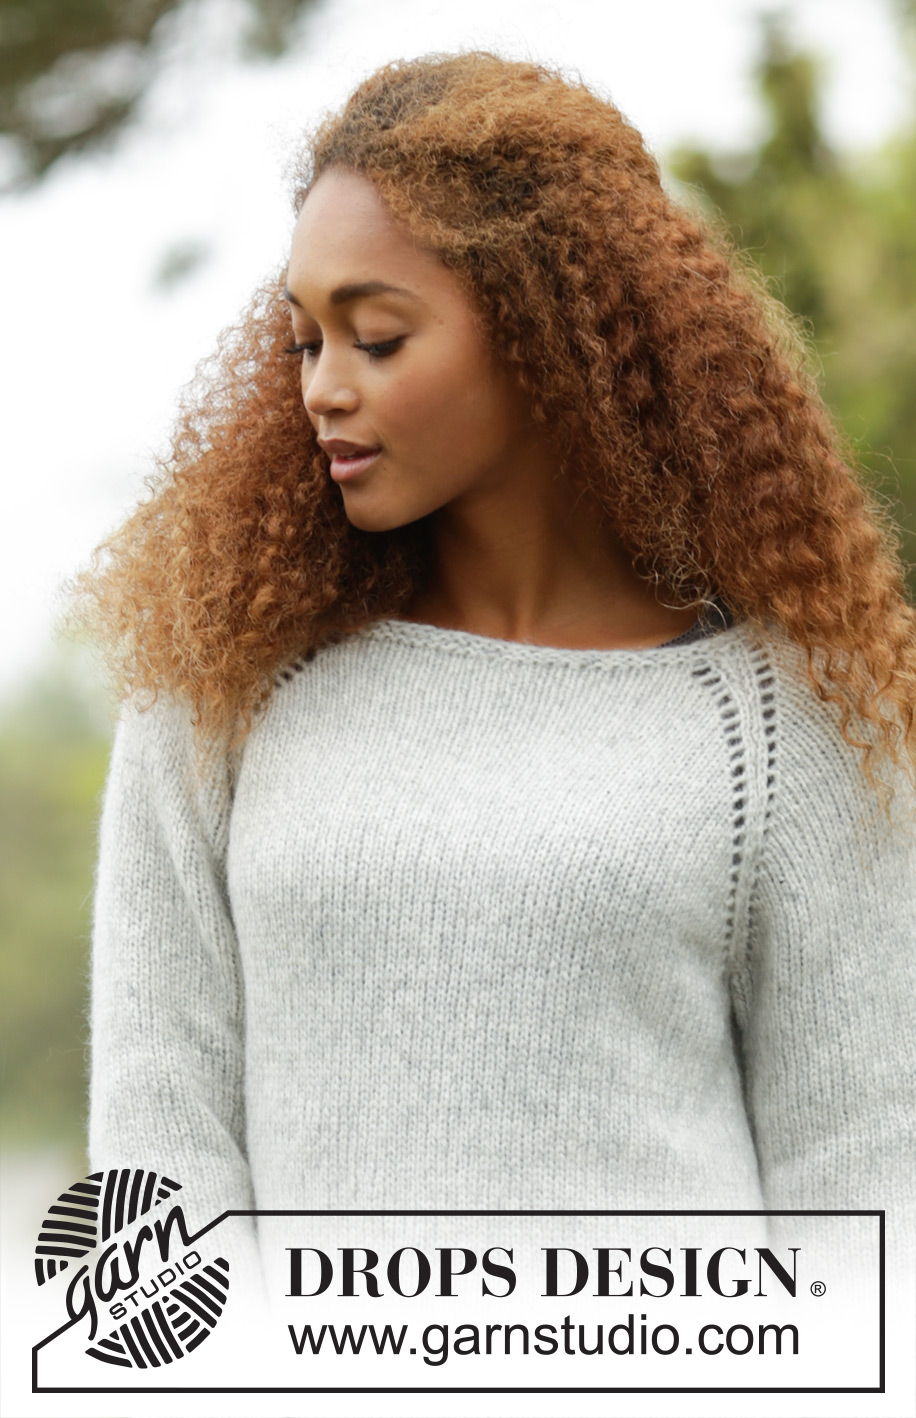
Lilla Camilla#lillacamillasweater |
|
 |
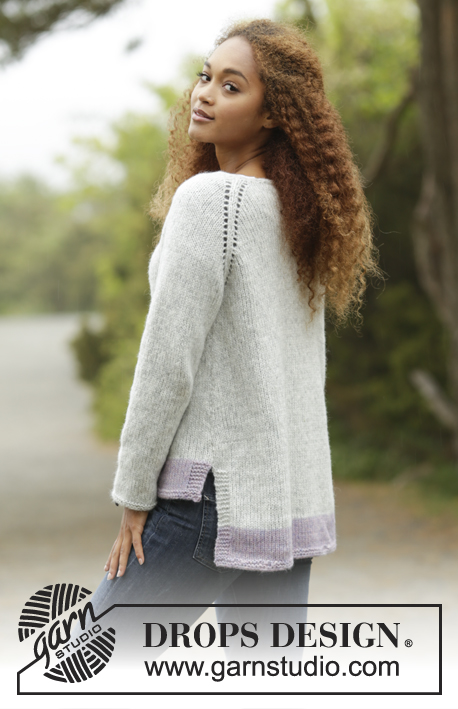 |
Knitted DROPS jumper with raglan, worked top down in ”Air”. Size: S - XXXL.
DROPS 172-33 |
|
|
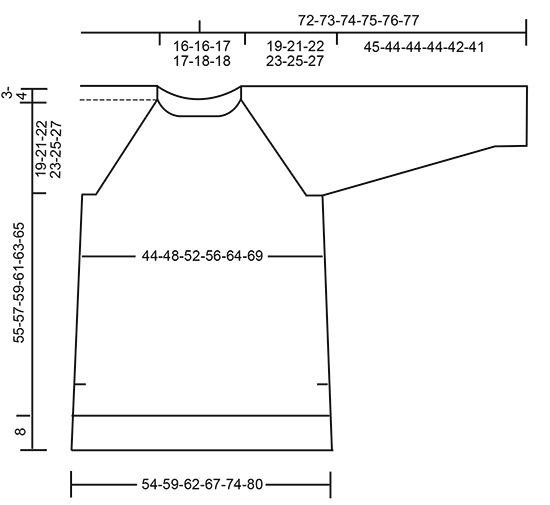
GARTER ST (worked in the round): 1 ridge = 2 rounds. * K 1 round and P 1 round *, repeat from *-*. GARTER ST (back and forth): K all rows. 1 ridge = 2 rows K. INCREASE TIP RAGLAN: Inc for raglan on each side of the four markers - NOTE: The no of inc sts are different on front/back piece and sleeves. Inc 2 sts in each side on front and back piece every other round (= 8 sts inc): Inc as follows before marker: Beg 2 st before marker and work as follows: Work 2 sts in first st, 1 YO, K 1, marker. Inc as follows after marker: Marker, K 1, 1 YO and work 2 sts in next st. On next round K the YO to make hole. Inc 1 sts in each side on front and back piece or each sleeve every other round (= 4 sts inc in front/back or 4 sts in on sleeves): Inc as follows before marker: Beg 1 st before marker and work as follows: 1 YO, K 1, marker. Inc as follows after marker: Marker, K 1, 1 YO. On next round K the YO to make hole. Inc 1 sts in each side on front and back piece or each sleeve every 4th round (= 4 sts inc in front/back or 4 sts in on sleeves): Inc as follows before marker: Round 1: Beg 1 st before marker and work as follows: 1 YO, K 1, marker. Round 2: K YOs to make holes. Round 3: Beg 2 st before marker and work as follows: K 2 tog, 1 YO, K 1, marker (= no sts inc). Round 4: K YOs to make holes. Inc as follows after marker: Round 1: Marker, K 1, 1 YO. Round 2: K YOs to make holes. Round 3: Marker, K 1, 1 YO, K 2 tog (= no sts inc). Round 4: K YOs to make holes. INCREASE TIP (applies to inc in the sides of body): Beg 1 sts before marker, 1 YO, K 2 (marker is in the middle of these 2 sts), 1 YO (= 2 sts inc). On next round K YOs twisted to avoid holes. DECREASE TIP: Dec mid under sleeve as follows: Beg 3 sts before marker and K 2 tog, K 2 (marker is between these 2 sts), slip 1 st as if to K, K 1, psso (= 2 sts dec). ---------------------------------------------------------- JUMPER: Worked in the round on circular needle, top down. Work sleeves in the round on circular needle/double pointed needles. YOKE: Cast on 62-62-66-74-78-78 sts on circular needle size 4.5 mm with pearl grey and work 1 ridge in GARTER ST - see explanation above. K 1 round while inc 10 sts evenly = 72-72-76-84-88-88 sts. Switch to a short circular needle size 5 mm and work as follows (= beg of round = mid back): 13-13-14-14-15-15 sts in stocking st (= half back piece), insert a marker, 10-10-10-14-14-14 sts in stocking st (= sleeve), insert a marker, 26-26-28-28-30-30 sts in stocking st (= front piece), insert a marker, 10-10-10-14-14-14 sts in stocking st (= sleeve), insert a marker, stocking st over the last 13-13-14-14-15-15 sts on round (= half back piece). REMEMBER KNITTING TENSION AND READ ALL OF THE FOLLOWING SECTION BEFORE CONTINUING: On next round start inc for RAGLAN – READ INCREASE TIP. Inc on each side of the 4 markers but inc differently on front/back piece and sleeves as follows: FRONT AND BACK PIECE: Inc 2 sts in each side on front and back piece every other round 0-2-1-3-6-8 times, inc 1 st in each side on front and back piece every other round 20-21-24-24-22-22 times and inc 1 st on each side on front and back piece every 4th round 1-0-0-0-0-0 times. SLEEVES: Inc 1 st in each side on each sleeve every other round 16-23-25-24-22-22 times and inc 1 st in each side on each sleeve every 4th round 3-0-0-1-3-4 times. After all inc = 232-264-280-304-324-344 sts on needle. Piece measures 22-24-25-27-29-31 cm from shoulder (19-21-22-23-25-27 cm from cast-on edge). Now work as follows: Work the first 34-38-40-44-49-53 sts (= half back piece), slip the next 48-56-60-64-64-66 sts on a stitch holder (= sleeve), cast on 6-6-8-8-10-12 sts under sleeve (insert 1 marker in the middle of these new sts), work the next 68-76-80-88-98-106 sts (= front piece), slip the next 48-56-60-64-64-66 sts on a stitch holder (= sleeve), cast on 6-6-8-8-10-12 sts under sleeve (insert 1 marker in the middle of these new sts), work the remaining 34-38-40-44-49-53 sts (= half back piece). NOW MEASURE THE PIECE FROM HERE. BODY: = 148-164-176-192-216-236 sts. Work in stocking st in the round with pearl grey until piece measures 3 cm. Now inc 1 st on each side of both markers – READ INCREASE TIP (= 4 sts inc). Inc every 3 cm 9 times = 184-200-212-228-252-272 sts. Continue in stocking st until piece measures 28-28-29-30-30-30 cm. Slip sts between 2nd and 1st marker on a stitch holder (= back piece), then work back and forth over the remaining 92-100-106-114-126-136 sts (= front piece). Switch to purple haze and work in stocking st with 5 sts in GARTER ST in each side - see explanation above. Continue like this for 7 cm, then work 2 ridges over all sts, cast off. BACK PIECE: Slip 92-100-106-114-126-136 sts from stitch holder back on to circular needle size 5 mm. Work in stocking st with 5 sts in garter st in each side. When piece measures 8 cm change to purple haze, continue with stocking st and garter st for 7 cm. Then work 2 ridges over all sts, cast off. SLEEVE: Slip sts from stitch holder back on a short circular needle/ double pointed needles size 5 mm and cast in addition on 6-6-8-8-10-12 new sts under sleeve = 54-62-68-72-74-78 sts. Insert 1 marker in the middle of the new sts under sleeve – NOW MEASURE PIECE FROM HERE. Worked in stocking st in the round on circular needle/double pointed needles. When piece measures 3 cm, dec 1 st on each side of marker - READ DECREASE TIP. Repeat dec every 3½-2½-2-2-2-1½ cm a total of 10-13-15-16-17-18 times. After all dec are done, 34-36-38-40-40-42 sts remain on round. When sleeve measures 44-43-43-43-41-40 cm, switch to double pointed needles size 4.5 mm. Work 2 ridges and LOOSELY cast off. Sleeve measures approx. 45-44-44-44-42-41 cm (NOTE: Shorter measurements in the larger sizes because of wider neck and longer yoke). Work the other sleeve the same way. ASSEMBLY: Sew the openings under the sleeves. |
|
 |
|
Have you finished this pattern?Tag your pictures with #dropspattern #lillacamillasweater or submit them to the #dropsfan gallery. Do you need help with this pattern?You'll find 29 tutorial videos, a Comments/Questions area and more by visiting the pattern on garnstudio.com. © 1982-2026 DROPS Design A/S. We reserve all rights. This document, including all its sub-sections, has copyrights. Read more about what you can do with our patterns at the bottom of each pattern on our site. |
|


With over 40 years in knitting and crochet design, DROPS Design offers one of the most extensive collections of free patterns on the internet - translated to 17 languages. As of today we count 324 catalogues and 12267 patterns translated into English (UK/cm). 12267
We work hard to bring you the best knitting and crochet have to offer, inspiration and advice as well as great quality yarns at incredible prices! Would you like to use our patterns for other than personal use? You can read what you are allowed to do in the Copyright text at the bottom of all our patterns. Happy crafting!
Post a comment to pattern DROPS 172-33
We would love to hear what you have to say about this pattern!
If you want to leave a question, please make sure you select the correct category in the form below, to speed up the answering process. Required fields are marked *.