
Popular categories
Looking for a yarn?


Comments / Questions (41)
![]() Anna Maria wrote:
Anna Maria wrote:
I started this pattern but the 62 stitches make a much narrower neckline than the picture. And I was using size 10 US needles and a larger gauge anyway. To get the shape of the photo, I ended up starting with 30 stitches in the front and back and 16 for the sleeves
29.04.2018 - 05:23
![]() Francoise wrote:
Francoise wrote:
Bonjour ,je voudrai faire ce modèle lilla Camilla mais j aimerai qu au niveau du cou il soit un peu plus couvrant car sur le mannequin il me semble trop échancré \\\\r\\\\nPouvez vous m indiquez comment ?\\\\r\\\\nJe vous remercie d avance
21.04.2018 - 08:22DROPS Design answered:
Bonjour Françoise, nous ne sommes malheureusement pas en mesure de pouvoir ajuster chacun de nos modèles à chaque demande individuelle. Pour toute assistance complémentaire, vous pouvez vous adresser à votre magasin DROPS qui saura vous conseiller et vous renseigner. Bon tricot!
23.04.2018 - 08:35
![]() Irene wrote:
Irene wrote:
I would SO love to knit this jumper, would it be good for a beginner to try?
20.03.2018 - 16:36DROPS Design answered:
Dear Irene, read carefully whole pattern and if you have question please feel free to ask here. For any personnal assistance you are welcome to contact your store. Happy knitting!
20.03.2018 - 16:40
![]() Ingrid wrote:
Ingrid wrote:
Hallo, wie stricke ich die Raglanzunahmen? Ich verstehe die anleitung nicht. Beginnend an der hinteren Mitte: können Sie mir die Reihenfolge für die einzelnen Reihen vor und nach jedem Markierer schreiben? Wie oft muss ich diese wiederholen? Ich verstehe nicht wann ich eine und wann zwei zunehmen soll. Gib es ein Video dazu? Lieben Dank! Ingrid
18.02.2017 - 18:40DROPS Design answered:
Liebe Ingrid, es wird je nach der Größe vor bzw nach dem Markierer in interschiedlichen Rhythmus an Vorder-/Rückenteil und an den Ärmeln zugenommen. Z.B in der 1. Größe: Vorder- & Rückenteil: 1 M in jeder 2. Rd 20 x und 1 M in jeder 4. Rd 1 x. Gleichzeitig werden Sie an den Ärmeln (in der 1. Größe): 1 M in jeder 2. Rd 16 x dann in jeder 4. Rd 3 x zunehmen. Viel Spaß beim stricken!
20.02.2017 - 09:52
![]() Ragni wrote:
Ragni wrote:
Hei, jeg har to spørsmål: 1) er 62 masker nok til den halsen - synes ikke bildet stemmer overens med hva jeg har strikket til nå. 2) Økningene er litt vanskelige å forstå. Jeg kan jo ikke øke både hver andre og hver fjerde? Da vil det bli to hull på rad/runde nr. 4, 8 og 12?? Eller har jeg missforstått?
05.02.2017 - 14:01DROPS Design answered:
Hej Ragni. Det burde vaere nok med antal masker (du tager ud i 3 p) og herefter skifter du til p 5. Modellen paa billedet baerer den mindste str. Du starter med at öke i hver 2. p, naar du er faerdig er det paa hver 4. p - ikke samtidig.
06.02.2017 - 13:41
![]() Tina Tryk, Denmark wrote:
Tina Tryk, Denmark wrote:
Hej sikke dejlig bluse. Jeg er ikke så meget for uld - får det for varmt. Hvad vil I anbefale, hvis det skal være garn uden uld, men med den samme effekt
09.01.2017 - 16:24DROPS Design answered:
Hej Tina. Ja, du kan eventuelt erstatte med Paris. Se alternativer i garngruppe C her
10.01.2017 - 13:49
![]() Carmen wrote:
Carmen wrote:
Ich stricke den Pullover gerade mit 2 Fäden Baby Alpaka-Silk, ganz wunderbar. Das Material kommt durch den schlichten Schnitt sehr schön zur Geltung. Seit ich eure Seite und die Drops-Garne entdeckt habe, macht das Stricken wieder richtig Spaß! Ganz lieben Dank! Viele Grüße, Carmen
08.01.2017 - 08:46
![]() Laura wrote:
Laura wrote:
L'aumento sul davanti dietro di 1 m deve essere fatto prima o dopo il segnapunto? Idem per l' aumento delle maniche prima o dopo il segnapunti. Grazie sempre
02.01.2017 - 14:52DROPS Design answered:
Buongiorno Laura. Il giro inizia al centro sul dietro. Se deve aumentare sia sul davanti e dietro che sulle maniche, aumenta prima e dopo ognuno dei quattro segnapunti. Se solo sul davanti dietro, aumenta prima del segnapunti tra il dietro e la manica, dopo il segnapunti tra la manica e il davanti , prima del segnapunti tra il davanti e l’altra manica, dopo il segnapunti tra la manica e il dietro. Se deve aumentare solo sulle maniche aumenta dopo il segnapunti tra il dietro e la manica, prima del segnapunti tra la manica e il davanti; dopo il segnapunti tra il davanti e l’altra manica e prima del segnapunti tra la manica e il dietro. Buon lavoro!
02.01.2017 - 15:01
![]() Laura wrote:
Laura wrote:
Buongiorno, sono in procinto di iniziare il raglan ma non mi é chiaro" l'aumento di 1 m ad ogni lato del davanti e del dietro o su ogni manica a giri alterni". se aumento 1 m ad ogni lato del davanti e del dietro i mie aumenti per giro saranno 8 e non 4. help!! :) P.S. mi confermate che per la taglia S la sezione "aumento di 2 m ad ogni lato del davanti e dal dietro a giri alterni(=8 aumenti)" non la devo eseguire? Grazie mille sempre
02.01.2017 - 13:01DROPS Design answered:
Buongiorno Laura. Per la taglia S non deve lavorare la sezione “aumento di 2 m ad ogni lato del davanti e dal dietro a giri alterni(=8 aumenti)”. Quando aumenta 1 m a ogni lato del davanti e dietro aumenterà 4 maglie sul davanti /dietro. Se nello stesso giro deve aumentare anche sulle maniche, avrà aumentato 8 maglie. Buon lavoro!
02.01.2017 - 13:59
![]() Laura wrote:
Laura wrote:
Buongiorno, sono alla sezione sprone e dice dalle 62 m iniziali di effettuare 19 aumenti. In seguito parla di 72 m dopo l'aumento, ma se faccio 19 aumenti sulle 62 m il tot é 81. Grazie mille
02.01.2017 - 11:46DROPS Design answered:
Buongiorno Laura, abbiamo corretto la spiegazione, deve fare 10 aumenti dopo le 62 maglie. Buon lavoro!
02.01.2017 - 12:02
|
|
Lilla Camilla#lillacamillasweater |
|
 |
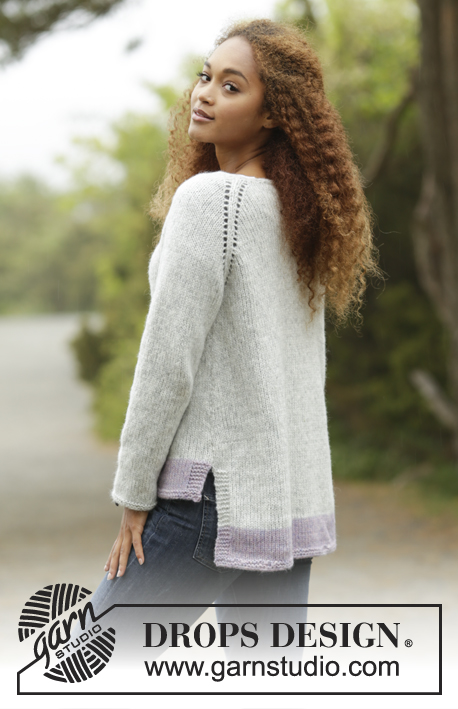 |
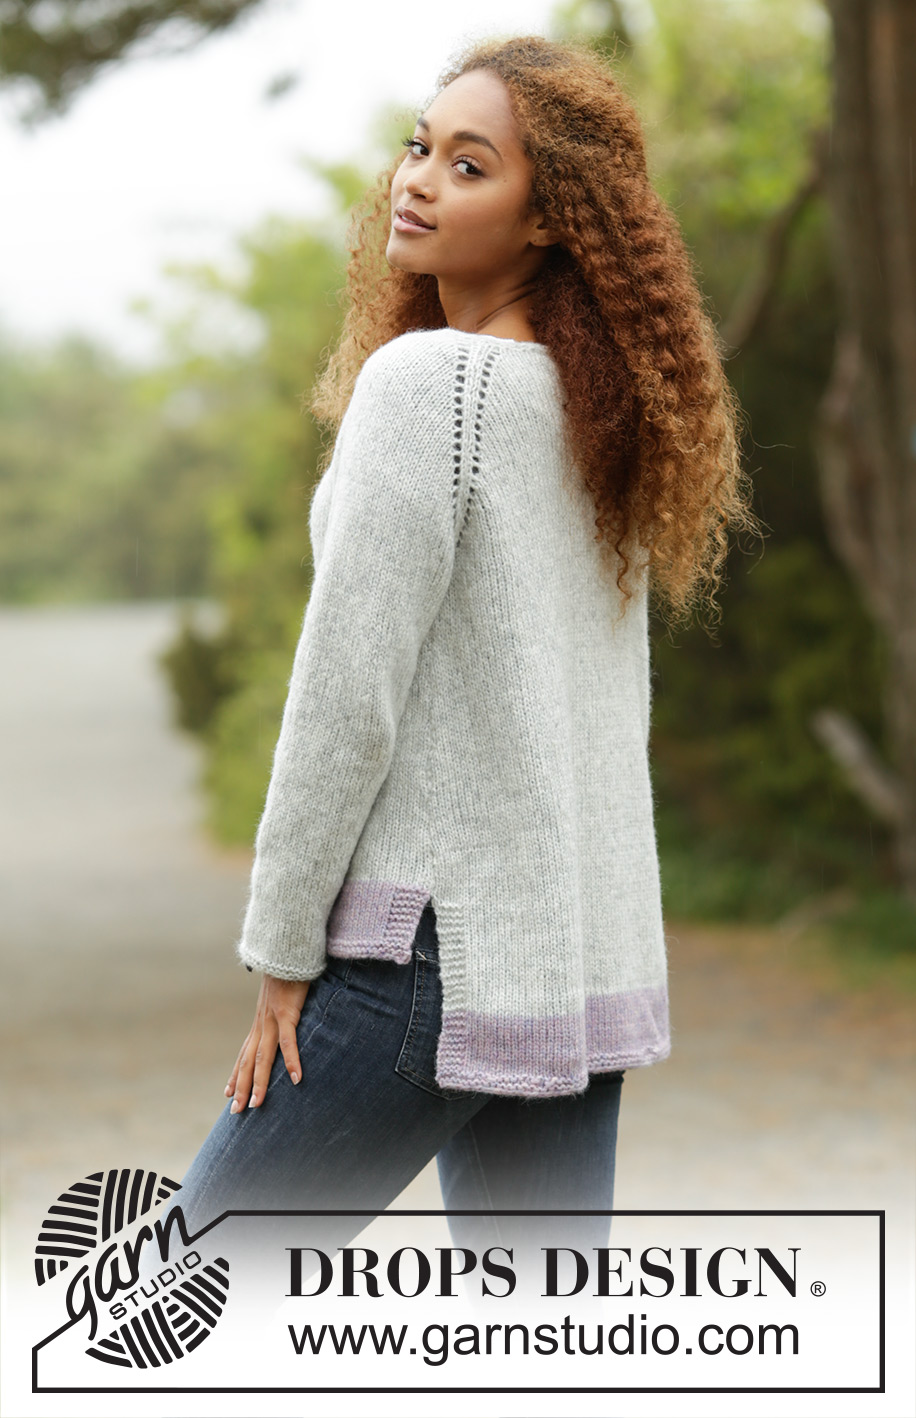
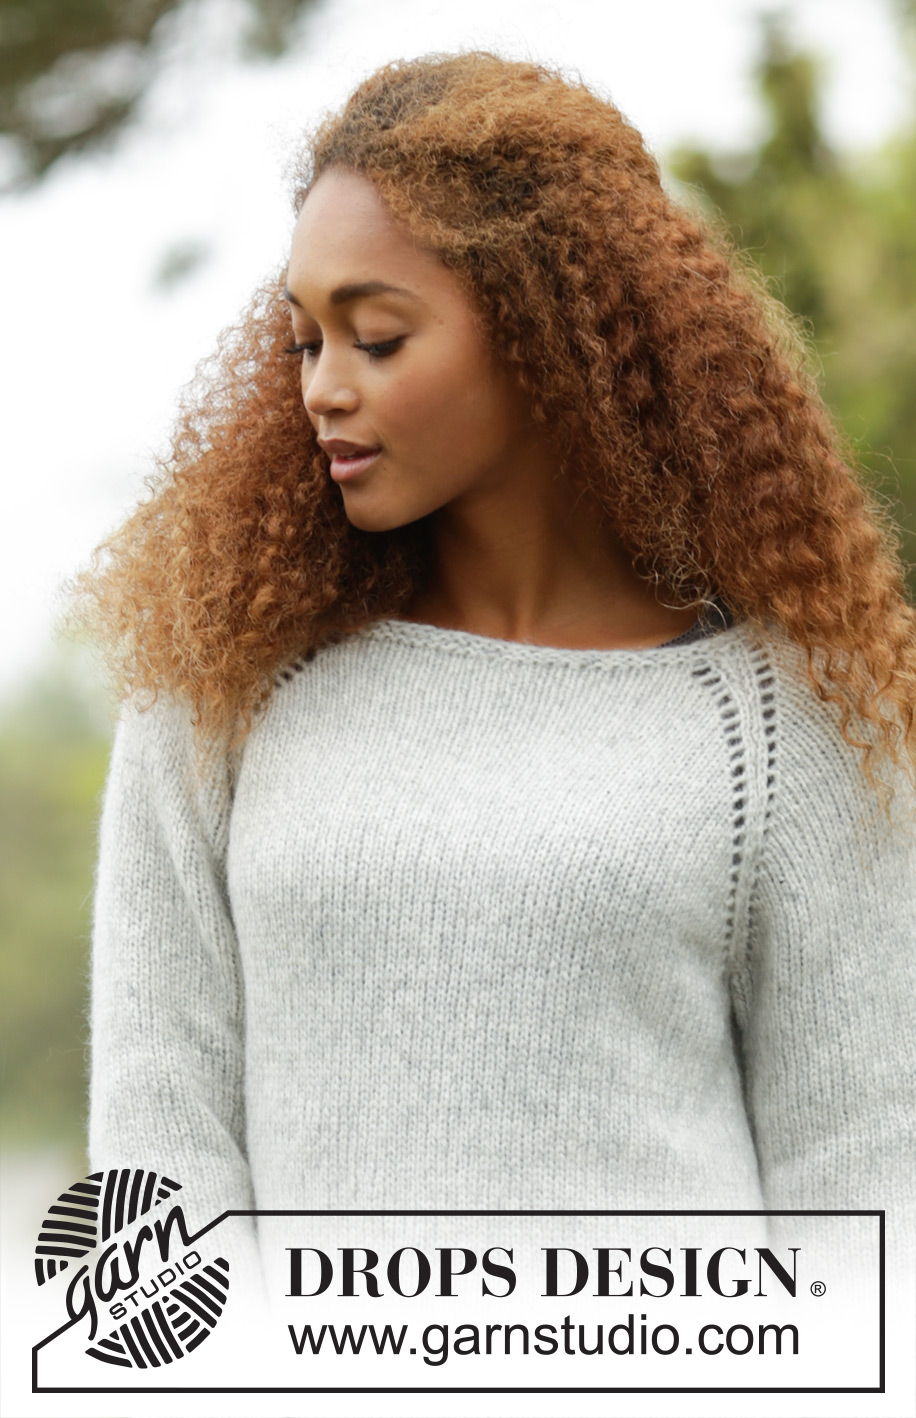
Knitted DROPS jumper with raglan, worked top down in ”Air”. Size: S - XXXL.
DROPS 172-33 |
|
|
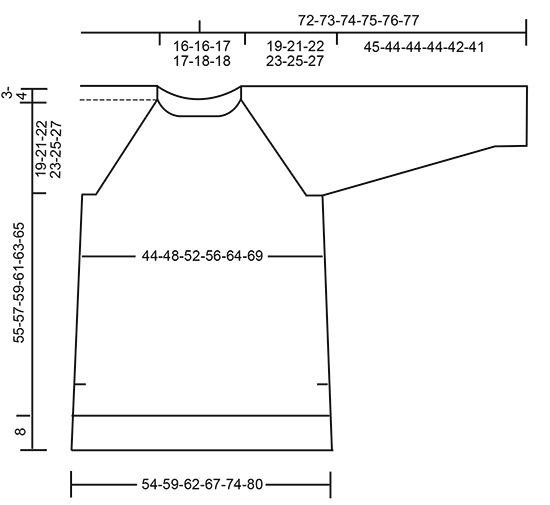
GARTER ST (worked in the round): 1 ridge = 2 rounds. * K 1 round and P 1 round *, repeat from *-*. GARTER ST (back and forth): K all rows. 1 ridge = 2 rows K. INCREASE TIP RAGLAN: Inc for raglan on each side of the four markers - NOTE: The no of inc sts are different on front/back piece and sleeves. Inc 2 sts in each side on front and back piece every other round (= 8 sts inc): Inc as follows before marker: Beg 2 st before marker and work as follows: Work 2 sts in first st, 1 YO, K 1, marker. Inc as follows after marker: Marker, K 1, 1 YO and work 2 sts in next st. On next round K the YO to make hole. Inc 1 sts in each side on front and back piece or each sleeve every other round (= 4 sts inc in front/back or 4 sts in on sleeves): Inc as follows before marker: Beg 1 st before marker and work as follows: 1 YO, K 1, marker. Inc as follows after marker: Marker, K 1, 1 YO. On next round K the YO to make hole. Inc 1 sts in each side on front and back piece or each sleeve every 4th round (= 4 sts inc in front/back or 4 sts in on sleeves): Inc as follows before marker: Round 1: Beg 1 st before marker and work as follows: 1 YO, K 1, marker. Round 2: K YOs to make holes. Round 3: Beg 2 st before marker and work as follows: K 2 tog, 1 YO, K 1, marker (= no sts inc). Round 4: K YOs to make holes. Inc as follows after marker: Round 1: Marker, K 1, 1 YO. Round 2: K YOs to make holes. Round 3: Marker, K 1, 1 YO, K 2 tog (= no sts inc). Round 4: K YOs to make holes. INCREASE TIP (applies to inc in the sides of body): Beg 1 sts before marker, 1 YO, K 2 (marker is in the middle of these 2 sts), 1 YO (= 2 sts inc). On next round K YOs twisted to avoid holes. DECREASE TIP: Dec mid under sleeve as follows: Beg 3 sts before marker and K 2 tog, K 2 (marker is between these 2 sts), slip 1 st as if to K, K 1, psso (= 2 sts dec). ---------------------------------------------------------- JUMPER: Worked in the round on circular needle, top down. Work sleeves in the round on circular needle/double pointed needles. YOKE: Cast on 62-62-66-74-78-78 sts on circular needle size 4.5 mm with pearl grey and work 1 ridge in GARTER ST - see explanation above. K 1 round while inc 10 sts evenly = 72-72-76-84-88-88 sts. Switch to a short circular needle size 5 mm and work as follows (= beg of round = mid back): 13-13-14-14-15-15 sts in stocking st (= half back piece), insert a marker, 10-10-10-14-14-14 sts in stocking st (= sleeve), insert a marker, 26-26-28-28-30-30 sts in stocking st (= front piece), insert a marker, 10-10-10-14-14-14 sts in stocking st (= sleeve), insert a marker, stocking st over the last 13-13-14-14-15-15 sts on round (= half back piece). REMEMBER KNITTING TENSION AND READ ALL OF THE FOLLOWING SECTION BEFORE CONTINUING: On next round start inc for RAGLAN – READ INCREASE TIP. Inc on each side of the 4 markers but inc differently on front/back piece and sleeves as follows: FRONT AND BACK PIECE: Inc 2 sts in each side on front and back piece every other round 0-2-1-3-6-8 times, inc 1 st in each side on front and back piece every other round 20-21-24-24-22-22 times and inc 1 st on each side on front and back piece every 4th round 1-0-0-0-0-0 times. SLEEVES: Inc 1 st in each side on each sleeve every other round 16-23-25-24-22-22 times and inc 1 st in each side on each sleeve every 4th round 3-0-0-1-3-4 times. After all inc = 232-264-280-304-324-344 sts on needle. Piece measures 22-24-25-27-29-31 cm from shoulder (19-21-22-23-25-27 cm from cast-on edge). Now work as follows: Work the first 34-38-40-44-49-53 sts (= half back piece), slip the next 48-56-60-64-64-66 sts on a stitch holder (= sleeve), cast on 6-6-8-8-10-12 sts under sleeve (insert 1 marker in the middle of these new sts), work the next 68-76-80-88-98-106 sts (= front piece), slip the next 48-56-60-64-64-66 sts on a stitch holder (= sleeve), cast on 6-6-8-8-10-12 sts under sleeve (insert 1 marker in the middle of these new sts), work the remaining 34-38-40-44-49-53 sts (= half back piece). NOW MEASURE THE PIECE FROM HERE. BODY: = 148-164-176-192-216-236 sts. Work in stocking st in the round with pearl grey until piece measures 3 cm. Now inc 1 st on each side of both markers – READ INCREASE TIP (= 4 sts inc). Inc every 3 cm 9 times = 184-200-212-228-252-272 sts. Continue in stocking st until piece measures 28-28-29-30-30-30 cm. Slip sts between 2nd and 1st marker on a stitch holder (= back piece), then work back and forth over the remaining 92-100-106-114-126-136 sts (= front piece). Switch to purple haze and work in stocking st with 5 sts in GARTER ST in each side - see explanation above. Continue like this for 7 cm, then work 2 ridges over all sts, cast off. BACK PIECE: Slip 92-100-106-114-126-136 sts from stitch holder back on to circular needle size 5 mm. Work in stocking st with 5 sts in garter st in each side. When piece measures 8 cm change to purple haze, continue with stocking st and garter st for 7 cm. Then work 2 ridges over all sts, cast off. SLEEVE: Slip sts from stitch holder back on a short circular needle/ double pointed needles size 5 mm and cast in addition on 6-6-8-8-10-12 new sts under sleeve = 54-62-68-72-74-78 sts. Insert 1 marker in the middle of the new sts under sleeve – NOW MEASURE PIECE FROM HERE. Worked in stocking st in the round on circular needle/double pointed needles. When piece measures 3 cm, dec 1 st on each side of marker - READ DECREASE TIP. Repeat dec every 3½-2½-2-2-2-1½ cm a total of 10-13-15-16-17-18 times. After all dec are done, 34-36-38-40-40-42 sts remain on round. When sleeve measures 44-43-43-43-41-40 cm, switch to double pointed needles size 4.5 mm. Work 2 ridges and LOOSELY cast off. Sleeve measures approx. 45-44-44-44-42-41 cm (NOTE: Shorter measurements in the larger sizes because of wider neck and longer yoke). Work the other sleeve the same way. ASSEMBLY: Sew the openings under the sleeves. |
|
 |
|
Have you finished this pattern?Tag your pictures with #dropspattern #lillacamillasweater or submit them to the #dropsfan gallery. Do you need help with this pattern?You'll find 29 tutorial videos, a Comments/Questions area and more by visiting the pattern on garnstudio.com. © 1982-2026 DROPS Design A/S. We reserve all rights. This document, including all its sub-sections, has copyrights. Read more about what you can do with our patterns at the bottom of each pattern on our site. |
|


With over 40 years in knitting and crochet design, DROPS Design offers one of the most extensive collections of free patterns on the internet - translated to 17 languages. As of today we count 324 catalogues and 12267 patterns translated into English (UK/cm). 12267
We work hard to bring you the best knitting and crochet have to offer, inspiration and advice as well as great quality yarns at incredible prices! Would you like to use our patterns for other than personal use? You can read what you are allowed to do in the Copyright text at the bottom of all our patterns. Happy crafting!
Post a comment to pattern DROPS 172-33
We would love to hear what you have to say about this pattern!
If you want to leave a question, please make sure you select the correct category in the form below, to speed up the answering process. Required fields are marked *.