
Popular categories
Looking for a yarn?


Comments / Questions (135)
Hila wrote:
Hello I am trying to do this pattern size M.. I am having problems with the row numbers- on the A1 diagrams there are no row numbers- is this diagram starting from row #3 or #1? I need to increase on row #5- and cant understand which row is it thank you
06.05.2018 - 06:26DROPS Design answered:
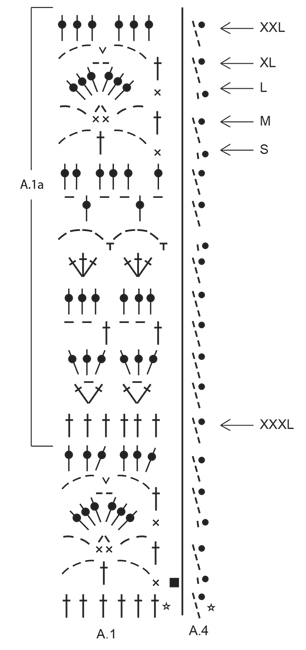
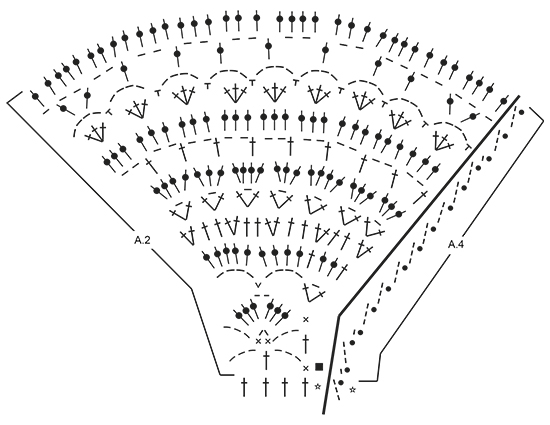
Dear Hila, the first row in A.1 and A.2 (= the one with a star) has already been worked = 1st row after the fundation chain. Start reading diagram on next row (with a black square in both diagrams), reading from the right towards the left on every row. The 5th row will be then the one with dc (US)/tr (UK). Happy crocheting!
07.05.2018 - 09:07
![]() Fabiola wrote:
Fabiola wrote:
Mi sono bloccata al 5° giro......( Sul 6° giro (giro a m.a) in A.1 aumentare in modo uniforme come segue Tra il 2° e 3° segnapunti e tra il 6° e 7° segnapunti: aumentare 0-0-6-6-6-6 m.a (= 12-12-18-18-24-24 m.a tra questi segnapunti).......credo manchi un giro.... per poter fare il giro di m.a.con gli aumenti,dopo i ventaglietti, devo fare gli archetti di 3 cat. e m.b. , ma il lavoro è tirato se sugli aumenti faccio 3 cat......
24.04.2018 - 08:55DROPS Design answered:
Buongiorno Fabiola. Al sesto giro (giro di maglie alte), per aumentare, deve lavorare 2 maglie alte nella stessa maglia, distanziando gli aumenti a intervalli regolari. Buon lavoro!
24.04.2018 - 09:59Hajni wrote:
Hello, making this in size L. On round 14 I begin with A.2 doing 36 dc's, (I jump to A.1.) and make the first dc in the same 2-ch-space I made the last dc from A.2. then 3 dc's in next chain space, then 2 dc's in next chain space. Now I completed a full repetition in width of A.1. What do I do now when I have to begin again... Do I move to another chain space and make 1 dc, then 3 dc in the next chain space, then 2 in the next space?
23.04.2018 - 14:09DROPS Design answered:
Dear Hajini, when repeating A.1 you will work 1 dc in same ch-space, 3 dc in next ch-space, 1 dc in next ch-space and so on, ie you will have in A.1 3 dc in each ch-space. Happy crocheting!
23.04.2018 - 16:16Maria wrote:
I'm working the last row on the YOKE in size S. it starts with doing A.1a 3 times in width before the first marker. From the start of the row i have 18tr until the first marker, so when i finish the A.1a x 3 i end up with 2ch but i only have 2 tr left, so i don't know where to anchor these 2 ch before i start adding the 8ch for under the arm hole. What do i do?
05.04.2018 - 13:10DROPS Design answered:
Dear Maria, before chains for armhole, replace the last chain in the last repeat before armhole with a tr in the last st from previous repeat on previous row. Happy crocheting!
29.06.2018 - 08:00Sara wrote:
I'm working the last row on the YOKE in size S. it starts with doing A.1a 3 times in width before the first marker. From the start of the row i have 18tr until the first marker, so when i finish the A.1a x 3 i end up with 2ch but i only have 2 tr left, so i don't know where to anchor these 2 ch before i start adding the 8ch for under the arm hole. What do i do?
12.03.2018 - 04:34DROPS Design answered:
Dear Sara, before chains for armhole, replace the last chain in the last repeat before armhole with a tr in the last st from previous repeat on previous row. Happy crocheting!
29.06.2018 - 08:01
![]() Ingunn wrote:
Ingunn wrote:
Hei. "STR M-L-XL-XXL-XXXL: Fortsett med mønster A.1 som før, men over st i A.2 (= 36 st) hekles A.3 totalt 2 ganger i bredden. Hekle 1-2-3-4-5 omg av A.3 (se pil i diag for riktig str). Er det 3 omganger i A3 i tillegg til der man hekler A3 første gang over A2, eller er det totalt 3 omganger? Og starter man fra sin str i diagrammet på første runde med A3?? Jeg hekler i XL. Og når man hekler med A1 så samsvarer ikke diagrammet i mønster på A3 og A1a?
05.02.2018 - 18:44DROPS Design answered:
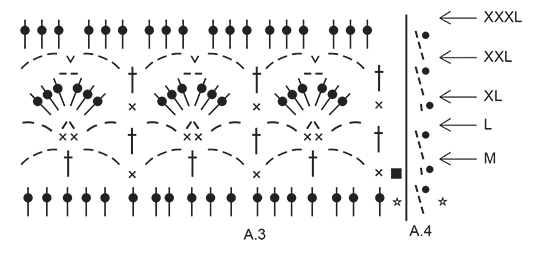
Hei Ingunn. Det hekles totalt 3 omganger av A.3 over A.2, første omgang (markert med stjerne) er allerede heklet så den hoppes det over, dvs du hekler de 3 neste omgangene til og med omgangen med pil for din størrelse i diagrammet. A.3 skal da samsvare med mønster A.1. Når A.1a skal hekles videre over A.3, startes mønsteret ved pilen i A.1a. God hekling:)
26.02.2018 - 13:14
![]() Kari Solheimslid wrote:
Kari Solheimslid wrote:
Strikker L. Spm vedr omg 6. Mellom merketråde 2 og 3 skal A1 repeteres 3 ganger for å få til økning, men mønsteret ble bare repetert 2 ganger i omgangen før. Hvordan hekler jeg mellom disse to merketrådene? På forhånd takk for hjelpen :)
29.06.2017 - 23:15DROPS Design answered:
Hei Kari, A1 er 6 staver i bredden, slik at med økningene (6 staver) du kan hekle A1 3 ganger mellom merketrådene 2 og 3 på omgang 6. Håper dette hjelper, Mvh, Deirdre
30.06.2017 - 10:52
![]() Martine wrote:
Martine wrote:
Zonder te meederen in A.2 kwam ik uit op te veel steken aan het einde. Nadat ik alle meerder steken uit het patroon A.2 had gehaald en op eigen inzicht verder ben gegaan klopt het nu wel. Het gedeelte van de pas, moet je daar 2 keer telpatroon A.1 haken en daarna A.2? Op de foto lijkt het erop dat alleen telpatroon A.1a is gebruikt
18.06.2017 - 15:50DROPS Design answered:
Hoi Martine, Zoals bij de pas staat beschreven staat haak je A.1 en A.2 niet boven elkaar, maar naast elkaar, dus in de breedte afwisselend een aantal herhalingen in A.1 en dan in A2. In A.2 zitten meerderingen die zorgen er voor dat de pas naar beneden toe wijder wordt. In A.1 zitten geen meerderingen.
25.06.2017 - 16:58
![]() Martine wrote:
Martine wrote:
Er staat in het patroon meerder bij 6e toer in A.1 en aan het einde van dat stukje staat haak A.2 als hiervoor. Moet je bij A.2 ook meerderen? Ik heb inmiddels geprobeerd om te meerderen en niet meerderen maar dan begint het op een rok idee te lijken. Aan het einde van A.2 zou je bij maat M 256 stk moeten hebben, ik kom uit op meer dan 1200 stk als ik telpatroon A.2 volg zoals het er staat. Wat doe ik fout?
16.06.2017 - 05:55DROPS Design answered:
Hoi Martine, Nee, je meerdert niet op A.2. (Er staat ook: brei A.2 als hiervoor.) Je meerdert alleen in de gedeeltes waar je A.1 hebt gehaakt en niet in A.2
17.06.2017 - 20:39
![]() Alessandra wrote:
Alessandra wrote:
Ho seguito le vostre gentili indicazioni e sono arrivata al 6° giro dove per la taglia M devo aumentare 6 m.a. tra il 4° e 5° e tra l'8 e il 1° segnapunti, vuol dire che devo aumentare di 2 m.a. un ventaglietto si e uno no? Devo fare tre ventaglietti da 4 m.a. due catenelle e 4 m.a. mentre gli altri rimangono di 3 m.a. 2 catenelle e 3 m.a.? Vi ringrazio per la risposta. Alessandra
03.06.2017 - 11:04DROPS Design answered:
Buongiorno Alessandra, si, deve contare quanti ventaglietti ha tra quei segnapunti e distribuire gli aumenti in modo omogeneo. Buon lavoro!
03.06.2017 - 14:01
|
||||||||||||||||||||||||||||
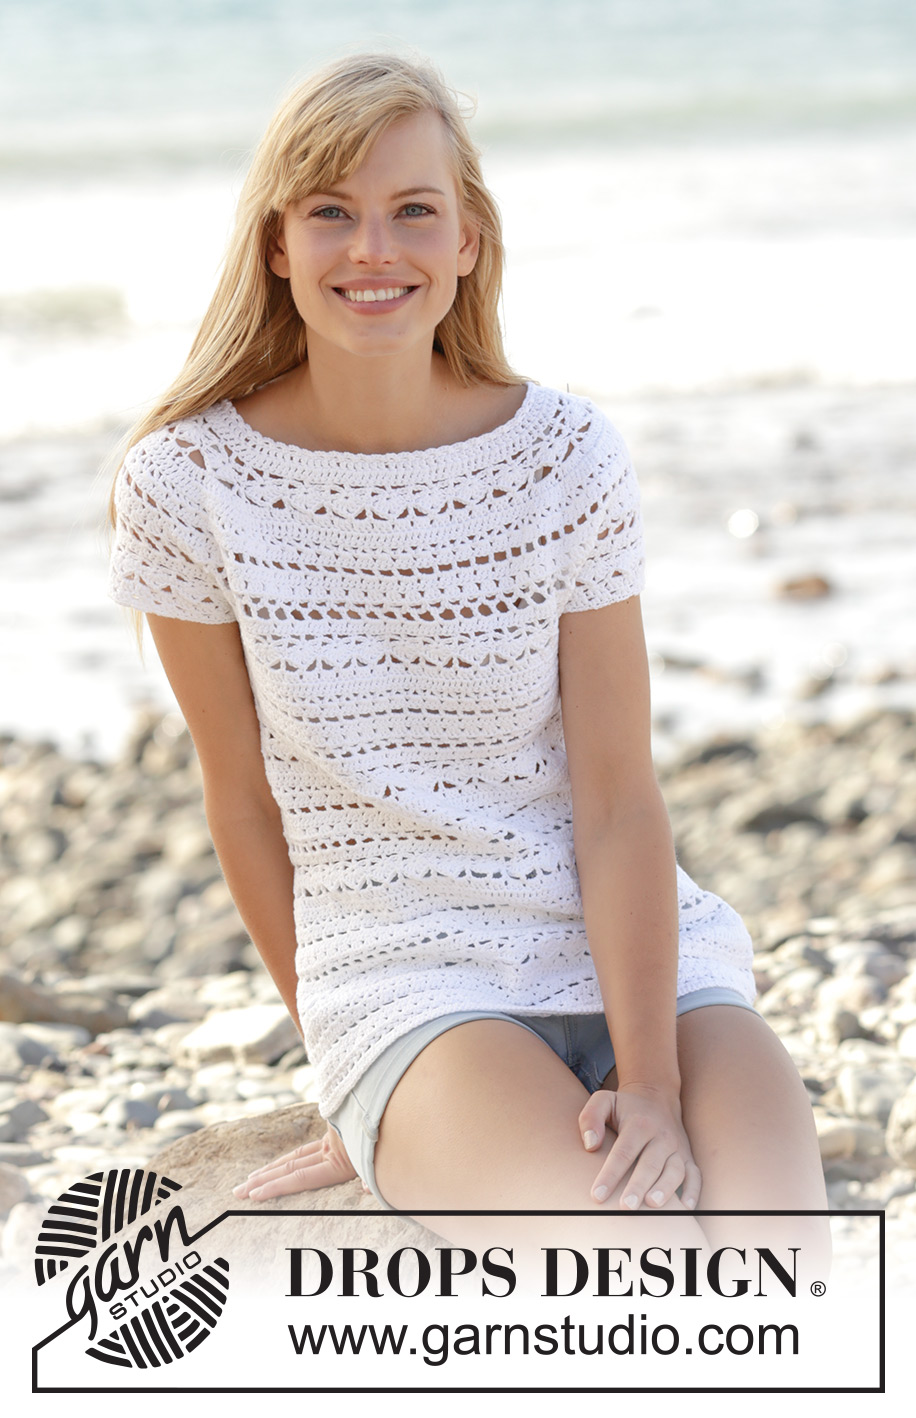
Seashore Bliss Top#seashoreblisstop |
||||||||||||||||||||||||||||
|
|
||||||||||||||||||||||||||||
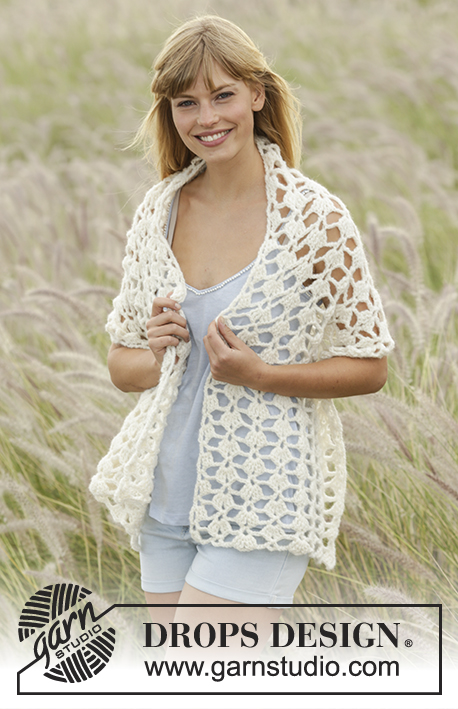
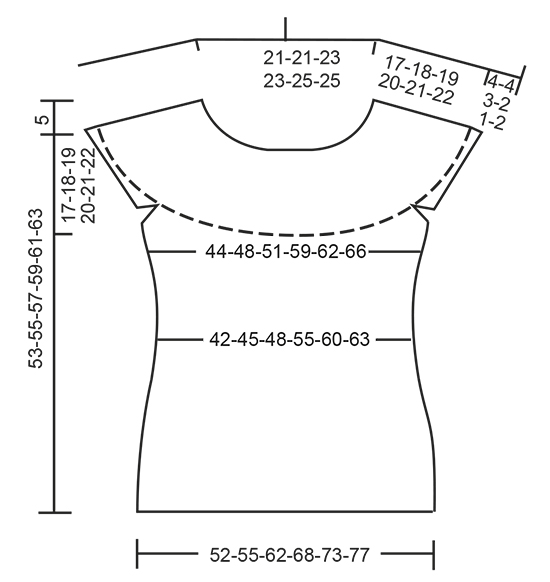
Crochet DROPS top with lace pattern and round yoke in ”Muskat”. The piece is worked top down. Size: S - XXXL.
DROPS 169-26 |
||||||||||||||||||||||||||||
|
PATTERN: See diagrams A.1 to A.4. Diagram A.4 shows how round beg and ends. CROCHET INFO: Replace first tr at beg of every tr round with 3 ch. Finish round with 1 sl st in 3rd ch at beg of round. Replace first dc at beg of every dc round with 1 ch. Finish every round with 1 sl st in ch from beg of round. INCREASE TIP: Inc 1 tr by working 2 tr in same tr. DECREASE TIP: Dec 1 tr by working 2 tr tog as follows: Work 1 tr but wait with last pull through (= 2 sts on hook), then work next tr but on last pull through, pull yarn through all 3 sts on hook. TIP ARMHOLE: Size S, M and XL: In the last repeat of A.1 before marker 1 and marker 3 (= beginning of armhole), replace the last chain stitch with a treble crochet in the last stitch of the same repeat on previous row. ---------------------------------------------------------- TOP: The piece is worked top down. NOTE: It is important to keep the crochet tension vertically so that the measurements on yoke will be correct. YOKE: Work 108-108-117-117-124-124 ch on hook size 4 mm with Muskat and form 1 ring with 1 sl st in first ch. Work first round as follows: Work 3 ch (= 1 tr) - READ CROCHET INFO, 1 tr in each of the next 3-3-5-5-5-5 ch, * skip 1 ch, 1 tr in each of the next 6 ch *, repeat from *-* the entire row = 94-94-102-102-108-108 tr. Work 1 round with 1 tr in every tr and inc 18-18-22-22-28-40 tr evenly - READ INCREASE TIP = 112-112-124-124-136-148 tr. Work next round and insert 8 markers in the piece as follows: A.4 shows how round beg and ends. Insert 1st marker at beg of round, work A.2 over the first 4 tr, insert 2nd marker, A.1 over the next 12 tr (= 2 times in width), insert 3rd marker, A.2 over the next 4 tr, insert 4th marker, work A.1 over the next 36-36-42-42-48-54 tr (= 6-6-7-7-8-9 times in width), insert 5th marker, A.2 over the next 4 tr, insert 6th marker, A.1 over the next 12 tr (= 2 times in width), insert 7th marker, A.2 over the next 4 tr, insert 8th marker, A.1 over the last 36-36-42-42-48-54 tr (= 6-6-7-7-8-9 times in width). REMEMBER THE CROCHET TENSION! SIZE XXL-XXXL: On 5th round (round with tr) in A.1 inc evenly as follows: Between 2nd and 3rd marker and 6th and 7th marker: Inc 6-6 tr. 12-12 tr have been inc in total on round (= 18-18 tr between 2nd and 3rd marker and 6th and 7th marker). Repeat A.1 3-3 times between 2nd and 3rd marker and between 6th and 7th marker: ALL SIZES: On 6th round (round with tr) in A.1 inc evenly as follows: Between 2nd and 3rd marker and 6th and 7th marker: Inc 0-0-6-6-6-6 tr (= 12-12-18-18-24-24 tr between these markers). Between 4th and 5th marker and 8th and 1st marker: Inc 0-6-6-6-6-6 tr (= 36-42-48-48-54-60 tr between each of these markers). Then repeat diagram A.1 2-2-3-3-4-4 times between 2nd and 3rd marker, 6-7-8-8-9-10 times between 4th and 5th marker, 2-2-3-3-4-4 times between 6th and 7th marker and 6-7-8-8-9-10 times between 8th and 1st marker. Work A.2 as before. SIZE XL-XXL-XXXL: On 8th round (round with tr) in A.1 inc evenly as follows: Between 4th and 5th marker and 8th and 1st marker: Inc 6-6-6 tr (= 54-60-66 tr between each of these markers). 12-12-12 tr have been inc in total on round. Repeat A.1 9-10-11 times between 4th and 5th marker and between 8th and 1st marker. Repeat inc on 10th round in A.1 (= 60-66-72 tr between each of these markers). Repeat diagram A.1 10-11-12 times between 4th and 5th marker and between 8th and 1st marker. ALL SIZES: On last round in A.2 insert 1 new marker in the middle of each A.2 (i.e. 18 tr on each side of marker in A.2 = 4 markers). Remove the old markers (= 4 markers remain in piece). Sts between markers are for sleeves (= 48-48-54-54-60-60 tr on each sleeve). When A.2 has been worked 1 time vertically, there are 240-252-276-300-324-336 tr on round. Yoke is now done in size S. SIZE M-L-XL-XXL-XXXL: Continue with pattern A.1 as before but over tr in A.2 (= 36 tr) work A.3 2 times in total in width (marker is in the middle of these repetitions). Work 1-2-3-4-5 rounds of A.3 (see arrow in diagram for correct size). Piece now measures 17-18-19-20-21-22 cm vertically. ALL SIZES: Work A.1a (see arrow on where pattern beg in the different sizes) 3 times in total in width until first marker – SEE ARMHOLE TIP, work 8-8-8-10-10-10 ch, skip sts between the 2 markers (= sleeve), work A.1a 12-13-14-16-17-18 times in total in width until next marker (= front piece), work 8-8-8-10-10-10 ch, skip sts between the 2 markers (= sleeve), work A.1a 9-10-11-13-14-15 times in total in width (= 160-172-184-212-224-236 sts). Fasten off. BODY: Beg round mid under sleeve as follows: Size S-L: Work 1 sl st in 5th ch, 1 ch, work 1 dc in each of the next 3-3 ch, work A.1a as before until ch under 2nd sleeve, 1 dc in each of the 8-8 ch under sleeve, work A.1a as before the rest of round. Work the 8-8 sts under each sleeve as 1st st in A.1a. SIZE M-XL-XXL-XXXL: Work 1 sl st in 5th ch, 3 ch, work 1 tr in each of the next 3-5-5-5 ch, work A.1a as before until ch under 2nd sleeve, 1 tr in each of the 8-10-10-10 ch under sleeve, work A.1a as before the rest of round. Work the 8-10-10-10 sts under each sleeve as 1st st in A.1a. ALL SIZES: Insert 1 marker in piece, NOW MEASURE PIECE FROM HERE. On first round with tr dec 4-4-4-2-2-2 tr evenly - READ DECREASE TIP = 156-168-180-210-222-234 tr. Then repeat A.1a 26-28-30-35-37-39 times in width. Repeat A.1a vertically. When piece measures 12 cm, adjust so that next round is with tr, dec 6 tr evenly = 150-162-174-204-216-228 tr. Now repeat A.1a 25-27-29-34-36-38 times in width. SIZE XL: Repeat dec when piece measures 16 cm from marker = 198 tr. Now repeat A.1a 33 times in width. ALL SIZES: When piece measures 20-21-22-23-24-25 cm from marker – adjust so that next round is with tr, inc 6 tr evenly. Repeat inc every 2-2-1½-1½-1½-1½ cm 5-5-7-7-7-7 more times = 186-198-222-246-264-276 tr. Repeat A.1a 1 more in width on every inc. When all inc are done, repeat A.1a 31-33-37-41-44-46 times in width. Work until piece measures 36-37-38-39-40-41 cm from marker, adjust to finish nicely according to pattern. Fasten off. SLEEVE EDGE: SIZE S: Beg by working mid under sleeve as follows: Work 1 sl st in 4th ch of the 8 ch worked in armhole on body. Work 1 ch (= 1 dc). Then work with 1 dc in each of the next 4 ch, work A.3 over the next 18 tr, work A.1 (adjust pattern according to A.3) 2 times in total in width as before, work A.3 over the next 18 tr, finish with 1 dc in each of the last 3 ch. Work as 1st st in A.3 in the 8 sts under sleeve. On last round in A.3 dec 10 tr evenly = 46 tr. SIZE M-XL-XXL: Beg by working mid under sleeve as follows: Work 1 sl st in 4th ch of the 8-10-10 ch worked in armhole on body. Work 3 ch (= 1 tr). Then work with 1 tr in each of the next 4-6-6 ch, work A.3 as before, work A.1 (adjust pattern according to A.3) 2-3-4 times in total in width as before, work A.3, finish with 1 tr in each of the last 3 ch. Work as 1st st in A.3 in the 8-10-10 sts under sleeve. On last round in A.3 dec 10 tr evenly = 46-54-60 tr. SIZE L: Beg by working mid under sleeve as follows: Work 1 sl st in 4th ch of the 8 ch worked in armhole on body. Work 1 ch (= 1 dc). Then work 1 dc in each of the next 4 ch, work A.3 as before, work A.1 (adjust pattern according to A.3) 3 times in total in width as before, work A.3, finish with 1 dc in each of the last 3 ch. Work as 1st st in A.3 in the 8 sts under sleeve. On last round in A.3 dec 10 tr evenly = 52 tr. SIZE XXXL: Beg by working mid under sleeve as follows: Work 1 sl st in 4th ch of the 10 ch worked in armhole on body. Work 3 ch (= 1 tr). Then work 1 tr in each of the next 6 ch, work 1 tr in each of the 60 tr, finish with 1 tr in each of the last 3 ch. Work 1 tr in every tr and dec 10 tr evenly = 60 tr. ALL SIZES: Work * 1 dc in first/next tr, 1 ch, skip approx. 1 cm *, repeat from *-* around the entire sleeve. Fasten off. Work the other sleeve the same way. NECK EDGE: Crochet an edge around the neck. Beg mid back. Work * 1 dc in first/next tr, 3 ch, skip approx. 1 cm *, repeat from *-* around the entire neck. Make sure to avoid a tight neck edge, adjust to finish with 1 sl st in first ch. Fasten off. |
||||||||||||||||||||||||||||
Diagram explanations |
||||||||||||||||||||||||||||
|
||||||||||||||||||||||||||||
 |
||||||||||||||||||||||||||||
 |
||||||||||||||||||||||||||||
 |
||||||||||||||||||||||||||||
 |
||||||||||||||||||||||||||||
Have you finished this pattern?Tag your pictures with #dropspattern #seashoreblisstop or submit them to the #dropsfan gallery. Do you need help with this pattern?You'll find 11 tutorial videos, a Comments/Questions area and more by visiting the pattern on garnstudio.com. © 1982-2026 DROPS Design A/S. We reserve all rights. This document, including all its sub-sections, has copyrights. Read more about what you can do with our patterns at the bottom of each pattern on our site. |
||||||||||||||||||||||||||||


With over 40 years in knitting and crochet design, DROPS Design offers one of the most extensive collections of free patterns on the internet - translated to 17 languages. As of today we count 325 catalogues and 12298 patterns translated into English (UK/cm). 12298
We work hard to bring you the best knitting and crochet have to offer, inspiration and advice as well as great quality yarns at incredible prices! Would you like to use our patterns for other than personal use? You can read what you are allowed to do in the Copyright text at the bottom of all our patterns. Happy crafting!
Post a comment to pattern DROPS 169-26
We would love to hear what you have to say about this pattern!
If you want to leave a question, please make sure you select the correct category in the form below, to speed up the answering process. Required fields are marked *.