
Popular categories
Looking for a yarn?


Comments / Questions (177)
Monica wrote:
Ola, As mangas começam diretamente das cavas? Se começam, porque fazer correntinhas? Elas não ficariam soltas em um cordão? Obrigado
23.05.2017 - 23:29
![]() Gerlinde wrote:
Gerlinde wrote:
In der Anleitung habe ich folgenden Fehler festgestellt: Der Ärmel wird laut Anleitung mit einer Lochreihe beendet. Auf dem Foto ist jedoch ersichtlich, dass als Abschluss eine Kante aus wahrscheinlich Stäbchenmaschen gehäkelt wurde. Vielleicht könnten sie die Anleitung des schönen Häkelpullovers korrigieren. Freundliche Grüße!
02.05.2017 - 09:28
![]() Suleika wrote:
Suleika wrote:
Ben aan de mouwen begonnen. Er staat dat je 3 x 8 st ( stokjes?) moet minderen in het begin van de mouw. Ik haak in maat L maar de mouw wordt met 36 st wel heel erg strak. Klopt het wel??
23.03.2017 - 15:52DROPS Design answered:
Hoi Suleika. Ja, de mouw wordt van boven naar beneden gehaakt, en met de juiste stekenverhouding, dan is de omtrek bij de pols ca. 20-22 cm. Dus dat zou goed moeten zijn :)
27.03.2017 - 13:01
![]() Prescilla wrote:
Prescilla wrote:
Ja de steekverhouding klopt. Daarom snap ik het ook niet
07.03.2017 - 13:26DROPS Design answered:
Hoi Prescilla. Ik kan je helaas dan niet verder helpen. Het patroon is vaak gemaakt en zou correct moeten zijn. Probeer om verder te gaan en zien of het niet gaat kloppen aan het eind - of dan aanpassen.
07.03.2017 - 14:12
![]() Prescilla wrote:
Prescilla wrote:
Ik snap niets van de afmetingen. Er staat ongeveer 21cm. Maar bij mij is het 23cm terwijl ik met 4mm de drops denim haak
04.03.2017 - 02:10DROPS Design answered:
Hoi Prescila. Klopt de stekenverhouding wel? Je moet ca 16 stk x 9 toeren hebben per 10 x 10 cm.
06.03.2017 - 13:44
![]() Jakubecz Erika wrote:
Jakubecz Erika wrote:
Tisztelt Dropsdesign! Nagyon szépek a termékek amik fel vannak téve a honlapjukra. Azonban ebben a minta leírásban már az első sorban hiba van. Azt írják, hogy 8 erp-val horgoljuk körbe a varázskört, majd minden erp-be kettőt, így 18 szem lesz.. nekem a 2*8 szem az csak 16. Akkor a kezdő körbe 9 erp-t kell horgolni? remélem a többi részben már nem találok hibát..:) Köszönettel: Erika
09.02.2017 - 12:48DROPS Design answered:
Kedves Erika, a varázshurok után a kört összesen 9 rp-val kell körbe horgolni, ebben benne van az első szem, amivel a varázshurkot mintegy rögzítjük. A Facebook "Magyar Drops csoport"-jában közvetlen segítséget is kaphat, ha a továbbiakban elakadna az elkészítéssel. Eredményes kézimunkázást!
25.09.2017 - 00:48
![]() Bea wrote:
Bea wrote:
Goedenavond ik zou graag willen weten welke steek het streepje met open rondje in A2 is?
17.01.2017 - 20:53DROPS Design answered:
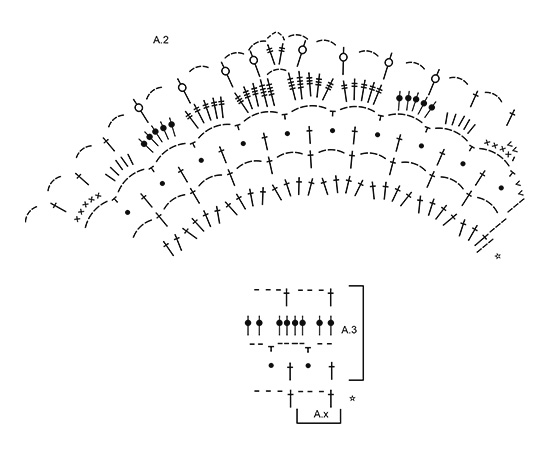
Hoi Bea. Dat is "dstk in stk" - zie ook symbool nr. 10 in de symboolbeschrijving.
18.01.2017 - 12:52
![]() Carolina wrote:
Carolina wrote:
Necesito ayuda con la parte trasera Se saltan 6 repeticiones de A3 para el cuello y se hace A3 paral los hombros, ¿Pero debo de continuarlo por el contorno de la prenda o únicamente lo que es el hombro?
11.08.2016 - 20:24DROPS Design answered:
Hola Carolina, Para finalizar el patrón, se trabajan cada hombro por separado y se trabaja el diagrama A3 correspondiente a la parte del hombro.
14.08.2016 - 11:54
![]() Maggie wrote:
Maggie wrote:
Maggie Price 09.08.2016 kl. 14:22: When making front of garment pattern states - work as back until piece measures 32-36-40-44-52-58cm in total, there are now approx 14-16-18-20-24-26 repetitions of A3 HOWEVER on instructions for back of garment the repetitions of18-28-22-24-28 etc. measure 46-50-54-58-66 cm etc. How is it possible 18 repeats are 46cm total on back and only 40 cm total on front, when it's the same pattern, which is correct?? Surely they should be both the same size
09.08.2016 - 14:35DROPS Design answered:
Hi Maggie, Sorry about the long wait for an answer! The pattern states that you work the front piece for a shorter length than the back piece - 17-19-21-etc cm, instead of 23-25-27-etc cm. Therefore the number of repeats is less too, before the front piece is worked for the neck. Does that make sense? Hope so. Kind regards, Deirdre
05.04.2017 - 13:08
![]() Maggie Price wrote:
Maggie Price wrote:
When making front of garment pattern states - work as back until piece measures 32-36-40-44-52-58cm in total, there are now approx 14-16-18-20-24-26 repetitions of A3 HOWEVER on instructions for back of garment the repetitions of18-28-22-24-28 etc. measure 46-50-54-58-66 cm etc. How is it possible 18 repeats are 46cm total on back and only 40 cm total on front, when it's the same pattern, which is correct?? Surely they should be both the same size if the tension in kept correct !
09.08.2016 - 14:22
|
||||||||||||||||||||||||||||||||||||||||||||||
Janis#janissweater |
||||||||||||||||||||||||||||||||||||||||||||||
|
|
||||||||||||||||||||||||||||||||||||||||||||||
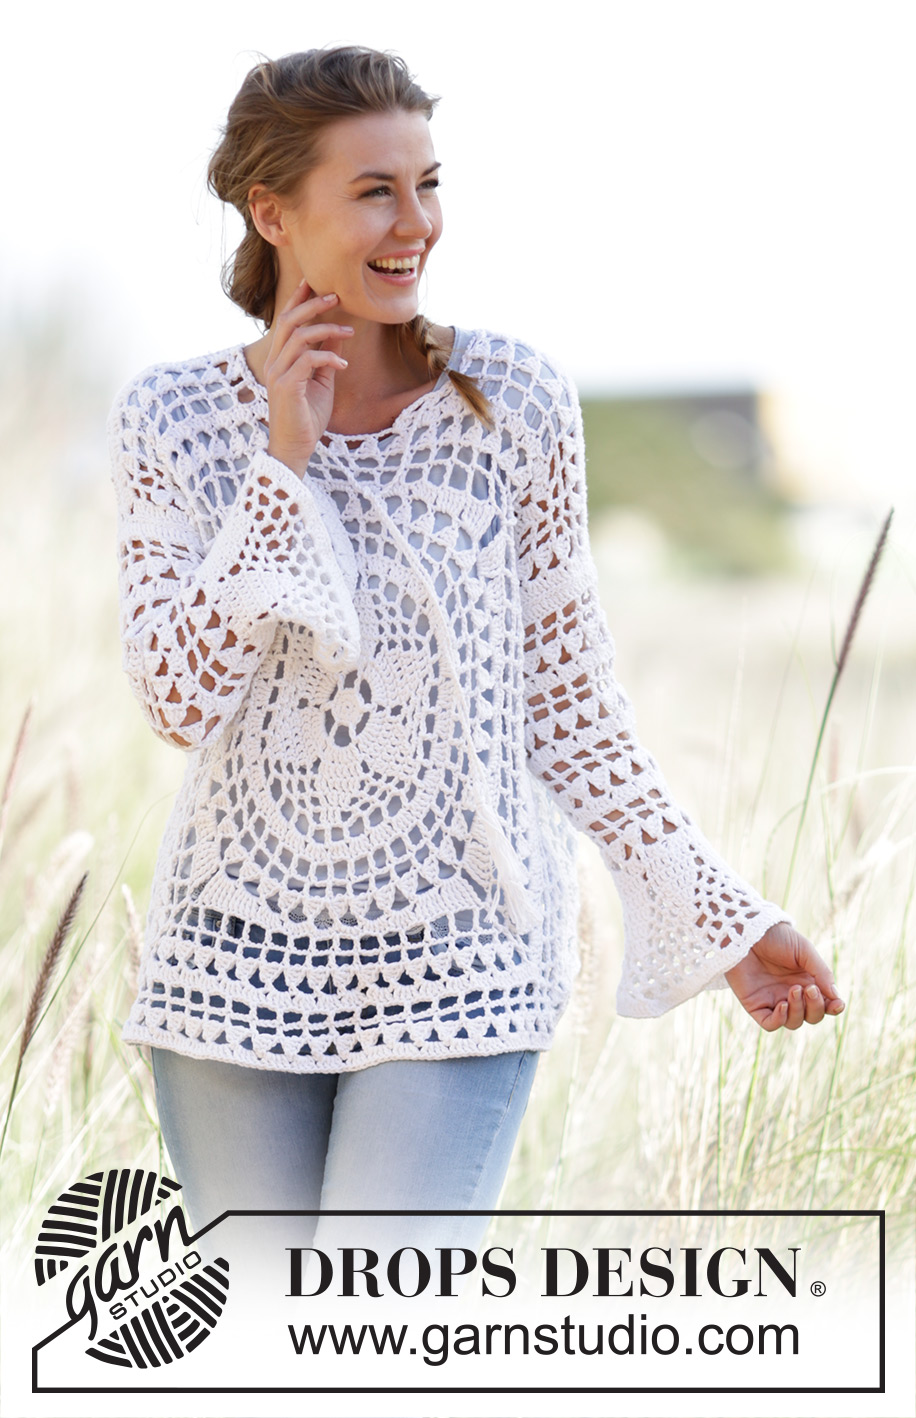
Crochet DROPS jumper worked in a square with flounce sleeves and lace pattern in ”Paris”. Size: S - XXXL.
DROPS 170-2 |
||||||||||||||||||||||||||||||||||||||||||||||
|
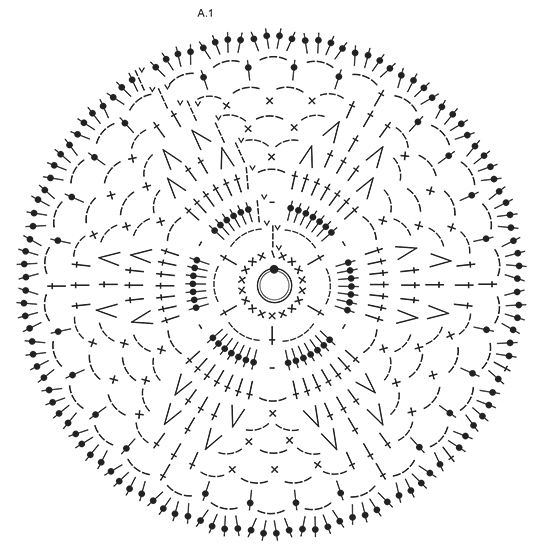
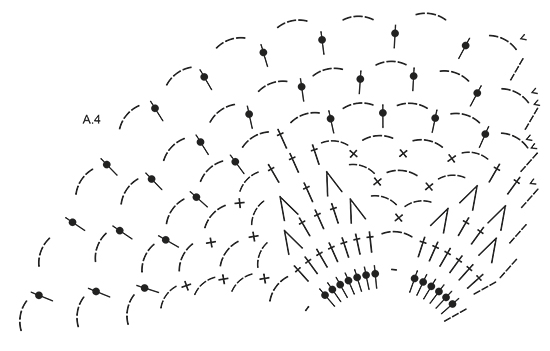
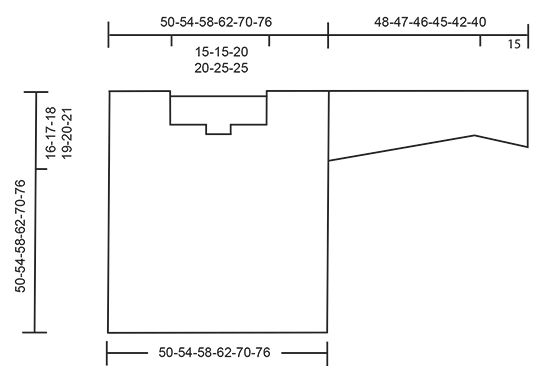
MAGIC CIRCLE: To avoid hole in the middle beg with this technique: Hold yarn end in the left hand and make a loop around left index finger (from left to right). Hold the loop with left thumb and index finger. Insert hook through loop, get the yarn from ball, pull yarn through loop, make 1 YO on hook and pull YO through st on hook = 1 dc, then work 8 dc around loop, finish with 1 sl st in first dc = 9 dc. Continue as explained in pattern – AT THE SAME TIME pull yarn end so that loop is tighten tog and the hole disappears. CROCHET INFO: Replace first dc on round with 1 ch. Finish round with one sl st in first ch from beg of round. Replace first tr on round/row with 3 ch. Finish round with one sl st in third ch from beg of round. PATTERN: See diagrams A.1 to A.4. QUADRUPLE TR: Make 4 YOs on hook, insert hook around ch-space and pull yarn around ch-space, * 1 YO on hook, pull yarn through the next 2 loops on hook *, repeat from *-* 4 more times = 1 loop on hook. DECREASE TIP: Dec 1 tr by working the next 2 tr tog as follows: Work 1 tr but wait with last pull through (= 2 loops on hook), then work next tr but on last pull through, pull yarn through all 3 loops on hook. ---------------------------------------------------------- JUMPER: BACK PIECE: Work back piece in a circle, then as a square from mid back. Work up along one side of square for shoulder/neck at the end. Work a MAGIC CIRCLE on hook size 4.5 mm with Paris – see explanation above = 9 dc around circle. Then work according to A.1 (on first round in A1 work 2 dc in each of the 9 dc = 18 dc). REMEMBER THE CROCHET TENSION! READ CROCHET INFO! When A.1 has been worked, there are 120 tr on round and piece measures approx. 22 cm in diameter. Then work according to A.2, work 4 repetitions of A.2 around the circle - beg on second round in A.2. NOTE: Sl sts at beg of A.2 are only worked at beg of round. When A.2 has been worked, continue according to A.3. A.x shows 1 repetition of A.3 in width. Work A.3, in every corner work 1 dtr + 3 ch + 1 dtr, work 2 repetitions more of A.3 between every corner for every round worked. Continue with A.3 until piece measures 23-25-27-29-33-36 cm from centre (46-50-54-58-66-72 cm in total), there are now approx. 18-20-22-24-28-30 repetitions of A.3 along each side of square. Now work piece back and forth and dec for neck in the middle of the first side of square. Cut the yarn and skip the middle 6-6-8-8-10-10 repetitions (= neck) on the first side of square, continue A.3 with inc in the corners until row has been worked, do not work over the 6-6-8-8-10-10 repetitions skipped at beg of row. Fasten off, piece measures 25-27-29-31-35-38 cm from centre (50-54-58-62-70-76 cm in total), there are approx. 7-8-8-9-10-11 repetitions on each shoulder, and approx. 20-22-24-26-30-32 repetitions along each of the other 3 sides. Insert 1 marker in each side, 16-17-18-19-20-21 cm down from shoulder, this shows where sleeve is sewn in. FRONT PIECE: Work as back piece until piece measures 17-19-21-23-27-30 cm from centre (32-36-40-44-52-58 cm in total), there are now approx. 14-16-18-20-24-26 repetitions of A.3 along each side of square. Now work piece back and forth and dec for neck in the middle of the first side of square. Cut the yarn and skip the middle 2 repetitions (= neck) on the first side of square, continue with A.3 with inc in the corners until row has been worked, do not work over the 2 repetitions skipped at beg of row. Turn and work a row from WS. Cut the yarn, skip the first 2-2-3-3-4-4 repetitions, continue with A.3 and inc in the corners, but turn when 2-2-3-3-4-4 repetitions remain on row, 6-6-8-8-10-10 repetitions have been dec mid front for neck. Continue back and forth with A.3 and inc until piece measures 25-27-29-31-35-38 cm from centre (50-54-58-62-70-76 cm in total), there are approx. 7-8-8-9-10-11 repetitions on each shoulder, and approx. 20-22-24-26-30-32 repetitions along each of the other 3 sides, adjust according to back piece. Fasten off. Insert 1 marker in each side, 16-17-18-19-20-21 cm down from shoulder, this shows where sleeve is sewn in. SLEEVE: Sleeve is worked in the round, top down. Work 64-64-69-69-74-74 ch and form a ring with one sl st in first ch. Work 3 ch (= 1 tr), 1 tr in each of the next 6-6-3-3-0-0 ch, skip 1 ch, * work 1 tr in each of the next 7 ch, skip 1 st *, repeat from *-* the entire round = 56-56-60-60-64-64 tr. Remember CROCHET INFO! Then work in the round and according to A.3. On 3rd round in A.3 dec 8 tr evenly - READ DECREASE TIP. Repeat dec every time 3th round in diagram is worked 3 times in total = 32-32-36-36-40-40 tr. Work A.3 until piece measures 33-32-31-30-27-25 cm, finish after 2nd or 4th round in A.3. Work 40-40-40-48-48-48 tr in total around ch-spaces. Then work according to A.4 (5-5-5-6-6-6 repetitions in width, diagram shows 2 repetitions in width), work first round as follows: * Work 1 tr in each of the first 7 tr, 1 ch, skip 1 tr *, repeat from *-* 4-4-4-5-5-5 more times. NOTE: Sl sts at beg of A.4 are only worked at beg of round. Work A.4 1 time vertically. Work now 1 round with tr: 1 tr in each tr, 3 tr around each ch-space. Fasten off. Sleeve measures approx. 48-47-46-45-42-40 cm. Work another sleeve the same way. ASSEMBLY: Sew the shoulder seams. Sew side seams from markers in the side and down. Sew in sleeves. TWINED STRING: Cut 2 lengths of 3 metres each. Twine the strands tog until they resist, fold the string double so that it twines again. Make a knot at each end. Thread tie up and down around the neck. Cut 8 lengths of yarn of 20 cm. Thread the ends through the end of the tie and fold them double. Twine one of the strand around the top of tassel. Make another fringe in the other end of tie. |
||||||||||||||||||||||||||||||||||||||||||||||
Diagram explanations |
||||||||||||||||||||||||||||||||||||||||||||||
|
||||||||||||||||||||||||||||||||||||||||||||||
 |
||||||||||||||||||||||||||||||||||||||||||||||
 |
||||||||||||||||||||||||||||||||||||||||||||||
 |
||||||||||||||||||||||||||||||||||||||||||||||
 |
||||||||||||||||||||||||||||||||||||||||||||||
Have you finished this pattern?Tag your pictures with #dropspattern #janissweater or submit them to the #dropsfan gallery. Do you need help with this pattern?You'll find 16 tutorial videos, a Comments/Questions area and more by visiting the pattern on garnstudio.com. © 1982-2026 DROPS Design A/S. We reserve all rights. This document, including all its sub-sections, has copyrights. Read more about what you can do with our patterns at the bottom of each pattern on our site. |
||||||||||||||||||||||||||||||||||||||||||||||


With over 40 years in knitting and crochet design, DROPS Design offers one of the most extensive collections of free patterns on the internet - translated to 17 languages. As of today we count 324 catalogues and 12267 patterns translated into English (UK/cm). 12267
We work hard to bring you the best knitting and crochet have to offer, inspiration and advice as well as great quality yarns at incredible prices! Would you like to use our patterns for other than personal use? You can read what you are allowed to do in the Copyright text at the bottom of all our patterns. Happy crafting!
Post a comment to pattern DROPS 170-2
We would love to hear what you have to say about this pattern!
If you want to leave a question, please make sure you select the correct category in the form below, to speed up the answering process. Required fields are marked *.