
Popular categories
Looking for a yarn?


Comments / Questions (177)
![]() Katja wrote:
Katja wrote:
Kann es wirklich sein, dass dieses Modell in der Größe M nur eine Gesamtlänge von 54 cm hat ? Ich bin 1,62 cm groß und das wäre eindeutig zu kurz und würde mir wie bei dem Modellbild bestimmt nicht so weit nach unten gehn. Bei meiner Größe müsste die Länge mindestens 65 cm sein, damit es annähernd so aussieht wie auf dem Bild. Oder verstehe ich hier bei den Maßen etwas falsch ?
30.01.2016 - 13:32DROPS Design answered:
Der Pulli wird sich beim Tragen noch etwas aushängen durch das Muster. Wenn der Pulli länger würde, würde er gleichzeitig auch breiter, da Sie ihn ja quadratförmig stricken. Sie können aber, wenn er Ihnen zu kurz ist, unten einfach noch einen Rand im Muster A.3 anhäkeln.
03.02.2016 - 18:45Theresa wrote:
It is beautiful perfect for the "Free Spirit"
28.01.2016 - 08:59
![]() Trisha Day wrote:
Trisha Day wrote:
Angel Wings Gorgeous!!
27.01.2016 - 13:10
![]() Anna-karin Allansson wrote:
Anna-karin Allansson wrote:
Vill så gärna få detta mönster. När kommer det
26.01.2016 - 12:14
![]() Angelika wrote:
Angelika wrote:
Wird sofort gemacht wenn die anleitung da ist. Sooo schön
21.01.2016 - 07:05
![]() Monika Himml wrote:
Monika Himml wrote:
Suuper Teil,freue mich schon auf die Anleitung! Wie in den 68`Jahren ,mein Geburtsjahr :-))
20.01.2016 - 19:09
![]() Åsa Byström wrote:
Åsa Byström wrote:
Urläcker!
12.01.2016 - 11:17
![]() Jsabelle wrote:
Jsabelle wrote:
Macht richtig lust auf den nächsten Sommer.
11.01.2016 - 20:15
![]() Judy King wrote:
Judy King wrote:
Simply gorgeous! !
11.01.2016 - 20:03
![]() Liselotte wrote:
Liselotte wrote:
Vacker
08.01.2016 - 15:25
|
||||||||||||||||||||||||||||||||||||||||||||||
Janis#janissweater |
||||||||||||||||||||||||||||||||||||||||||||||
|
|
||||||||||||||||||||||||||||||||||||||||||||||
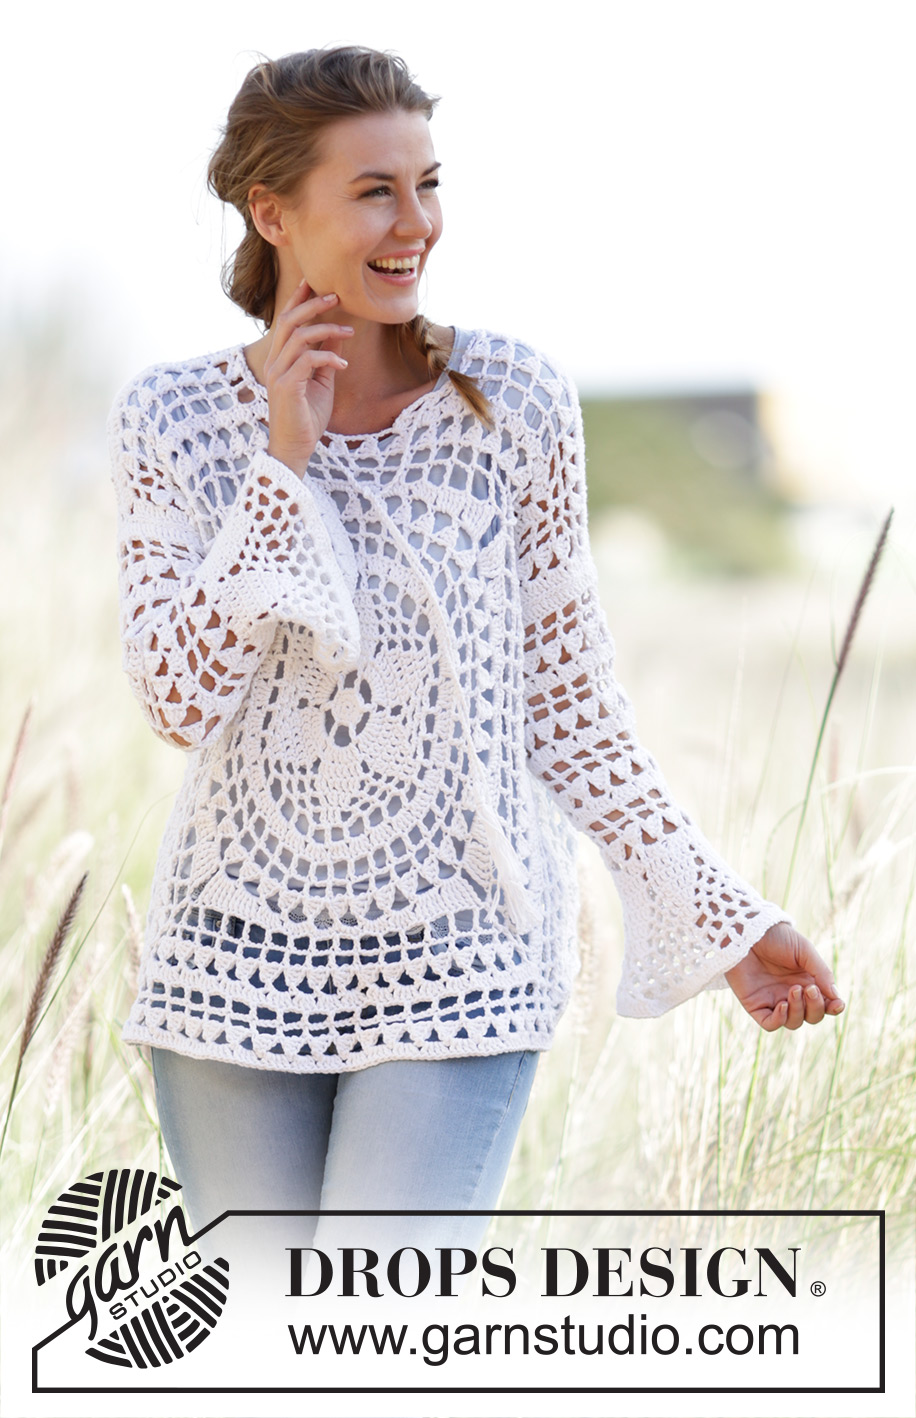
Crochet DROPS jumper worked in a square with flounce sleeves and lace pattern in ”Paris”. Size: S - XXXL.
DROPS 170-2 |
||||||||||||||||||||||||||||||||||||||||||||||
|
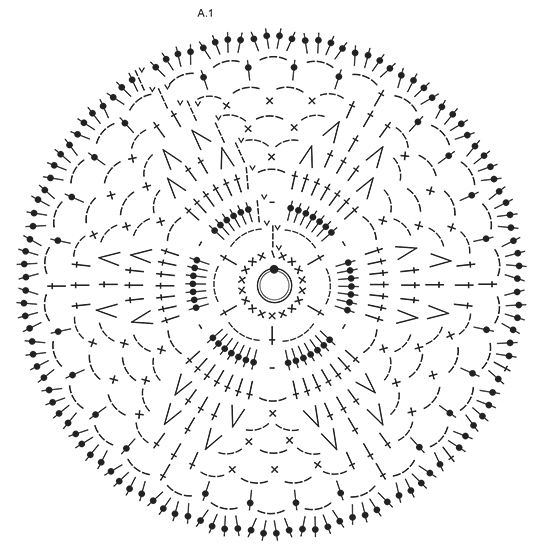
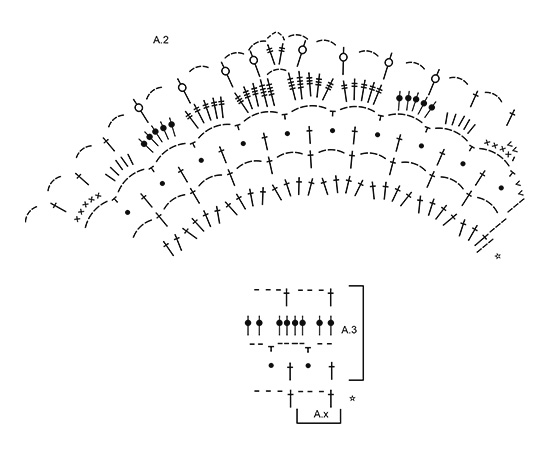
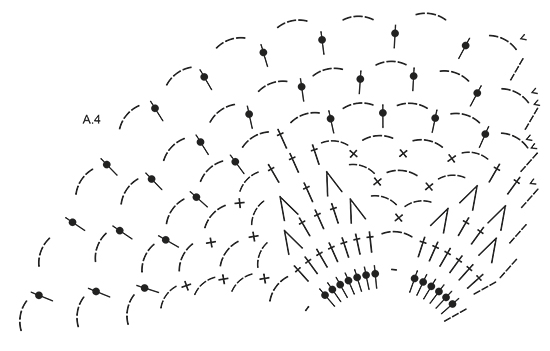
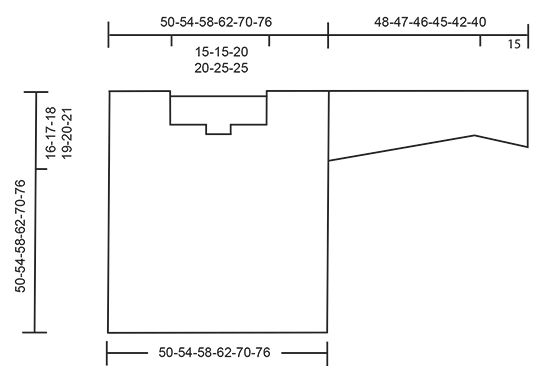
MAGIC CIRCLE: To avoid hole in the middle beg with this technique: Hold yarn end in the left hand and make a loop around left index finger (from left to right). Hold the loop with left thumb and index finger. Insert hook through loop, get the yarn from ball, pull yarn through loop, make 1 YO on hook and pull YO through st on hook = 1 dc, then work 8 dc around loop, finish with 1 sl st in first dc = 9 dc. Continue as explained in pattern – AT THE SAME TIME pull yarn end so that loop is tighten tog and the hole disappears. CROCHET INFO: Replace first dc on round with 1 ch. Finish round with one sl st in first ch from beg of round. Replace first tr on round/row with 3 ch. Finish round with one sl st in third ch from beg of round. PATTERN: See diagrams A.1 to A.4. QUADRUPLE TR: Make 4 YOs on hook, insert hook around ch-space and pull yarn around ch-space, * 1 YO on hook, pull yarn through the next 2 loops on hook *, repeat from *-* 4 more times = 1 loop on hook. DECREASE TIP: Dec 1 tr by working the next 2 tr tog as follows: Work 1 tr but wait with last pull through (= 2 loops on hook), then work next tr but on last pull through, pull yarn through all 3 loops on hook. ---------------------------------------------------------- JUMPER: BACK PIECE: Work back piece in a circle, then as a square from mid back. Work up along one side of square for shoulder/neck at the end. Work a MAGIC CIRCLE on hook size 4.5 mm with Paris – see explanation above = 9 dc around circle. Then work according to A.1 (on first round in A1 work 2 dc in each of the 9 dc = 18 dc). REMEMBER THE CROCHET TENSION! READ CROCHET INFO! When A.1 has been worked, there are 120 tr on round and piece measures approx. 22 cm in diameter. Then work according to A.2, work 4 repetitions of A.2 around the circle - beg on second round in A.2. NOTE: Sl sts at beg of A.2 are only worked at beg of round. When A.2 has been worked, continue according to A.3. A.x shows 1 repetition of A.3 in width. Work A.3, in every corner work 1 dtr + 3 ch + 1 dtr, work 2 repetitions more of A.3 between every corner for every round worked. Continue with A.3 until piece measures 23-25-27-29-33-36 cm from centre (46-50-54-58-66-72 cm in total), there are now approx. 18-20-22-24-28-30 repetitions of A.3 along each side of square. Now work piece back and forth and dec for neck in the middle of the first side of square. Cut the yarn and skip the middle 6-6-8-8-10-10 repetitions (= neck) on the first side of square, continue A.3 with inc in the corners until row has been worked, do not work over the 6-6-8-8-10-10 repetitions skipped at beg of row. Fasten off, piece measures 25-27-29-31-35-38 cm from centre (50-54-58-62-70-76 cm in total), there are approx. 7-8-8-9-10-11 repetitions on each shoulder, and approx. 20-22-24-26-30-32 repetitions along each of the other 3 sides. Insert 1 marker in each side, 16-17-18-19-20-21 cm down from shoulder, this shows where sleeve is sewn in. FRONT PIECE: Work as back piece until piece measures 17-19-21-23-27-30 cm from centre (32-36-40-44-52-58 cm in total), there are now approx. 14-16-18-20-24-26 repetitions of A.3 along each side of square. Now work piece back and forth and dec for neck in the middle of the first side of square. Cut the yarn and skip the middle 2 repetitions (= neck) on the first side of square, continue with A.3 with inc in the corners until row has been worked, do not work over the 2 repetitions skipped at beg of row. Turn and work a row from WS. Cut the yarn, skip the first 2-2-3-3-4-4 repetitions, continue with A.3 and inc in the corners, but turn when 2-2-3-3-4-4 repetitions remain on row, 6-6-8-8-10-10 repetitions have been dec mid front for neck. Continue back and forth with A.3 and inc until piece measures 25-27-29-31-35-38 cm from centre (50-54-58-62-70-76 cm in total), there are approx. 7-8-8-9-10-11 repetitions on each shoulder, and approx. 20-22-24-26-30-32 repetitions along each of the other 3 sides, adjust according to back piece. Fasten off. Insert 1 marker in each side, 16-17-18-19-20-21 cm down from shoulder, this shows where sleeve is sewn in. SLEEVE: Sleeve is worked in the round, top down. Work 64-64-69-69-74-74 ch and form a ring with one sl st in first ch. Work 3 ch (= 1 tr), 1 tr in each of the next 6-6-3-3-0-0 ch, skip 1 ch, * work 1 tr in each of the next 7 ch, skip 1 st *, repeat from *-* the entire round = 56-56-60-60-64-64 tr. Remember CROCHET INFO! Then work in the round and according to A.3. On 3rd round in A.3 dec 8 tr evenly - READ DECREASE TIP. Repeat dec every time 3th round in diagram is worked 3 times in total = 32-32-36-36-40-40 tr. Work A.3 until piece measures 33-32-31-30-27-25 cm, finish after 2nd or 4th round in A.3. Work 40-40-40-48-48-48 tr in total around ch-spaces. Then work according to A.4 (5-5-5-6-6-6 repetitions in width, diagram shows 2 repetitions in width), work first round as follows: * Work 1 tr in each of the first 7 tr, 1 ch, skip 1 tr *, repeat from *-* 4-4-4-5-5-5 more times. NOTE: Sl sts at beg of A.4 are only worked at beg of round. Work A.4 1 time vertically. Work now 1 round with tr: 1 tr in each tr, 3 tr around each ch-space. Fasten off. Sleeve measures approx. 48-47-46-45-42-40 cm. Work another sleeve the same way. ASSEMBLY: Sew the shoulder seams. Sew side seams from markers in the side and down. Sew in sleeves. TWINED STRING: Cut 2 lengths of 3 metres each. Twine the strands tog until they resist, fold the string double so that it twines again. Make a knot at each end. Thread tie up and down around the neck. Cut 8 lengths of yarn of 20 cm. Thread the ends through the end of the tie and fold them double. Twine one of the strand around the top of tassel. Make another fringe in the other end of tie. |
||||||||||||||||||||||||||||||||||||||||||||||
Diagram explanations |
||||||||||||||||||||||||||||||||||||||||||||||
|
||||||||||||||||||||||||||||||||||||||||||||||
 |
||||||||||||||||||||||||||||||||||||||||||||||
 |
||||||||||||||||||||||||||||||||||||||||||||||
 |
||||||||||||||||||||||||||||||||||||||||||||||
 |
||||||||||||||||||||||||||||||||||||||||||||||
Have you finished this pattern?Tag your pictures with #dropspattern #janissweater or submit them to the #dropsfan gallery. Do you need help with this pattern?You'll find 16 tutorial videos, a Comments/Questions area and more by visiting the pattern on garnstudio.com. © 1982-2026 DROPS Design A/S. We reserve all rights. This document, including all its sub-sections, has copyrights. Read more about what you can do with our patterns at the bottom of each pattern on our site. |
||||||||||||||||||||||||||||||||||||||||||||||


With over 40 years in knitting and crochet design, DROPS Design offers one of the most extensive collections of free patterns on the internet - translated to 17 languages. As of today we count 324 catalogues and 12267 patterns translated into English (UK/cm). 12267
We work hard to bring you the best knitting and crochet have to offer, inspiration and advice as well as great quality yarns at incredible prices! Would you like to use our patterns for other than personal use? You can read what you are allowed to do in the Copyright text at the bottom of all our patterns. Happy crafting!
Post a comment to pattern DROPS 170-2
We would love to hear what you have to say about this pattern!
If you want to leave a question, please make sure you select the correct category in the form below, to speed up the answering process. Required fields are marked *.