
Popular categories
Looking for a yarn?


Comments / Questions (177)
![]() Christina wrote:
Christina wrote:
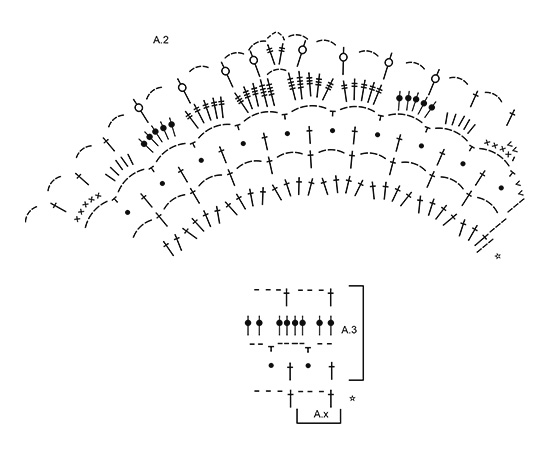
I'm having trouble figuring out the corners during A.3. I think I've managed okay for the first 3 rows, but I can't figure out how the 4th (the one with repeats of dc, 3 ch) should look at the corners. Approaching a corner, should it be dc into tr from previous row, 3 ch, (tr, 3 ch, tr) into corner space? Then 3 ch or dc (into which stitch) next? I really wish there was a chart for the corners.
01.03.2016 - 00:52DROPS Design answered:
Dear Christina, on every row in A.3 you should have in each corner 3 ch, then in next corner work (1 tr, 3 ch, 1 tr, 3 ch) in the 3-ch-space from previous row. On either side of this, work as stated in diagram. Happy crocheting!
01.03.2016 - 09:20
![]() Donna wrote:
Donna wrote:
Does A2 last row begin with a chain 3 or double crochet
29.02.2016 - 21:52DROPS Design answered:
Dear Donna, at the end of next to last row crochet sl st to the mid sc from beg of row, then start with ch3 to replace 1st dc. Happy crocheting!
01.03.2016 - 09:15
![]() Donna Senior wrote:
Donna Senior wrote:
On A2 how many picot should there be?
29.02.2016 - 02:33DROPS Design answered:
Dear Mrs Senior, in row 2 in A.2 work 1 picot (13th symbol= work ch 3, 3 dc in first ch) between each dc on round. Happy crocheting!
29.02.2016 - 10:02
![]() Maria Fona wrote:
Maria Fona wrote:
Não entendo, tanto no gráfico como na descrição, a transição de A1 para A2. Quantas vezes se faz o A2 e como se une?
22.02.2016 - 13:14DROPS Design answered:
Faz-se A.2 4 vezes em largura à volta do círculo inicial. Faz-se A.2 1 vez em altura. Bom croché!
24.03.2016 - 13:33
![]() Koszinski wrote:
Koszinski wrote:
Bonjour c est encore moi voilà je suis arriver a la première ranger de a3 je sais que il faut faire une bide trois maille en l air faire trois brides dans la troisième maille en l air mais les coin je comprend pas aider moi svp merci beaucoup
18.02.2016 - 12:43DROPS Design answered:
Bonjour Mme Koszinski, à chaque rang de A.3 dans les coins crochetez 1 DB, 3 ml, 1DB (avec 1 picot/3 ml avant et après en fonction du rang de A.3). Bon crochet!
18.02.2016 - 14:25
![]() Koszinski wrote:
Koszinski wrote:
Bonjour merci pour votre reponse ma question est pour quel parti sert le diagramme a 4 svp merci cordialement
13.02.2016 - 06:29DROPS Design answered:
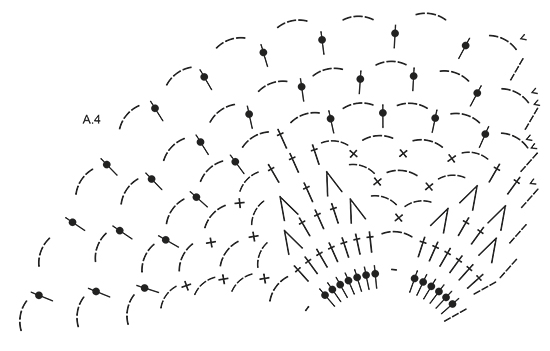
Bonjour Mme Koszinski, le diagramme A.4 correspond au volant du bas des manches. Bon crochet!
15.02.2016 - 10:15
![]() Koszinski wrote:
Koszinski wrote:
Bonjour j ai fini mes 120 brides je suis arriver au troisieme tour du motif a 2 si j ai bien compris une brides une maille en l air une bride le hic c est que tout est reserer aider moi svp merci cordialement
06.02.2016 - 06:12DROPS Design answered:
Bonjour Mme Koszinski, au 3ème tour de A.2, on crochète 1 B, 1 picot (= point noir = 3 ml, 3 B dans la 1ère de ces 3 ml). On a ainsi 1 picot au-dessus des 3 ml du 2ème tour. Bon crochet!
08.02.2016 - 11:12
![]() Virpi Teittinen wrote:
Virpi Teittinen wrote:
Ohjeen alussa sanotaan että aloitusrenkaaseen virkataan yht.9 ks:aa, mikä on selvästi virhe, sillä kuvallisessa ohjeessa aloituslenkkiin tehdään 17 ks:aa joka on mielestäni oikein.
05.02.2016 - 07:36
![]() Anna wrote:
Anna wrote:
Perché non pubblicate il modello? è bellissimo
04.02.2016 - 11:52
![]() Ilka wrote:
Ilka wrote:
Hallo, ich habe am Ende von A2 nur 32 LfM-bögen, laut Anleitung müssten es, um eckig zu werden aber 4x9=36 sein.Ausserdem muss ja wohl vorher durch die Kettmaschen noch zwei Felder weggenommen werden... Wo ist hier der (mein?) Fehler ?
02.02.2016 - 15:32DROPS Design answered:
Liebe Ilka, ich bin nicht sicher, ob ich Ihre Frage richtig verstanden habe. Haben Sie in der ganzen Runde nur 32 Bögen? Nach unserer Anleitung sind im abgebildeten Rapport am Ende von A.2 15 Lm-Bögen. Dieser Rapport wird insgesamt 4 x in der RD gearbeitet, also 60 Bögen total.
14.03.2016 - 11:55
|
||||||||||||||||||||||||||||||||||||||||||||||
Janis#janissweater |
||||||||||||||||||||||||||||||||||||||||||||||
|
|
||||||||||||||||||||||||||||||||||||||||||||||
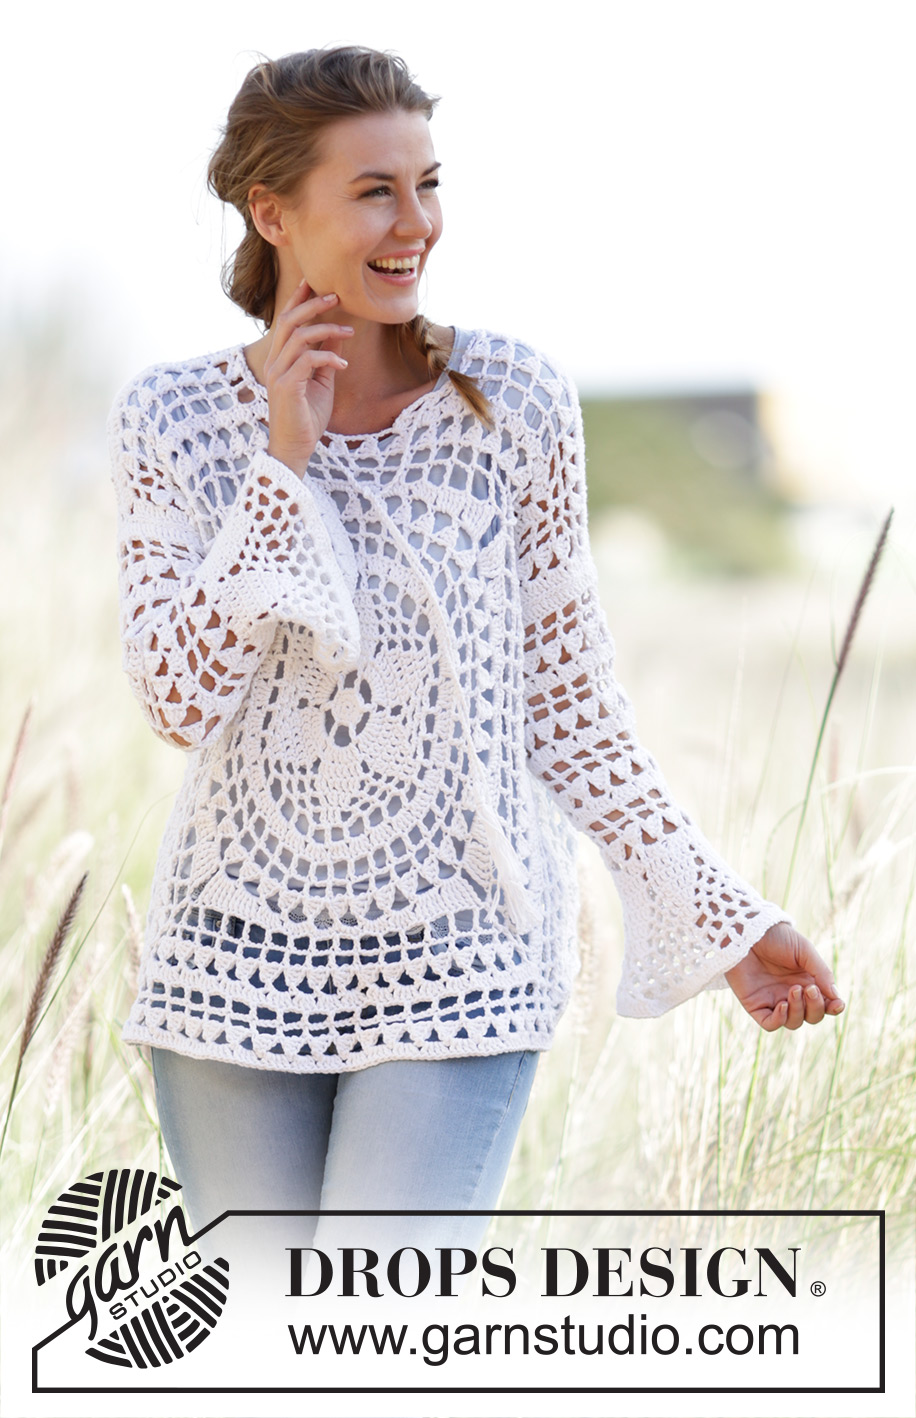
Crochet DROPS jumper worked in a square with flounce sleeves and lace pattern in ”Paris”. Size: S - XXXL.
DROPS 170-2 |
||||||||||||||||||||||||||||||||||||||||||||||
|
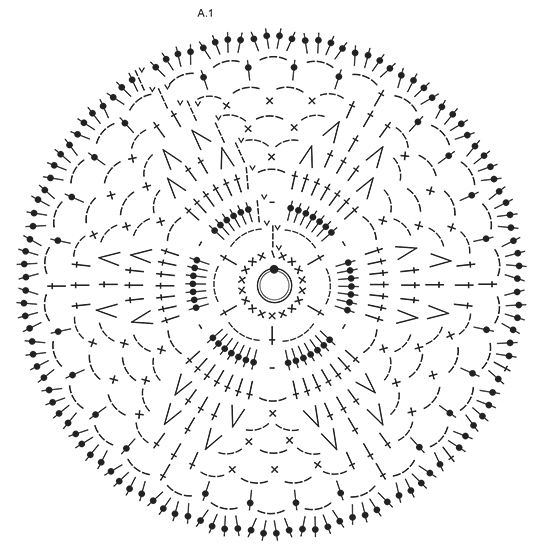
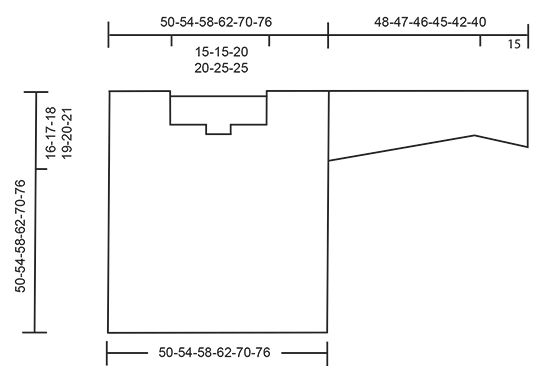
MAGIC CIRCLE: To avoid hole in the middle beg with this technique: Hold yarn end in the left hand and make a loop around left index finger (from left to right). Hold the loop with left thumb and index finger. Insert hook through loop, get the yarn from ball, pull yarn through loop, make 1 YO on hook and pull YO through st on hook = 1 dc, then work 8 dc around loop, finish with 1 sl st in first dc = 9 dc. Continue as explained in pattern – AT THE SAME TIME pull yarn end so that loop is tighten tog and the hole disappears. CROCHET INFO: Replace first dc on round with 1 ch. Finish round with one sl st in first ch from beg of round. Replace first tr on round/row with 3 ch. Finish round with one sl st in third ch from beg of round. PATTERN: See diagrams A.1 to A.4. QUADRUPLE TR: Make 4 YOs on hook, insert hook around ch-space and pull yarn around ch-space, * 1 YO on hook, pull yarn through the next 2 loops on hook *, repeat from *-* 4 more times = 1 loop on hook. DECREASE TIP: Dec 1 tr by working the next 2 tr tog as follows: Work 1 tr but wait with last pull through (= 2 loops on hook), then work next tr but on last pull through, pull yarn through all 3 loops on hook. ---------------------------------------------------------- JUMPER: BACK PIECE: Work back piece in a circle, then as a square from mid back. Work up along one side of square for shoulder/neck at the end. Work a MAGIC CIRCLE on hook size 4.5 mm with Paris – see explanation above = 9 dc around circle. Then work according to A.1 (on first round in A1 work 2 dc in each of the 9 dc = 18 dc). REMEMBER THE CROCHET TENSION! READ CROCHET INFO! When A.1 has been worked, there are 120 tr on round and piece measures approx. 22 cm in diameter. Then work according to A.2, work 4 repetitions of A.2 around the circle - beg on second round in A.2. NOTE: Sl sts at beg of A.2 are only worked at beg of round. When A.2 has been worked, continue according to A.3. A.x shows 1 repetition of A.3 in width. Work A.3, in every corner work 1 dtr + 3 ch + 1 dtr, work 2 repetitions more of A.3 between every corner for every round worked. Continue with A.3 until piece measures 23-25-27-29-33-36 cm from centre (46-50-54-58-66-72 cm in total), there are now approx. 18-20-22-24-28-30 repetitions of A.3 along each side of square. Now work piece back and forth and dec for neck in the middle of the first side of square. Cut the yarn and skip the middle 6-6-8-8-10-10 repetitions (= neck) on the first side of square, continue A.3 with inc in the corners until row has been worked, do not work over the 6-6-8-8-10-10 repetitions skipped at beg of row. Fasten off, piece measures 25-27-29-31-35-38 cm from centre (50-54-58-62-70-76 cm in total), there are approx. 7-8-8-9-10-11 repetitions on each shoulder, and approx. 20-22-24-26-30-32 repetitions along each of the other 3 sides. Insert 1 marker in each side, 16-17-18-19-20-21 cm down from shoulder, this shows where sleeve is sewn in. FRONT PIECE: Work as back piece until piece measures 17-19-21-23-27-30 cm from centre (32-36-40-44-52-58 cm in total), there are now approx. 14-16-18-20-24-26 repetitions of A.3 along each side of square. Now work piece back and forth and dec for neck in the middle of the first side of square. Cut the yarn and skip the middle 2 repetitions (= neck) on the first side of square, continue with A.3 with inc in the corners until row has been worked, do not work over the 2 repetitions skipped at beg of row. Turn and work a row from WS. Cut the yarn, skip the first 2-2-3-3-4-4 repetitions, continue with A.3 and inc in the corners, but turn when 2-2-3-3-4-4 repetitions remain on row, 6-6-8-8-10-10 repetitions have been dec mid front for neck. Continue back and forth with A.3 and inc until piece measures 25-27-29-31-35-38 cm from centre (50-54-58-62-70-76 cm in total), there are approx. 7-8-8-9-10-11 repetitions on each shoulder, and approx. 20-22-24-26-30-32 repetitions along each of the other 3 sides, adjust according to back piece. Fasten off. Insert 1 marker in each side, 16-17-18-19-20-21 cm down from shoulder, this shows where sleeve is sewn in. SLEEVE: Sleeve is worked in the round, top down. Work 64-64-69-69-74-74 ch and form a ring with one sl st in first ch. Work 3 ch (= 1 tr), 1 tr in each of the next 6-6-3-3-0-0 ch, skip 1 ch, * work 1 tr in each of the next 7 ch, skip 1 st *, repeat from *-* the entire round = 56-56-60-60-64-64 tr. Remember CROCHET INFO! Then work in the round and according to A.3. On 3rd round in A.3 dec 8 tr evenly - READ DECREASE TIP. Repeat dec every time 3th round in diagram is worked 3 times in total = 32-32-36-36-40-40 tr. Work A.3 until piece measures 33-32-31-30-27-25 cm, finish after 2nd or 4th round in A.3. Work 40-40-40-48-48-48 tr in total around ch-spaces. Then work according to A.4 (5-5-5-6-6-6 repetitions in width, diagram shows 2 repetitions in width), work first round as follows: * Work 1 tr in each of the first 7 tr, 1 ch, skip 1 tr *, repeat from *-* 4-4-4-5-5-5 more times. NOTE: Sl sts at beg of A.4 are only worked at beg of round. Work A.4 1 time vertically. Work now 1 round with tr: 1 tr in each tr, 3 tr around each ch-space. Fasten off. Sleeve measures approx. 48-47-46-45-42-40 cm. Work another sleeve the same way. ASSEMBLY: Sew the shoulder seams. Sew side seams from markers in the side and down. Sew in sleeves. TWINED STRING: Cut 2 lengths of 3 metres each. Twine the strands tog until they resist, fold the string double so that it twines again. Make a knot at each end. Thread tie up and down around the neck. Cut 8 lengths of yarn of 20 cm. Thread the ends through the end of the tie and fold them double. Twine one of the strand around the top of tassel. Make another fringe in the other end of tie. |
||||||||||||||||||||||||||||||||||||||||||||||
Diagram explanations |
||||||||||||||||||||||||||||||||||||||||||||||
|
||||||||||||||||||||||||||||||||||||||||||||||
 |
||||||||||||||||||||||||||||||||||||||||||||||
 |
||||||||||||||||||||||||||||||||||||||||||||||
 |
||||||||||||||||||||||||||||||||||||||||||||||
 |
||||||||||||||||||||||||||||||||||||||||||||||
Have you finished this pattern?Tag your pictures with #dropspattern #janissweater or submit them to the #dropsfan gallery. Do you need help with this pattern?You'll find 16 tutorial videos, a Comments/Questions area and more by visiting the pattern on garnstudio.com. © 1982-2026 DROPS Design A/S. We reserve all rights. This document, including all its sub-sections, has copyrights. Read more about what you can do with our patterns at the bottom of each pattern on our site. |
||||||||||||||||||||||||||||||||||||||||||||||


With over 40 years in knitting and crochet design, DROPS Design offers one of the most extensive collections of free patterns on the internet - translated to 17 languages. As of today we count 324 catalogues and 12267 patterns translated into English (UK/cm). 12267
We work hard to bring you the best knitting and crochet have to offer, inspiration and advice as well as great quality yarns at incredible prices! Would you like to use our patterns for other than personal use? You can read what you are allowed to do in the Copyright text at the bottom of all our patterns. Happy crafting!
Post a comment to pattern DROPS 170-2
We would love to hear what you have to say about this pattern!
If you want to leave a question, please make sure you select the correct category in the form below, to speed up the answering process. Required fields are marked *.