
Popular categories
Looking for a yarn?


Comments / Questions (50)
![]() Arlete wrote:
Arlete wrote:
Gostaria de saber se tem alguma correção no gráfico das costas pois o mesmo não da certo de forma alguma.
10.10.2016 - 01:04DROPS Design answered:
Não existe qualquer correcção para este modelo. Deve tricotar todas as carreiras dos diagramas, após a 1.ª repetição (em que começa na carreira 13).
12.10.2016 - 19:23
![]() Victoire wrote:
Victoire wrote:
Merci pour votre réponse. Autre question qui me vient. Lorsque l'on tricote les points fantaisie, sur l'envers, faut-il tricoter les augmentations en mailles torses comme lors du début de l'ouvrage, ou avec des mailles envers classiques ?
25.07.2016 - 17:48DROPS Design answered:
Bonjour Victoire, les augmentations des épaules se tricotent torse (cf Augmentations 1), celles des côtés, après les emmanchures se tricotent à l'end (= cf Augmentations 2 - pour former des jours sur les côtés). Bon tricot!
26.07.2016 - 10:06
![]() Victoire wrote:
Victoire wrote:
Bonjour, Au début de l'ouvrage lorsqu'il faut mettre en attente l'épaule droite, faut-il ensuite prendre une autre pelote pour l'épaule gauche ? Ou laisser une certaine longueur de laine avant de monter l'épaule droite ? Je ne comprends pas très bien comment cela fonctionne.... Et autre question, "Tourner et tricoter comme avant", après avoir tricoté les 5 premiers rangs de l'épaule droite, cela signifie tricoter en mailles endroit ? ou envers ? Merci beaucoup d'avance.
25.07.2016 - 14:58DROPS Design answered:
Bonjour Victoire, après avoir tricoté l'épaule droite, coupez le fil. Tricotez l'épaule gauche, puis à la fin du rang indiqué sur l'endroit (tricotez les m comme avant = jersey et point mousse comme précédemment), montez les mailles de l'encolure et tricotez les m de l'épaule droite en attente. Bon tricot!
25.07.2016 - 15:14
![]() Silke Krause wrote:
Silke Krause wrote:
Ich stricke zur Zeit das Rückenteil bzw. den Armausschnitt und frage mich, ob die cm-Angabe richtig ist ( 13-12- etc.), im Vergleich zum Bild scheint mir der Ausschnitt zu klein? Kann das sein?
23.05.2016 - 23:02DROPS Design answered:
LIebe Silke, diese cm-Angaben (13-12-12-10-10-7 cm) bezeichnen nicht den gesamten Armausschnitt, sondern nur die Stelle, an der die Zunahme beginnt.
24.05.2016 - 07:52
![]() Anja wrote:
Anja wrote:
Fertig! Ein wunderschöner, leicht und schnell zu strickender Sommerpuli. Danke für die tolle Anleitung!
05.05.2016 - 13:29Elsa wrote:
Hello, for the back piece, when you say "work the X sts from right shoulder on to needle" do you mean just move them from some scrap yarn or wherever they might be kept or move them on the needle and at the same time knit them after the newly cast on neck stitches? Also at the same point in the pattern, do we work the neck stitches separately from the left and right shoulder pieces? Thank you
04.05.2016 - 23:06DROPS Design answered:
Dear Elsa, work first right shoulder and put aside, work then left shoulder separately, at the end of the last WS row on left shoulder, cast on the new sts for neck and work 1 row over the sts from right shoulder so that on next row, you have all sts from right shoulder, neck and left shoulder on the needle. Happy knitting!
06.05.2016 - 08:43
![]() Renee Feamster wrote:
Renee Feamster wrote:
Why does special note say, 'beg on row 13....? Following instructions indicate working from row 1.? Thank you
18.04.2016 - 00:30DROPS Design answered:
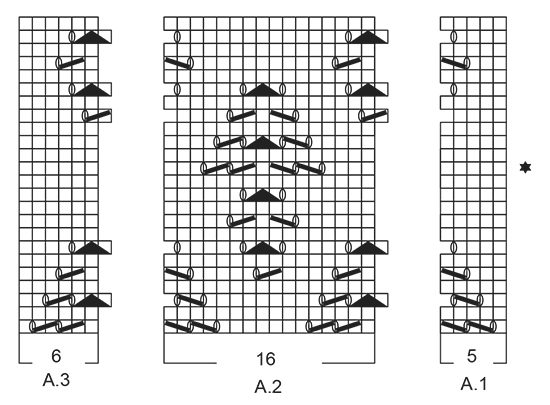
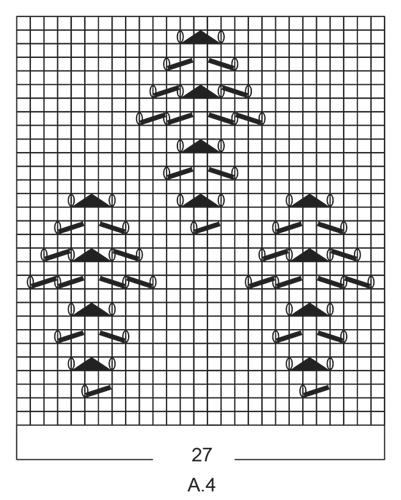
Dear Renee, when you work the left shoulder you have to start worknig the diagrams from the 13th row which is indicated by the star, not from 1st row. Follow the given instructions: Work 3 sts in garter st, 2-3-4-5-0-0 sts in stocking st, A.1 (= 5 sts), A.2 (= 16 sts) 3-3-3-3-4-4 times in width, A.3 (= 6 sts), 2-3-4-5-0-0 sts in stocking st, 3 sts in garter st, but start from the star. Happy knitting!
18.04.2016 - 10:33
![]() Renee Feamster wrote:
Renee Feamster wrote:
Why does special note say, 'beg on row 13....? Following instructions indicate working from row 1.? Thank you
18.04.2016 - 00:29DROPS Design answered:
Dear Renee, when you work the left shoulder you have to start worknig the diagrams from the 13th row which is indicated by the star, not from 1st row. Follow the given instructions: Work 3 sts in garter st, 2-3-4-5-0-0 sts in stocking st, A.1 (= 5 sts), A.2 (= 16 sts) 3-3-3-3-4-4 times in width, A.3 (= 6 sts), 2-3-4-5-0-0 sts in stocking st, 3 sts in garter st, but start from the star. Happy knitting!
18.04.2016 - 10:33
![]() Renee Feamster wrote:
Renee Feamster wrote:
Why does special note say, 'beg on row 13....? Following instructions indicate working from row 1.? Thank you
16.04.2016 - 18:31DROPS Design answered:
Dear Mrs Fearnster, on back piece, you start working A.1-A.3 with row marked with a star (= 13th row in diagrams) - 1st row pattern worked on back piece will be 13th row, after diagram has been worked to the end, start diagrams from 1st row and repeat diagrams in height. Happy knitting!
18.04.2016 - 10:30
![]() Delphine wrote:
Delphine wrote:
Bonjour, Pour le dos il faut commencer le motif par le 13ème rang des motifs A1, A2 et A3 ou seulement A1 et A3? Merci pour votre réponse.
12.04.2016 - 23:14DROPS Design answered:
Bonjour Delphine, on tricote 1 fois A.1, 3-4 fois A.2 (cf taille) et 1 fois A.3 à partir du 13ème rang (depuis l'étoile). Bon tricot!
13.04.2016 - 09:00
|
|||||||||||||||||||
Woodstock#woodstocktop |
|||||||||||||||||||
 |
 |
||||||||||||||||||
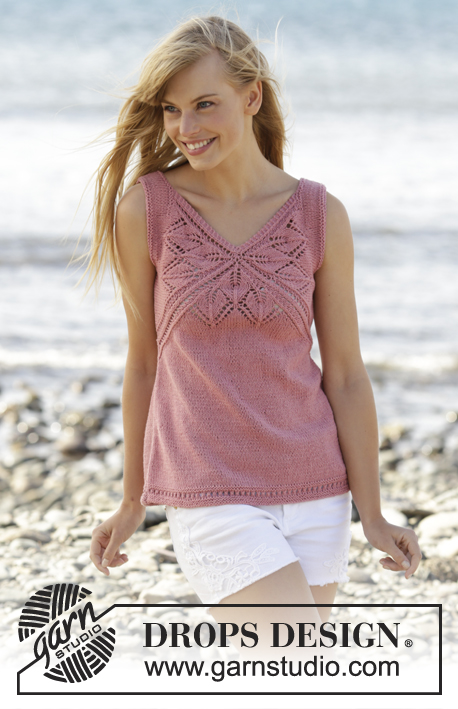
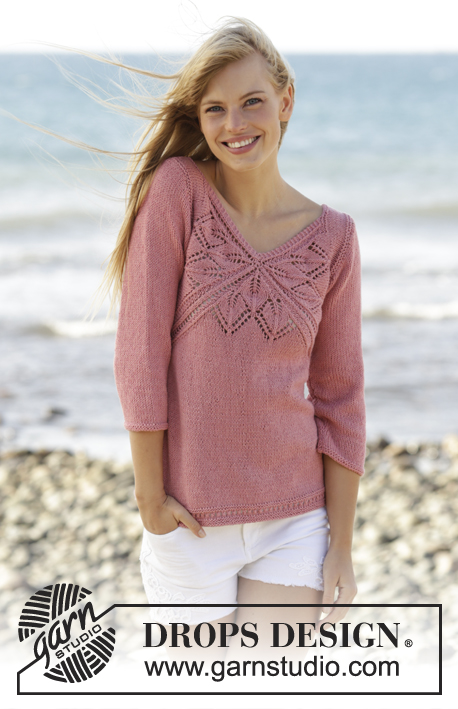
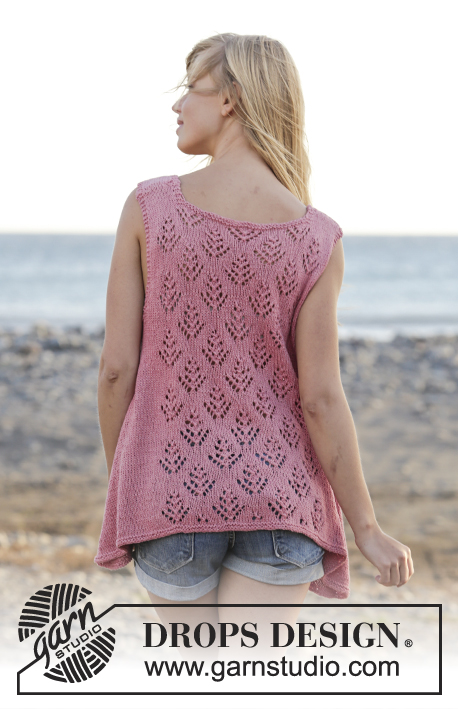
Knitted DROPS top with lace pattern and A-shape, worked top down in ”Belle”. Size: S - XXXL.
DROPS 167-6 |
|||||||||||||||||||
|
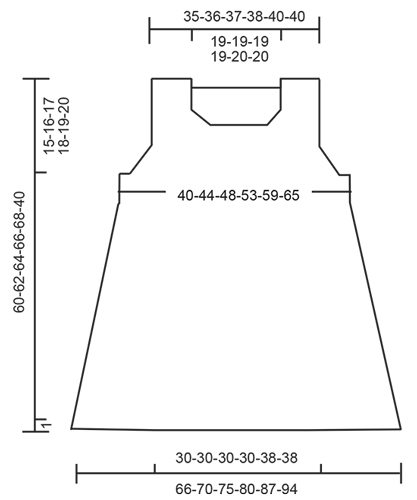
GARTER ST (worked in the round): 1 ridge = 2 rounds. * K 1 round and P 1 round *, repeat from *-*. GARTER ST (back and forth): K all rows. 1 ridge = 2 rows K. PATTERN: See diagrams A.1 to A.4. The diagrams show all rounds/rows in pattern seen from RS. INCREASE TIP 1: All inc are done from RS. Inc 1 st by making a YO. On next row P YO twisted (i.e. work in back loop of YO instead of front) to avoid holes. NOTE: Work the new sts in stocking st. INCREASE TIP 2: Work until 1 st remains before marker in the side, 1 YO, 2 sts in stocking st, 1 YO. Repeat in the other side. On next round K the YOs. They should make holes. ---------------------------------------------------------- TOP: The piece is worked top down. Work first front and back piece separately, back and forth down to armholes, then work in the round. BACK PIECE: Work right shoulder as follows: Cast on 16-17-17-18-20-20 sts on circular needle size 4.5 mm with Belle. Work as follows (1st row = from RS): 3 sts in GARTER ST - see explanation above (= towards the neck), work 10-11-11-12-14-14 sts in stocking st, 3 sts in garter st (= towards armhole). Continue like this until 4 rows in stocking st have been work inside the 3 sts in garter st in each side. On next row inc 1 st inside the 3 sts in garter st towards the neck - READ INCREASE TIP 1 = 17-18-18-19-21-21 sts. Work 1 row from WS and put piece aside. Work left shoulder as follows: Cast on and work as right shoulder but reversed. I.e. inc 1 st before the 3 sts in garter st towards the neck on 5th row in stocking st. Work 1 row from WS. Turn and work as before over all sts. At the end of row cast on 35-35-37-37-39-39 new sts for neck and then work the 17-18-18-19-21-21 sts from right shoulder on to needle = 69-71-73-75-81-81 sts. Work the new sts cast on for neck in garter st. When 2 ridges have been worked over these sts, continue with 2 rows in stocking st inside the 3 sts in garter st in each side. REMEMBER THE KNITTING TENSION Now work pattern as follows on next row from RS (NOTE: Beg on 13th row in A.1- A.3, see star in diagram): Work 3 sts in garter st, 2-3-4-5-0-0 sts in stocking st, A.1 (= 5 sts), A.2 (= 16 sts) 3-3-3-3-4-4 times in width, A.3 (= 6 sts), 2-3-4-5-0-0 sts in stocking st, 3 sts in garter st. Repeat A.1-A.3 vertically until finished measurements. When piece measures 13-12-12-10-10-7 cm from cast-on edge, inc 1 st inside the 3 sts in garter st in each side for armhole. Repeat inc on every row from RS 2-4-6-9-11-16 more times = 75-81-87-95-105-115 sts. Work 1 row from WS after last inc and put piece aside. FRONT PIECE: Work right shoulder as follows: Cast on 16-17-17-18-20-20 sts on circular needle size 4.5 mm with Belle. Work as follows (1st row = from RS): 3 sts in garter st (= towards armhole), work 10-11-11-12-14-14 sts in stocking st, 3 sts in garter st (= towards the neck). READ ALL OF THE FOLLOWING SECTION BEFORE CONTINUING! Continue like this, AT THE SAME TIME when piece measures 7-8-7-8-8-9 cm, inc for neck and when piece measures 13-12-12-10-10-7 cm inc for armholes the same way as on back piece. NOTE: In size XXXL beg inc for armholes before inc for neck. INCREASE NECK: Inc 1 st inside the 3 sts in garter st towards the neck. Repeat inc on every row from RS 4-4-5-5-6-6 more times = 5-5-6-6-7-7 sts inc for neck. When all inc are done, work 1 row from WS. Put piece aside. Work left shoulder as follows: Cast on and work as right shoulder but reversed. I.e. inc 1 st before the 3 sts in garter st towards the neck. When all inc for neck are done, work 1 row from WS. Turn and work as before over all sts. At the end of row cast on 27 new sts in all sizes for neck, then work all sts from right shoulder on to needle. Continue back and forth like this (continue inc for armholes) until 2 ridges have been worked over the new sts for neck. On next row from RS work pattern A.4 (= 27 sts) over the middle 27 sts on needle. NOTE: Work A.4 1 time vertically but the repetition will not be finished vertically before front and back pieces are put tog and you are working in the round on body. When all inc for armholes are done, there are 75-81-87-95-105-115 sts on needle. After last inc work 1 row from WS. Turn and work over all sts on front piece, cast on 4-6-8-10-12-14 new sts for armhole, insert a marker in the middle of these new sts (= 2-3-4-5-6-7 sts on each side of marker), work 75-81-87-95-105-115 sts from back piece on to same circular needle and cast on 4-6-8-10-12-14 new sts for armhole, insert a marker in the middle of these new sts (= 2-3-4-5-6-7 sts on each side of marker) = 158-174-190-210-234-258 sts on round. Beg of round is after the last 4-6-8-10-12-14 new sts cast on. BODY: Then work in the round on circular needle. NOW MEASURE THE PIECE FROM HERE. Now continue with pattern as follows: Work 3 sts in garter st, continue in stocking st with pattern as before over the next 69-75-81-89-99-109 sts - NOTE: Continue pattern A.4 until entire repetition has been worked 1 time vertically, then work in stocking st over all sts on front piece, 10-12-14-16-18-20 sts in garter st, stocking st over the next 5-8-11-15-12-17 sts, continue pattern A.1-A.3 as before over the next 59-59-59-59-75-75 sts, 5-8-11-15-12-17 sts in stocking st, 7-9-11-13-15-17 sts in garter st. When 2 ridges have been worked over the new sts for armholes, continue these sts in stocking st until finished measurements. When piece measures 4 cm, inc 2 st in each side of piece - READ INCREASE TIP 2! Repeat inc every 4th round until finished measurements. When piece measures 44-45-46-47-48-49 cm – adjust to finish after 10th or 20th round in A.1-A.3 - work 1 round in stocking st. There are now approx. 262-278-298-318-346-374 sts on round depending on where the pattern is finished. Then work 2 ridges. Cast off. ASSEMBLY: Sew the shoulder seams tog. Make sure that to avoid a tight seam. |
|||||||||||||||||||
Diagram explanations |
|||||||||||||||||||
|
|||||||||||||||||||
 |
|||||||||||||||||||
 |
|||||||||||||||||||
 |
|||||||||||||||||||
Have you finished this pattern?Tag your pictures with #dropspattern #woodstocktop or submit them to the #dropsfan gallery. Do you need help with this pattern?You'll find 22 tutorial videos, a Comments/Questions area and more by visiting the pattern on garnstudio.com. © 1982-2026 DROPS Design A/S. We reserve all rights. This document, including all its sub-sections, has copyrights. Read more about what you can do with our patterns at the bottom of each pattern on our site. |
|||||||||||||||||||


With over 40 years in knitting and crochet design, DROPS Design offers one of the most extensive collections of free patterns on the internet - translated to 17 languages. As of today we count 324 catalogues and 12245 patterns translated into English (UK/cm). 12245
We work hard to bring you the best knitting and crochet have to offer, inspiration and advice as well as great quality yarns at incredible prices! Would you like to use our patterns for other than personal use? You can read what you are allowed to do in the Copyright text at the bottom of all our patterns. Happy crafting!
Post a comment to pattern DROPS 167-6
We would love to hear what you have to say about this pattern!
If you want to leave a question, please make sure you select the correct category in the form below, to speed up the answering process. Required fields are marked *.