
Popular categories
Looking for a yarn?


Comments / Questions (57)
![]() Elaine Morris wrote:
Elaine Morris wrote:
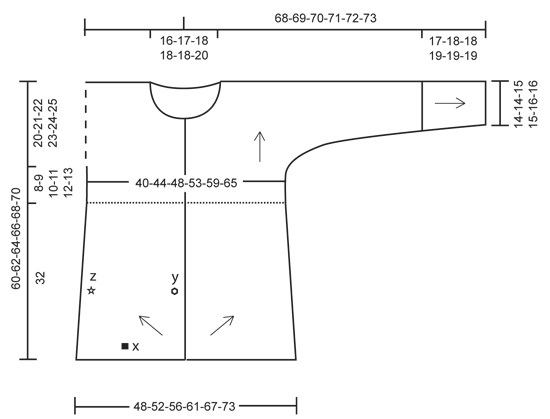
How do you know when there have been enough increases to Y and X?
05.01.2015 - 18:30DROPS Design answered:
Dear Mrs Morris, inc mid back (towards Y) until piece measures 32 cm (measured along Y) - Repeat inc in bottom edge (towards X) until piece measures 24-26-28-30½-33½-36½ cm (measured along x) - in 2 larger sizes, inc mid back (towards Y) are finished before all inc are done towards bottom edge (towards X). Then decrease towards the side (= Z) and dec on mid back (towards Y) when all inc towards mid back are done. Happy knitting!
06.01.2015 - 09:14
![]() Elaine Morris wrote:
Elaine Morris wrote:
Can anybody explain this pattern to me please? I don't understand the increase/decrease instructions of the back pieces that are seamed. Does anyone know if there is a video of how to do this?
04.01.2015 - 22:07DROPS Design answered:
Dear Mrs Morris, for each back piece you have to inc at the beg of each row from RS (towards "Y" in chart), and at the beg of every row from WS (towards "X" in chart). When all inc towards X are done, start to inc on the side (towards "Z" = side seam) to shape the jacket. Happy knitting!
05.01.2015 - 09:32
![]() Yvonne wrote:
Yvonne wrote:
Hoe kan ik het patroon aanpassen zodat ik het met gewone breinaalden kan maken? Met een rondbreinaald heb ik nog nooit gewerkt.
17.10.2014 - 17:17DROPS Design answered:
Het vest kan op rechte naalden gebreid worden, maar u hebt dan zeer veel steken op de naalden staan. Kijk anders bij 'tips en hulp' voor onze instructievideo's voor breien op rondbreinaalden.
17.10.2014 - 23:03
![]() Lena wrote:
Lena wrote:
Die Maschenprobe ist hier: 24 M. x 48 R. kraus rechts
10.08.2014 - 13:28
![]() Michaela wrote:
Michaela wrote:
Hallo, die Maschenprobe ist immer 10 x 10 cm groß, das steht auch so im oberen Teil der Anleitung. LG Michaela
10.08.2014 - 00:34
![]() B. Hall wrote:
B. Hall wrote:
Das Modell gefaellt mir sehr gut, aber ich wuesste gerne die groesse der Maschenprobe, da ich handgesponnenes garn dafuer verwenden will. Mit herzlichem Dank und freundlichem Gruss, B. Hall
07.08.2014 - 16:37DROPS Design answered:
Sie finden die Maschenprobe bei uns immer oben im Kopf neben dem Foto.
11.08.2014 - 09:45
![]() Betina wrote:
Betina wrote:
Ich warte sehnsüchtig auf die Anleitung
07.07.2014 - 20:47
![]() Betina wrote:
Betina wrote:
Ich warte sehnsüchtig auf die Anleitung
07.07.2014 - 20:43
![]() Beate wrote:
Beate wrote:
Eine sehr schöne Jacke,freu mich schon auf die Anleitung!
05.07.2014 - 22:31
![]() Sissel Andresen wrote:
Sissel Andresen wrote:
Varm og elegant! Passer i by og ved sjøen.
01.07.2014 - 18:49
|
||||||||||||||||
Clear Water#clearwatercardigan |
||||||||||||||||
 |
 |
|||||||||||||||
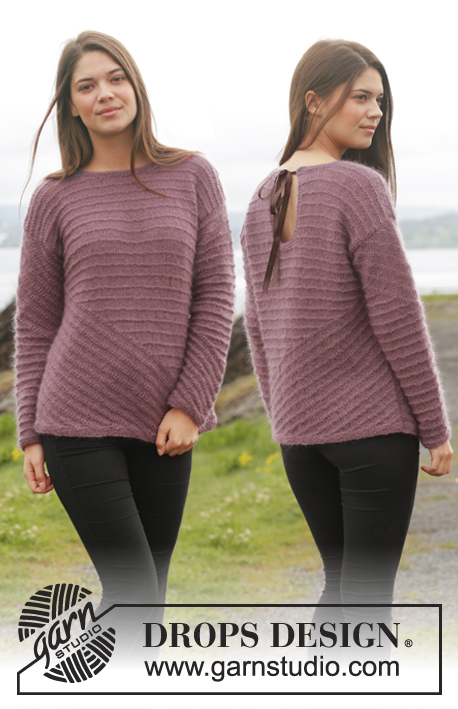
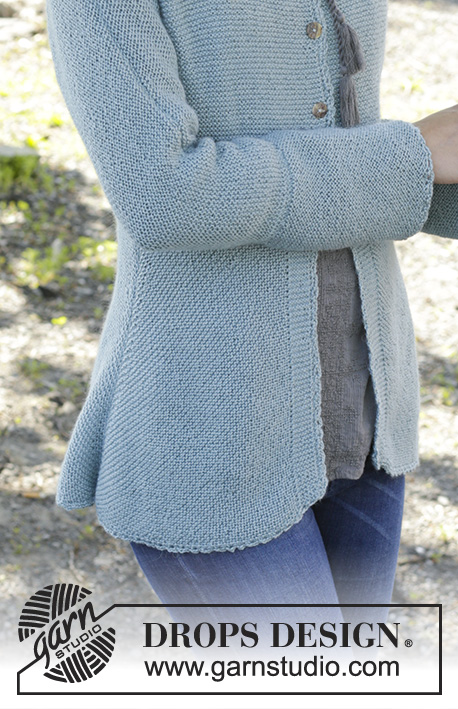
Knitted DROPS jacket in garter st in ”BabyAlpaca Silk”. Size: S - XXXL.
DROPS 156-43 |
||||||||||||||||
|
GARTER ST (back and forth on needle): K all rows. 1 ridge = 2 rows K. DECREASE TIP: Dec 1 st as follows: K 2 tog. BUTTONHOLES: Cast off for buttonholes on right band. 1 buttonhole = cast off fourth st from mid front and cast on 1 new st on next row over this st. Cast off for button holes when piece measures (measured from edge with picked up sts): SIZE S: 1, 6, 10 and 15 cm SIZE M: 1, 6, 11 and 17 cm SIZE L: 1, 6, 11 and 17 cm SIZE XL: 1, 5, 10, 14 and 20 cm SIZE XXL: 1, 5, 10, 14 and 19 cm SIZE XXXL: 1, 6, 11, 16 and 21 cm ---------------------------------------------------------- JACKET: The jacket is worked in parts in different directions. Arrows on chart show the knitting direction. Work entire jacket in GARTER ST - see explanation above, back and forth on circular needle to make room for all the sts. BACK PIECE: The back piece is worked in 2 parts that are sewn tog mid back. Then work yoke from here. LEFT BACK PIECE: Cast on 3 sts on circular needle size 3 mm with BabyAlpaca Silk. READ ALL OF THE FOLLOWING SECTION BEFORE CONTINUING! INC ON EVERY ROW IN EACH SIDE OF PIECE WHILE DEC. INCREASE: Inc 1 st at beg of every row from RS (= y – see chart) and at beg of every row from WS (= x) by working 2 sts in first st. Repeat inc mid back (= y) until piece measures 32 cm in all sizes (measured along y). Repeat inc in bottom edge (= x) until piece measures 24-26-28-30½-33½-36½ cm measured along x. NOTE! In size XXL and XXXL inc mid back (= y) are finished before all inc in bottom edge are done (= x). REMEMBER THE KNITTING TENSION! DECREASE IN THE SIDE: When inc in bottom edge (= x) is done, dec in the side (= z) as follows: Dec 1 st – READ DECREASE TIP - at beg of every row from WS. Repeat dec on every row from WS until finished measurements. AT THE SAME TIME when piece measures 3 cm along z - dec 1 st at beg of next row from WS inside 4 sts (after dec). Repeat dec every 2½ cm a total of 10 times. DECREASE MID BACK: When inc mid back (= y) is done, dec 1 st at beg of next row from RS. Repeat dec at beg of every row from RS until 3 sts remain. Cast off. RIGHT BACK PIECE: Work as left back piece but reversed. I.e. all dec/inc explained at beg of row from RS are now done at beg of row from WS and vice versa. ASSEMBLY BACK PIECE: Sew tog left and right back piece mid back in outer loops of edge sts. YOKE AT THE BACK: The piece is worked back and forth in garter st until finished measurements. Pick up (from RS) 1 st in every ridge on back piece - see dotted line on chart (same as on front piece). On next row adjust no of sts to 96-106-116-128-142-156. Cast on 1 st at the end of the next 2 rows (= edge st) = 98-108-118-130-144-158 sts. Continue to work until piece measures 8-9-10-11-12-13 cm from where sts were picked up. Cast on 10-10-10-7-7-7 new sts in each side for sleeve. Then cast on in each side on every other row: 4-3-3-3-2-2 sts 12-15-15-17-17-19 times and 15-15-11-3-14-5 sts 1 time = 244-248-250-252-254-258 sts. When piece measures 26-28-30-32-34-36 cm from where sts were picked up, cast off the middle 36-38-40-40-42-46 sts for neck. Finish each shoulder separately. On next row, cast off 1 st towards the neck = 103-104-104-105-105-105 sts on each shoulder/sleeve. Continue to work until piece measures 28-30-32-34-36-38 cm from where sts were picked up - sleeve opening measures approx. 14-14-15-15-16-16 cm - loosely cast off. LEFT FRONT PIECE: Work front piece diagonally (as right back piece + band), then work the yoke, i.e. work as follows: Cast on 10-10-10-10-11-11 sts (= 3 sts + 7-7-7-7-8-8 band sts) on circular needle size 3 with BabyAlpaca Silk. Work as RIGHT BACK PIECE, but work the last 7-7-7-7-8-8 sts from WS without inc (= band). NOTE! When dec from RS beg, cast off these 7-7-7-7-8-8 band sts. YOKE (LEFT FRONT PIECE): Worked back and forth in garter st. Pick up (from RS) 1 st in every ridge and 1 st in every band st in waist – see dotted line on chart. On next row adjust no of sts to 55-61-65-71-79-86. On next row cast on 1 new st in the side (= edge st) = 56-62-66-72-80-87 sts. Continue to work until piece measures 8-9-10-11-12-13 cm from where sts were picked up. Cast on 10-10-10-7-7-7 new sts for sleeve at the end of next row from WS for sleeve. Then cast on in the side on every other row: 4-3-3-3-2-2 sts 12-15-15-17-17-19 times and 15-15-11-3-14-5 sts 1 time = 129-132-132-133-135-137 sts. Continue to work until piece measures 16-18-18-20-20-22 cm. Now cast off 18-18-18-18-20-22 sts towards mid front for neck. Then cast off on every other row towards the neck 2 sts 4-5-5-5-5-5 times = 103-104-104-105-105-105 sts remain on row for shoulder/sleeve. Work until piece measures 28-30-32-34-36-38 cm from where sts were picked up, adjust according to back piece. Loosely cast off. RIGHT FRONT PIECE: Work front piece diagonally (same as left back piece + band), then work the yoke, i.e. work as follows: Cast on 10-10-10-10-11-11 sts (= 3 sts + 7-7-7-7-8-8 band sts) on circular needle size 3 mm with BabyAlpaca Silk. Work as LEFT BACK PIECE - AT THE SAME TIME work the first 7-7-7-7-8-8 sts from RS without inc (= band). YOKE (RIGHT FRONT PIECE): Work as LEFT YOKE but reversed - i.e. cast on sts for sleeve at the end of row from RS. Remember BUTTONHOLES - see explanation above. ASSEMBLY: Sew shoulder/overarm seams edge to edge to avoid a chunky seam. NECK EDGE: Pick up (from RS) approx. 100 to 140 sts on circular needle size 3 mm with BabyAlpaca Silk. Work 3 ridges in garter st back and forth. Loosely cast off. CUFFS: Pick up 1 st in every ridge at the bottom of sleeve. On next row adjust no of sts to 68-68-72-72-78-78. Then work back and forth over all sts. When cuff measures 17-18-18-19-19-19 cm (or desired length), loosely cast off. ASSEMBLY: Sew side seam, underarm seam and cuff seam in one inside 1 edge st. Sew on the buttons approx. 1 cm from edge on left front piece. CROCHET EDGE: Beg by working mid back of neck on crochet hook size 3.5 mm with BabyAlpaca Silk. Work 1 dc, * 3 ch, skip approx. 1 cm, 1 dc *, repeat from *-* around the neck, down along front piece, around the entire bottom edge and up and around to the back of neck again. Finish with 1 sl st in dc from beg of round. Work the same way around the cuffs at the bottom of both sleeves. |
||||||||||||||||
Diagram explanations |
||||||||||||||||
|
||||||||||||||||
 |
||||||||||||||||
Have you finished this pattern?Tag your pictures with #dropspattern #clearwatercardigan or submit them to the #dropsfan gallery. Do you need help with this pattern?You'll find 18 tutorial videos, a Comments/Questions area and more by visiting the pattern on garnstudio.com. © 1982-2026 DROPS Design A/S. We reserve all rights. This document, including all its sub-sections, has copyrights. Read more about what you can do with our patterns at the bottom of each pattern on our site. |
||||||||||||||||


With over 40 years in knitting and crochet design, DROPS Design offers one of the most extensive collections of free patterns on the internet - translated to 17 languages. As of today we count 324 catalogues and 12267 patterns translated into English (UK/cm). 12267
We work hard to bring you the best knitting and crochet have to offer, inspiration and advice as well as great quality yarns at incredible prices! Would you like to use our patterns for other than personal use? You can read what you are allowed to do in the Copyright text at the bottom of all our patterns. Happy crafting!
Post a comment to pattern DROPS 156-43
We would love to hear what you have to say about this pattern!
If you want to leave a question, please make sure you select the correct category in the form below, to speed up the answering process. Required fields are marked *.