
Popular categories
Looking for a yarn?


Comments / Questions (57)
Gyde wrote:
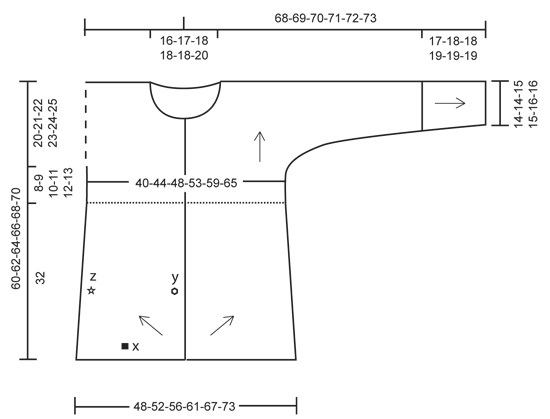
Hallo. Ich habe ein Problem. Ich bin beim linken Rückenlehne. Achse y soll 32 cm sein. Danach die Achse x 36 1/2 cm. Wenn Achse x fertig ist, kommt die Seite z dran. Hier sollen wir abnehmen. Es soll doch bestimmt ein Rechteck entstehen. Was ist mit der Achse y? Muss man hier nicht nach den 32 cm weiter zunehmen? Sonst gibt es doch kein Rechteck. Danke und liebe Grüße. Gyde
17.05.2017 - 22:32DROPS Design answered:
Liebe Gyde,Wenn die Zunahmen an der hinteren Mitte (= y) fertig sind, am Anfang der nächsten Hin-R 1 M abnehmen. Diese Abnahme am Anfang jeder Hin-R arbeiten, bis noch 3 M auf der Nadel sind. Abketten - siehe ABNAHMEN HINTERE MITTE. Viel Spaß beim stricken!
18.05.2017 - 09:08
![]() Silvia wrote:
Silvia wrote:
Hallo, Gerne würde ich diese Jacke stricken und ich versuche gerade die Anleitung zu verstehen. Was ist bitte eine Passe? Wozu wird sie benötigt? Danke für eine kurze Information. Herzliche Grüße,Silvia
24.02.2017 - 16:18DROPS Design answered:
Liebe Silvia, nach dem Sie das untere Teil (quer) gestrickt haben, dann nehmen Sie Maschen auf, so dass Sie das obere Teil (vom gepunkten Linie bis Schulter). Viel Spaß beim stricken!
24.02.2017 - 17:10
![]() Mechtild Gabriel wrote:
Mechtild Gabriel wrote:
Guten Abend, danke für die Auflösung meines Rätsels. Das Wort "zusätzlich" statt "gleichzeitig" hat mir sofort die Augen geöffnet. Ich habe diese tolle Jacke vor 1/2 Jahr schon einmal in altrosa gestrickt ohne die 10 Abnahmen. Sie ist mit 12 gleichfarbigen Knöpfen wunderschön geworden. Ein Rückenteil ist jetzt fertig. Dank "drops" und "lanade" ist Stricken zu meinem bezahlbaren Vergnügen geworden. Die Modelle erregen überall Aufmerksamkeit. Danke und gute Nacht Mechtildt
30.06.2016 - 22:44
![]() Mechtild Gabriel wrote:
Mechtild Gabriel wrote:
Ich verstehe den Satz "Diese Abnahme am Anfang jeder Rückreihe bis zum fertigen Maß arbeiten.GLEICHZEITIG bei einer Gesamtlänge von 3 cm (gemessen entlang x) 1 M abnehmen. Diese Abnahme alle 2 1/2 cm insgesamt 10 x arbeiten . Wie und wann soll wieviel abgenommen werden. Danke Mechtild Gabriel
29.06.2016 - 21:31DROPS Design answered:
Liebe Mechtild, der linke Rand Ihres Strickstücks (von vorne betrachtet) war ja zunächst die Unterkante x und wird dann zum Seitenrand z. Dort werden die beschriebenen Abnahmen gemacht und zwar je 1 M in jeder Rück-R und zusätzlich nach 3 cm noch folgende Abnahmen, wiederum in der Rück-R: 4 M nach der Abnahme am Reihenanfang nochmals 1 M abn (und alle 2½ cm noch 9 x wdh, also ingesamt 10 x)
30.06.2016 - 13:20
![]() Marie wrote:
Marie wrote:
Bonsoir, vraiment je ne comprends rien à vos explications! Je commence avec 3 points et après??? je commence avec quoi?? Bonne soirée,Marie
23.05.2016 - 20:55DROPS Design answered:
Bonjour Marie et désolée, pour reprendre dès le début: vous montez 3 m, et augmentez 1 m côté y (= début de rang sur l'end) + 1 m côté x (= début de rang sur l'env). Répétez les augm. côté Y jusqu'à 32 cm, mais en même temps à 3 cm le long de ce côté, diminuez côté z (début de rang sur l'env). Répétez les augm. côté X (cf taille) puis diminuez 1 m côté x (= début de rang sur l'env) tous les 2 rangs (= tous les rangs sur l'env). Quand les augm. côté y sont faites, diminuez 1 m au début de chaque rang sur l'end jusqu'à ce qu'il reste 3 m. Bon tricot!
24.05.2016 - 08:33
![]() Marie wrote:
Marie wrote:
Bonjour,je viens de commencer le modèle Clear Water,je ne comprends pas les explications demi-dos gauche???Dois je faire les diminutions à droite et à gauche en même temps,donc coté endroit un jeté et coté envers le rang d'après 2mailles dans le première maille ?Donc une augmentation tous les rangs. merci de m'éclairer.
23.05.2016 - 13:35DROPS Design answered:
Bonjour Marie, quand les augmentations à gauche (= côté x) sont terminées, diminuez 1 m en début de rang sur l'envers (côté gauche vu sur l'endroit), et, quand l'ouvrage mesure 3 cm côté Z (= à droite vu sur l'endroit), diminuez 1 m à 4 m du bord sur l'envers (= à gauche, vu sur l'endroit) (en plus de la diminution = 2 dim sur ce rang). Les augmentations côté Y se font tous les 2 rangs (tous les rangs sur l'endroit) jusqu'à ce que l'ouvrage mesure 32 cm le long de ce côté. Bon tricot!
23.05.2016 - 14:13
![]() France Lamothe wrote:
France Lamothe wrote:
Bonjour, Auriez-vous les mesures pour les différentes tailles pour le modèle Clear Water?
13.04.2016 - 22:03DROPS Design answered:
Bonjour Mme Lamothe, vous trouverez à la fin des explications le schéma avec toutes les mesures pour chaque taille, comparez-les à un vêtement similaire que vous avez et dont vous aimez la taille pour trouver la taille adéquate. Voir aussi ici. Bon tricot!
14.04.2016 - 08:54
![]() Florence wrote:
Florence wrote:
Bonjour J'aurais besoin de précisions concernant le devant gauche. Je ne comprends pas comment tricoter l'empiecement. Si vous pouviez m'apporter des précisions vousnm'aideriez beaucoup! Merci!
16.11.2015 - 18:21DROPS Design answered:
Bonjour Florence, pour l'empiècement du devant gauche: on relève les m le long de la partie du bas, puis on tricote 1 rang sur l'env en ajustant le nbe de m. On monte ensuite 1 m sur le côté (= côté couture dos = à droite sur l'end) pour la lis. On tricote "droit" pendant quelques cm puis on monte les mailles de la manche en fin de rang sur l'envers. On rabat les mailles de l'encolure en début de rang sur l'envers et on rabat les mailles de l'épaule. Bon tricot!
17.11.2015 - 08:44
![]() Silvia wrote:
Silvia wrote:
The manual has a crucial mistake: The lower parts of the jacket are knitted diagonally, the front parts include a border . That does not fit! >> When I knit up 10 cm = 48 R, measured diagonally, vertical edge is longer by a factor of √2 (= 1.414 …), that’s 14.1 cm. To keep from contracting use a steam iron, to force the border to the desired length . Better knit the border separately!
18.08.2015 - 22:57DROPS Design answered:
Dear Silvia, when working front piece, you inc towards band until piece measures 32 cm, but inc towards x until piece measures 24-36.5 cm then when all inc towards x are done, start to dec towards z to get correct shape. Happy knitting!
19.08.2015 - 09:51
![]() Silvia wrote:
Silvia wrote:
Die Anleitung hat einen entscheidenden Fehler: Die unteren Teile der Jacke werden diagonal gestrickt, vorn wird die Blende gleich mitgestrickt. Das passt aber nicht! >>Wenn ich 10 cm = 48 R hoch stricke (spätere Diagonale), wird die vordere (später senkrechte) Kante um √2 (=1,414…) länger, also 14,1 cm lang. Man muss die Blende also mit dem Dampfbügeleisen in die gewünschte Länge zwingen. Besser strickt man die Blende nachträglich an.
18.08.2015 - 22:48
|
||||||||||||||||
Clear Water#clearwatercardigan |
||||||||||||||||
 |
 |
|||||||||||||||
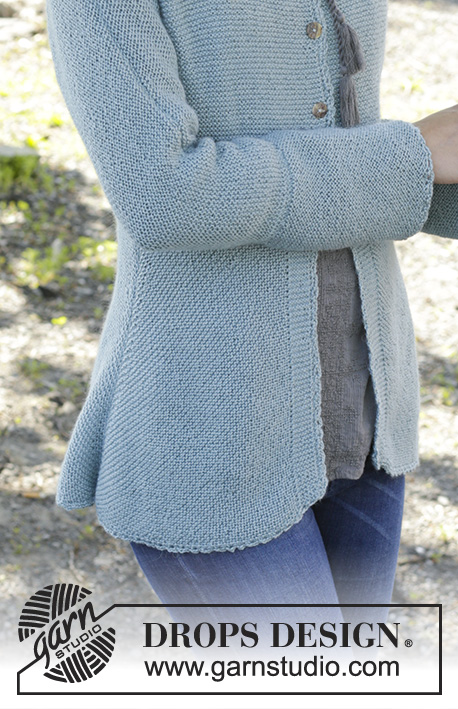
Knitted DROPS jacket in garter st in ”BabyAlpaca Silk”. Size: S - XXXL.
DROPS 156-43 |
||||||||||||||||
|
GARTER ST (back and forth on needle): K all rows. 1 ridge = 2 rows K. DECREASE TIP: Dec 1 st as follows: K 2 tog. BUTTONHOLES: Cast off for buttonholes on right band. 1 buttonhole = cast off fourth st from mid front and cast on 1 new st on next row over this st. Cast off for button holes when piece measures (measured from edge with picked up sts): SIZE S: 1, 6, 10 and 15 cm SIZE M: 1, 6, 11 and 17 cm SIZE L: 1, 6, 11 and 17 cm SIZE XL: 1, 5, 10, 14 and 20 cm SIZE XXL: 1, 5, 10, 14 and 19 cm SIZE XXXL: 1, 6, 11, 16 and 21 cm ---------------------------------------------------------- JACKET: The jacket is worked in parts in different directions. Arrows on chart show the knitting direction. Work entire jacket in GARTER ST - see explanation above, back and forth on circular needle to make room for all the sts. BACK PIECE: The back piece is worked in 2 parts that are sewn tog mid back. Then work yoke from here. LEFT BACK PIECE: Cast on 3 sts on circular needle size 3 mm with BabyAlpaca Silk. READ ALL OF THE FOLLOWING SECTION BEFORE CONTINUING! INC ON EVERY ROW IN EACH SIDE OF PIECE WHILE DEC. INCREASE: Inc 1 st at beg of every row from RS (= y – see chart) and at beg of every row from WS (= x) by working 2 sts in first st. Repeat inc mid back (= y) until piece measures 32 cm in all sizes (measured along y). Repeat inc in bottom edge (= x) until piece measures 24-26-28-30½-33½-36½ cm measured along x. NOTE! In size XXL and XXXL inc mid back (= y) are finished before all inc in bottom edge are done (= x). REMEMBER THE KNITTING TENSION! DECREASE IN THE SIDE: When inc in bottom edge (= x) is done, dec in the side (= z) as follows: Dec 1 st – READ DECREASE TIP - at beg of every row from WS. Repeat dec on every row from WS until finished measurements. AT THE SAME TIME when piece measures 3 cm along z - dec 1 st at beg of next row from WS inside 4 sts (after dec). Repeat dec every 2½ cm a total of 10 times. DECREASE MID BACK: When inc mid back (= y) is done, dec 1 st at beg of next row from RS. Repeat dec at beg of every row from RS until 3 sts remain. Cast off. RIGHT BACK PIECE: Work as left back piece but reversed. I.e. all dec/inc explained at beg of row from RS are now done at beg of row from WS and vice versa. ASSEMBLY BACK PIECE: Sew tog left and right back piece mid back in outer loops of edge sts. YOKE AT THE BACK: The piece is worked back and forth in garter st until finished measurements. Pick up (from RS) 1 st in every ridge on back piece - see dotted line on chart (same as on front piece). On next row adjust no of sts to 96-106-116-128-142-156. Cast on 1 st at the end of the next 2 rows (= edge st) = 98-108-118-130-144-158 sts. Continue to work until piece measures 8-9-10-11-12-13 cm from where sts were picked up. Cast on 10-10-10-7-7-7 new sts in each side for sleeve. Then cast on in each side on every other row: 4-3-3-3-2-2 sts 12-15-15-17-17-19 times and 15-15-11-3-14-5 sts 1 time = 244-248-250-252-254-258 sts. When piece measures 26-28-30-32-34-36 cm from where sts were picked up, cast off the middle 36-38-40-40-42-46 sts for neck. Finish each shoulder separately. On next row, cast off 1 st towards the neck = 103-104-104-105-105-105 sts on each shoulder/sleeve. Continue to work until piece measures 28-30-32-34-36-38 cm from where sts were picked up - sleeve opening measures approx. 14-14-15-15-16-16 cm - loosely cast off. LEFT FRONT PIECE: Work front piece diagonally (as right back piece + band), then work the yoke, i.e. work as follows: Cast on 10-10-10-10-11-11 sts (= 3 sts + 7-7-7-7-8-8 band sts) on circular needle size 3 with BabyAlpaca Silk. Work as RIGHT BACK PIECE, but work the last 7-7-7-7-8-8 sts from WS without inc (= band). NOTE! When dec from RS beg, cast off these 7-7-7-7-8-8 band sts. YOKE (LEFT FRONT PIECE): Worked back and forth in garter st. Pick up (from RS) 1 st in every ridge and 1 st in every band st in waist – see dotted line on chart. On next row adjust no of sts to 55-61-65-71-79-86. On next row cast on 1 new st in the side (= edge st) = 56-62-66-72-80-87 sts. Continue to work until piece measures 8-9-10-11-12-13 cm from where sts were picked up. Cast on 10-10-10-7-7-7 new sts for sleeve at the end of next row from WS for sleeve. Then cast on in the side on every other row: 4-3-3-3-2-2 sts 12-15-15-17-17-19 times and 15-15-11-3-14-5 sts 1 time = 129-132-132-133-135-137 sts. Continue to work until piece measures 16-18-18-20-20-22 cm. Now cast off 18-18-18-18-20-22 sts towards mid front for neck. Then cast off on every other row towards the neck 2 sts 4-5-5-5-5-5 times = 103-104-104-105-105-105 sts remain on row for shoulder/sleeve. Work until piece measures 28-30-32-34-36-38 cm from where sts were picked up, adjust according to back piece. Loosely cast off. RIGHT FRONT PIECE: Work front piece diagonally (same as left back piece + band), then work the yoke, i.e. work as follows: Cast on 10-10-10-10-11-11 sts (= 3 sts + 7-7-7-7-8-8 band sts) on circular needle size 3 mm with BabyAlpaca Silk. Work as LEFT BACK PIECE - AT THE SAME TIME work the first 7-7-7-7-8-8 sts from RS without inc (= band). YOKE (RIGHT FRONT PIECE): Work as LEFT YOKE but reversed - i.e. cast on sts for sleeve at the end of row from RS. Remember BUTTONHOLES - see explanation above. ASSEMBLY: Sew shoulder/overarm seams edge to edge to avoid a chunky seam. NECK EDGE: Pick up (from RS) approx. 100 to 140 sts on circular needle size 3 mm with BabyAlpaca Silk. Work 3 ridges in garter st back and forth. Loosely cast off. CUFFS: Pick up 1 st in every ridge at the bottom of sleeve. On next row adjust no of sts to 68-68-72-72-78-78. Then work back and forth over all sts. When cuff measures 17-18-18-19-19-19 cm (or desired length), loosely cast off. ASSEMBLY: Sew side seam, underarm seam and cuff seam in one inside 1 edge st. Sew on the buttons approx. 1 cm from edge on left front piece. CROCHET EDGE: Beg by working mid back of neck on crochet hook size 3.5 mm with BabyAlpaca Silk. Work 1 dc, * 3 ch, skip approx. 1 cm, 1 dc *, repeat from *-* around the neck, down along front piece, around the entire bottom edge and up and around to the back of neck again. Finish with 1 sl st in dc from beg of round. Work the same way around the cuffs at the bottom of both sleeves. |
||||||||||||||||
Diagram explanations |
||||||||||||||||
|
||||||||||||||||
 |
||||||||||||||||
Have you finished this pattern?Tag your pictures with #dropspattern #clearwatercardigan or submit them to the #dropsfan gallery. Do you need help with this pattern?You'll find 18 tutorial videos, a Comments/Questions area and more by visiting the pattern on garnstudio.com. © 1982-2026 DROPS Design A/S. We reserve all rights. This document, including all its sub-sections, has copyrights. Read more about what you can do with our patterns at the bottom of each pattern on our site. |
||||||||||||||||


With over 40 years in knitting and crochet design, DROPS Design offers one of the most extensive collections of free patterns on the internet - translated to 17 languages. As of today we count 324 catalogues and 12267 patterns translated into English (UK/cm). 12267
We work hard to bring you the best knitting and crochet have to offer, inspiration and advice as well as great quality yarns at incredible prices! Would you like to use our patterns for other than personal use? You can read what you are allowed to do in the Copyright text at the bottom of all our patterns. Happy crafting!
Post a comment to pattern DROPS 156-43
We would love to hear what you have to say about this pattern!
If you want to leave a question, please make sure you select the correct category in the form below, to speed up the answering process. Required fields are marked *.