
Popular categories
Looking for a yarn?


Comments / Questions (112)
![]() Marianne Olsen wrote:
Marianne Olsen wrote:
Hej. Jeg hækler Str 6/9 mdr. Efter strukturrækkerne står der at der skal være 198 m. Er det korrekt at det kun er St der tælles med her. Jeg kan kun få det til at passe med 198 st og 8 lm
07.04.2016 - 21:09Celeste wrote:
Hola! Empezando el canesú, talle 1/3 meses; inserto los marcapuntos y en la fila siguiente debo: "Trabajar 1 p.a. en cada p.b. pero en cada p.b. con MP trabajar 2 p.a. + 2 p.de cad. + 2 p.a. = 94-98-102-102 (102-106) p.a. en la fila." Algo hago mal porque me quedan muchos puntos más! En cada p.b. con MP hago 6 puntos totales (2 pa + 2 cad + 2 pa), ¿qué es lo que estoy haciendo mal? GRACIAS! Saludos desde Argentina
30.03.2016 - 03:10DROPS Design answered:
Hola Celeste, el patrón está correcto. Para la talla que trabajas comenzamos el canesú con 86 p.b. Tenemos 4 pts con MP en la fila, donde vamos a hacer los aumentos, en cada uno de estos pts trabajamos 2 p.a.+2 p.de cad + 2 p.a. De este modo aumentamos en una fila 3p.a. en cada MP (ya que trabajamos 4 p.a. en 1p.a. sin contar los p.de cad). 3 p.a. x 4 MP = 12 p.a. aumentados. 86 p.a. + 12 p.a. = 98 p.a.
31.03.2016 - 10:32
![]() Susanne wrote:
Susanne wrote:
De 3 lm man skal hækle i starten hvor skal de sidde fast henne
11.03.2016 - 14:52DROPS Design answered:
Hej Susanne, Du starter med 1 km i første af de 42 lm og fortsætter med de 3 lm osv ifølge opskriften. God fornøjelse!
11.03.2016 - 15:23
![]() Susanne wrote:
Susanne wrote:
Jeg forstår ikke ærmet helt. de 42 masker man skal slå op er det fra raglan række til raglan række ?? og hvor skal de lm man skal slå op side fast henne
11.03.2016 - 13:34DROPS Design answered:
Hej, De 42 m skal ikke slåes op, dem har du allerede, det var dem du hoppede over da du skulle fortsætte under ærmerne og nedad. God fornøjelse!
11.03.2016 - 14:06
![]() Celine wrote:
Celine wrote:
Comment augmenter dans les raglans? Faut-il crocheter 2x 2B+2B et 2x 2ml dans les arceaux de raglans sur l'endroit? Je ne comprend pas l'explication? Que voulez vous dire avec EN MÊME TEMPS
02.02.2016 - 21:59DROPS Design answered:
Bonjour Céline, on augmente à chaque rang de brides (= sur l'endroit): 4 fois (2 B + 2 ml + 2 B) soit 2 B + 2 ml + 2 B dans chacun des 4 arceaux des raglans (crochetez autour des 2 arceaux des rangs précédents). Bon crochet!
03.02.2016 - 09:51
![]() Monica wrote:
Monica wrote:
Salve non ho capito come devo iniziare la manica. Le 46 maglie iniziali come le ricavo? Grazie
26.12.2015 - 00:02DROPS Design answered:
Buonasera Monica, le 46 m delle maniche sono quelle che aveva alla fine dello sprone quando ha diviso le maglie per le varie parti del modello. Buon lavoro!
28.12.2015 - 17:57
![]() Fatima wrote:
Fatima wrote:
Hallo liebes Team, ich habe eine Frage zum Ärmel, und zwar da steht beginnen sie von er Rückseite, heißt das das man den Ärmel von links häkelt oder was ist damit gemeint. Vielen Dank und liebe Grüße
30.10.2015 - 14:06DROPS Design answered:
Ja, es bedeutet, dass Sie mit einer Rück-R beginnen, also nicht die Vorderseite vorne haben, sondern die Rückseite, wenn Sie mit dem Ärmel beginnen. Die nächste R häkeln Sie dann wieder als Hin-R, d.h. Sie häkeln ganz normal in Hin- und Rück-R, nur dass Sie mit einer Rück-R beginnen.
05.11.2015 - 12:59
![]() Lene wrote:
Lene wrote:
Hei, Hekler i str 0/1 mnd. Jeg får ikke maskeantallet til å stemme. 82 masker pluss 16 (økningen på første runde)er 98, og ikke 94 som det står i oppskriften. Hva er det jeg ikke skjønner her.
10.09.2015 - 06:56DROPS Design answered:
Hej Lene, hvis du i hver raglan overgang hækler: 2 st + 2 lm + 2 st om hver lm-bue i hver raglanlinje, så har du 3 nye st i hver raglanlinje dvs gange 4 (= 12 st økt på raden) 82+12=94. God fornøjelse!
17.09.2015 - 11:36
![]() Maria wrote:
Maria wrote:
Jeg forstår simpelthen ikke, hvordan jeg skal komme omgang med ærmerne. Hvor skal jeg starte? Altså hvilken maske? Og hvor skal de der luftmasker hen? Er der ikke en bedre måde at formulere de ærmer på? Tak for jeres hjælp og den fine opskrift :)
03.08.2015 - 10:01DROPS Design answered:
Hej Maria, Jo når du starter med ærmet, hækler du først 3 eller 4 lm (antal i din str) så hækler du 1 fm i hver m fra skulderen (som skal blive til ærme) når du har hæklet dem, hækler du 5 eller 6 lm. Nu vender du arb og hækler 1 st i 4lm fra nålen og fortsætter i hver m ifølge opskriften. Ærmet hækles således frem og tilbage ovenfra og ned. God fornøjelse!
05.08.2015 - 08:49Tania wrote:
Little Lady Rose pattern - size 6/9 months - 90 sc around neck. When I work first row of collar I end up with 70 st not 64? Can't figure out why?
06.07.2015 - 23:57DROPS Design answered:
Dear Tania, dec evenly on first round on neck to get 64 sc at the end of first row. Happy crocheting!
07.07.2015 - 10:08
|
|||||||||||||
Little Lady Rose#littleladyrosecardigan |
|||||||||||||
|
|
|||||||||||||
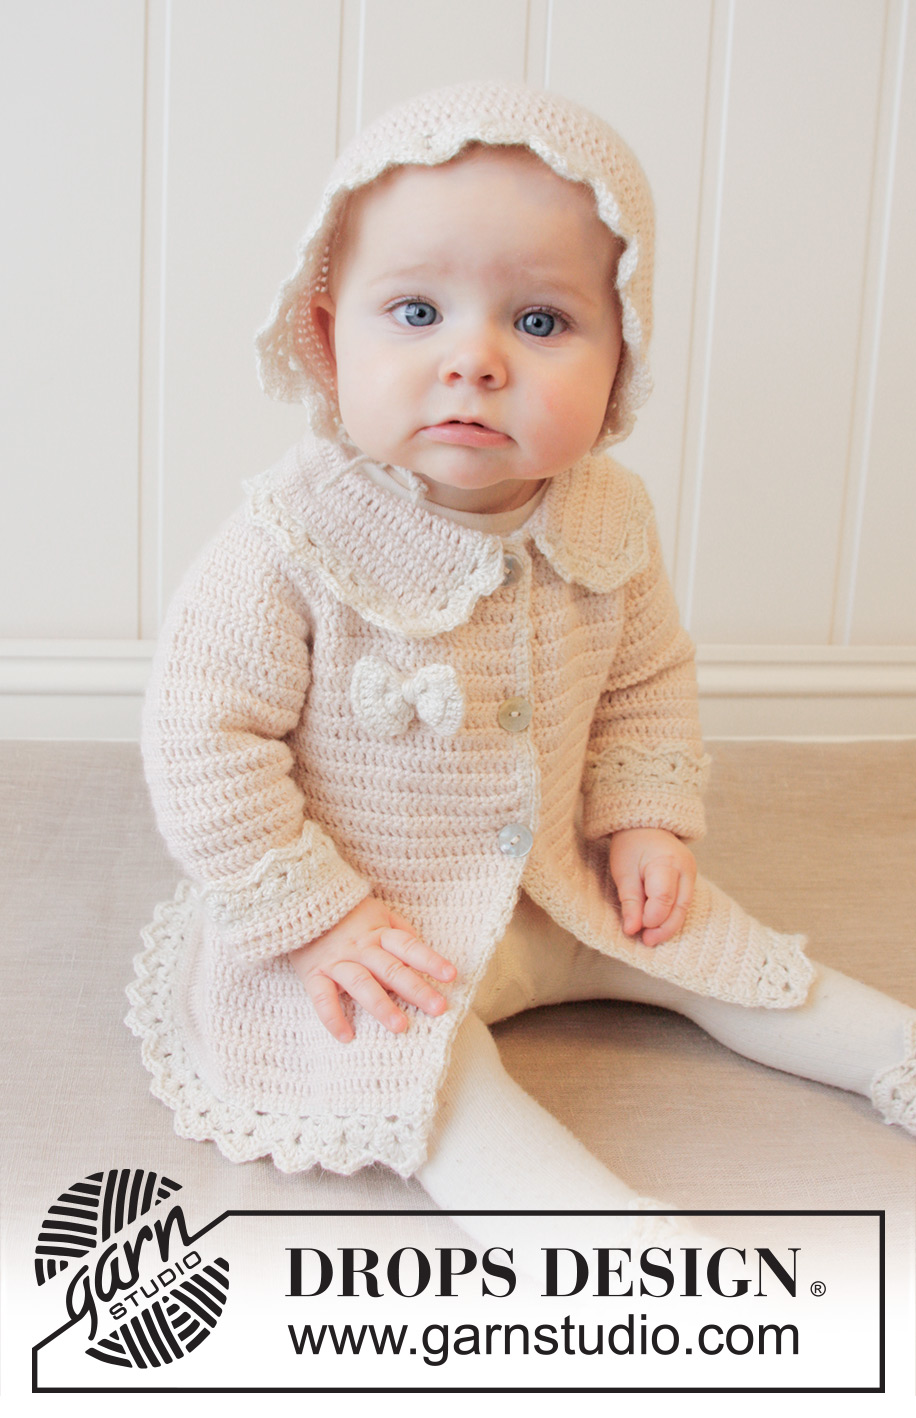
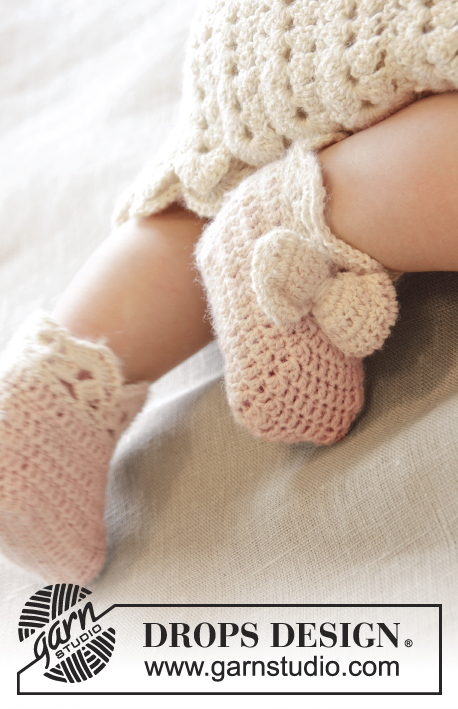
Crochet baby jacket with raglan and fan edges, worked top down in DROPS BabyAlpaca Silk. Size 0-4 years.
DROPS Baby 25-12 |
|||||||||||||
|
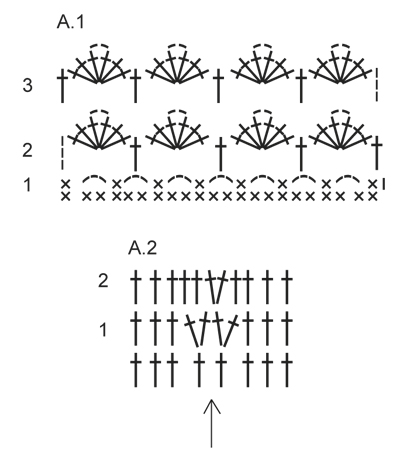
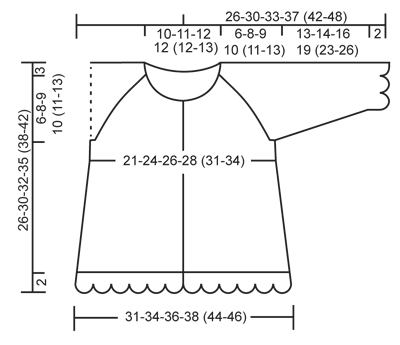
CROCHET INFO: Replace first dc at beg of every dc row with 1 ch, finish row with 1 dc in 3rd ch from beg of previous row. Replace first tr at beg of every tr row with 3 ch, finish row with 1 tr in ch from beg of previous row. TEXTURE ROWS: * 1 row dc (worked from WS), 1 row tr (worked from RS) *, repeat from *-* (1 row dc + 1 row tr = 1 texture row). INCREASE TIP: Inc 1 dc/tr by working 2 dc/tr in same st. DECREASE TIP: Work 1 dc/tr but wait with last pull through (= 2 sts on hook), then work next dc/tr but on last pull through, pull yarn through all sts on hook = 1 dc/tr dec. PATTERN: See diagram A.1. (A.2 applies to inc on collar). ---------------------------------------------------------- JACKET: The piece is worked top down. Worked back and forth from mid front. YOKE: Work 83-87-91-91 (91-95) ch (incl 1 ch to turn with) on hook size 3.5 mm with powder. Work 1 dc in 2nd ch from hook, then work 1 dc in every ch the entire row = 82-86-90-90 (90-94) dc on row (incl 5 band sts in each side towards mid front). Now insert 4 markers in piece for raglan as follows (beg mid front – NOTE: Do NOT work while inserting markers): Skip 15-16-17-17 (17-18) dc (= left front piece), insert 1 marker in next dc, skip 14 dc (= sleeve), insert 1 marker in next dc, skip 20-22-24-24 (24-26) dc (= back piece), insert 1 marker in next dc, skip 14 dc (= sleeve) and insert last marker in next dc (there are now 15-16-17-17 (17-18) dc on right front piece after last marker). READ ALL OF THE FOLLOWING SECTION BEFORE CONTINUING: READ CROCHET INFO and work next row as follows from RS: Work 1 tr in every dc but in every dc with marker work 2 tr + 2 ch + 2 tr = 94-98-102-102 (102-106) tr on row. Then work TEXTURE ROWS - see explanation above (work back and forth with 1 dc/tr in every st from previous row – but on every row with dc from WS work 2 ch over the 2 ch from previous row in raglan lines. On row with tr work 2 tr + 2 ch + 2 tr in both ch-spaces). AT THE SAME TIME on first row from RS (i.e. on row with tr) inc for raglan as follows: Work 2 tr + 2 ch + 2 tr in every ch-space in every raglan line (= 16 tr inc on row – note: work around both ch-spaces). Repeat inc on every row from RS 3-4-5-6 (7-8) more times (= 4-5-6-7 (8-9) times in total) = 158-178-198-214 (230-250) sts. REMEMBER THE CROCHET TENSION! After last inc for raglan work 1 row with dc from WS as before. Work next row as follows from RS: Work 1 tr in each of the first 25-28-31-33 (35-38) dc (= left front piece), skip the next 34-38-42-46 (50-54) dc (= sleeve), work 6-6-6-6 (8-8) ch, work 1 tr in each of the next 40-46-52-56 (60-66) dc (= back piece), skip the next 34-38-42-46 (50-54) dc (= sleeve), work 6-6-6-6 (8-8) ch and work 1 tr in each of the last 25-28-31-33 (35-38) dc (= right front piece). Then finish body and sleeves separately. BODY: NOW MEASURE PIECE FROM HERE! Work 1st row from WS – work 1 dc in every tr from previous row and 1 dc in each of the 6-6-6-6 (8-8) ch under each armhole = 102-114-126-134 (146-158) dc on row. Insert 1 marker 28-31-34-36 (39-42) sts in from each side (= 46-52-58-62 (68-74) sts on back piece). Continue back and forth with TEXTURE ROWS. AT THE SAME TIME when piece measures 2-2-2-3 (2-3) cm, inc 1 st on each side of both markers – READ INCREASE TIP (= 4 sts inc). Repeat inc approx. every 1-1½-1½-1½ (1½-1½) cm 10-10-10-10 (13-13) more times (= 11-11-11-11 (14-14) times in total) = 146-158-170-178 (202-214) sts. When piece measures approx. 15-17-18-20 (22-24) cm from armhole – adjust so that inc are done, work 1 row dc from WS AT THE SAME TIME inc 2-2-2-0 (0-0) dc evenly – READ INCREASE TIP = 148-160-172-178 (202-214) dc. Fasten off. Switch to off white and work 1 row dc from WS with 1 dc in every dc from previous row. Then work Fan pattern according to diagram A.1, i.e. work as follows: ROW 1 (= RS): 1 ch, 1 dc in first st, * 3 ch, skip 2 dc, 1 dc in next st *, repeat from *-* the entire row = 49-53-57-59 (67-71) ch-spaces, turn. ROW 2 (= WS): Work 3 ch (= 1 tr), 3 tr + 2 ch + 3 tr in first ch-space, * 1 tr in next ch-space, 3 tr + 2 ch + 3 tr in next ch-space *, repeat from *-* the entire row and finish with 1 tr in first dc from beg of previous row = 25-27-29-30 (34-36) tr-groups with 1 tr between every tr-group, turn piece. ROW 3 (= RS): Work 3 ch (= 1 tr), 3 tr + 2 ch + 3 tr in ch-space in the mid of first tr-group, * 1 tr in next tr, 3 tr + 2 ch + 3 tr in ch-space in the mid of next tr-group *, repeat from *-* the entire row and finish with 1 tr in 3rd ch from beg of previous row = 25-27-29-30 (34-36) tr-groups with 1 tr between every tr-group. Fasten off. SLEEVE: = 34-38-42-46 (50-54) sts. Insert 1 marker here – NOW MEASURE PIECE FROM HERE. Work 1st row from RS with powder as follows: work 3-3-3-3 (4-4) ch, work 1 tr in each stitch and work 3-3-3-3 (4-4) ch. Turn piece, work 1 dc in 2nd ch from hook, work 1 dc in each of the next 1-1-1-1 (2-2) ch, 1 dc in every tr from previous row and 1 tr in each of the 3-3-3-3 (4-4) ch from beg of previous row = 40-44-48-52 (58-62) sts on row. Then work TEXTURE ROWS back and forth as before with tr from RS and dc from WS. AT THE SAME TIME when sleeve measures 2-2-3-3(3-3) cm from marker, dec 1 st in each side - SEE DECREASE TIP! Repeat dec every 8-5-3-3 (2½-2½) cm 1-2-4-5 (7-8) more times (= 2-3-5-6 (8-9) times in total in each side) = 36-38-38-40 (42-44) sts. When sleeve measures approx. 13-14-16-19 (23-26) cm from marker – finish after 1 row with dc from WS, fasten off. Switch to off white. Work 1 row dc from WS AT THE SAME TIME inc 4-2-2-6 (4-2) dc evenly = 40-40-40-46 (46-46) dc. Then work Fan pattern according to diagram A.1, beg from RS, the same way as on bottom of jacket. After 1st row there are 13-13-13-15 (15-15) ch-spaces on row and after 2nd row there are 7-7-7-8 (8-8) tr-groups with 1 tr between every tr-group. ASSEMBLY: Sew underarm seams tog edge to edge in front loop of outermost sts. Sew the openings under the sleeves. Sew the buttons on to left front piece. Upper button should be approx. 1 cm from neckline and there should be approx. 5 to 7 cm between each button. Button through tr in texture pattern. ELEVATION IN BACK OF NECK: For better fit work a small elevation at the back of neck. Insert 1 marker in st in each corner in neck, i.e. at beg of every raglan line. Work on hook size 3.5 mm with powder as follows: Beg in 11th st from mid front, work 1 dc in every st until 1 st remains before st with marker, work 1 htr in next st, 1 tr in st with marker and 1 htr in next st, then work 1 dc in every st until 1 st remains before next st with marker, 1 htr in next st, 1 tr in st with marker and 1 htr in next st. Continue like this until 10 sts remain before mid front in the other side. Turn piece and work 1 dc in every dc but at every marker work 3 dc tog, i.e. work 1 dc in htr but wait with last YO and pull through, work 1 dc in st with marker but wait with last YO and pull through, work 1 dc in next htr but now pull last YO through all 4 sts on hook (= 2 dc dec). Fasten off. COLLAR: Work on hook size 3.5 mm with powder as follows: Beg in 4th st from mid front and work 1 dc in every dc around the neck until 3 dc remain on row AT THE SAME TIME work 5th and 6th st tog – READ DECREASE TIP = approx. 57-60-64-64 (64-67) dc remain. Make sure that markers at each raglan line moves upwards - remove the markers from the sts they are in and place them between the st they were in and the next st toward the sleeve.Then work texture rows back and forth as on body with 1 st in every st. AT THE SAME TIME after 3-3-3-4 (4-4) cm, inc on the next 2 rows as shown in A.2. After last inc, collar measures approx. 5-5-5-6 (6-6) cm. Fasten off. CROCHET EDGE ALONG MID FRONT: Work with off white as follows: Beg from WS at the bottom on left front piece and work 1 row dc up along mid front and then over the 3 sts at the top of neck before collar beg - work approx. 2 dc in every tr-row and 1 dc in every dc-row. Turn piece and work as follows: * 3 ch, skip 2 dc, 1 dc in next st *, repeat from *-* the entire row to bottom of band. Fasten off and repeat along right front piece, beg from WS at the top by neck. CROCHET EDGE AROUND COLLAR: Work with off white as follows: Beg from RS where collar beg after the 3 sts at the top of neck and work 1 row dc around the entire collar until where collar ends before the top 3 sts in neck in the other side. Turn piece and work as follows: * 3 ch, skip approx. 2 sts, 1 dc in next dc *, repeat from *-*, NOTE: Adjust so that no of ch-spaces can be divided by 2 + 1. Turn piece and work a finishing edge with fans as follows from RS: Work sl sts until mid of first ch-space, 3 ch (= 1 tr), * 3 tr + 2 ch + 3 tr in next ch-space, 1 tr in next ch-space *, repeat from *-* the entire row. Fasten off. BOW: Work 11 ch on hook size 3.5 mm with off white. Work first row as follows: 1 tr in 4th ch from hook, 1 tr in each of the next 7 ch = 9 tr on row. Turn piece and work TEXTURE ROWS back and forth until piece measures approx. 10 cm – finish after 1 row with dc. Fasten off. Sew short sides tog to form a ring and twine some yarn around the mid of bow to tighten it neatly in the middle. Fasten bow at the top on right front piece. |
|||||||||||||
Diagram explanations |
|||||||||||||
|
|||||||||||||
 |
|||||||||||||
 |
|||||||||||||
Have you finished this pattern?Tag your pictures with #dropspattern #littleladyrosecardigan or submit them to the #dropsfan gallery. Do you need help with this pattern?You'll find 10 tutorial videos, a Comments/Questions area and more by visiting the pattern on garnstudio.com. © 1982-2026 DROPS Design A/S. We reserve all rights. This document, including all its sub-sections, has copyrights. Read more about what you can do with our patterns at the bottom of each pattern on our site. |
|||||||||||||


With over 40 years in knitting and crochet design, DROPS Design offers one of the most extensive collections of free patterns on the internet - translated to 17 languages. As of today we count 325 catalogues and 12298 patterns translated into English (UK/cm). 12298
We work hard to bring you the best knitting and crochet have to offer, inspiration and advice as well as great quality yarns at incredible prices! Would you like to use our patterns for other than personal use? You can read what you are allowed to do in the Copyright text at the bottom of all our patterns. Happy crafting!
Post a comment to pattern DROPS Baby 25-12
We would love to hear what you have to say about this pattern!
If you want to leave a question, please make sure you select the correct category in the form below, to speed up the answering process. Required fields are marked *.