
Popular categories
Looking for a yarn?


Comments / Questions (118)
![]() Sarah wrote:
Sarah wrote:
Please ignore my previous question as I've figured out that these pieces are worked in sections, so cutting the yarn is necessary. However, I'm confused about the RIGHT FRONT PIECE section instructions. It says "At the same time bind off for armhole in the side as on the back piece". What does this mean?
04.02.2024 - 15:01DROPS Design answered:
Dear Sarah, in the back piece, you bind off at the beginning of every row from each side for the armholes. That is because you needed to cast off for both armholes on both sides. Now, as you work each front piece, you will cast off for one single armhole in each front piece, so you will cast off at the beginning of the rows that start from the side edge of the front piece (in each front piece it will be in opposite sides), that is, the side opposite from the neck. Happy knitting!
04.02.2024 - 23:38
![]() Sarah wrote:
Sarah wrote:
Hi again -- I'm starting the back piece of this pattern but it's not clear if I need to cut the yarn and put the other stitches on a stitch holder. I presume so in order to work the back piece independently? Thanks, Sarah
03.02.2024 - 19:00DROPS Design answered:
Dear Sarah, you will now work only the back piece so you keep the back piece stitches in the needles and put both front pieces' stitches on a stitch holder or thread. You also cut the yarn and rejoin it for working the back piece. Happy knitting!
04.02.2024 - 23:02
![]() Sarah wrote:
Sarah wrote:
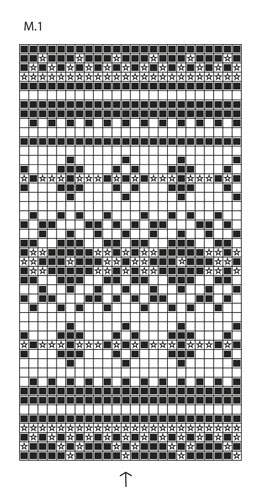
The M1 chart section has confused me a bit. The pattern says "work diagram M.1 until 15 sts remain, work 1st st in diagram M.1 (so that pattern beg and ends the same way on each side of band)". I thought I did this and have ended up with a mess. Can someone explain to me what "work 1st st in diagram M.1" means - does it mean to knit the last stitch before the 14st section as if it were the 1st st in the next row? Thanks, Sarah
29.01.2024 - 20:24DROPS Design answered:
Dear Sarah, what you need to do is, when 15 sts remain, work the very first stitch of M.1 in that specific row. For example, in row 1, you start with the star symbol (beige), work towards the left and work as many repeats of M.1 as necessary and end with the stitch with the star (that is, the rightmost stitch in A.1). Then, in the next rows, work over it as with the other stitches , as indicated in the charts. Happy knitting!
29.01.2024 - 23:34
![]() Yiqi Huang wrote:
Yiqi Huang wrote:
Hi! For the first button hole, should I do it still with the 4 mm needles as a part of the rib or should I do it with the 5 mm needles as a part of the main body?
27.01.2024 - 20:08DROPS Design answered:
Dear Mrs Huang, the buttonholes are worked with the same needles as the ribbing edges, ie with the larger needles when working body/front piece. Happy knitting!
29.01.2024 - 11:59
![]() Yiqi Huang wrote:
Yiqi Huang wrote:
So following my previous question (now I realised that one should K on K and P on P indeed for the rib), should I start the WS with 2 garter, K2, then K2/P2 all the way till the 2 garter stitches on the end?
23.01.2024 - 01:13DROPS Design answered:
Hi Yiqi, Yes, you continue the rib, starting with 2 garter stitches and K2 and finishing with K2 and 2 garter stitches on the other side, until the rib measures 6 cm. Happy knitting!
23.01.2024 - 06:39
![]() Yiqi Huang wrote:
Yiqi Huang wrote:
Hi Drops! I already got a bit lost in the instruction of the bottom ribbing. If you end the row (RS) with K2 garter 2, then start the next row (WS) with garter 2 K2, aren’t you K on the K stitches and P on the P stitches? I thought for ribbing we need to K on the P stitches and vice versa on each row.
23.01.2024 - 01:00DROPS Design answered:
Dear Mrs Huang, you are right, from WS you will K over K and P over P, this means from WS you will work: K2, then repeat (P2, K2) ending with P2, K2. Happy knitting!
23.01.2024 - 07:49
![]() Jeanette Ek wrote:
Jeanette Ek wrote:
Undrar om mönstret verkligen stämmer när man ska sticka ärmarna Får inte riktigt ihop detta Man ska öka 19ggr vart 4:dje varv Då betyder detta att man alltså ska påbörja rapporten innan alla ökningar är klara? Annars stämmer inte måtten på ärmen Stickar största storlek! Är inte första gången jag haft krångel med just detta mönster stämmer inte 100% i slutet på rapporten på bakstycket Fick göra om lite!
28.03.2023 - 19:02DROPS Design answered:
Hej Jeanette, ja du starter mønsteret når ærmet måler 24 cm, du udgår fra midterste maske i mønsteret, og fortsætter mønsteret efterhånden som du får flere masker :)
12.04.2023 - 15:30
![]() Bettina Felden wrote:
Bettina Felden wrote:
Liebes Drops-Team, könnte ich auch für die Herrenjacke alternativ 'Drops-Air' oder 'Drops Brushed Alpaca Silk' verwenden, danke und liebe Grüße
28.02.2023 - 15:42DROPS Design answered:
Liebe Frau Felden, also vielleicht am besten DROPS Air - gerne kann Ihnen aber Ihr DROPS Händler die beste Alternative empfehlen - auch per Telefon oder per E-Mail. Viel Spaß beim stricken!
28.02.2023 - 17:53
![]() Louise LAcelle wrote:
Louise LAcelle wrote:
Bonjour, j’ai presque terminé la veste , mais la je ne comprend pas bien les rangs raccourcis du col. Est ce que je dois casser mon fil après les 10 mailles de début de rang qu’on met en attente ? Tourner l’ouvrage? Bref je suis un peu perdu!
28.02.2023 - 00:56DROPS Design answered:
Bonjour Mme Lacelle, pour les rangs raccourcis, tricotez les mailles avant de les mettre en attente pour éviter d'avoir à couper le fil, lorsque vous aurez terminé les rangs raccourcis, tournez encore une fois et tricotez jusqu'à la fin du rang d'un côté, puis tournez et tricotez toutes les mailes jusqu'à l'autre côté, et rabattez au rang suivant. Bon tricot!
28.02.2023 - 10:49
![]() Grant Foden wrote:
Grant Foden wrote:
Hello, I am stuck on the instructions for the final row before casting off on the shawl collar. I don't understand the instruction for avoiding holes between the transitions "To avoid holes in every transition where piece was turned, slip loop before next st twisted on needle and work tog with first st on needle. " Where is the loop which is to be slipped onto needle twisted coming from? Many thanks.
21.02.2023 - 16:42DROPS Design answered:
Dear Mr Foden, you can see how to do in this video (for a heel with short rows), at time code 04:04 for example: you pick up the strand before the stitch left unworked and you work this strand twisted together with the next stitch. Hipe it will help. Happy knitting!
21.02.2023 - 18:15
|
||||||||||
Harald#haraldjacket |
||||||||||
 |
 |
|||||||||
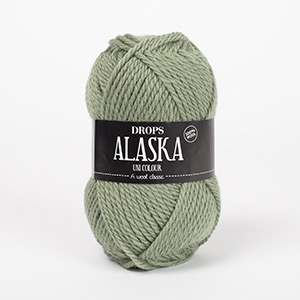
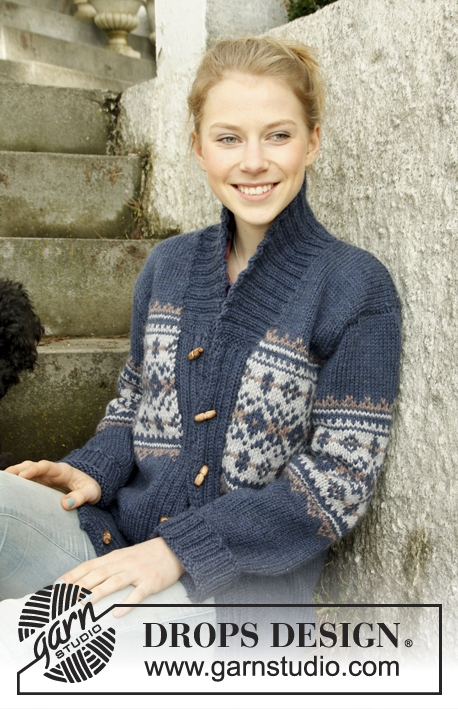
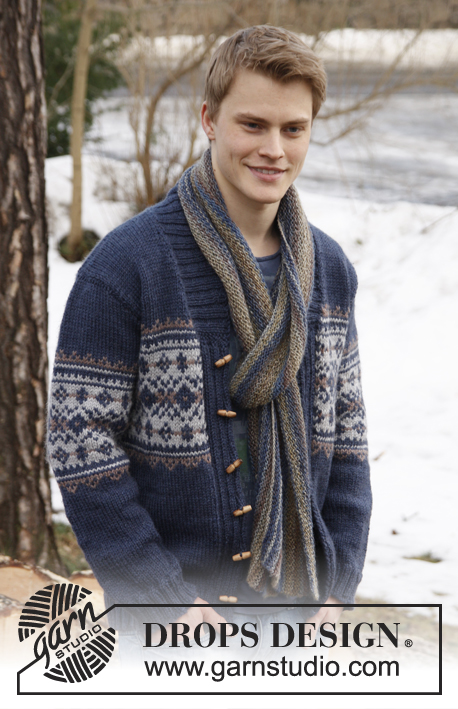
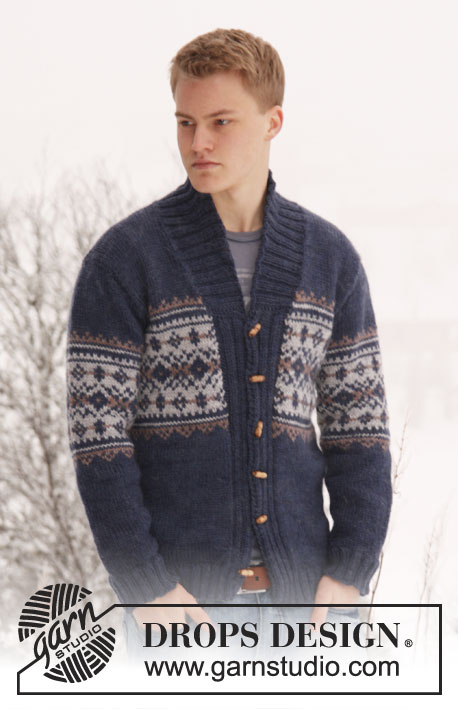
Men's knitted jacket in DROPS Alaska, with pattern and shawl collar. Size: S - XXXL.
DROPS Extra 0-813 |
||||||||||
|
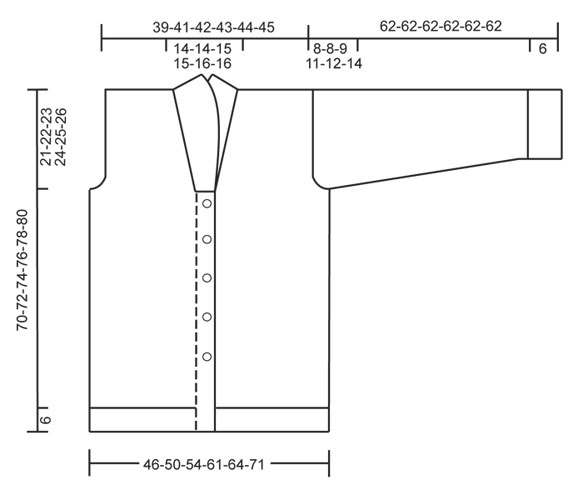
GARTER ST (back and forth on needle): K all rows. BUTTON HOLES: Cast off for button holes on left band, all cast offs are done from RS. 1 button hole = P tog 5th and 6th st from mid front and make 1 YO. On next row K the YO. Cast off for button holes when piece measures: SIZE S: 6, 14, 23, 31, 40 and 48 cm. SIZE M: 6, 15, 24, 32, 41 and 49 cm. SIZE L: 6, 15, 24, 33, 42 and 50 cm. SIZE XL: 6, 13, 21, 28, 36, 43 and 51 cm SIZE XXL: 7, 14, 22, 29, 37, 44 and 52 cm SIZE XXXL: 7, 15, 22, 30, 37, 45 and 53 cm PATTERN: See diagram M.1 – the diagram shows 2 repetitions in breadth. Work entire pattern in stocking st. DECREASE TIP (applies to neckline at the front): Dec inside 1 edge st in garter st. All dec are done from RS. Dec after 1 edge st as follows: Slip 1 st as if to K, K 1, psso. Dec before 1 edge st as follows: K 2 tog. -------------------------------------------------------- BODY: Worked back and forth on circular needle from mid front. Cast on 226-246-262-286-302-330 sts on circular needle size 4 mm with dark blue Alaska. P 1 row from WS. Then work next row as follows from RS: 2 edge sts in GARTER ST - see explanation above - * K 2/P 2 *, repeat from *-* until 4 sts remain and finish with K 2 and 2 edge sts in GARTER ST. Continue rib like this until piece measures 6 cm. AT THE SAME TIME when piece measures 6-6-6-6-7-7 cm, cast off for BUTTON HOLES on left band - see explanation above. After rib, switch to circular needle size 5 mm and work next row from RS as follows: 2 sts in garter st, K 2, P 2, K 2, P 2, K 2, P 2 (= 14 band sts), work in stocking st until 14 sts remain while AT THE SAME TIME dec 53-61-65-65-69-73 sts evenly (do not dec over bands), finish with P 2, K 2, P 2, K 2, P 2, K 2 and 2 sts in garter st = 173-185-197-221-233-257 sts. Insert a marker 47-50-53-59-62-68 sts in from each side (= 79-85-91-103-109-121 sts between markers on back piece). Then work in stocking st with 14 band sts in each side towards mid front as before. REMEMBER THE KNITTING TENSION! When piece measures 32-33-34-35-36-37 cm, work diagram M.1 as follows: Work 14 band sts as before with dark blue, work diagram M.1 until 15 sts remain, work 1st st in diagram M.1 (so that pattern beg and ends the same way on each side of band) and finish with 14 band sts in dark blue as before. When piece measures 49-50-51-52-53-54 cm, work next row from RS as follows: Cast off the first 13 sts, insert a marker (this marks where to start the knit up for collar), work 31-34-37-42-45-51 sts (= right front piece), cast off 6-6-6-8-8-8 sts for armhole, work 73-79-85-95-101-113 sts (= back piece), cast off 6-6-6-8-8-8 sts for armhole and work the rest of row (= 44-47-50-55-58-64 sts on left front piece). Turn and cast off the first 13 sts, insert a marker (this marks where to end the knit up for collar), work the rest of row = 31-34-37-42-45-51 sts. Finish each part separately. BACK PIECE: = 73-79-85-95-101-113 sts. Continue diagram M.1 (when diagram M.1 has been worked 1 time vertically, continue with dark blue until finished measurements) – AT THE SAME TIME cast off for armholes at beg of every row in each side: 3 sts 0-0-0-1-1-2 times, 2 sts 1-1-2-2-3-4 times and 1 st 1-3-3-4-4-4 times = 67-69-71-73-75-77 sts remain on needle. When piece measures 68-70-72-74-76-78 cm, cast off the middle 21-21-23-23-25-25 sts for neck. Now finish each shoulder separately. Continue to cast off 1 st on next row from neck = 22-23-23-24-24-25 sts remain on the shoulder. Cast off when piece measures 70-72-74-76-78-80 cm. RIGHT FRONT PIECE: = 31-34-37-42-45-51 sts. Continue diagram M.1 as on back piece with 1 edge st in garter st towards mid front. AT THE SAME TIME cast off for armhole in the side as on back piece. AT THE SAME TIME when piece measures 50-51-52-53-54-55 cm, dec 1 st towards the neck - SEE DECREASE TIP! Repeat dec on every 4th row a total of 3-3-4-4-6-6 times, and on every 8th row a total of 3-3-3-3-2-2 time. After all cast offs and dec are done, 22-23-23-24-24-25 sts remain on shoulder. Cast off when piece measures 70-72-74-76-78-80 cm. LEFT FRONT PIECE: Work as right front piece but reversed. SLEEVE: Worked in the round on double pointed needles, switch to circular needle when needed. Cast on 52-52-56-56-60-60 sts on double pointed needles size 4 mm with dark blue. K 1 round, then work rib = K 2/P 2. When piece measures 6 cm, switch to double pointed needles size 5 mm. K 1 round while AT THE SAME TIME dec 11-9-11-11-13-13 sts evenly = 41-43-45-45-47-47 sts. Insert a marker at beg of round (= mid under sleeve). Then work in stocking st. When piece measures 7-7-7-7-9-10 cm, inc 1 st on each side of marker mid under sleeve. Repeat inc a total of 11-13-14-16-17-19 times in Size S: On every 10th round, Size M: Every 8th round, Size L: Every 7th round, Size XL: Every 6th round, Size XXL: Every 5th round and Size XXXL: Every 4th round = 63-69-73-77-81-85 sts. AT THE SAME TIME when piece measures 30-30-29-27-26-24 cm, insert a marker in the middle st on round (= mid on top of shoulder). Work diagram M.1 – NOTE: St marked with arrow in diagram should be the st with marker mid on top of sleeve. When diagram M.1 has been worked 1 time vertically, continue with dark blue until finished measurements. AT THE SAME TIME when piece measures 54-54-53-51-50-48 cm (shorter measurements in the larger sizes because of longer sleeve cap and broader shoulder width), cast off 6-6-6-8-8-8 sts mid under sleeve. Then work back and forth on needle until finished measurements. AT THE SAME TIME cast off for sleeve cap at beg of every row in each side: 2 sts 3-3-3-3-3-4 times and 1 st 2-2-2-4-4-5 times. Then cast off 2 sts in each side until piece measures 61 cm in all sizes, then cast off 3 sts 1 time in each side. Cast off the remaining sts, the piece measures approx. 62 cm in all sizes. ASSEMBLY: Sew the shoulder seams. SHAWL COLLAR: Knit up sts (inside 1 edge st) on circular needle size 4 mm with dark blue - start mid front at marker on right front piece: Knit up approx. 34 to 44 sts up to shoulder, then 22 to 28 sts along the neck, and 34 to 44 sts down along left front piece until marker = 90 to 116 sts. K 1 row from WS while AT THE SAME TIME inc no of sts to 126-130-138-142-150-154. Then work rib as follows (seen from RS): 2 sts in garter st, * K 2, P 2 *, repeat from *-* and finish with K 2 and 2 sts in garter st. Continue like this until collar measures approx. 5 cm. Now inc 1 st in each of the middle 12 P-sections, seen from RS (= back of neck) = 138-142-150-154-162-166 sts. Then work K over K and P over P until collar measures approx. 7 cm. Now work as follows: Work 1 row as before and slip the first 10 sts worked on a stitch holder, turn piece, work the rest of row and slip the first 10 sts worked at the beg of row on another stitch holder. Turn piece, work the rest of row and slip the first 10 sts worked at the beg of row on the first stitch holder, turn piece, work the rest of row and slip the first 10 sts worked at the beg of row on the other stitch holder. Continue like this until there are a total of 40 sts on the stitch holders in each side. Then slip sts from stitch holders back on needle and work 1 row as before over all the 138-142-150-154-162-166 sts – NOTE: To avoid holes in every transition where piece was turned, slip loop before next st twisted on needle and work tog with first st on needle. Cast off with K over K and P over P. Neatly fasten collar with stitches in each side towards band – sew edge to edge to avoid a chunky seam. MORE ASSEMBLY: Sew in sleeves and sew on buttons. |
||||||||||
Diagram explanations |
||||||||||
|
||||||||||
 |
||||||||||
 |
||||||||||
Have you finished this pattern?Tag your pictures with #dropspattern #haraldjacket or submit them to the #dropsfan gallery. Do you need help with this pattern?You'll find 28 tutorial videos, a Comments/Questions area and more by visiting the pattern on garnstudio.com. © 1982-2026 DROPS Design A/S. We reserve all rights. This document, including all its sub-sections, has copyrights. Read more about what you can do with our patterns at the bottom of each pattern on our site. |
||||||||||


With over 40 years in knitting and crochet design, DROPS Design offers one of the most extensive collections of free patterns on the internet - translated to 17 languages. As of today we count 325 catalogues and 12298 patterns translated into English (UK/cm). 12298
We work hard to bring you the best knitting and crochet have to offer, inspiration and advice as well as great quality yarns at incredible prices! Would you like to use our patterns for other than personal use? You can read what you are allowed to do in the Copyright text at the bottom of all our patterns. Happy crafting!
Post a comment to pattern DROPS Extra 0-813
We would love to hear what you have to say about this pattern!
If you want to leave a question, please make sure you select the correct category in the form below, to speed up the answering process. Required fields are marked *.