
Popular categories
Looking for a yarn?


Comments / Questions (118)
![]() Patrycja wrote:
Patrycja wrote:
Dziękuje za odpowiedź. Oczywiście że jasne . Jeszcze pytanie odnośnie żakardu. Liczba oczek musi być podzielna przez 12? Czy dobrze kombinuję? Pojedynczy motyw pojawi się w rozmiarze m 13 razy. Czyli 185 oczek odejmuje od tego 14 bo na listwy bo żeczne , zostaje mi 157. Nie bardzo to podzielę przez 12. Wychodzi 13 motywów i coś.
20.08.2025 - 14:21DROPS Design answered:
Witaj Patrycjo, zobacz kurs DROPS TUTAJ, fragment zatytułowany 'Gdy liczba oczek nie zgadza się z liczbą powtórzeń schematu'. Pozdrawiam!
21.08.2025 - 12:22
![]() Patrycja wrote:
Patrycja wrote:
No właśnie wydaje mi się to zupełnie odwrotne. Gdy zrobię zamykanie oczek po ściągaczu to sweter wyjdzie zwężany od dołu. Chyba że się mylę? W projekcie wydaje się być prosty w talii
20.08.2025 - 10:13DROPS Design answered:
Witaj ponowie Patrycjo, gdy masz 100 o. i wykonasz ściągacz i na tej samej liczbie oczek wykonasz drugą próbkę, ale dżersejem, to ściągacz będzie znacznie węższy niż dżersej (bez naciągania robótki). Aby część dżersejem miała taką samą szerokość jak część ściągaczem, musisz zmniejszyć liczbę oczek w części dżersejem. Mam nadzieję, że teraz jest to jaśniejsze. Pozdrawiamy!
20.08.2025 - 10:23
![]() Patrycja wrote:
Patrycja wrote:
Dzień dobry, robię rozmiar M. Nie rozumiem dlaczego zaraz po scidgsczu jest takie zwężenie W tym samym czasie równomiernie zamknąć 53-61-65-65-69-73 oczka (nie zamykać oczek ponad obszyciami przodów), kończyć przerabiając 2 oczka lewe, 2 oczka prawe, 2 oczka lewe, 2 oczka prawe, 2 oczka lewe, 2 oczka prawe i 2 oczka ściegiem francuskim = 173-185-197-221-233-257 oczek". Czy faktycznie sweter jest zwężany od dołu? I to samo jest przy rękawach. W jakim celu taki myk?
20.08.2025 - 06:49DROPS Design answered:
Witaj Patrycjo, dzięki temu zabiegowi unikniesz widocznej różnicy szerokości między ściągaczem, a resztą robótki. Gdybyś tego nie zrobiła, to sweter miałby wygląd nieco retro, gdy ściągacz na dole był wyraźnie węższy niż body. Pozdrawiamy!
20.08.2025 - 08:08
![]() Knitterbee wrote:
Knitterbee wrote:
Hi! Is the first bottom hole knitted during the first ribbing section? If yes, the bottom hole would look differently than from the example photos? Or do I misunderstand something here? Thank you very much for answering the question and as well as the beautiful pattern!
28.05.2025 - 18:25DROPS Design answered:
Dear Knitterbee, the first buttonhole is worked when the piece measures 6cm from the bottom, since the piece is worked from the bottom up. So you would cast off for the first/lowermost buttonhole right as you end the lower rib edge, which is exactly where it's placed if you check the zoomed out photo. Happy knitting!
31.05.2025 - 23:26
![]() Katie wrote:
Katie wrote:
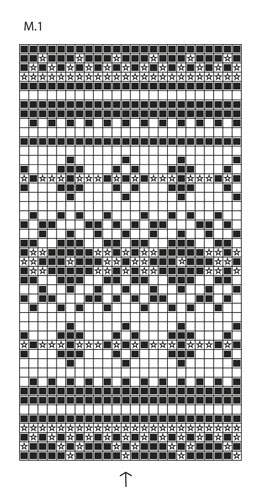
Help! When I am binding off 13 stitches for the shawl collar, I wasn’t finished yet with the M1 pattern. So, when the instructions say “work 37 stitches for the right front piece, do I work those stitches in the color that I was supposed to be on in the pattern (which is my star color)? This seems weird as then my star color would be at my sleeve bind off rather than the main color. But if I use the main color, then the pattern is off.
25.05.2025 - 02:22DROPS Design answered:
Dear Katie, you should continue the pattern while you decrease for the neck. Happy knitting!
25.05.2025 - 23:01
![]() Annica wrote:
Annica wrote:
Ska det minskas 65maskor (L) direkt efter byte till sticka nr5 efter mudden nedtill? Under hur många varv görs denna minskning? Enligt beskrivning ser det ut som det är på ett och samma varv alla dessa minskningar görs så att dey sedan blir 197 maskor (L) kvar. Tacksam för hjälp!
15.04.2025 - 07:39
![]() Mark wrote:
Mark wrote:
I don't understand the decrease tip. I'm beginning to work the right front piece. What is meant with inside, after, and before?
28.03.2025 - 05:46DROPS Design answered:
Dear Mark, inside means after the edge stitch towards mid front, ie after the first stitch at the beginning of a row from the right side for the right front piece and before the edge stitch towards mid front = at the end of the row from the right side for the left fron piece. Happy knitting!
28.03.2025 - 08:20
![]() Frieda Strijbos wrote:
Frieda Strijbos wrote:
Ik kan niet goed aan de maattabel uit, mijn zoon heeft 105 cm borstomtrek, welke maat brei dan het beste voor hem.
20.11.2024 - 12:10DROPS Design answered:
Dag Frieda,
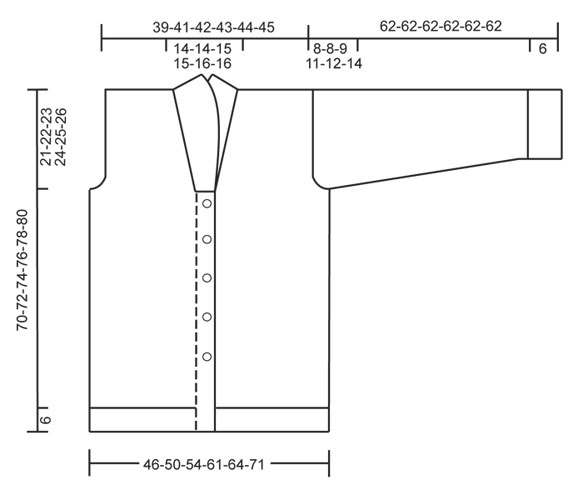
Voor een goede maat kun je het beste even een bestaande trui erbij pakken en daarvan de maten opmeten. Daarna kijk je in de maattekening onderaan het patroon voor de maat die het meest in de buurt komt.
21.11.2024 - 20:00
![]() Sarah wrote:
Sarah wrote:
Hi — I’m still struggling to read this pattern. I’ve begun the cast off section but have run out of stitches before reaching 61cm. The pattern doesn’t indicates the cast offs should be done on every row each side (knit and purl row I assume?). When I do this, I run out of stitches.
17.11.2024 - 15:22DROPS Design answered:
Dear Sarah, before the sleeve cap, if you are working the largest size, you should have 85 stitches. At 48 cm you start casting off for the sleeve cap, 8 stitches under the arm. Then cast off 2 stitches 4 times on each side (= 16 in total) and 1 stitch 5 times on each side (= 10 in total). Now you should have 51 stitches and you should have approx. 4cm left. In these 4 cm, continue casting off 2 sts on each side so you will cast off approx. 20 stitches and then cast off at 61 cm as indicated. You should still have stitches left to cast off straight, altogether. Happy knitting!
17.11.2024 - 23:50
![]() Sarah wrote:
Sarah wrote:
Another question from me: I don’t know at which point to cast off under the arm. Because I’m working the sleeve a little bit longer, it’s hard for me to know when to cast off under the arm because it’s not clear where on the arm the cast off starts. I.e. does the cast off start at the armpit? Before that? If so, how many cm before the armpit. In other words, how do I know when I’m at the correct length I need in order to start the cast off on part under the arm? Thanks.
12.11.2024 - 00:11DROPS Design answered:
Dear Sarah, if you need longer sleeve you will just have to work longer after rib and before sleeve cap so that the sleeve cap stil measures 8 to 14 cm (see chart). Happy knitting!
12.11.2024 - 09:22
|
||||||||||
Harald#haraldjacket |
||||||||||
 |
 |
|||||||||
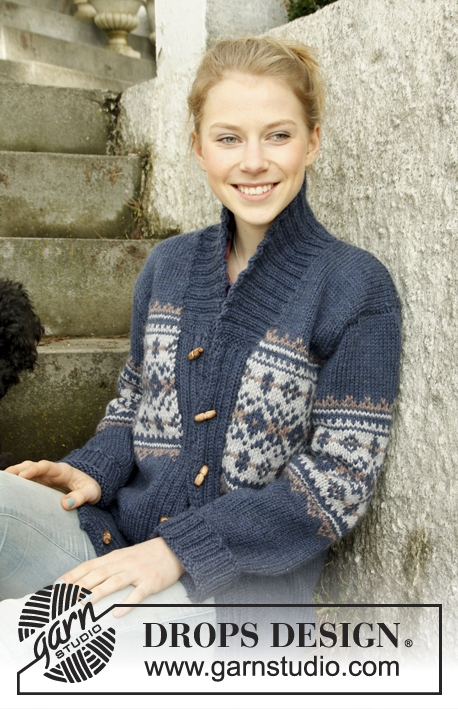
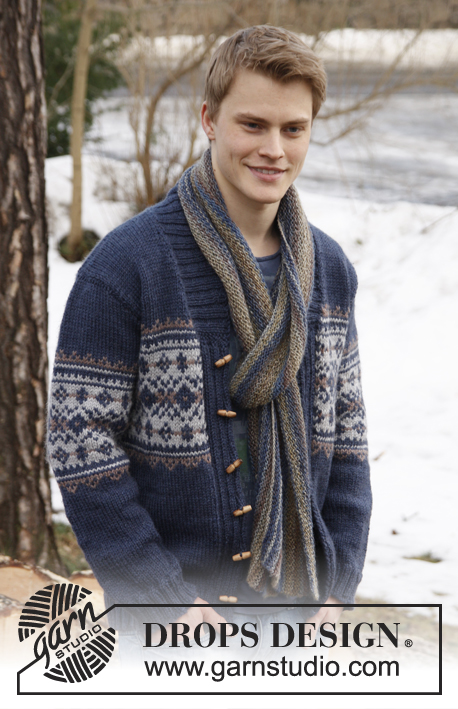
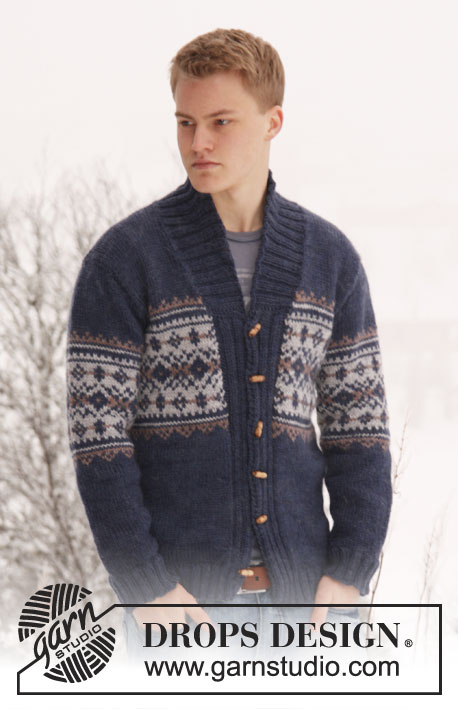
Men's knitted jacket in DROPS Alaska, with pattern and shawl collar. Size: S - XXXL.
DROPS Extra 0-813 |
||||||||||
|
GARTER ST (back and forth on needle): K all rows. BUTTON HOLES: Cast off for button holes on left band, all cast offs are done from RS. 1 button hole = P tog 5th and 6th st from mid front and make 1 YO. On next row K the YO. Cast off for button holes when piece measures: SIZE S: 6, 14, 23, 31, 40 and 48 cm. SIZE M: 6, 15, 24, 32, 41 and 49 cm. SIZE L: 6, 15, 24, 33, 42 and 50 cm. SIZE XL: 6, 13, 21, 28, 36, 43 and 51 cm SIZE XXL: 7, 14, 22, 29, 37, 44 and 52 cm SIZE XXXL: 7, 15, 22, 30, 37, 45 and 53 cm PATTERN: See diagram M.1 – the diagram shows 2 repetitions in breadth. Work entire pattern in stocking st. DECREASE TIP (applies to neckline at the front): Dec inside 1 edge st in garter st. All dec are done from RS. Dec after 1 edge st as follows: Slip 1 st as if to K, K 1, psso. Dec before 1 edge st as follows: K 2 tog. -------------------------------------------------------- BODY: Worked back and forth on circular needle from mid front. Cast on 226-246-262-286-302-330 sts on circular needle size 4 mm with dark blue Alaska. P 1 row from WS. Then work next row as follows from RS: 2 edge sts in GARTER ST - see explanation above - * K 2/P 2 *, repeat from *-* until 4 sts remain and finish with K 2 and 2 edge sts in GARTER ST. Continue rib like this until piece measures 6 cm. AT THE SAME TIME when piece measures 6-6-6-6-7-7 cm, cast off for BUTTON HOLES on left band - see explanation above. After rib, switch to circular needle size 5 mm and work next row from RS as follows: 2 sts in garter st, K 2, P 2, K 2, P 2, K 2, P 2 (= 14 band sts), work in stocking st until 14 sts remain while AT THE SAME TIME dec 53-61-65-65-69-73 sts evenly (do not dec over bands), finish with P 2, K 2, P 2, K 2, P 2, K 2 and 2 sts in garter st = 173-185-197-221-233-257 sts. Insert a marker 47-50-53-59-62-68 sts in from each side (= 79-85-91-103-109-121 sts between markers on back piece). Then work in stocking st with 14 band sts in each side towards mid front as before. REMEMBER THE KNITTING TENSION! When piece measures 32-33-34-35-36-37 cm, work diagram M.1 as follows: Work 14 band sts as before with dark blue, work diagram M.1 until 15 sts remain, work 1st st in diagram M.1 (so that pattern beg and ends the same way on each side of band) and finish with 14 band sts in dark blue as before. When piece measures 49-50-51-52-53-54 cm, work next row from RS as follows: Cast off the first 13 sts, insert a marker (this marks where to start the knit up for collar), work 31-34-37-42-45-51 sts (= right front piece), cast off 6-6-6-8-8-8 sts for armhole, work 73-79-85-95-101-113 sts (= back piece), cast off 6-6-6-8-8-8 sts for armhole and work the rest of row (= 44-47-50-55-58-64 sts on left front piece). Turn and cast off the first 13 sts, insert a marker (this marks where to end the knit up for collar), work the rest of row = 31-34-37-42-45-51 sts. Finish each part separately. BACK PIECE: = 73-79-85-95-101-113 sts. Continue diagram M.1 (when diagram M.1 has been worked 1 time vertically, continue with dark blue until finished measurements) – AT THE SAME TIME cast off for armholes at beg of every row in each side: 3 sts 0-0-0-1-1-2 times, 2 sts 1-1-2-2-3-4 times and 1 st 1-3-3-4-4-4 times = 67-69-71-73-75-77 sts remain on needle. When piece measures 68-70-72-74-76-78 cm, cast off the middle 21-21-23-23-25-25 sts for neck. Now finish each shoulder separately. Continue to cast off 1 st on next row from neck = 22-23-23-24-24-25 sts remain on the shoulder. Cast off when piece measures 70-72-74-76-78-80 cm. RIGHT FRONT PIECE: = 31-34-37-42-45-51 sts. Continue diagram M.1 as on back piece with 1 edge st in garter st towards mid front. AT THE SAME TIME cast off for armhole in the side as on back piece. AT THE SAME TIME when piece measures 50-51-52-53-54-55 cm, dec 1 st towards the neck - SEE DECREASE TIP! Repeat dec on every 4th row a total of 3-3-4-4-6-6 times, and on every 8th row a total of 3-3-3-3-2-2 time. After all cast offs and dec are done, 22-23-23-24-24-25 sts remain on shoulder. Cast off when piece measures 70-72-74-76-78-80 cm. LEFT FRONT PIECE: Work as right front piece but reversed. SLEEVE: Worked in the round on double pointed needles, switch to circular needle when needed. Cast on 52-52-56-56-60-60 sts on double pointed needles size 4 mm with dark blue. K 1 round, then work rib = K 2/P 2. When piece measures 6 cm, switch to double pointed needles size 5 mm. K 1 round while AT THE SAME TIME dec 11-9-11-11-13-13 sts evenly = 41-43-45-45-47-47 sts. Insert a marker at beg of round (= mid under sleeve). Then work in stocking st. When piece measures 7-7-7-7-9-10 cm, inc 1 st on each side of marker mid under sleeve. Repeat inc a total of 11-13-14-16-17-19 times in Size S: On every 10th round, Size M: Every 8th round, Size L: Every 7th round, Size XL: Every 6th round, Size XXL: Every 5th round and Size XXXL: Every 4th round = 63-69-73-77-81-85 sts. AT THE SAME TIME when piece measures 30-30-29-27-26-24 cm, insert a marker in the middle st on round (= mid on top of shoulder). Work diagram M.1 – NOTE: St marked with arrow in diagram should be the st with marker mid on top of sleeve. When diagram M.1 has been worked 1 time vertically, continue with dark blue until finished measurements. AT THE SAME TIME when piece measures 54-54-53-51-50-48 cm (shorter measurements in the larger sizes because of longer sleeve cap and broader shoulder width), cast off 6-6-6-8-8-8 sts mid under sleeve. Then work back and forth on needle until finished measurements. AT THE SAME TIME cast off for sleeve cap at beg of every row in each side: 2 sts 3-3-3-3-3-4 times and 1 st 2-2-2-4-4-5 times. Then cast off 2 sts in each side until piece measures 61 cm in all sizes, then cast off 3 sts 1 time in each side. Cast off the remaining sts, the piece measures approx. 62 cm in all sizes. ASSEMBLY: Sew the shoulder seams. SHAWL COLLAR: Knit up sts (inside 1 edge st) on circular needle size 4 mm with dark blue - start mid front at marker on right front piece: Knit up approx. 34 to 44 sts up to shoulder, then 22 to 28 sts along the neck, and 34 to 44 sts down along left front piece until marker = 90 to 116 sts. K 1 row from WS while AT THE SAME TIME inc no of sts to 126-130-138-142-150-154. Then work rib as follows (seen from RS): 2 sts in garter st, * K 2, P 2 *, repeat from *-* and finish with K 2 and 2 sts in garter st. Continue like this until collar measures approx. 5 cm. Now inc 1 st in each of the middle 12 P-sections, seen from RS (= back of neck) = 138-142-150-154-162-166 sts. Then work K over K and P over P until collar measures approx. 7 cm. Now work as follows: Work 1 row as before and slip the first 10 sts worked on a stitch holder, turn piece, work the rest of row and slip the first 10 sts worked at the beg of row on another stitch holder. Turn piece, work the rest of row and slip the first 10 sts worked at the beg of row on the first stitch holder, turn piece, work the rest of row and slip the first 10 sts worked at the beg of row on the other stitch holder. Continue like this until there are a total of 40 sts on the stitch holders in each side. Then slip sts from stitch holders back on needle and work 1 row as before over all the 138-142-150-154-162-166 sts – NOTE: To avoid holes in every transition where piece was turned, slip loop before next st twisted on needle and work tog with first st on needle. Cast off with K over K and P over P. Neatly fasten collar with stitches in each side towards band – sew edge to edge to avoid a chunky seam. MORE ASSEMBLY: Sew in sleeves and sew on buttons. |
||||||||||
Diagram explanations |
||||||||||
|
||||||||||
 |
||||||||||
 |
||||||||||
Have you finished this pattern?Tag your pictures with #dropspattern #haraldjacket or submit them to the #dropsfan gallery. Do you need help with this pattern?You'll find 28 tutorial videos, a Comments/Questions area and more by visiting the pattern on garnstudio.com. © 1982-2026 DROPS Design A/S. We reserve all rights. This document, including all its sub-sections, has copyrights. Read more about what you can do with our patterns at the bottom of each pattern on our site. |
||||||||||


With over 40 years in knitting and crochet design, DROPS Design offers one of the most extensive collections of free patterns on the internet - translated to 17 languages. As of today we count 325 catalogues and 12298 patterns translated into English (UK/cm). 12298
We work hard to bring you the best knitting and crochet have to offer, inspiration and advice as well as great quality yarns at incredible prices! Would you like to use our patterns for other than personal use? You can read what you are allowed to do in the Copyright text at the bottom of all our patterns. Happy crafting!
Post a comment to pattern DROPS Extra 0-813
We would love to hear what you have to say about this pattern!
If you want to leave a question, please make sure you select the correct category in the form below, to speed up the answering process. Required fields are marked *.