
Popular categories
Looking for a yarn?


Comments / Questions (214)
![]() Bobe wrote:
Bobe wrote:
Ho eseguito il modello 5/7 seguendo le direttive con le diminuzioni manica destra diminuire le prime 6 e manica sinistra le ultime 6 maglie ma al momento di inserire le maniche il disegno non combacia dalla manica destra e ovviamente poi tutta la schiena . Stranamente a partire dalla manica sinistra funziona
12.08.2019 - 18:49DROPS Design answered:
Buonasera Bobe, è sicura di aver intrecciato le maglie nello stesso punto per le maniche e per il dietro? Gli intrecci prima di unire tutto il lavoro devono essere fatti sull'ultimo ferro del diagramma. Buon lavoro!
12.08.2019 - 20:09
![]() REINE MARIE wrote:
REINE MARIE wrote:
BONSOIR J AI RECUE MA LAINE CE MATIN (muskat) elle est magnifique;merci beaucoup je me regale a faire ce magnifique gilet.a bientot
10.08.2019 - 19:46
![]() REINE MARIE wrote:
REINE MARIE wrote:
BONSOIR JE VOUS REMERCIE BEAUCOUP POUR VOTRE REPONSE MAIS VOILA J AI REUSSI MON GILET ET AVEC DE L ATTENTION ET PATIENCE J AI REUSSI A TRICOTER LES MANCHES A QUATRE AIGUILLES C EST SUPERBE .LA ;JE MONTE L EMPIECEMENT MERCI ENCORE
09.08.2019 - 21:52
![]() Ronni wrote:
Ronni wrote:
Wonder Waves pattern has 2 charts on the final page. There is no legend for those charts.... so I have no clue what in supposed to be doing, because the written pattern simply says to follow the chart. I have no clue what the stitches are because apparently different charts use different stitch symbols. Can you send me a legend for those chats please s.....o I know which stitches I'm supposed to be using?
07.08.2019 - 02:40DROPS Design answered:
Dear Ronni, you will find symbols and diagram key just above the measurement chart. Happy knitting!
07.08.2019 - 12:27
![]() REINE MARIE wrote:
REINE MARIE wrote:
BONJOUR PEUT ON TRICOTER LES MANCHES AVEC 2AIGUILLES AU LIEU DE 4AIGUILLES.MERCI
04.08.2019 - 10:46DROPS Design answered:
Bonjour Reine Marie, vous pouvez tout à fait ajuster les manches pour les tricoter en rangs - vous trouverez ici plus d'infos à ce sujet. Bon tricot!
08.08.2019 - 10:39
![]() REINE MARIE wrote:
REINE MARIE wrote:
BONJOUR PEUX T ON TRICOTER LES MMANCHES AVEC 2AIGUILLES AU LIEU DE LES TRICOTER AVEC 4AIGUILLES.MERCI
04.08.2019 - 10:43
![]() REINE MARIE wrote:
REINE MARIE wrote:
MERCI BEAUCOUP POUR L EXPLICATION JE VAIS ME REMETTRE AU TRAVAIL JE VOUS TIENS AU COURANT J ADORE VOTRE MODELE QUI EST TRES JOLI MA PETITE FILLE VA ETRE HEUREUSE MAIS IL FAUT QUE JE REUSSISSE .MERCI ENCORE BONNE SOIREE
03.08.2019 - 21:37
![]() REINE MARIE wrote:
REINE MARIE wrote:
BONJOUR VOILA JE FAIS CE JOLI MODELE POUR MA PETITE FILLE QUI A 11ANS J AI COMMENCE LA MANCHE DROITE MAIS VOILA JE COMMENCE A LA MAILLE 7EME QUI EST A L ENDROIT SUIVIE D UN JETE ET DE DEUX MAILLES ENSEMBLENT MAIS ARRIVEE A LA FIN CELA NE TOMBE PAS JUSTE AVEC LE DESSIN .POUVEZ VOUS M AIDER SVP
03.08.2019 - 20:46DROPS Design answered:
Bonjour Reine. La 7eme maille est la maille au milieu du diagramme. Vous tricotez: 1 m endroit, 1 jeté , 1 m end, 1 jeté, 1 m end et puis 2 maille ensemble à l’end. Bon tricot!
03.08.2019 - 21:28
![]() Linda wrote:
Linda wrote:
Goedemiddag, betreft Wonder wave vestje maat 3/4: ik ben begonnen met het breien van de rechtermouw op 3 naalden. ALs ik aan patroon M1 en later M2 begin houd ik dan de rechte en averechte naalden van het patroon aan? Omdat ik nu rond brei is het resultaat dan toch anders dan bij het lijfje dat ik op rechte nld heb gebreid.
11.07.2019 - 14:45DROPS Design answered:
Dag Linda,
In het telpatroon staat aangegeven hoe je de betreffende naald op de verkeerde danwel goede kant breit. Als je dit aanhoud, komt het goed. De zwarte bolletjes brei je dus recht aan de verkeerde kant en averecht aan de goede kant.
12.07.2019 - 08:12
![]() Linda wrote:
Linda wrote:
Goedemiddag, betreft Wonder wave vestje maat 3/4: ik ben begonnen met het breien van de rechtermouw op 3 naalden. ALs ik aan patroon M1 en later M2 begin houd ik dan de rechte en averechte naalden van het patroon aan? Omdat ik nu rond brei is het resultaat dan toch anders dan bij het lijfje dat ik op rechte nld heb gebreid.
11.07.2019 - 14:43
|
|||||||||||||
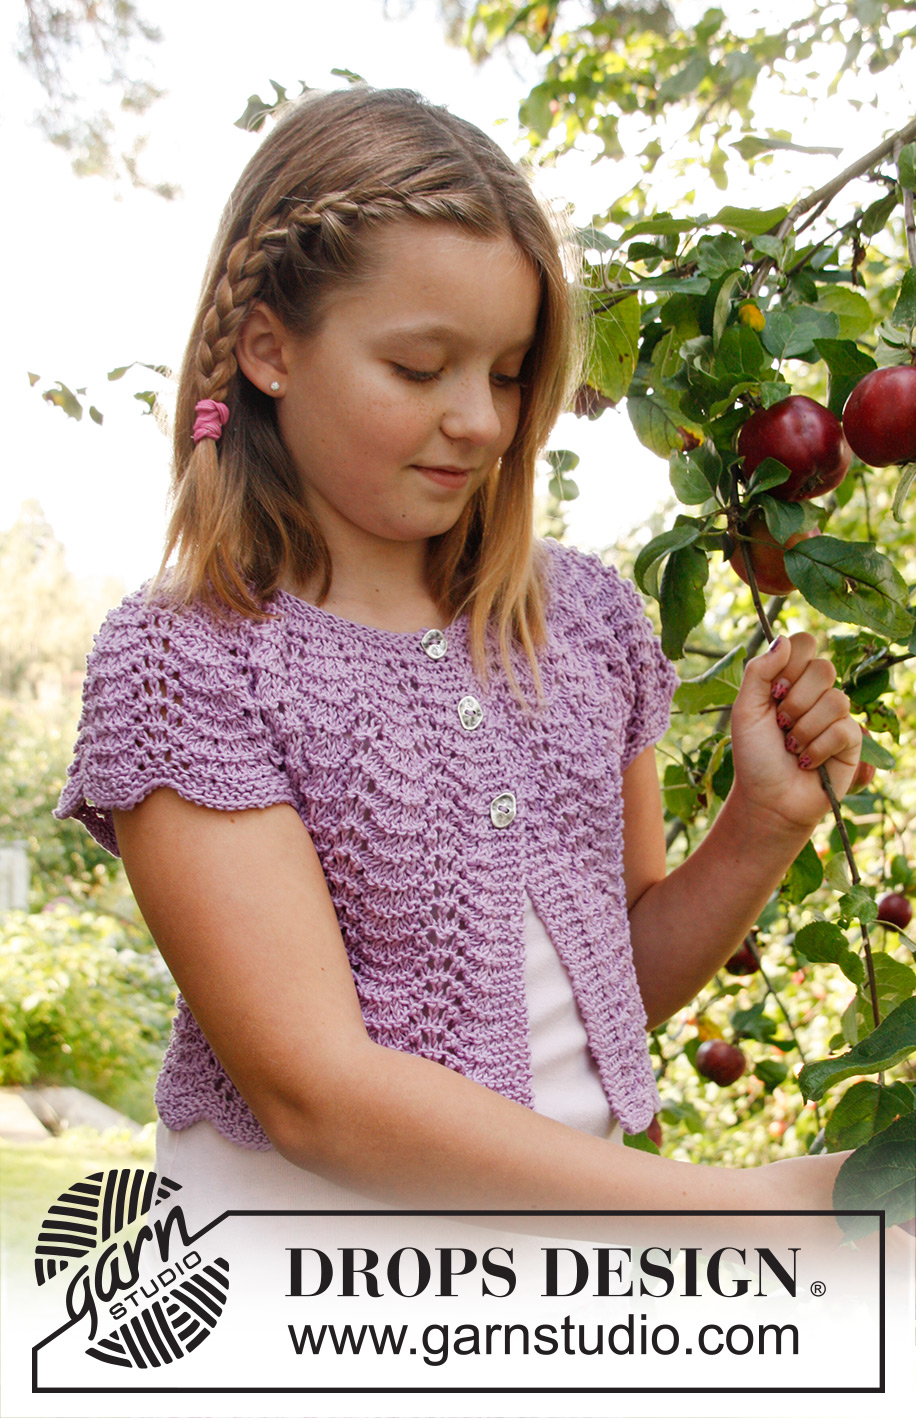
Wonder Wave#wonderwavecardigan |
|||||||||||||
|
|
|||||||||||||
Knitted DROPS jacket with short sleeves, wavy pattern and round yoke in ”Muskat”. Size 3 - 12 years
DROPS Children 22-22 |
|||||||||||||
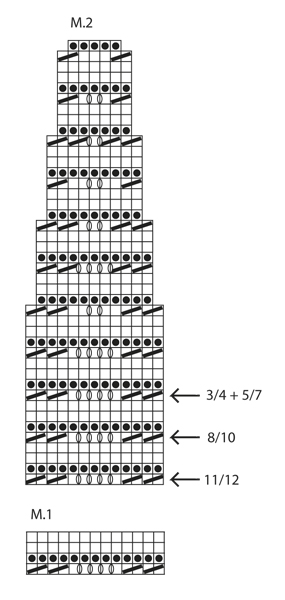
|
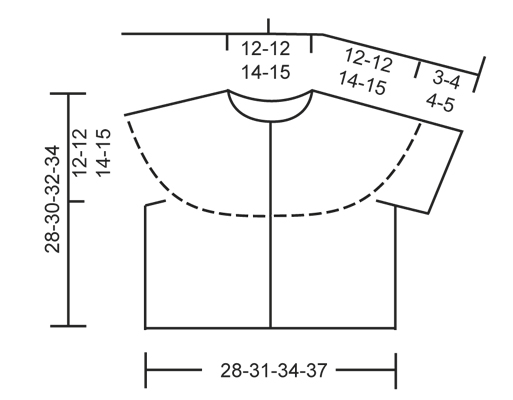
WAVY PATTERN: See diagrams M.1 and M.2. The diagrams show pattern from RS. GARTER ST (in the round on double pointed needles/circular needle): 1 ridge = 2 rounds * K 1 round and P 1 round *, repeat from *-*. BUTTON HOLES: Cast off for button holes on right band from RS. 1 button hole = cast off 3rd band st from edge, on next row cast on 1 new st over the cast off st. Cast off for button holes when piece measures: SIZE 3/4 years: 18, 23 and 27 cm SIZE 5/7 years: 20, 25 and 29 cm SIZE 8/10 years: 21, 27 and 31 cm SIZE 10/12 years: 23, 29 and 33 cm NOTE: Last button hole is cast off on row after diagram M.2 has been worked. --------------------------------------------------------- BODY: Worked back and forth on circular needle from mid front. Loosely cast on 152-166-180-194 sts (incl 5 band sts in each side) on circular needle size 4 mm with Muskat. Work first row as follows from RS: * K 10, K 2 tog *, repeat from *-* until 8-10-12-14 sts remain, K these sts = 140-153-166-179 sts. Then K 3 rows back and forth. Continue with diagram M.1 with 5 band sts in each side in garter st until finished measurements. REMEMBER THE KNITTING TENSION! When piece measures approx. 16-18-18-19 cm (adjust so that 1 row remains of diagram M.1), work next row as follows (= WS): Work 34-37-41-44 sts, loosely cast off 7-7-6-6 sts for armhole, work 58-65-72-79 sts, loosely cast off 7-7-6-6 sts for armhole and work the rest of row (= 34-37-41-44 sts). Put piece aside and knit the sleeves. RIGHT SLEEVE: Worked in the round on double pointed needles. Cast on 59-59-74-74 sts on double pointed needles size 4 mm with Muskat. Work first round as follows: * K 6, K 2 tog *, repeat from *-* until 3-3-2-2 sts remain, K these sts = 52-52-65-65 sts. Then P 1 round, K 1 round and P 1 round. Insert a marker at the beg of the round. Continue with diagram M.1 - beg in the 11th-1st-4th-7th sts in diagram, count from the right (in size 3/4 and 8/10 years, K first st, and at the end of round K this st tog with the last st on round). Continue working like this until piece measures approx. 3-4-4-5 cm (adjust so that 1 round of diagram M.1 remains). On next round cast off the FIRST 6-6-7-7 sts, work the rest of round = 46-46-58-58 sts. LEFT SLEEVE: Cast on and work as right sleeve but when piece measures 3-4-4-5 cm, cast off like this: Size 3/4 and 8/10: cast off the FIRST 6-7 sts on round Size 5/7 and 11/12: cast off the LAST 6-7 sts on round (this is important to make the pattern correct on yoke). YOKE: Slip sleeves on to same circular needle as body where armholes were cast off = 218-231-270-283 sts. NOTE: It is very important that the right sleeve is inserted in the right side and the left sleeve is inserted in the left side so that the pattern fits onwards. Continue with diagram M.2 – start at the arrow for the correct size - with 5 band sts in garter st in each side (= 16-17-20-21 repetitions on the round). AT THE SAME TIME when piece measures 18-20-21-23 cm, cast off for BUTTON HOLES - see explanation above. When diagram M.2 has been worked vertically, 90-95-110-115 sts remain on needle. Work next row as follows from RS: K 5 (while at the same time casting off for the last button hole), * K 2 tog, K 1 *, repeat from *-* until 7-6-6-5 sts remain, K these sts = 64-67-77-80 sts. K 3-3-5-5 rows back and forth, then cast off with K from RS. ASSEMBLY: Sew tog the openings under the sleeves and sew on buttons. |
|||||||||||||
Diagram explanations |
|||||||||||||
|
|||||||||||||
 |
|||||||||||||
 |
|||||||||||||
Have you finished this pattern?Tag your pictures with #dropspattern #wonderwavecardigan or submit them to the #dropsfan gallery. Do you need help with this pattern?You'll find 13 tutorial videos, a Comments/Questions area and more by visiting the pattern on garnstudio.com. © 1982-2026 DROPS Design A/S. We reserve all rights. This document, including all its sub-sections, has copyrights. Read more about what you can do with our patterns at the bottom of each pattern on our site. |
|||||||||||||


With over 40 years in knitting and crochet design, DROPS Design offers one of the most extensive collections of free patterns on the internet - translated to 17 languages. As of today we count 325 catalogues and 12298 patterns translated into English (UK/cm). 12298
We work hard to bring you the best knitting and crochet have to offer, inspiration and advice as well as great quality yarns at incredible prices! Would you like to use our patterns for other than personal use? You can read what you are allowed to do in the Copyright text at the bottom of all our patterns. Happy crafting!
Post a comment to pattern DROPS Children 22-22
We would love to hear what you have to say about this pattern!
If you want to leave a question, please make sure you select the correct category in the form below, to speed up the answering process. Required fields are marked *.