
Popular categories
Looking for a yarn?


Comments / Questions (51)
![]() Karin wrote:
Karin wrote:
Hallo, möchte sehr gerne den Kragen stricken, aber ich verstehe nicht, wie die Rückreihe gestrickt wird. In der Anleitung steht das Diagramm zeigt die Hin und Rückreihe der Vorderseite.? Was bedeutet dies? Wie stricke ich die 2. Musterreihe? Sorry, aber ich bin noch Anfänger. LG
13.10.2017 - 19:19DROPS Design answered:
Liebe Karin, der Kragen ist in der Runde gestrickt, dh immer von der Vorderseite. Wenn Sie M.1 stricken, lesen Sie jede Runde von rechts nach links (bei der rechten Ecke unten anfangen), dh Reihe 1 im M.1 = 1 M li, 11 M re. Reihe 2 im M.1: 1 M li, 1 Umschlag, 4 M re, 1 M. re. abheben, 2 re. zusammen, die abgehobene über die gestrickten ziehen, 4 M re, 1 Umschlag. Viel Spaß beim stricken!
16.10.2017 - 09:20
![]() Marianna wrote:
Marianna wrote:
Fino a li ho capito.... ma le maglie da diminuire sono 2 per giro è il primo schema con i calati che faccio
14.07.2017 - 10:09DROPS Design answered:
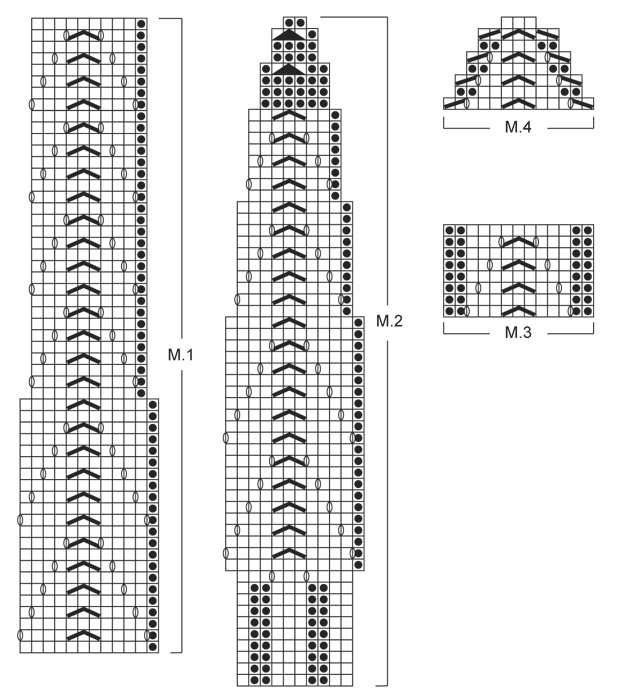
Buongiorno Marianna. Il diagramma M2 viene lavorato 9 volte sulle maglie del giro (9 ripetizioni del motivo). Quando lavora il giro 32, diminuisce 2 maglie in ognuna di queste ripetizioni; quindi su tutto il giro, diminuisce 2 m x 9 volte = 18 maglie. Analogamente al giro 42 e sugli altri giri con diminuzioni. Buon lavoro!
14.07.2017 - 11:04
![]() Marianna wrote:
Marianna wrote:
Ho bisogno di aiuto nelo schema M2 non capisco quando si iniziano a calare le maglie mi aiutate
13.07.2017 - 21:38DROPS Design answered:
Buonasera Marianna, seguendo il diagramma M.2 le maglie verranno diminuite in modo graduale: la prima diminuzione viene lavorata sul 32° giro, segua il diagramma dal basso verso l'alto e da destra verso sinistra. Buon lavoro!
13.07.2017 - 21:55
![]() Birthe wrote:
Birthe wrote:
Garnmængden passer ikke til Halsen i største str.. Har lavet strikkeprøve og strikkefastheden passer , der skal bruges 250G. vil i rette dette?
06.01.2017 - 17:34DROPS Design answered:
Hej Birthe. Vi har endnu ikke modtaget andre lignende kommentarer paa dette populaere mönster, men kommer de saa skal vi revidere opskriften.
11.01.2017 - 12:12
![]() Birthe Nielsen wrote:
Birthe Nielsen wrote:
Der er oplyst forkert mængde garn til halskraven, der skal bruges 250g til den største str. har tjekket strikkefastheden.
29.12.2016 - 19:33Nicole wrote:
I am working on the hat and am running out of correct number of stitches before next round starts. So my pattern looks wrong all the way up that part of hat. Picture looks even all the way around. I am counting and have correct number on needles. Anyone else have this issue? Help starting over again!
27.01.2015 - 18:14DROPS Design answered:
Dear Nicole, you are working M2 in the round for the hat, ie you will repeat 9 times M1 in width around. On 10th round in M2 you inc 2 sts x 9 repeat = 18 sts (+90 sts = 108 sts). Then you will dec 2 sts per repeat on row 32, 42, 50, 54, 57 (ie 2 dec x 9 repeats x 5 dec row = 90 sts dec), 2sts remain per repeat = 18 sts left when M.2 has been worked 1 time in height. Do not hesitate to add a marker between each repeat so that you can check your number of sts on each row. Happy knitting!
28.01.2015 - 10:38
![]() Lillvohr Andersson wrote:
Lillvohr Andersson wrote:
Mönster 131-35 är ej komplett, resårkanten på mössan finns ej med den får man titta på bilden för att räkna ut maskantalet och antal varv själv
02.11.2013 - 07:28DROPS Design answered:
Resårkanten på mössan är med i diagrammet. Se även tidigare svar!
04.11.2013 - 13:29Fecanas wrote:
For the hat how is the ribbing done?
11.08.2013 - 14:23DROPS Design answered:
Dear Mrs Fecanas, for the hat, follow diagram M.2 from the beg. it includes ribbing. Happy knitting!
12.08.2013 - 08:44
![]() Silke wrote:
Silke wrote:
Der nächste Winter kommt bestimmt! Hab die Mütze gestrickz. Es ging ganz einfach und sie gefällt mir sehr gut. Danke für die Anleitung.
19.07.2013 - 17:05
![]() Martine wrote:
Martine wrote:
Modèle très facile à réaliser, même si débutante
18.11.2012 - 12:11
|
||||||||||||||||||||||
Florence Set#florenceset |
||||||||||||||||||||||
 |
 |
|||||||||||||||||||||
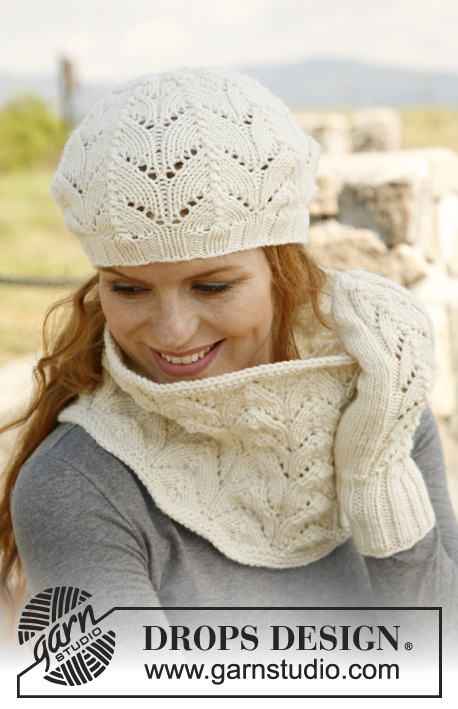
Knitted DROPS neck warmer, mittens and hat with lace pattern in ”Nepal”.
DROPS 131-35 |
||||||||||||||||||||||
|
GARTER ST (in the round on circular needle): 1 ridge = 2 rounds * K 1 round and P 1 round *, repeat from *-*. PATTERN: See diagrams M.1-M.4. Diagrams show pattern from RS and the entire pattern is worked in the round on circular needle or double pointed needles. INCREASE TIP – for mitten: Inc 1 st by making 1 YO, on next row K YO twisted (i.e. work in back loop of st instead front) to avoid holes. DECREASE TIP – for mitten: Dec on same round as dec in diagram M.4. Dec as follows at 1st marker: Work until 1 st remains before marker, slip 1 st as if to K, K 1, psso. Dec as follows at 2nd marker: work until 1 st remains before marker, K 2 tog. -------------------------------------------------------- -------------------------------------------------------- NECK WARMER: Worked in the round on circular needle. Cast on 132-144-156-168 sts with Nepal on circular needle size 5 mm. Work 4 rounds in GARTER ST - see explanation above. Then work diagram M.1. When diagram M.1 has been worked, 110-120-130-140 sts remain on round. Work 4 rounds in GARTER ST and cast off. -------------------------------------------------------- -------------------------------------------------------- HAT: Worked in the round on circular needle. Cast on 90 sts on circular needle size 3.5 mm with Nepal. Then work diagram M.2 - while AT THE SAME TIME after 10 rounds switching to circular needle size 5 mm. REMEMBER THE KNITTING TENSION! – Switch to double pointed needles size 5 mm when needed. When diagram M.2 has been worked, 18 sts remain on round. Cut the thread and pull it through the remaining sts, tighten tog and fasten. The hat measures approx. 24 cm vertically. To make the hat keep its shape - moisten it and place it over a large plate to dry. -------------------------------------------------------- -------------------------------------------------------- MITTEN: Worked in the round on double pointed needles. Cast on 39-39 sts on double pointed needles size 3.5 mm with Nepal and K 1 round. Then work rib as follows = P 2, K 2, P 2, K 2, P 2, K 1, * P 2, K 2 *, repeat from *-* the entire round. Continue with K over K and P over P until rib measures 8-9 cm. Switch to double pointed needles size 4 mm, work next round as follows: K 4, P 2, K 9, P 2, K the remaining sts - while AT THE SAME TIME dec 4-1 sts evenly = 35-38 sts on the round. Work next round as follows: K 4, diagram M.3 over the next 13 sts, K the remaining sts. When piece measures 11-13 cm, inc 1 st on each side of first st on round for thumb – READ INCREASE TIP – (on the other mitten, inc on each side of 4th st after M.3). Repeat inc on each side of the inc sts on every other round a total of 5 times = 45-48 sts. Now slip the 11 thumb sts on a stitch holder. Then work in stocking st and with pattern while AT THE SAME TIME casting on 1 new st behind thumb on next round = 35-38 sts. When mitten measures approx. 25-27 cm - adjust to finish after 1 whole repetition of diagram M.3 (approx. 3 cm remain until finished measurements) insert 2 markers: 1 marker after 21st-23rd st and 1 marker after 31st- 32nd st (= 10-9 sts between markers). Then dec for tip on the underside by dec 1 st at every marker on every other round – Read DECREASE TIP – while AT THE SAME TIME working diagram M.4 over M.3. When diagram M.4 has been worked, 17-20 sts remain on needle. On next round work all sts tog 2 by 2. Cut the thread and pull it through the remaining sts, tighten tog and fasten. THUMB: Slip the 11 thumb sts back on double pointed needles size 4 mm. In addition knit up 4-5 sts behind thumb = 15-16 sts. Work in stocking st until the thumb itself measures approx. 4½-5½ cm (try on the mitten, approx. ½ cm remains until finished measurements). Now dec by working the sts tog 2 by 2. Repeat dec on next round. Cut the thread and pull it through the remaining sts, tighten tog and fasten. |
||||||||||||||||||||||
Diagram explanations |
||||||||||||||||||||||
|
||||||||||||||||||||||
 |
||||||||||||||||||||||
Have you finished this pattern?Tag your pictures with #dropspattern #florenceset or submit them to the #dropsfan gallery. Do you need help with this pattern?You'll find 16 tutorial videos, a Comments/Questions area and more by visiting the pattern on garnstudio.com. © 1982-2026 DROPS Design A/S. We reserve all rights. This document, including all its sub-sections, has copyrights. Read more about what you can do with our patterns at the bottom of each pattern on our site. |
||||||||||||||||||||||


With over 40 years in knitting and crochet design, DROPS Design offers one of the most extensive collections of free patterns on the internet - translated to 17 languages. As of today we count 324 catalogues and 12260 patterns translated into English (UK/cm). 12260
We work hard to bring you the best knitting and crochet have to offer, inspiration and advice as well as great quality yarns at incredible prices! Would you like to use our patterns for other than personal use? You can read what you are allowed to do in the Copyright text at the bottom of all our patterns. Happy crafting!
Post a comment to pattern DROPS 131-35
We would love to hear what you have to say about this pattern!
If you want to leave a question, please make sure you select the correct category in the form below, to speed up the answering process. Required fields are marked *.