
Popular categories
Looking for a yarn?


Comments / Questions (50)
![]() Mette Rose wrote:
Mette Rose wrote:
Jeg har lavet en stikkeprøve på pinde tre der bliver helt hen i vejret. Hvis jeg måler den uden at trække i prøven bliver den 28 masker og ca 40 pinde. Prøven i ret passer dog med jeres angivelser men det fremgår at man skal labbe prøven i mønster. Passer strikketesten hos jer? Garnet har den rigtige tykkelse, 2,5-3 og prøven er pæn. Kan i give et råd?
18.03.2015 - 18:15DROPS Design answered:
Hej Mette. Pröv med en tykkere pind - og vask pröven för du maaler.
20.03.2015 - 14:55
![]() Anett Lind wrote:
Anett Lind wrote:
Jeg kan ikke få masketallet på forstykket til at passe. Jeg synes,at det er alt for stort. På ryggen er der 116 masker, mens der er 71 masker til forstykket. Er det rigtigt?
31.12.2014 - 22:28DROPS Design answered:
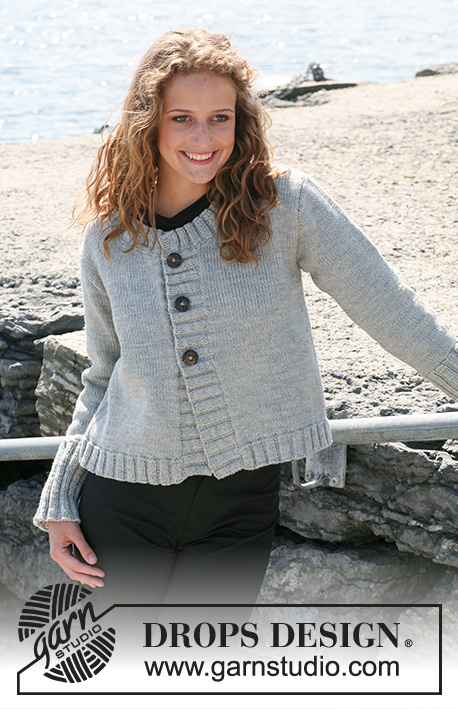
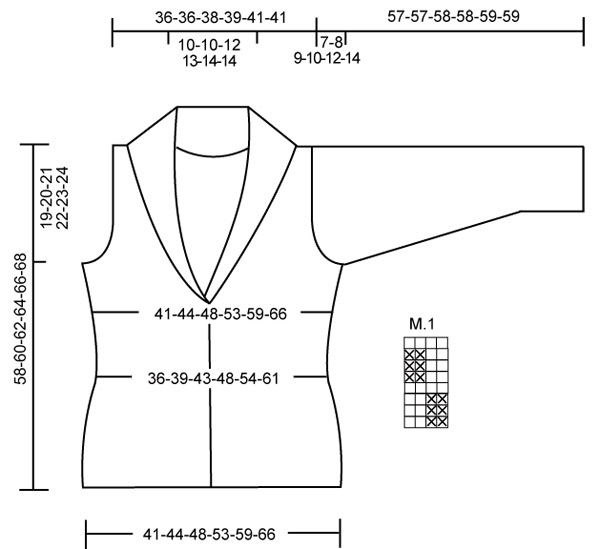
Hej Anett. Ja, det er korrekt der er 72 m til sidst inden du lukker af til skulder. Men forstykkerne skal overlappe hinanden et godt stykke som du ogsaa kan se paa billedet (14 m), saa det kommer til at passe fint.
14.01.2015 - 14:59
![]() Joa wrote:
Joa wrote:
Jeg måtte trevle en del op, da den blev alt for lille, strikker nu større model og 1/2 nr. tykkere pinde, og den svarer til en str. M. Ja, forklaringen på de ekstra 2 p på forstykket brude være bedre forklaret i opskriften. Ellers en rigtig sød model.
08.02.2014 - 14:50
![]() Elizabeth wrote:
Elizabeth wrote:
I found the tension on the pattern is impossible to work. To increase the size of the needles does not suit the Alpaca wool, it has no elasticity. My daughter in law chose the pattern so I could knit it as a gift but result was very disappointing as I had to work to a much larger size and compensate for the length of sleeves etc.
19.12.2013 - 23:27
![]() Josie wrote:
Josie wrote:
Wie liest man das Muster M1 richtig: Für die Hinreihen von rechts nach links und für die Rückreihen von links nach recht? Oder immer von rechts? Und wie wende ich das Muster auf das Nadelspiel für die Ärmel an, wenn es keine Rückreihen gibt?
06.05.2013 - 17:12DROPS Design answered:
Liebe Josie, ja lesen Sie das Muster so. Es ist wichtig, dass sich das Muster von der Vorderseite aus gesehen so ergibt wie im Diagramm abgebildet. Zu Ihrer zweiten Frage haben wir die Legende zum Diagramm umformuliert, nun ist es leichter verständlich.
07.05.2013 - 07:03
![]() Melanie wrote:
Melanie wrote:
Wie strickt man bei diesem modell bzw.z. B. bei pullovern die randmaschen am ausschnitt ?
23.02.2013 - 15:25DROPS Design answered:
Liebe Melanie, die Randmaschen werden bei unseren Modellen immer kraus re (jede R re) gestrickt.
25.02.2013 - 08:42Esmeralda wrote:
El patrón está excelente , nosotras somos tallas grandes y casi todos los patrones lo sacan para flacas, se anotaron 100 puntos, gracias.
06.02.2013 - 16:17
![]() Ans Roelofs wrote:
Ans Roelofs wrote:
Hallo, kunt u mij de tip voor breien tav de voorbies goed uitleggen, want zoals ik lees kom ik er niet uit. er staat 2 nld alleen over de voorbiesst op elke 5 cm. Maar wat zijn die 2 naalden dan. Wat moet ik doen of wat moet ik laten? Alvast bedankt voor de moeite. Ik vind het een geweldig patroon. Met vriendelijke groet, Ans Roelofs
30.12.2012 - 11:49DROPS Design answered:
Je breit dus 2 nld extra over de voorbiesst (14 ribbelst) op elke 5 cm. Het is in feite een nld met een verkorte toer (zie video index onder V en kies de basismethode). Je breit 14 ribbelst, keert het werk en breit terug. Brei door over alle st zoals eerder.
06.01.2013 - 15:39
![]() Pauliina wrote:
Pauliina wrote:
Kädentien kavennuksissa on ohjeessa virhe. Silmukat ei täsmää.
13.11.2012 - 08:13
![]() Brendalee wrote:
Brendalee wrote:
Falling in love with the style, I had to make this my first project after a 20 year hiatus from any knitting. I substituted stockinette for all of the garter stitch areas, and incorporated a tubular cast-on (thanks to your tutorial video), which resulted in a terrific urban look.
22.10.2012 - 22:54
|
|||||||
The Myth of Amethyst |
|||||||
|
|
|||||||
Knitted DROPS jacket with textured pattern in ”Alpaca”. Size S - XXXL.
DROPS 108-13 |
|||||||
|
Garter st, back and forth on needle: K all rows. Garter st, in the round: K 1 round, P 1 round. Knitting tip: When working front pieces, work 2 rows on front bands only on approx every 5 cm (garter st tends to tighten, so do this to make front bands fit the jacket). Pattern: See diagram M.1. Diagram shows the pattern from the RS. Back piece: Worked back and forth on needle. Cast on 100-108-116-128-144-160 sts (includes 1 edge st each side) on needle size 3 mm with Alpaca. Work 8 rows garter st – see above, and continue in M.1 with 1 edge st each side. Note: beg and finish M.1 with 2 K sts to make pattern fit at the side. Continue in pattern like this until finished measurements. Remember the knitting tension! When piece measures 8 cm dec 2 sts each side, and repeat the dec on every 5 cm a total of 3 times = 88-96-104-116-132-148 sts. When piece measures 24 cm inc 2 sts each side, and repeat the inc on every 6-6-7-7-8-8 cm a total of 3 times = 100-108-116-128-144-160 sts. When piece measures 39-40-41-42-43-44 cm cast off for armhole each side at the beg of every row: 5 sts 1 time, 4 sts 0-1-1-1-2-4 times and 2 sts 1-1-2-4-5-5 times = 86-86-90-94-98-98 sts. When piece measures 56-58-60-62-64-66 cm cast off the middle 22-22-26-30-32-32 sts for neck and dec 1 st on neckline on next row = 31-31-31-31-32-32 sts left on each shoulder. Cast off when piece measures 58-60-62-64-66-68 cm. Right front piece: Cast on 63-67-71-79-87-95 sts (includes 1 edge st at side and 14 front band sts towards mid front) on needle size 3 mm with Alpaca. Work 8 rows garter st and continue as follows from mid front: 14 garter sts (= front band), M.1 on the next 48-52-56-64-72-80 sts, 1 edge st. Read Knitting tip! When piece measures 8 cm dec at the side as described for back piece = 57-61-65-73-81-89 sts. Read all of the following section before continuing! When piece measures 24 cm inc at the side as described for back piece. At the same time when piece measures 33-35-36-38-39-41 cm inc 1 st in the outermost st towards mid front on every 2.5 cm a total of 10 times. Work inc sts in garter st. At the same time when piece measures 34-36-37-39-40-42 cm work 1 extra st into front band (i.e. no of sts remain the same, but no of garter sts inc and no of sts in pattern dec) on every 2-2-1.5-1.5-1.5-1.5 cm a total of 11-11-13-17-18-18 times. At the same time when piece measures 39-40-41-42-43-44 cm cast off for armhole at side as described for back piece. After all dec and inc are complete there are 66-66-68-72-74-74 sts on row (35-35-37-41-42-42 garter sts for collar and 31-31-31-31-32-32 sts in pattern on shoulder). When piece measures 58-60-62-64-66-68 cm cast off the 31-31-31-31-32-32 shoulder sts and continue on the 35-35-37-41-42-42 sts for collar in garter st as follows: * work 2 rows on all sts, work 2 rows on the 18-18-19-20-21-21 sts towards mid front only *, repeat from *-* until collar measures 7-7-8-8.5-9-9 cm (measured on the shorter side) from shoulder. Cast off. Left front piece: Like right front piece, but mirrored. Sleeve: Worked in the round on double pointed needles. Cast on 48-48-52-52-56-60 sts on needles size 3 mm in Alpaca. Insert a marking Thread (MT) at beg of round. Work 16 rounds garter st – see above, and then continue in M.1 on all sts. When piece measures 8-8-12-12-8-7 cm inc 1 st on each side of MT on every 2.5-2-1.5-1.5-1.5-1.5 cm a total of 16-19-21-23-24-25 times = 80-86-94-98-104-110 sts. Incorporate the inc sts in M.1 as you go along. When piece measures 50-49-49-48-47-45 cm – less for the larger sizes because of longer sleeve cap and wider shoulder - cast off 3 sts on both sides of MT and complete piece back and forth on needle. Cast off for sleeve cap each side at the beg of every row: 2 sts 4-4-5-5-6-6 times, 1 st 1-2-2-3-4-7 times, then 2 sts each side until piece measures 56-56-57-57-58-58 cm, now cast off 3 sts each side 1 time and cast off remaining sts. Sleeve measures approx 57-57-58-58-59-59 cm. Assembly: Sew shoulder seams. Sew side seams inside 1 edge st. Set in sleeves. Sew collar tog mid back and sew to neckline. Crochet border/ buttonhole loops: Beg at the bottom on right front piece, work round neckline and down along left front piece. Crochet with crochet hook size 3 mm as follows: 1 dc, * 3 ch, skip approx 1-1.5 cm, 1 dc in next st *, repeat from *-*. At the same time approx 10 to 12 cm from bottom edge on right front piece make 1 buttonhole loop by working 5 ch instead of 3 ch. Make another 2 buttonhole loops on right front piece with approx 8-8-8-9-9-9 cm between each. Sew on buttons in the innermost garter st on left front piece. |
|||||||
Diagram explanations |
|||||||
|
|||||||
 |
|||||||
Have you finished this pattern?Tag your pictures with #dropspattern or submit them to the #dropsfan gallery. Do you need help with this pattern?You'll find 22 tutorial videos, a Comments/Questions area and more by visiting the pattern on garnstudio.com. © 1982-2026 DROPS Design A/S. We reserve all rights. This document, including all its sub-sections, has copyrights. Read more about what you can do with our patterns at the bottom of each pattern on our site. |
|||||||


With over 40 years in knitting and crochet design, DROPS Design offers one of the most extensive collections of free patterns on the internet - translated to 17 languages. As of today we count 325 catalogues and 12298 patterns translated into English (UK/cm). 12298
We work hard to bring you the best knitting and crochet have to offer, inspiration and advice as well as great quality yarns at incredible prices! Would you like to use our patterns for other than personal use? You can read what you are allowed to do in the Copyright text at the bottom of all our patterns. Happy crafting!
Post a comment to pattern DROPS 108-13
We would love to hear what you have to say about this pattern!
If you want to leave a question, please make sure you select the correct category in the form below, to speed up the answering process. Required fields are marked *.