
Looking for a yarn?


Comments / Questions (3)
![]() Rena wrote:
Rena wrote:
Guten Tag Ich habe die Maschen am Ärmel aufgenommen Wo wird der Markierer genau gsetzt ? Ca 5 cm weiter nach unten = Heißt das 5 cm in Richtung Vorderteil? Danke für eine kurze Antwort
19.08.2025 - 13:28DROPS Design answered:
Liebe Rena, ja genau, schauen Sie diese Lektion, wir zeigen, wie man die Ärmel für so ein Modell stricken, einschl. wo dieser Markierer eingesetzt wird. Viel Spaß beim Stricken!
20.08.2025 - 07:42
![]() Julia wrote:
Julia wrote:
Hallo, mir ist aufgefallen, dass es in der Anleitung Unklarheiten gibt. Soll das Vorderteil und die Ärmel mit Nadelstärke 3,5 oder 4 gestrickt werden? Ich vermute, dass Nadelstärke 4 korrekt ist. Könnten Sie das bitte überprüfen und gegebenenfalls korrigieren, vielen Dank.
13.02.2025 - 20:09DROPS Design answered:
Liebe Julia, die Ärmel werden mit Nadeln 5 und 4 gestrickt, eine Korrektur erfolgt, danke für den Hinweis. Viel Spaß beim Stricken!
14.02.2025 - 08:36
![]() Francine Deguel wrote:
Francine Deguel wrote:
Bonjour, je pense qu'il y a un soucis pour l'encolure devant , si je fait aprés les mailles de montage du devant les 9 cm puis les augmentations comme vous dite je me retrouve avec une encolure trop basse, en voyant la vidéo c'est tout de suite que l'on commence les mailles en biais ? merci Francine
18.10.2024 - 06:35DROPS Design answered:
Bonjour Mme Deguel, les vidéos ne sont là que pour monter la technique, pour chaque modèle, la hauteur de l'encolure sera différente, ici en l'occurence, on va tricoter 9 cm avant d'augmenter pour l'encolure puis on va augmenter 4 fois (soit 8 rangs); on aura donc une encolure plus profonde que dans la vidéo (ou même dans la leçon). Bon tricot!
18.10.2024 - 08:48
|
|
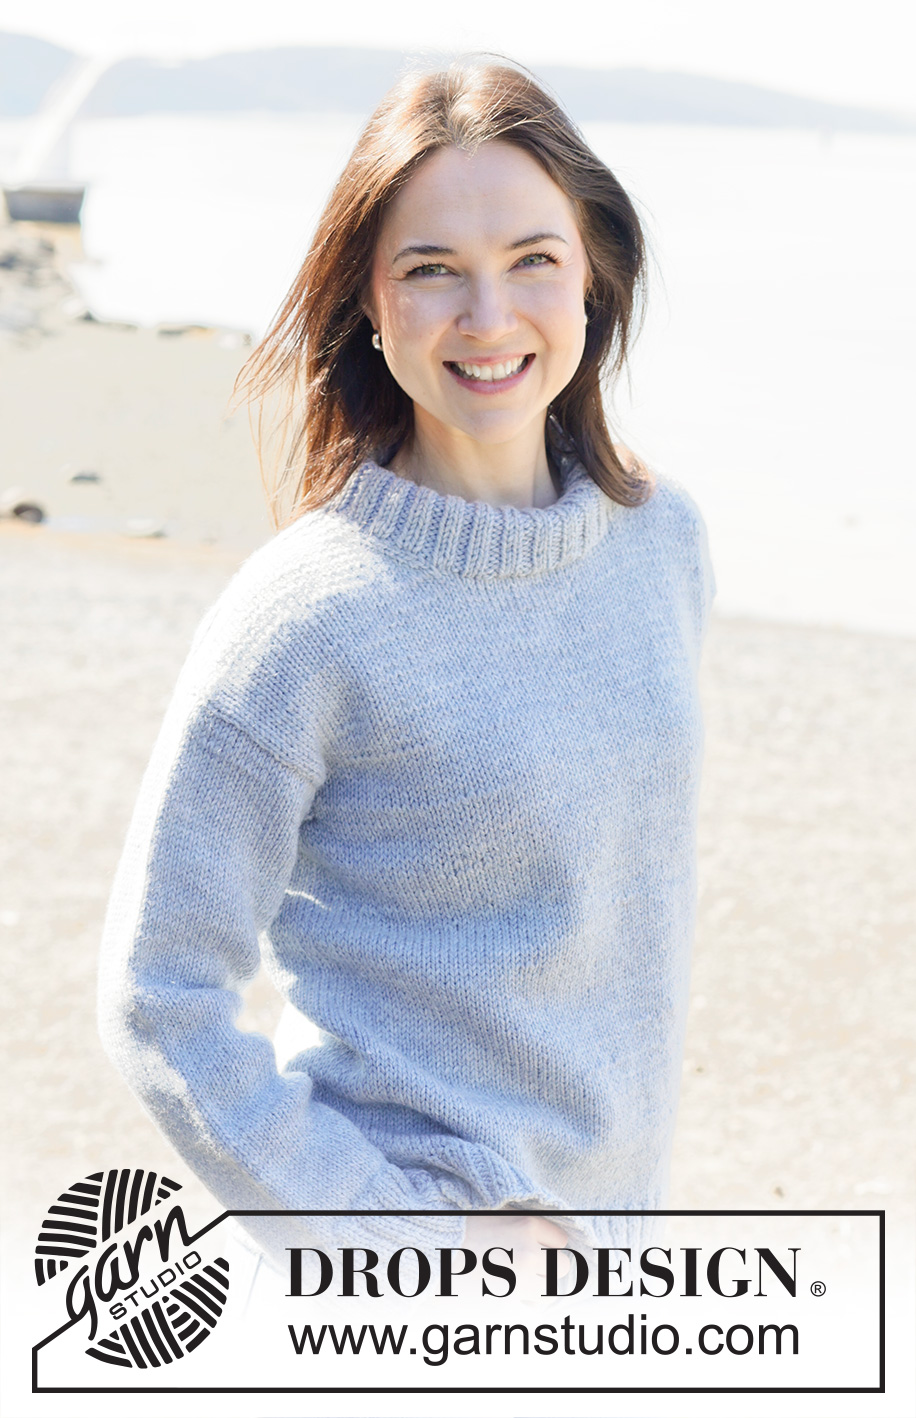
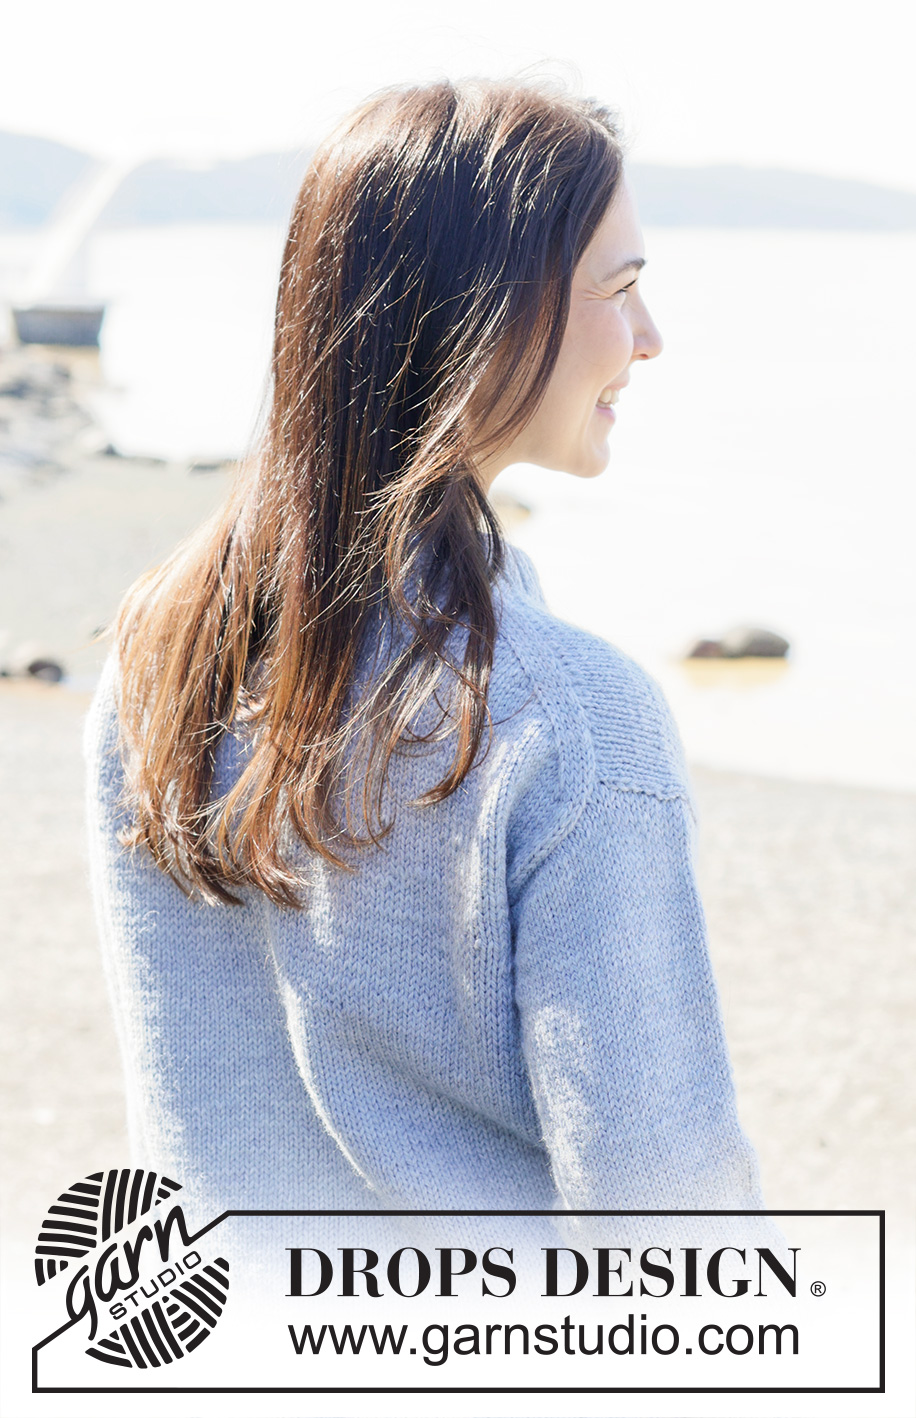
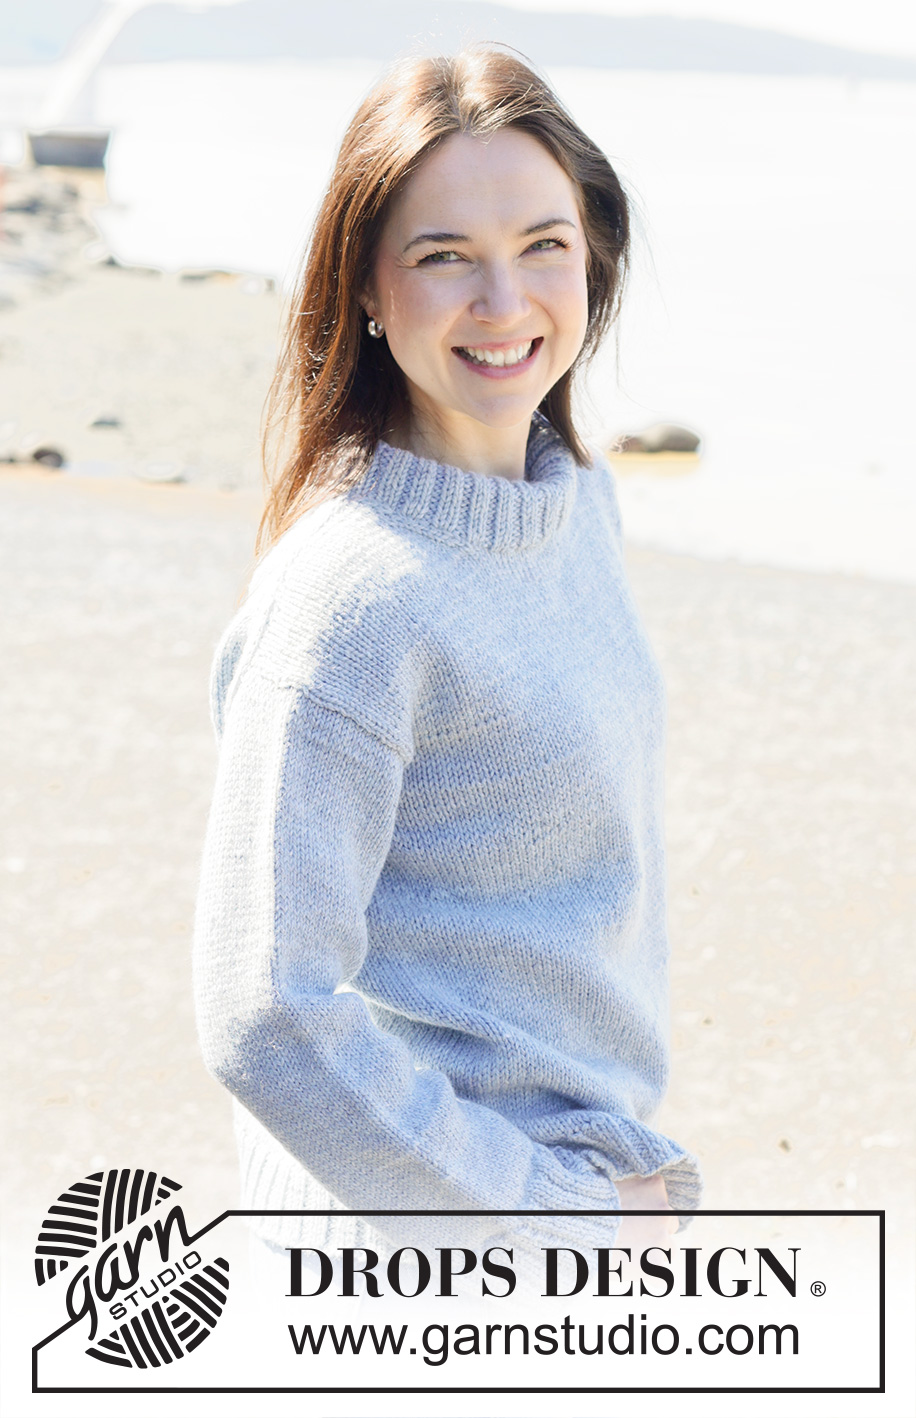
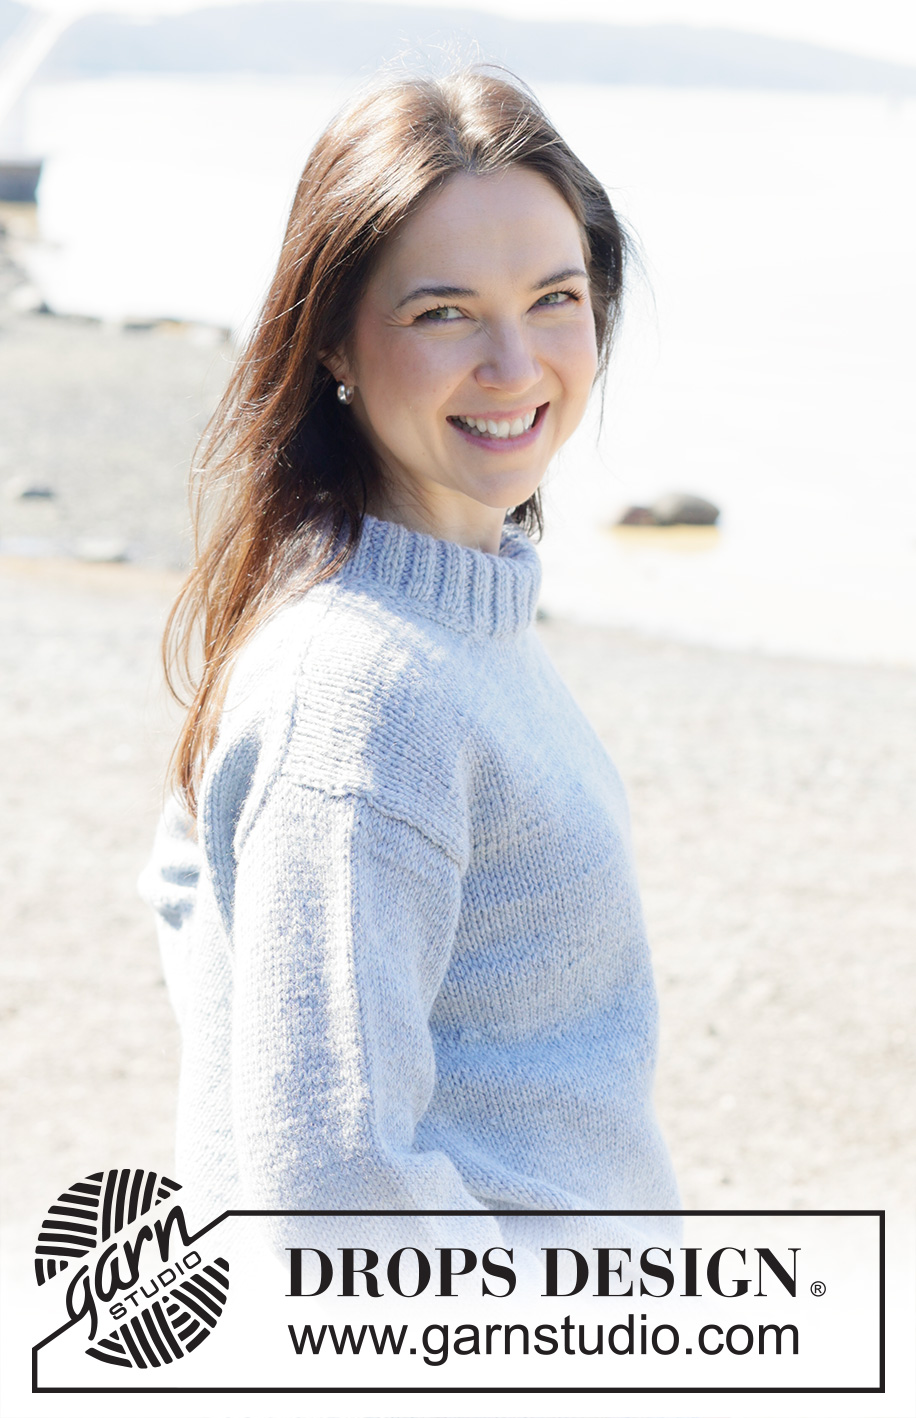
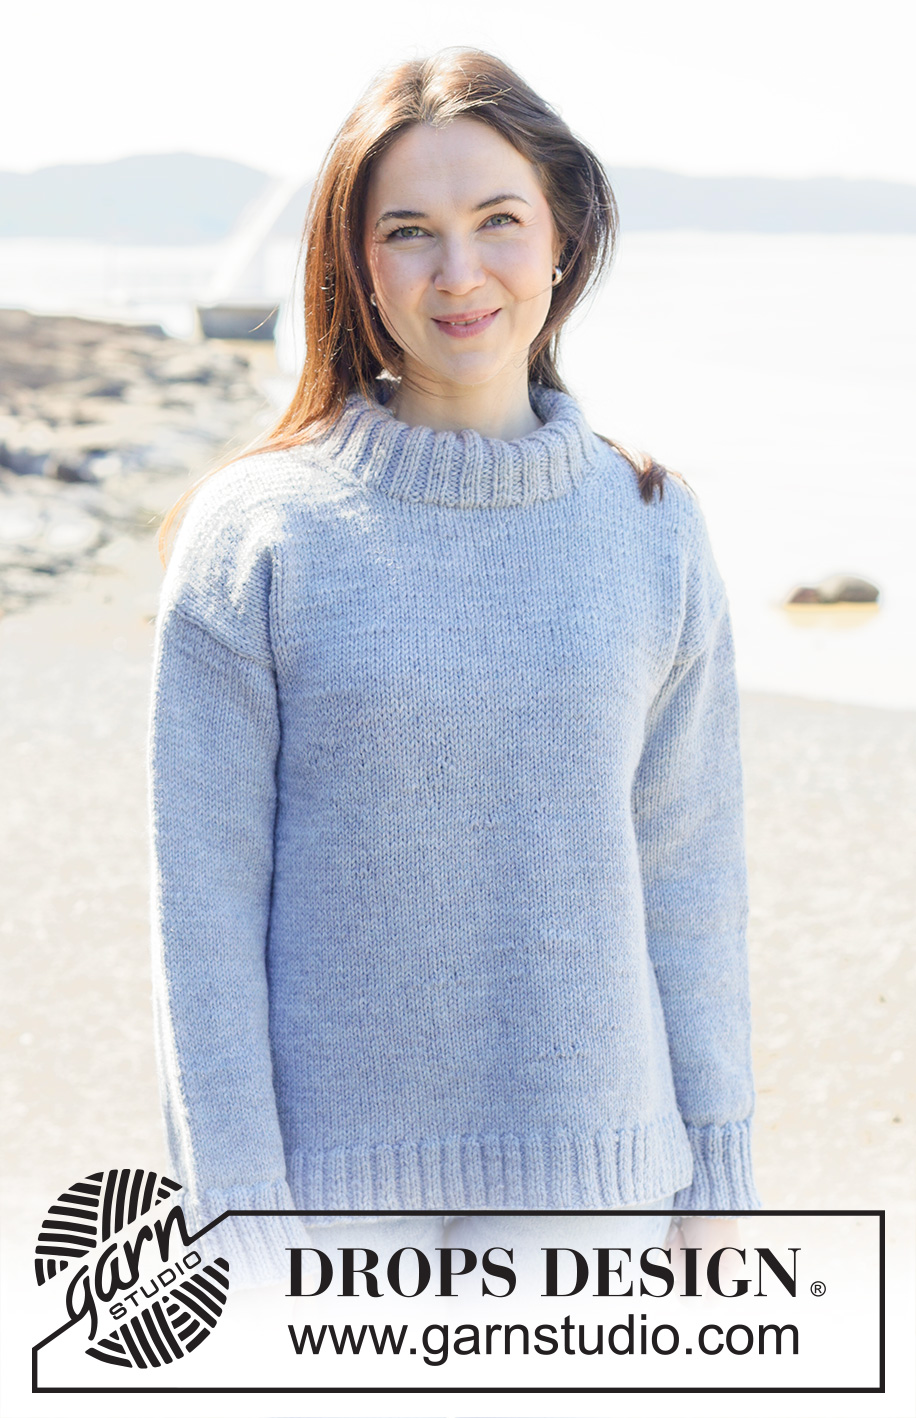
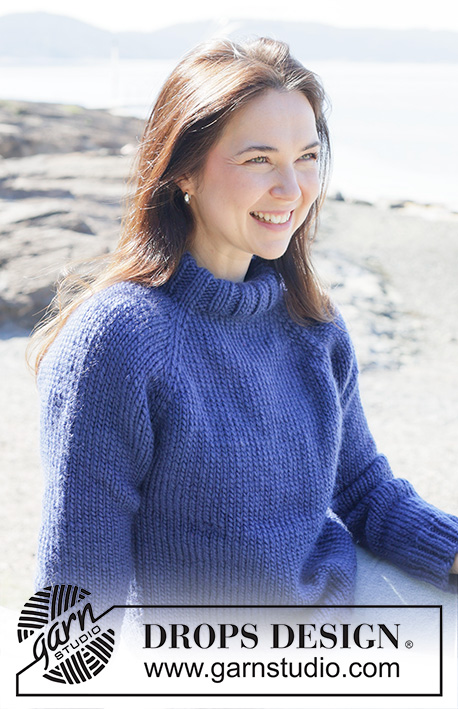
North to Alaska#northtoalaskasweater |
|
 |
 |
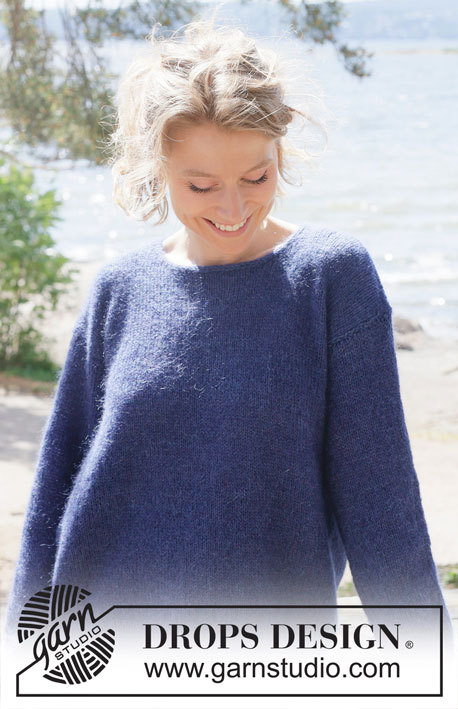
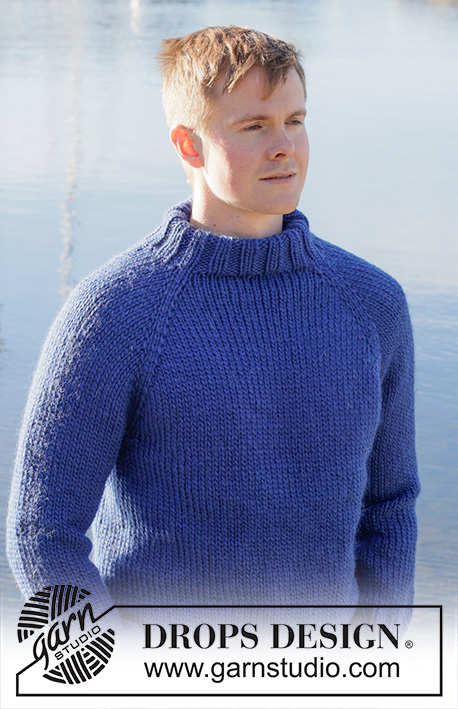
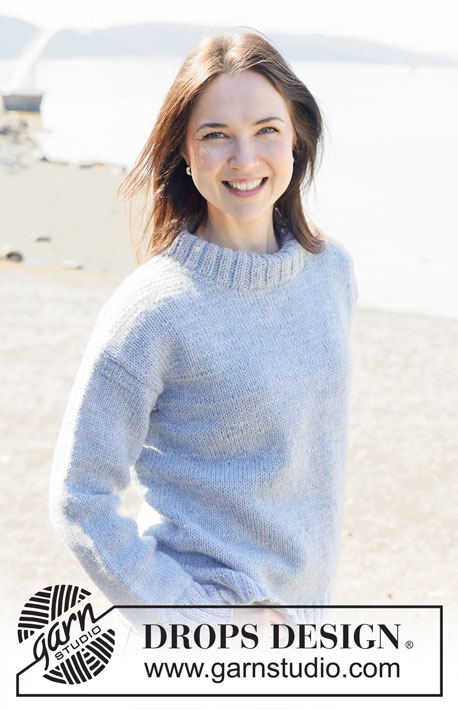
Knitted jumper in DROPS Alaska. Piece is knitted top down with diagonal shoulder / European shoulder, vents in the sides and stocking stitch. Size: S - XXXL
DROPS 254-37 |
|
|
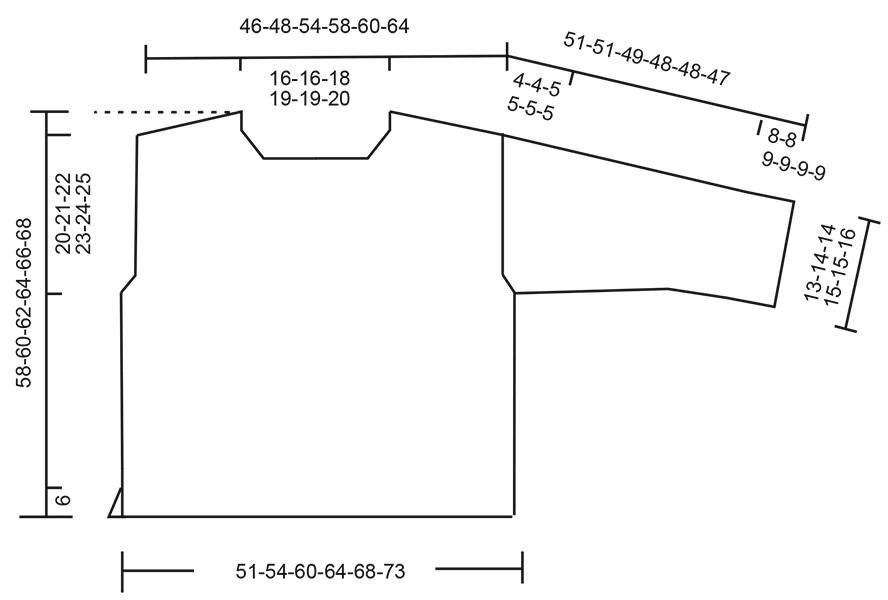
---------------------------------------------------------- EXPLANATION FOR THE PATTERN: ---------------------------------------------------------- GARTER STITCH (when working back and forth): Knit on all rows, i.e. knit from right side and knit from wrong side. 1 ridge vertically = knit 2 rows. INCREASE TIP-1: INCREASE 1 STITCH TOWARDS THE LEFT - from RIGHT SIDE: Use left needle to pick up yarn between 2 stitches from row below, pick up yarn from the front and knit in the stitch loop that is on the back of the needle. INCREASE 1 STITCH TOWARDS THE RIGHT - from RIGHT SIDE: Use left needle to pick up yarn between 2 stitches from row below, pick up yarn from the back and knit in the stitch loop that is on the front side of the needle. . INCREASE TIP-2: INCREASE 1 STITCH TOWARDS THE RIGHT - from WRONG SIDE: Use left needle to pick up yarn between 2 stitches from row below, pick up yarn from the back and purl in the stitch loop that is on the front side of the needle. INCREASE 1 STITCH TOWARDS THE LEFT - from WRONG SIDE: Use left needle to pick up yarn between 2 stitches from row below, pick up yarn from the front and purl in the stitch loop that is on the back side of the needle. KNITTING TIP: When working short row there will be a small hole when turning the piece - the hole can be closed by tightening the yarn or using the technique German Short Rows as follows: Slip first stitch purlwise. Place strand over right needle and tighten well at the back (should lead to two loops on needle). Work these loops together on next row. DECREASE TIP: Decrease 1 stitch on each side of marker thread as follows: Work until 3 stitches remain before marker thread and knit 2 together, knit 2 (marker thread is in the middle of these 2 stitches), slip 1 stitch knitwise, knit 1, pass slipped stitch over stitch worked (= 2 stitches decreased). ------------------------------------------------------- START THE PIECE HERE: ---------------------------------------------------------- JUMPER - SHORT OVERVIEW OF THE PIECE: In this pattern long and short needles have been used - begin with fitting length and switch as needed. First work piece back and forth on needle. Begin by casting on stitches in the back of neck. Then work back piece downwards while at the same time increasing in each side of piece until number of stitches for shoulder width is reached. Back piece has a slight diagonal shoulder. Then work down to armholes. Now put back piece a side and work the front piece. Front piece is first worked in 2 parts. Begin by picking up stitches along one shoulder, work stocking stitch while increasing towards the neck. Repeat on the other shoulder. Put right and left front piece together when increases for neck are done. Then work front piece down to armholes. Now slip front piece and back piece on to same circular needle and work body downwards in the round on circular needle before dividing the piece for vents. Pick up stitches for sleeves around the armholes. First work back and forth with short rows to form a sleeve cap. Then work sleeves downwards in the round on needle. Finish by picking up stitches around the neck, and work a neck edge. Fold the neck edge double against the wrong side and fasten. BACK PIECE: Work piece back and forth on needle. Cast on 30-30-32-34-34-36 stitches on circular needle size 5 mm with DROPS Alaska. ROW 1 (= wrong side): Purl all stitches. ROW 2 (= right side): Read INCREASE TIP-1 and knit 3, increase 1 stitch towards the left, knit until 3 stitches remain, increase 1 stitch towards the right, knit 3. ROW 3 (= wrong side): Read INCREASE TIP-2 and purl 3, increase 1 stitch towards the right, purl until 3 stitches remain, increase 1 stitch towards the left, purl 3. Work 2nd and 3rd ROW 12-13-15-16-17-18 times (= 24-26-30-32-34-36 rows have been worked), after last increase there are = 78-82-92-98-102-108 stitches on needle. Insert 1 marker in the side. Now measure piece from here! Continue in stocking stitch - remember to follow the knitting tension - until piece measures 13-14-15-15-15-15 cm measured from marker along armhole. Now increase in each side for armholes. INCREASE FOR ARMHOLES: ROW 1 (= right side): Remember INCREASE TIP-1 and knit 3, increase 1 stitch towards the left, knit until 3 stitches remain, increase 1 stitch towards the right, knit 3. ROW 2 (= wrong side): Purl all stitches. Work 1st and 2nd ROW 2-2-2-2-3-4 times in total (= 4-4-4-4-6-8 rows have been worked) = 82-86-96-102-108-116 stitches on needle. Work until piece measures 15-16-17-17-18-19 cm, measured from marker along armhole, finish with a row from wrong side. Cut the yarn, slip stitches on a thread or stitch holder, now work front piece along the shoulder – read explanation below. LEFT FRONT PIECE: Find left shoulder on back piece as follows: Place back piece flat with right side up, place back piece so that stitches on thread/stitch holder is towards you, left side of piece = left shoulder. Now pick up stitches along left diagonal shoulder on back piece - begin from right side at the neck and pick up stitches out towards the shoulder as follows: Pick up 1 stitch in every worked row, inside outermost stitch = 24-26-30-32-34-36 stitches. All length measurements on front piece are done from pick up edge. Work in stocking stitch ( work first row from wrong side). When piece measures 9 cm, increase stitches towards the neck as follows: ROW 1 (= right side): Remember INCREASE TIP-1 and knit 3, increase 1 stitch towards the left, knit the rest of row. ROW 2 (= wrong side): Purl all stitches. Work 1st and 2nd ROW 4 times in total (= 8 rows worked) = 28-30-34-36-38-40 stitches, (next row should be worked from right side). Cut the yarn, slip stitches on a thread or stitch holder, now work right front piece along the shoulder – read explanation below. RIGHT FRONT PIECE: Now pick up stitches along right diagonal shoulder on back piece - begin from right side at the shoulder and pick up stitches out towards the neck as follows: Pick up 1 stitch in every worked row inside outermost stitch = 24-26-30-32-34-36 stitches. All length measurements on front piece are done from pick up edge. Work in stocking stitch ( work first row from wrong side). When piece measures 9 cm, increase stitches towards the neck as follows: ROW 1 (= right side): Work until 3 stitches remain, increase towards the right, knit 3 – remember INCREASE TIP-1. ROW 2 (= wrong side): Purl all stitches. Work 1st and 2nd ROW 4 times in total (= 8 rows worked) = 28-30-34-36-38-40 stitches(= next row should be worked from right side). Then place the front pieces together as explained below. FRONT PIECE (right and left part together): Work first row from right side as follows: Work the 28-30-34-36-38-40 stitches from right front, cast on 22-22-24-26-26-28 stitches for neck at the end of this row, then work the 28-30-34-36-38-40 stitches from left front piece = 78-82-92-98-102-108 stitches on needle. Work stocking stitch back and forth until piece measures 23-24-25-27-27-27 cm. Now increase in each side for armholes. INCREASE FOR ARMHOLES: ROW 1 (= right side): Remember INCREASE TIP-1 and knit 3, increase 1 stitch towards the left, work until 3 stitches remain, increase 1 stitch towards the right, knit 3. ROW 2 (= wrong side): Purl all stitches. Work 1st and 2nd ROW 2-2-2-2-3-4 times in total (= 4-4-4-4-6-8 rows have been worked) = 82-86-96-102-108-116 stitches on needle. Work until piece measures 25-26-27-29-30-31 cm, finish with a row from wrong side. Now put front piece and back piece together for body as explained below. Now measure the piece from here. BODY: Work the 82-86-96-102-108-116 stitches from front piece, cast on 4-6-6-6-8-8 new stitches at the end of this row (= in the side mid under sleeve - insert a marker thread in the middle of these stitches), then work the 82-86-96-102-108-116 stitches from back piece and cast on 4-6-6-6-8-8 new stitches on row (= in the side mid under sleeve - insert a marker thread in the middle of these stitches) = 172-184-204-216-232-248 stitches on needle. Move the marker threads upwards when working; they should be used for dividing for vents in each side, begin round at marker thread, work in the round. Work until piece measures approx. 54-56-58-60-62-64 cm, measured from the top point on shoulder. Now divide the piece for a vent in each side of body, divide at the marker threads by putting the stitches from back piece on hold and working stitches from front piece first back and forth on needle – read explained below. FRONT PIECE: = 86-92-102-108-116-124 stitches on needle. Continue on needle size 4 mm and work back and forth as follows: ROW 1 (= right side): Work 3 stitches in GARTER STITCH - read explanation above, work rib (= 2 knit/purl 2) until 5 stitches remain - AT THE SAME TIME increase 14-16-18-20-20-20 stitches evenly over rib stitches, work the last 5 stitches knit 2 and 3 stitches in garter stitch = 100-108-120-128-136-144 stitches. When piece measures 6 cm cast off. Front piece measures 60-62-64-66-68-70 cm measured from pick up edge, front piece approx. 2 cm longer than finished measurements because the pick up edge is not mid on top of shoulder but somewhat down on back piece, jumper measures 58-60-62-64-66-68 cm. BACK PIECE: Work as on front piece. SLEEVES: Place piece flat and insert 1 marker at the top of armhole = mid on top shoulder (NOTE! Mid on top shoulder is not same place as stitches were picked up for front piece but approx. 5-6 cm down on front piece). Pick up stitches around armhole, use circular needle size 5 mm, begin in the middle of the new stitches cast on under sleeve - pick up 72-78-80-84-90-94 stitches - adjust to pick up same number of stitches on each side of marker along armhole. Now work in stocking stitch back and forth with short rows over sleeve cap to get a better shape on sleeve, begin round mid under sleeve as follows: ROW 1 (= right side): Work 7-7-6-6-6-6 stitches past marker on top of shoulder, turn piece – read KNITTING TIP. 2ND ROW (= wrong side): work 7-7-6-6-6-6 stitches past marker, turn piece. ROW 3 (= right side): Work 7-7-6-6-6-6 stitches past where the previous turn was, turn piece. ROW 4 (= wrong side): Work 7-7-6-6-6-6 stitches past where the previous turn was, turn piece. Repeat ROWS 3 and 4. Work until 8-8-10-10-12-12 turns have been done in total (= 4-4-5-5-6-6 times in each side and last row is worked from wrong side). AFTER LAST TURN: The last time 4th row is worked finish row by turning piece, then work from right side until beginning of round (mid under sleeve). Insert 1 marker thread mid under sleeve, this is used when decreasing stitches under sleeve. Move marker thread upwards when working. Now work in the round in stocking stitch over all stitches while AT THE SAME TIME decreasing under sleeve, read DECREASE TIP and decrease like this: When sleeve measures 1 cm (measured mid under sleeve), decrease 2 stitches mid under sleeve – read DECREASE TIP, decrease every other round 3 times, then decrease every 2½-2-2-1½-1½-1½ cm 11-13-13-14-16-17 times in total = 44-46-48-50-52-54 stitches on needle. Work until sleeve measures 43-43-40-39-39-38 cm from shoulder. Switch to circular needles size 4 mm and work rib (= knit 2/purl 2) while AT THE SAME TIME increasing 8-6-8-6-8-6 stitches evenly on 1st round = 52-52-56-56-60-60 stitches. When rib measures 8-8-9-9-9-9 cm, cast off all stitches somewhat loosely with knit over knit and purl over purl. Sleeve measures approx. 51-51-49-48-48-47 cm from mid on top of shoulder. DOUBLE NECK EDGE: Begin at one shoulder line, and pick up from right side inside 1 edge stitch approx. 92 to 112 stitches on a short circular needle size 4 mm. Number of stitches must be divisible by 4. Work rib in the round = knit 2/purl 2 for 9 cm. Loosely cast off. Fold the neck in on the inside of garment, and fasten with a couple of stitches. |
|
 |
|
Have you finished this pattern?Tag your pictures with #dropspattern #northtoalaskasweater or submit them to the #dropsfan gallery. Do you need help with this pattern?You'll find 35 tutorial videos, a Comments/Questions area and more by visiting the pattern on garnstudio.com. © 1982-2025 DROPS Design A/S. We reserve all rights. This document, including all its sub-sections, has copyrights. Read more about what you can do with our patterns at the bottom of each pattern on our site. |
|


With over 40 years in knitting and crochet design, DROPS Design offers one of the most extensive collections of free patterns on the internet - translated to 17 languages. As of today we count 320 catalogues and 12092 patterns translated into English (UK/cm). 12092
We work hard to bring you the best knitting and crochet have to offer, inspiration and advice as well as great quality yarns at incredible prices! Would you like to use our patterns for other than personal use? You can read what you are allowed to do in the Copyright text at the bottom of all our patterns. Happy crafting!
Post a comment to pattern DROPS 254-37
We would love to hear what you have to say about this pattern!
If you want to leave a question, please make sure you select the correct category in the form below, to speed up the answering process. Required fields are marked *.