
Popular categories
Looking for a yarn?


Comments / Questions (39)
![]() Lisbeth wrote:
Lisbeth wrote:
På oket står det att jag på vart 4e varv ska öka endast vid framstycke/bakstycke. Vad menas? Jag har 4 markörer och de två mittersta är ju mellan ärm/bakstycke. Tacksam för förtydligande.
23.11.2024 - 19:33DROPS Design answered:
Hej Lisbeth, når du du tager 8 masker ud til raglan (på hver side af de 4 mærker), så er 1 på det ene forstykke, 2 på ærmerne, 2 på bagstykket, 2 på ærmerne, 1 på det andet forstykke. Når du kun skal tage ud på forstykket, så undlader du at tage de 2 masker ud på hvert ærme :)
27.11.2024 - 12:06
![]() Tiziana wrote:
Tiziana wrote:
Grazie per la vs risposta.allora la mia difficoltà è nella scollatura,mi dice di lavorare il bordo poi a rovescio fino a due maglie dopo il primo segnapunti,girare e tirare il filo...non capisco..non devo lavorare il bordo?? Come li recupero i punti..?? Scusate ma ne ho fatto solo uno lo scorso anno..a sprone tondo..ma ho avuto meno difficoltà.. grazie
15.11.2024 - 17:19DROPS Design answered:
Buonasera Tiziana, in questo punto si lavora a ferri accorciati, cioè non si lavora su tutte le maglie del ferro, ma solo su quelle indicate, poi si gira il lavoro, si tira il filo e si prosegue come indicato. Buon lavoro!
17.11.2024 - 19:50
![]() Karin Hartmann wrote:
Karin Hartmann wrote:
Hallo, vielen Dank für die sehr gute Anleitung für eine wunderschöne Jacke. Warum hat meine Jacke unter dem Ärmel nach Aufnehmen der 12 neuen Maschen an beiden Seiten der Aufnahmen ein Loch? Man kann die Löcher sicher hinterher zunähen, aber es muss doch eine Möglichkeit geben, sie zu vermeiden? Danke und viele Grüße
04.11.2024 - 08:02DROPS Design answered:
Liebe Frau Hartmann, um diese Löcher zu vermeiden können Sie den Querfaden am Übergang zwischen stillgelegten Maschen und neuen Maschen anheben und den zusammen mit der nächsten Maschen rechts verschränkt stricken. Viel Spaß beim Stricken!
04.11.2024 - 14:33
![]() Tiziana Italia wrote:
Tiziana Italia wrote:
Vorrei avere un video tutorial relativo a questo modello.. grazie
26.10.2024 - 17:31DROPS Design answered:
Buonasera Tiziana, non abbiamo un tutorial per l'intero modello, ma se ci dice quale parte le crea difficoltà possiamo aiutarla in modo più preciso. Buon lavoro!
27.10.2024 - 23:39
![]() Eva Karin Bjelland wrote:
Eva Karin Bjelland wrote:
Jeg skjønner ikke Halsringning. 1. Pinne. Jeg gjør som det står snur arbeidet. Strikker tilbake! Men da er jeg jo på vrangen igjen mens det på oppskriften står at jeg skal fortsette på retten. Skjønner bare ingenting. Har prøvd å se på videoer....????
26.09.2024 - 11:10DROPS Design answered:
Hei Eva Karin. 1. pinne strikkes fra vrangen og det strikkes 2 masker forbi 1. merke, snu arbeidet og stram tråden (ikke strikk tilbake). Du er nå på retten og skal strikke 2. pinne. Strikk rett 2 masker forbi 4. merketråd, snu arbeidet og stram tråden. Du er nå på vrangen og skal starte på 3. pinne. Fortsett videre slik det er forklart i oppskriften. mvh DROPS Design
07.10.2024 - 10:45
![]() Josette wrote:
Josette wrote:
Hello, my question is about the step for the body. Is the increase of 26 stiches after completing the 20 cm? Am I correct thinking all of the 26 stiches will be added on 1 row? I am doing size 7-8. thank you in advance for your answer.
23.09.2024 - 00:06DROPS Design answered:
Hi Josette, Yes, the increased stitches are worked on row 1 after the 20 cm. Happy knitting!
23.09.2024 - 06:18
![]() Effi Skopa wrote:
Effi Skopa wrote:
Thank you for your answer! I know that stocking stitch is where you knit an entire row, and then purl one row. My question otherwise : Is that row knit row or purl row ?
23.08.2024 - 08:02DROPS Design answered:
Dear Mrs Skopa, you generally start working from RS, so that you will knit all sts from RS and purl the stocking stitches from WS (with front band sts as before), note that you will start increasing already on first row. Happy knitting!
23.08.2024 - 15:37
![]() Effi Skopa wrote:
Effi Skopa wrote:
Hello from Greece,I am knitting size 7-8 years. I have knitted the Neck 7cm . You say in the pattern :"work the 6 band stiches as befor,stocking stich as far as marker thread 1.... My question: is that stocking stitch knit stitch or purl stitch ?
22.08.2024 - 16:11DROPS Design answered:
Hi Effi, Stocking stitch is knitted from the right side and purled from the wrong side. Happy crafting!
23.08.2024 - 06:33
![]() Berbett wrote:
Berbett wrote:
Bonjour, Ma question concerne les mailles de bordure. Glisser 1 maille tricoter à l envers avec l fil devant mais " combien faut-il tricoter de maille à l'envers ?" avec le fil devant et une maille endroit "Vous précisez avec le fil alors que les mailles envers se tricotent toujours avec le fil devant. Merci d'avance pour votre aide
04.08.2024 - 10:35DROPS Design answered:
Bonjour Berbett, on ne tricote aucune maille envers, on glisse juste 1 maille à l'envers avec le fil devant l'ouvrage; dans cette vidéo, nous montrons comment tricoter ces mailles I-Cord de chaque côté pour la bordure des devants; cela devrait pouvoir vous aider. Bon tricot!
05.08.2024 - 07:43
![]() Karen Anderson wrote:
Karen Anderson wrote:
I am having trouble with this pattern. I can't work out the neckline. Have looked at the video for neckline with short rows, but it shows how do the rows for a jumper on circular needles, not a cardigan on circular needles. Thank you
02.08.2024 - 09:55DROPS Design answered:
Dear Mrs Anderson, short rows are started from WS, work until 2 sts after first marker inserted from RS (left front piece), turn and work until 2 sts after 4th marker inserted from RS (right front piece), turn and work 2 sts more than previous short row on each side until you have worked a total of 6 rows, then turn and work from WS to the end of the row. At the same time remember to increase on each side of each marker threads = you will have increased 3 times from RS at each marker thread. Happy knitting!
02.08.2024 - 14:32
|
|
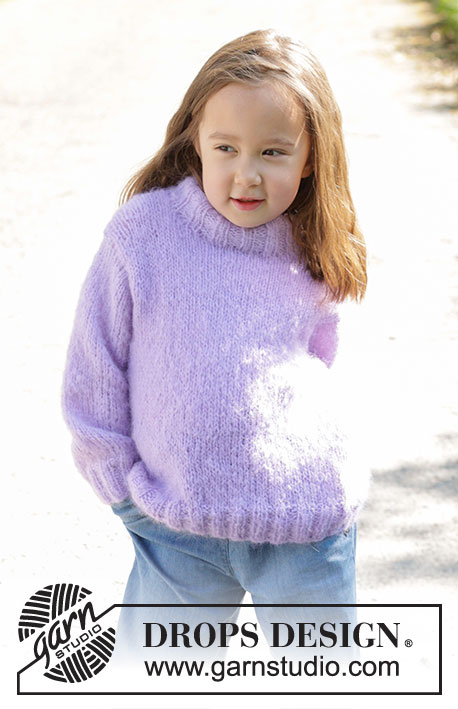
Little Cloud Blue Cardigan#littlecloudbluecardigan |
|
 |
 |
Knitted jacket for children in DROPS Air. The piece is worked top down with stocking stitch, high neck and raglan. Sizes 2 – 12 years.
DROPS Children 47-3 |
|
|
------------------------------------------------------- EXPLANATIONS FOR THE PATTERN: ------------------------------------------------------- GARTER STITCH (worked back and forth): Knit all rows. 1 ridge = knit 2 rows. EDGE STITCHES: 2 EDGE STITCHES AT BEGINNING OF ROW: Slip 1 stitch purl-wise with strand in front, knit 1. 2 EDGE STITCHES AT END OF ROW: Work until there are 2 stitches left, slip 1 purl-wise with strand in front, knit 1. Repeat at the beginning and end of all rows with 2 edge stitches. RAGLAN: Increase 1 stitch before/after 2 stocking stitches in each transition between the body and sleeves. The marker-thread sits between these 2 stitches. Increase 1 stitch by making 1 yarn over. On the next row (wrong side), work the yarn overs as follows: BEFORE MARKER-THREAD: Purl the back loop = no hole. AFTER MARKER-THREAD: Slip the yarn over and place it back on the left needle the other way round (insert the left needle from the back when replacing it). Purl the front loop = no hole. Work the new stitches in stocking stitch. INCREASE TIP (evenly spaced): Increase 1 stitch by making 1 yarn over which is worked twisted on the next row/round to avoid a hole. DECREASE TIP (for sleeves): Decrease 1 stitch on either side of the marker-thread as follows: Work until there are 3 stitches left before the marker-thread, knit 2 together, knit 2 (marker-thread sits between these 2 stitches), slip 1 stitch knit-wise, knit 1 and pass the slipped stitch over the knitted stitch. BUTTONHOLES: Work buttonholes on the right band (when the garment is worn). Work from the right side when there are 4 stitches left on the row as follows: Make 1 yarn over, knit 2 together and knit 2. On the next row (wrong side), knit the yarn over to leave a hole. The first buttonhole is worked when the neck is finished. Then work the other 4-4-5-5-5-5 buttonholes with approx. 6-7-6-7-8-8 cm between each one. ------------------------------------------------------- START THE PIECE HERE: ------------------------------------------------------- JACKET – SHORT OVERVIEW OF THE PIECE. The neck is worked back and forth with circular needle, from mid front and top down. A neckline is worked with short rows before continuing the yoke back and forth with circular needle. The yoke is divided for body and sleeves and the body continued back and forth with circular needle. The sleeves are worked in the round with double pointed needles/short circular needle. NECK: Cast on 90-90-90-94-94-102 stitches with circular needle size 5 mm and DROPS Air. Change to circular needle size 3.5 mm and purl 1 row from the wrong side. Work the next row as follows from the right side: 2 EDGE STITCHES and 4 GARTER STITCHES – read explanations above (6 band stitches), * knit 2, purl 2 *, work from *-* until there are 8 stitches left, knit 2, 4 garter stitches and 2 edge stitches (6 band stitches) – remember explanation above. Continue this rib back and forth for 6-6-7-7-8-8 cm – with the next row from the right side. Insert 4 marker-threads without working the stitches. NOTE: Each thread is inserted between 2 knitted stitches and mark the raglan-lines. Count 15-15-15-19-19-19 stitches (front piece), insert marker-thread 1 before the next stitch, count 20-20-20-16-16-20 stitches (sleeve), insert marker-thread 2 before the next stitch, count 20-20-20-24-24-24 stitches (back piece), insert marker-thread 3 before the next stitch, count 20-20-20-16-16-20 stitches (sleeve), insert marker-thread 4 before the next stitch. There are 15-15-15-19-19-19 stitches left after the last marker-thread (front piece). Knit 1 row and adjust the stitch count as follows: SIZES 2 - 3/4 - 5/6 YEARS: Work the 6 band stitches as before, stocking stitch as far as marker-thread 1 and increase 1 stitch over these stitches (do not increase/decrease the 2 knitted stitches in the raglan-line – applies at all marker-threads), work stocking stitch as far as marker-thread 2 and decrease 4 stitches evenly over these stitches, stocking stitch as far as marker-thread 3 without decreasing, work stocking stitch as far as marker-thread 4 and decrease 4 stitches evenly over these stitches, stocking stitch until there are 6 stitches left, increasing 1 stitch over these stitches, finish with 6 band stitches as before = 84 stitches. SIZES 7/8 - 9/10 YEARS: Work the 6 band stitches as before, stocking stitch as far as marker-thread 1 and decrease 2 stitches over these stitches (do not decrease the 2 knitted stitches in the raglan-line – applies at all marker-threads), work stocking stitch as far as marker-thread 2 without decreasing, stocking stitch as far as marker-thread 3 and decrease 2 stitches evenly over these stitches, work stocking stitch as far as marker-thread 4 without decreasing, stocking stitch until there are 6 stitches left and decrease 2 stitches evenly over these stitches, finish with 6 band stitches as before = 88 stitches. SIZE 11/12 YEARS: Work the 6 band stitches as before, stocking stitch as far as marker-thread 1 and decrease 2 stitches over these stitches (do not decrease the 2 knitted stitches in the raglan-line – applies at all marker-threads), work stocking stitch as far as marker-thread 2 and decrease 4 stitches evenly over these stitches, stocking stitch as far as marker-thread 3 and decrease 2 stitches evenly over these stitches, work stocking stitch as far as marker-thread 4 and decrease 4 stitches evenly over these stitches, stocking stitch until there are 6 stitches left, decreasing 2 stitches evenly over these stitches, finish with 6 band stitches as before = 88 stitches. ALL SIZES: = 84-84-84-88-88-88 stitches (16-16-16-17-17-17 stitches on each front piece, 16 stitches on each sleeve and 20-20-20-22-22-22 stitches on the back piece). NECKLINE: Change to circular needle size 5 mm. Now work a neckline with short rows and increase for raglan as described below. REMEMBER THE KNITTING TENSION! ROW 1 (wrong side): Work 6 band stitches as before, purl to 2 stitches past marker-thread 1 (front left of neck when the garment is worn), turn, tighten the strand. ROW 2 (right side): Knit and increase for RAGLAN on each side of all 4 marker-threads – read description above, to 2 stitches past marker-thread 4 (front right of neck = 8 stitches increased), turn, tighten the strand. ROW 3 (wrong side): Purl to 2 stitches past the last turn by marker-thread 1 (remember the yarn overs are worked as described under Raglan), turn, tighten the strand. ROW 4 (right side): Knit and increase for raglan on each side of all 4 marker-threads, to 2 stitches past the last turn by marker-thread 4 (= 8 stitches increased), turn, tighten the strand. ROW 5 (wrong side): Purl to 2 stitches past the last turn by marker-thread 1, turn, tighten the strand. ROW 6 (right side): Knit and increase for raglan on each side of all 4 marker-threads, to 2 stitches past the last turn by marker-thread 4 (= 8 stitches increased), turn, tighten the strand. ROW 7 (wrong side). Purl until there are 6 stitches left on the row, work the 6 band stitches as before. The short rows are finished and you have increased 3 times for raglan on each side of all 4 marker-threads = 108-108-108-112-112-112 stitches. Continue the yoke over all stitches. Remember the BUTTONHOLES on the right band – read description above. YOKE: Continue with stocking stitch and 6 band stitches on each side as before. Continue to increase for raglan as follows: Increase on each side of all 4 marker-threads every 2nd row (each row from the right side) 2-2-1-2-2-2 more times (5-5-4-5-5-5 times including the increases on the short rows) = 124-124-116-128-128-128 stitches. Continue increasing every 2nd row (each row from the right side) but every 2nd increase is only on the front and back pieces (4 increased stitches), i.e., increase on the front/back pieces every 2nd row and on the sleeves every 4th row. Increase like this 10-12-14-14-14-16 times on the front/back pieces (5-6-7-7-7-8 times on the sleeves). You have increased a total of 15-17-18-19-19-21 times on the front/back pieces and 10-11-11-12-12-13 times on the sleeves. There are 184-196-200-212-212-224 stitches (31-33-34-36-36-38 stitches to the marker thread on each front piece, 36-38-38-40-40-42 stitches between marker threads on the sleeves and 50-54-56-60-60-64 stitches between marker threads on the back piece) The yoke measures approx. 14-15-16-17-17-19 cm measured after the neck, mid-back. If necessary, continue working to the correct length. Now divide for the body and sleeves as follows: Work the first 32-34-35-37-37-39 stitches as before (front piece), place the next 34-36-36-38-38-40 stitches on a thread for the sleeve, cast on 8-8-10-10-12-12 stitches (in side under sleeve), work 52-56-58-62-62-66 stitches (back piece), place the next 34-36-36-38-38-40 stitches on a thread for the sleeve, cast on 8-8-10-10-12-12 stitches (in side under sleeve), work the last 32-34-35-37-37-39 stitches (front piece). The body and sleeves are finished separately. The piece is now measured from here! BODY: = 132-140-148-156-160-168 stitches. Continue with stocking stitch and 6 band stitches on each side as before for a further 11-14-17-20-22-22 cm. Knit 1 row from the right side and increase 22-26-26-26-30-30 stitches evenly spaced – read INCREASE TIP (do not increase over the bands) = 154-166-174-182-190-198 stitches. Change to circular needle size 3.5 mm and work as follows from the wrong side: 6 band stitches as before, * purl 2, knit 2 *, work from *-* until there are 8 stitches left, purl 2 and 6 band stitches as before. Continue this rib for 5 cm. Cast off a little loosely. The jacket measures approx. 34-38-42-46-48-50 cm from the shoulder. SLEEVES: Place the 34-36-36-38-38-40 stitches from the thread on the one side of the piece on short circular needle/double pointed needles size 5 mm and knit up 1 stitch in each of the new stitches cast on under the sleeve = 42-44-46-48-50-52 stitches. Insert a marker-thread in the middle of the 8-8-10-10-12-12 new stitches under the sleeve. Start at the marker-thread and work stocking stitch in the round. When the sleeve measures 3 cm, decrease 2 stitches mid under sleeve – read DECREASE TIP. Decrease like this every 2-3-4-5-5½-5½ cm a total of 5-5-5-5-5-6 times = 32-34-36-38-40-40 stitches. Continue working until the sleeve measures 14-19-23-26-31-33 cm from the division. There is approx. 7 cm left. try the jacket on and work to desired length before the rib. Knit 1 round and increase 8-10-12-10-12-12 stitches evenly spaced = 40-44-48-48-52-52 stitches. Change to double pointed needles size 3.5 mm and work rib (knit 2, purl 2) for 7 cm. Cast off a little loosely. The sleeve measures approx. 21-26-30-33-38-40 cm from the division. Work the other sleeve in the same way. ASSEMBLY: Sew the buttons onto the left band. If you want a double neck, fold it double to the inside and fasten down with a couple of stitches in each raglan-line. |
|

|
|
Have you finished this pattern?Tag your pictures with #dropspattern #littlecloudbluecardigan or submit them to the #dropsfan gallery. Do you need help with this pattern?You'll find 32 tutorial videos, a Comments/Questions area and more by visiting the pattern on garnstudio.com. © 1982-2025 DROPS Design A/S. We reserve all rights. This document, including all its sub-sections, has copyrights. Read more about what you can do with our patterns at the bottom of each pattern on our site. |
|


With over 40 years in knitting and crochet design, DROPS Design offers one of the most extensive collections of free patterns on the internet - translated to 17 languages. As of today we count 314 catalogues and 11820 patterns translated into English (UK/cm). 11820
We work hard to bring you the best knitting and crochet have to offer, inspiration and advice as well as great quality yarns at incredible prices! Would you like to use our patterns for other than personal use? You can read what you are allowed to do in the Copyright text at the bottom of all our patterns. Happy crafting!
Post a comment to pattern DROPS Children 47-3
We would love to hear what you have to say about this pattern!
If you want to leave a question, please make sure you select the correct category in the form below, to speed up the answering process. Required fields are marked *.