
Popular categories
Looking for a yarn?


Comments / Questions (56)
![]() Biance De Beer wrote:
Biance De Beer wrote:
Hi I have two questions 1. What does this mean: Cast off for the neck 3 stitches 1 time, 2 stitches 2 times, then decrease 1 stitch 4-5-5-5-5-6 times - read DECREASE TIP. 2. When you do the decrease/cast off row for the neck, do you only do it on a rs row or on both ws and rs? I really appreciate your help!
04.07.2023 - 22:51DROPS Design answered:
Dear Mrs De Beer, you will cast off at the beginning of a row from neck towards armhole/shoulder, this will be worked at the beginning of a right side row for right shoulder, front piece and at the beginning of a wrong side row for left shoulder. Happy knitting!
05.07.2023 - 07:49
![]() Biance wrote:
Biance wrote:
Hi What does it mean when you are supposed to set aside the 18 sts for the neck and then continue with the shoulders separately? I read the neck and diagonal shoulders sections but it doesn't make sense how to do the neck and shoulders. It feels a bit jumbled. I would appreciate the help. Thanks!
02.07.2023 - 22:55DROPS Design answered:
Hi Biance, Once you have the neck stitches on a thread, you cannot work both shoulders simultaneously. So now you row is from the neck to the armhole and the instructions are for these short rows. Once you have finished one shoulder you then work the other shoulder. Happy knitting!
03.07.2023 - 06:12
![]() Petra wrote:
Petra wrote:
Ich bin jetzt bei der Schulterschrägung am Vorderteil: man muss jetzt immer Maschen am Rand stilllegen und vorher Stricken damit man den Faden nicht abschneiden muss . An der rechten Schulter habe ich immer in der hinreihe still gelegt .Nun bin ich bei der linken Schulter und habe innen in der hinreihe angefangen, nun um diese äußersten Maschen still legen zu können muss ich sie in der Rückreihe Still legen, nun ist es aber um eine Reihe höher , habe ich was falsch gemacht
01.05.2023 - 14:40
![]() Mascha wrote:
Mascha wrote:
Wenn man beim Rücken- oder Vorderteil die 2×1 Masche (für den späteren Ansatz der Ärmel) zugenommen hat, strickt man dann weiterhin am Beginn und am Ende jeder Reihe eine Masche kraus rechts? Verschiebt sich dadurch das nächste Links-Rechts-Muster um eine Masche? Vielen Dank für Ihre Hilfe! :-)
28.04.2023 - 21:34DROPS Design answered:
Liebe Mascha, die Randmaschen stricken Sie am besten wie Sie möchten, sie können entweder glatt rechts oder Krausrechts gestrickt. Das Muster können Sie dann anpassen damit die Linke Maschen immer übereinander sein werden. Viel Spaß beim stricken!
02.05.2023 - 08:03
![]() Pg wrote:
Pg wrote:
I measured my gauge and it’s exactly like on the recommendat gauge , I even measured my gauge on the front peace of the sweater and it’s the exact same gauge , but when I am knitting I have too make 5 rows of green stripes to get to 40 cm , did I do something wrong because in the picture there is only 4 stripes , but my gauge is totally on point . Should I just continue and make more stripes until I reach the height ?
24.04.2023 - 16:45DROPS Design answered:
Hi, thank you for your information, we have made a correction :)
27.04.2023 - 14:17
![]() Klaske De Vries wrote:
Klaske De Vries wrote:
Ik snap niet goed het telpatroon A1: goede kant recht, verkeerde kant averecht. Dan komt toch de tricotkant aan de goede kant, en de ribbelkant achter? Terwijl op het plaatje het andersom lijkt: de ribbelkant aan de voorzijde.
20.04.2023 - 18:15DROPS Design answered:
Dag Klaske,
Klopt, de tricotsteek komt aan de goede kant en aan de verkeerde kant zie je averechtse tricotsteek. Op de een na laatste toer brei je de ene steek recht en de andere steek averecht met mosgroen.
20.04.2023 - 20:42
![]() Petrapeach wrote:
Petrapeach wrote:
Ichbin gerade beim Vorderteil bei diesem Schritt:( Bei einer Länge von 12 cm ab dem Anschlagrand je 1 Masche beidseitig zunehmen - ) muss ich also von ganz unten messen oder ab da messen wo ich zur 4,5 Nadel gewechselt habe . Außerdem wie soll ich die maschenprobe bei dem kraus rechts Rand beachten ? Ich bin relativ neu beim stricken und kenne mich noch nicht so gut aus mit der Terminologie
19.04.2023 - 21:26DROPS Design answered:
Liebe Petrapeach, messen Sie diese 12 cm von ganz unten, dh mit dem Bündchen. Maschenprobe wird glatt rechts mit den grösseren Nadeln gestrickt. Viel Spaß beim stricken!
20.04.2023 - 09:59
![]() Margie wrote:
Margie wrote:
Volgens de foto is de halsboord met boordsteek 1 recht - 1 averecht en niet met 2 recht - 2 averecht gebreid. Klopt dat?
26.03.2023 - 23:48DROPS Design answered:
Dag Margie,
Ja, je hebt gelijk denk ik. Ik zal het doorgeven aan de ontwerpafdeling om aan te passen.
27.03.2023 - 20:25
![]() Cinzia wrote:
Cinzia wrote:
In questo modello , non riesco capire la spiegazione per la diagonale della spalla. Potete aiutarmi? Grazie
23.03.2023 - 22:46DROPS Design answered:
Buonasera Cinzia, in quale punto sta riscontrando difficoltà? Buon lavoro!
26.03.2023 - 22:18
![]() Kerstin Vennberg wrote:
Kerstin Vennberg wrote:
Behöver man verkligen 150 gr av den mossgröna färgen eller är det en felskrivning ?
04.03.2023 - 06:39DROPS Design answered:
Hej Kerstin, tak for info, vi har rettet garnforbruget i opskriften på nettet :)
07.03.2023 - 15:43
|
|||||||||||||
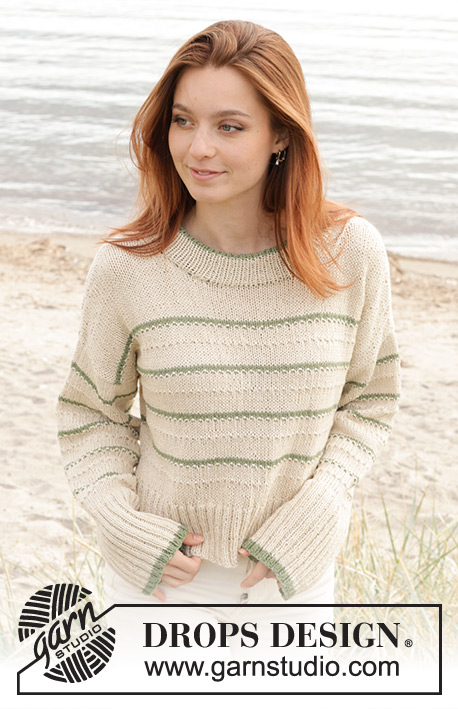
Promise of Spring#promiseofspringsweater |
|||||||||||||
 |
 |
||||||||||||
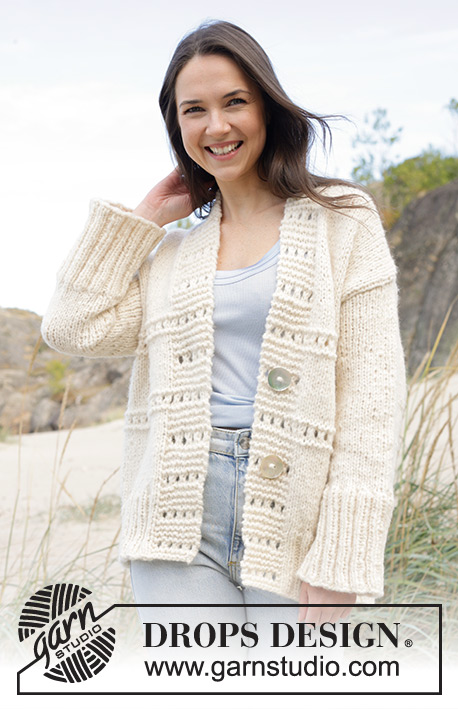
Knitted jumper in DROPS Belle or DROPS Merino Extra Fine. The piece is worked bottom up with stocking stitch, textured pattern, stripes and double neck. Sizes S - XXXL.
DROPS 241-7 |
|||||||||||||
|
------------------------------------------------------- EXPLANATIONS FOR THE PATTERN: ------------------------------------------------------- RIDGE/GARTER STITCH (worked back and forth): Knit all rows. 1 ridge = knit 2 rows. PATTERN: See diagram A.1. Choose diagram for your size. The diagram shows all rows in the pattern from the right side. INCREASE TIP-1 (sides of body): Make 1 yarn over inside the outermost 2 stitches on each side; the yarn overs are purled twisted on the next row to avoid holes. DECREASE TIP (for neck and when decreasing 1 stitch at a time): Decrease for the neck inside 3 stocking stitches. All decreases are worked from the right side! AFTER 3 STOCKING STITCHES: Slip 1 stitch as if to knit, knit 1 and pass the slipped stitch over the knitted stitch (1 stitch decreased). BEFORE 3 STOCKING STITCHES: Work until there are 5 stitches left mid-front, knit 2 together, work the last 3 stitches in stocking stitch (1 stitch decreased). INCREASE TIP-2 (sleeves): Increase 1 stitch on each side of the marker-stitch as follows: Work to the marker-stitch, make 1 yarn over, work the marker-stitch, 1 yarn over (= 2 stitches increased). On the next round work the yarn overs twisted to avoid holes. Then work the new stitches into A.1. ------------------------------------------------------- START THE PIECE HERE: ------------------------------------------------------- JUMPER – SHORT OVERVIEW OF THE PIECE: The front and back pieces are worked separately, back and forth and bottom up. The sleeves are worked in the round with double pointed needles/short circular needle, bottom up. The piece is sewn together, then the neck is worked in the round. FRONT PIECE: Cast on 120-132-144-156-172-188 stitches with circular needle size 3 mm and colour light beige DROPS Belle. Purl 1 row from the wrong side. Then work rib from the right side as follows: 1 edge stitch in GARTER STITCH – read description above, * knit 2, purl 2 *, work from *-* until there are 3 stitches left, knit 2 and 1 edge stitch in garter stitch. Continue this rib for 10 cm. Change to circular needle size 4.5 mm and work as follows from the right side: 1 edge stitch in garter stitch, work stocking stitch and decrease 30-34-38-40-44-50 stitches evenly spaced, 1 edge stitch in garter stitch = 90-98-106-116-128-138 stitches. Continue in stocking stitch with 1 edge stitch in garter stitch on each side. REMEMBER THE KNITTING TENSION! When the piece measures 12 cm from the cast-on edge, increase 1 stitch on each side - read INCREASE TIP-1. Repeat this increase every 2 cm a total of 5 times on each side = 100-108-116-126-138-148 stitches. When piece measures 14-14-15-15-15-16 cm from cast-on edge, work A.1. Continue working until the piece measures 31-32-33-34-35-36 cm. At the end of the next 2 rows cast on 1 stitch, which is used when sewing in the sleeves = 102-110-118-128-140-150 stitches. Continue with A.1 until the piece measures approx. 38-38-39-43-43-44 cm. Continue with stocking stitch and colour light beige over all stitches until the piece measures 46-48-49-51-52-54 cm. On the next row place the middle 18-18-18-20-20-20 stitches on a thread for the neck and finish each shoulder separately. OVERVIEW OF THE NEXT SECTION: Cast off/decrease for the neck and place stitches on a thread for the diagonal shoulder. Read NECK and DIAGONAL SHOULDERS before continuing. NECK: Cast off for the neck 3 stitches 1 time, 2 stitches 2 times, then decrease 1 stitch 4-5-5-5-5-6 times - read DECREASE TIP. DIAGONAL SHOULDERS: AT THE SAME TIME when the piece measures 50-52-54-56-58-60 cm, place the stitches by the armhole on a thread for the diagonal shoulder; to avoid cutting the strand, work the stitches before placing them on the thread. Place 6-7-8-9-10-11 stitches 4 times, then place the last 7-6-6-6-8-8 stitches on the thread. All stitches are now cast off or on the thread. Place the 31-34-38-42-48-52 stitches from the thread back on circular needle size 4.5 mm. Work 1 row of stocking stitch; to avoid holes when turning in the middle of the piece pick up the strand between 2 stitches and work it twisted together with the first stitch on the left needle. Cast off loosely. Work the other shoulder in the same way. BACK PIECE: Cast on and work in the same way as the front piece. Match A.1 to the front piece so the stripes are the same. Work until the piece measures 50-52-54-56-58-60 cm. On the next row cast off the middle 36-38-38-40-40-42 stitches for the neck and finish each shoulder separately. OVERVIEW OF THE NEXT SECTION: Decrease for the neck and place stitches on a thread for the diagonal shoulder. Read NECK and DIAGONAL SHOULDERS before continuing. NECK: Decrease 1 stitch for the neck on each row from the right side, 2 times - remember DECREASE TIP. DIAGONAL SHOULDERS: AT THE SAME TIME place the stitches by the armhole on a thread for the diagonal shoulder; to avoid cutting the strand work the stitches before placing them on the thread. Place 6-7-8-9-10-11 stitches 4 times, then place the last 7-6-6-6-8-8 stitches on the thread. All stitches are now cast off or on the thread. Place the 31-34-38-42-48-52 stitches from the thread back on circular needle size 4.5 mm. Work 1 row of stocking stitch; to avoid holes when turning in the middle of the piece, pick up the strand between 2 stitches and work it twisted together with the first stitch on the left needle. Cast off loosely. Work the other shoulder in the same way. SLEEVES: Cast on 72-76-80-84-88-92 stitches with double pointed needles size 3 mm and colour moss green DROPS Belle. Work 3 rounds of rib (knit 2, purl 2). Change to colour light beige and continue the rib until the sleeve measures 14 cm. Change to double pointed needles size 4.5 mm. Knit 1 round and decrease 18-20-22-24-26-28 stitches evenly spaced = 54-56-58-60-62-64 stitches. Insert 1 marker in the first stitch on the round; it will be used when increasing under the sleeve. Work A.1 in the round and increase 2 stitches under the sleeve – read INCREASE TIP-2. Increase like this every 2½-2½-2-2-1½-1½ cm a total of 11-12-13-14-15-16 times = 76-80-84-88-92-96 stitches. Continue with A.1 to finished length. Cast off when the sleeve measures 47-46-45-44-42-40 cm. Work the other sleeve in the same way. ASSEMBLY: Sew the shoulder seams. Sew the side seams, starting where you cast on 1 new stitch on each side and sew (inside this stitch) down to the beginning of the rib (leaving a split in each side). Sew in the sleeves inside the 1 stitch on the front and back pieces. NECK: Using short circular needle size 3 mm and colour light beige, knit up 116-128 stitches around the neck (including the stitches on the thread). Work rib in the round (knit 1, purl 1) for 5 cm. Change to colour moss green and continue the rib until the neck measures 11 cm. Loosely cast off with knit over knit and purl over purl. Fold the neck double to the inside and sew down. To avoid the neck being tight and rolling outwards, it is important that the seam is elastic. |
|||||||||||||
Diagram explanations |
|||||||||||||
|
|||||||||||||

|
|||||||||||||

|
|||||||||||||
Have you finished this pattern?Tag your pictures with #dropspattern #promiseofspringsweater or submit them to the #dropsfan gallery. Do you need help with this pattern?You'll find 32 tutorial videos, a Comments/Questions area and more by visiting the pattern on garnstudio.com. © 1982-2025 DROPS Design A/S. We reserve all rights. This document, including all its sub-sections, has copyrights. Read more about what you can do with our patterns at the bottom of each pattern on our site. |
|||||||||||||


With over 40 years in knitting and crochet design, DROPS Design offers one of the most extensive collections of free patterns on the internet - translated to 17 languages. As of today we count 314 catalogues and 11820 patterns translated into English (UK/cm). 11820
We work hard to bring you the best knitting and crochet have to offer, inspiration and advice as well as great quality yarns at incredible prices! Would you like to use our patterns for other than personal use? You can read what you are allowed to do in the Copyright text at the bottom of all our patterns. Happy crafting!
Post a comment to pattern DROPS 241-7
We would love to hear what you have to say about this pattern!
If you want to leave a question, please make sure you select the correct category in the form below, to speed up the answering process. Required fields are marked *.