
Popular categories
Looking for a yarn?


Comments / Questions (53)
![]() Michaela wrote:
Michaela wrote:
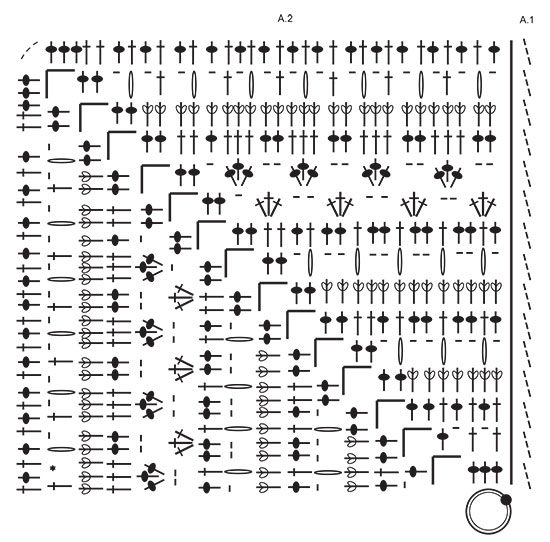
Tut mir leid, vielleicht war die Frage vorher unklar. Wenn man im Diagramm A2 z.B. die 4. und 5. Reihe von unten ansieht, dann sind in der 4. Reihe 9 Stäbchen dargestellt. In der 5. Reihe sollen dann jeweils 4 Stäbchen zusammengehäkelt werden, und dass insgesamt dreimal. Das geht sich aber nicht aus - dazu bräuchte ich in der 4. Reihe 12 Stäbchen und nicht 9. Daher meine Frage, ob man hier nicht immer 3 Stäbchen zusammenhäkelt anstatt 4? Vielen Dank!
27.05.2024 - 10:18DROPS Design answered:
Liebe Michaela, die 4 Stäbchen zusammen sind als nur 1 Stäbchen gezählt und werden so gehäket (Anfang der 5. Reihe: 1 Lm, 1 M überpsringen, 4 Stb zs in das nächste Stb, 2 Lm, 2 M überspringen, 4 Stb zs in das nächste Stb, 2 Lm, 2 M überspringen, 4 Stb zs in das nächste Stb, 1 Lm, 1 Stäbchen überspringen (= 1+1+2+1+2+1+1= 9 Maschen), dann 2 Stäbchen in nächsten Luftmaschenbogen, usw... Viel Spaß beim Häkeln!
27.05.2024 - 12:59
![]() Michaela wrote:
Michaela wrote:
In der Anleitung steht bei einem Symbol: "4 STÄBCHEN ZU 1 STÄBCHEN ZUSAMMENHÄKELN." Wenn man aber das Diagramm A2 ansieht und dort die Maschen zählt, sieht es eher so aus, als würden nur 3 Stäbchen zusammengehäkelt? Habe ich etwas übersehen? Vielen Dank!
26.05.2024 - 13:37DROPS Design answered:
Liebe Michaela, hier wird man 4 Stäbchen zusammen häkeln, so zählt jedes als 1 Stäbchen (wie für 1 Noppe z.B.). Viel Spaß beim Häkeln!
27.05.2024 - 08:46
![]() Gunvor wrote:
Gunvor wrote:
Jag blir galen på varv 4! Hur jag än gör får jag 2 stolpar över vid hörnet. Om jag tolkat diagramet rätt, är det sammanlagt 11 relief stolpar i varvet innan. Hoppar över 2m, en stolpgrupp i nästa, hoppas över 2m, en stolpgrupp i nästa. Hoppas över 2m 1 stolpgrupp i nästa, hoppa över 1m. Då är jag framme vid hörnet och har 2 st kvar. Det funkar ju inte? Tänker jag fel? Mönstret är jättevackert, men diagrammet är svårt att följa. Hade föredragit en beskrivning i text.
24.05.2024 - 08:56DROPS Design answered:
Hej Gunvor, du starter med at hoppe over 1m, 1 stolpgrupp i nästa, hoppa över 2, 1 stolpgrupp i nästa, hoppa över 2, 1 stolpgrupp i nästa, hoppa över 1, 2 stolpar i lm-bågen, 5lm, 2 stolpar i samma lm-båge, hoppa över 1 osv :)
24.05.2024 - 10:25
![]() Hennie Verhees wrote:
Hennie Verhees wrote:
Bij dit patroon voel ik mij misleid, jullie geven 1200 gram aan en ik heb nld 4 gebruikt de afmeting is hetzelfde ,maar ik houd ruim 4 bollen garen over. Hoe kan dit? 1 bol dat snap ik , maar niet 4 volle bollen . ook lijkt dit patroon op een luchtige omslagdoek , terwijl het een best zware deken is. Graag hier uw antwoord op . Met vriendelijke groet , Hennie Verhees
02.04.2024 - 11:06
![]() Kathleen A Dougherty wrote:
Kathleen A Dougherty wrote:
This is a beautiful blanket. I am going to start it. Thank You for the pattern.
05.02.2024 - 21:23
![]() Mattea wrote:
Mattea wrote:
Buongiorno, volevo una precisazione. Nella riga 6 devo lavorare una maglia alta sul gruppo di 4 maglie sottostante ma non so dove devo inserire l'uncinetto. C'è per caso un video esplicativo? grazie
23.12.2023 - 10:17DROPS Design answered:
Buongiorno Mattea, deve lavorare la maglia alta attorno al gruppo di maglie sotto. Provi a vedere se questo video può esserle di aiuto. Buon lavoro!
30.12.2023 - 10:51
![]() Agnieszka wrote:
Agnieszka wrote:
Not clear for me second row. I start wt chain 3, wich counts as first DC. Then directly I make second DC. Shouldn't I start with chain 4, which counts as first DC plus chain 1 space? Otherwise I have two DCs, without chain space in the begining of the row.
23.11.2023 - 10:25DROPS Design answered:
Dear Agnieszka, in this pattern, the 3 chains to start rounds are not replacing the first dc, this means A.1 is worked extra: you first work A.1 then repeat A.2 a total of 4 times in the round. Happy crocheting!
23.11.2023 - 15:36
![]() Connie Sahagun wrote:
Connie Sahagun wrote:
I already did all the squares but I started too crochet the sides together with the single stich but what I I don’t understand what to do in the corners.
27.07.2023 - 21:11DROPS Design answered:
Dear Mrs Sahagun, for the edge you will crochet 3 double crochets (US-crochet terminology) in each corner (and. 1 double crochet in each stitch along the sides of each square + 1 double crochet in the transition between 2 squares). Happy crocheting!
28.07.2023 - 07:39
![]() Gabi wrote:
Gabi wrote:
Guten Tag Werden nur vordere Reliefstäbchen gehäkelt oder abwechselnd vordere und hintere ? Herzlichen Dank
10.07.2023 - 06:43DROPS Design answered:
Liebe Gabi, Diagram wird in Runde gehäkelt, so die Reliefstäbchen werden immer so gehäkelt. Viel Spaß beim häkeln!
28.07.2023 - 09:08
![]() Linda Mcsweeney wrote:
Linda Mcsweeney wrote:
The graph is confusing for the last round. How many stitches should you have on one side? The graph does not line up with the stiches below on the left side. Thanks.
12.06.2023 - 19:57DROPS Design answered:
Dear Mrs Mcsweeney, on the last round you will have 32 dc (US-English) on the last half side on the square (A.2) and 3 chains in the corner, then 29 dc on the first half part on next side, this means you should have 32+29= 61 dc along each side of the square. Happy crocheting!
13.06.2023 - 08:14
|
||||||||||||||||||||||||||||
Day By The Sea#daybytheseablanket |
||||||||||||||||||||||||||||
 |
 |
|||||||||||||||||||||||||||
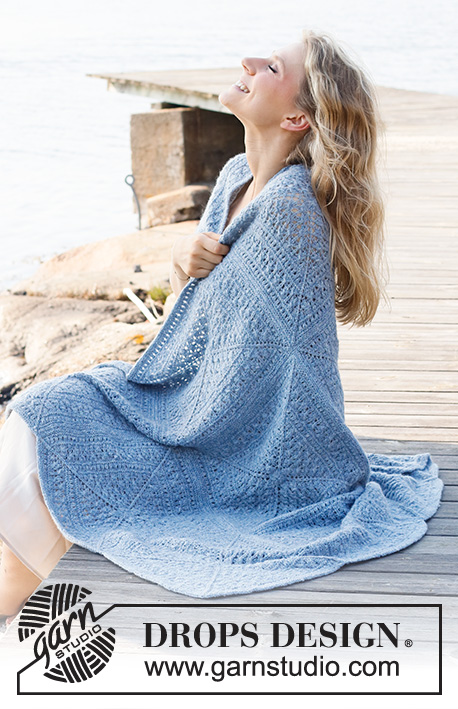
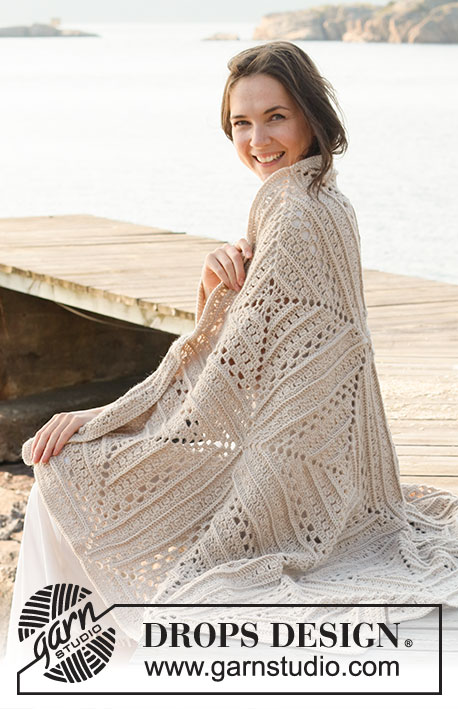
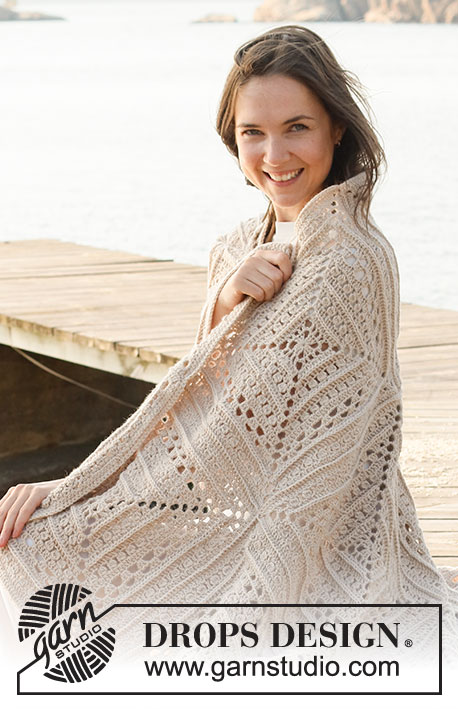
Crocheted blanket in DROPS Lima.
DROPS 221-2 |
||||||||||||||||||||||||||||
|
------------------------------------------------------- EXPLANATIONS FOR THE PATTERN: ------------------------------------------------------- PATTERN: See diagrams A.1 and A.2. Diagram A.1 shows how the rounds start and finish. CHAIN STITCH: If you work outermost on the hook the chain stitch will often be too tight; 1 chain stitch should be as long as 1 treble crochet is wide. ------------------------------------------------------- START THE PIECE HERE: ------------------------------------------------------- BLANKET – SHORT OVERVIEW OF THE PIECE: The blanket consists of 12 squares worked according to the diagrams. The squares are crocheted together and an edge is crocheted around the blanket to finish. SQUARE: Use crochet hook size 4 mm and Lima. Read CHAIN STITCH in explanations above. Work diagram A.2 a total of 4 times around the chain-stitch ring - A.1 shows how the round begins and ends. REMEMBER THE CROCHET TENSION! Work a total of 12 squares. ASSEMBLY: Lay the squares out, with 3 in width and 4 in length. Make sure all the squares have the right side up. Use Lima and work the squares together, first in width then in length. Lay 2 squares together, wrong side to wrong side, and work through both layers from the right side as follows: Fasten the strand with 1 double crochet around the chain-spaces in the corner, * work 1 double crochet in each stitch as far as the next corner (= 3 chain stitches), work 1 double crochet around the corner, 2 chain stitches and 1 double crochet around the next corner (= 3 chain stitches). Work from *-* until all the squares have been worked together, but on the last square finish with 1 double crochet in the last corner (= 3 chain stitches). Repeat along the other strips in width. Work the strips together lengthwise in the same way. EDGE: Use Lima and crochet hook size 4 mm. Start by fastening the strand with 1 slip stitch in the first corner, then work as follows: Work 3 chain stitches and 2 treble crochets around the first corner. * Work 1 treble crochet in each stitch as far as the corners between squares, work 1 treble crochet around each corner *, work from *-* to the last corner on this side of the blanket. Around corner 2 work 3 treble crochets, work from *-* to the last corner on this side of the blanket. Around corner 3 work 3 treble crochets, work from *-* to the last corner on this side of the blanket. Around corner 4 work 3 treble crochets, work from *-* as far as the first corner and finish with 1 slip stitch in the 3rd chain stitch at the beginning of the round. Cut and fasten the strand. |
||||||||||||||||||||||||||||
Diagram explanations |
||||||||||||||||||||||||||||
|
||||||||||||||||||||||||||||
 |
||||||||||||||||||||||||||||
Have you finished this pattern?Tag your pictures with #dropspattern #daybytheseablanket or submit them to the #dropsfan gallery. Do you need help with this pattern?You'll find 9 tutorial videos, a Comments/Questions area and more by visiting the pattern on garnstudio.com. © 1982-2026 DROPS Design A/S. We reserve all rights. This document, including all its sub-sections, has copyrights. Read more about what you can do with our patterns at the bottom of each pattern on our site. |
||||||||||||||||||||||||||||


With over 40 years in knitting and crochet design, DROPS Design offers one of the most extensive collections of free patterns on the internet - translated to 17 languages. As of today we count 324 catalogues and 12290 patterns translated into English (UK/cm). 12290
We work hard to bring you the best knitting and crochet have to offer, inspiration and advice as well as great quality yarns at incredible prices! Would you like to use our patterns for other than personal use? You can read what you are allowed to do in the Copyright text at the bottom of all our patterns. Happy crafting!
Post a comment to pattern DROPS 221-2
We would love to hear what you have to say about this pattern!
If you want to leave a question, please make sure you select the correct category in the form below, to speed up the answering process. Required fields are marked *.