
Popularne kategorie
Szukasz włóczki?


Komentarze / Pytania (92)
![]() Linda napisała::
Linda napisała::
Det står i oppskriften at en skal strikke to riller over et vist antall masker på midten, men når en skal strikke forstykke og bakstykke for seg selv, skal en fortsette med de rillene på midten?
18.12.2025 - 21:34Odpowiedź DROPS Design :
Hei Linda. Det strikkes 2 riller over de midterste maskene i hver side (under ermene), om du ser på bildet (der modellen løfter armen), ser du rillene. mvh DROPS Design
22.12.2025 - 09:38
![]() Audrey napisała::
Audrey napisała::
Where does the pattern indicate the finished size measurements? I read they are at the bottom of the pattern but I do not see them there.
20.11.2025 - 08:16Odpowiedź DROPS Design :
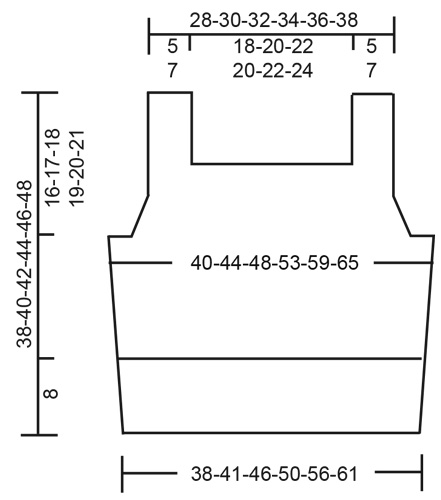
Dear Audrey, you will find all finished measurements for each size in the chart at the bottom of the page; read more about chart, measurements and sizes here. Happy knitting!
20.11.2025 - 10:27
![]() Annika napisała::
Annika napisała::
Fin!
24.06.2025 - 13:12
![]() Libby napisała::
Libby napisała::
I’m currently knitting the straps and the only length stated is for the entire piece - do you have a suggested strap length by itself? I feel like if the rest of the front piece varied from the pattern then I can no longer judge when to stop the straps (especially when only knitting one side first)
26.05.2025 - 12:41Odpowiedź DROPS Design :
Dear Libby, we only have here the total length of piece, so that you can measure from where you stopped towards the measurement for your size to get the height of the strap. You can also count for your size the number of rows required for decreasing + the 3 cm ribbing - remove this from the total length to get the approximate length for straps. Happy knitting!
26.05.2025 - 14:26
![]() Hanna napisała::
Hanna napisała::
Hi I just have a question about the back part of the piece. If I am decreasing every 4th row, and decreasing the same amount as in the front, won't the back piece be twice as long? Is that supposed to be the case? This does not appear to be the case in the diagram, so I am a little confused.
22.05.2025 - 12:57Odpowiedź DROPS Design :
Dear Hanna, correct, back piece will be higher than front piece as you will decrease the same number of times than on front piece but on every 4th row instead of on every 2nd row. Happy knitting!
22.05.2025 - 15:49
![]() Luna napisała::
Luna napisała::
So, when I start working back and forth. Should I have 4 sts (for the garter stitch edge) then SKPO, knit til the last 6 sts where 4 sts is for the garter stitch and then K2tog? Is this the correct way to decrease? Or should it be K2tog then the last 4 sts for the garter edge.
18.05.2025 - 20:47Odpowiedź DROPS Design :
Hi Luna, The 4 garter stitches are the first 4 stitches and the last 4 stitches on each row. You decrease as you say, after the first 4 stitches at the beginning of the row, then before the last 4 stitches at the end of the row. Regards, Drops Team.
19.05.2025 - 06:57
![]() Luna napisała::
Luna napisała::
Please explain when do I start to cast off. So, I have a marker for both sides. Should I start to cast off after each marker? I have one marker as from BOR and the other which marks the side.
18.05.2025 - 20:04Odpowiedź DROPS Design :
Dear Luna, you mean for armholes? From the beginning of the row cast off the first 3, 5, 8 or 10 sts (see size), work the next stitches as stated until 3,5,8 or 10 sts remain before next marker then cast off the next 6,10,16 or 20 sts, work until 3,5,8or 10 sts remain before end of the round and cast off these stitches, cut the yarn and pull it through the last stitch. Now work the 62-90 sts on front piece back and forth (back piece will be worked afterwards). Happy knitting!
19.05.2025 - 08:44
![]() Anna Eriksson napisała::
Anna Eriksson napisała::
Jag har svårt att förstå vilken storlek jag ska sticka. Brukar vara s och ibland m, hur räknar jag ut lättast vilken storlek jag ska sticka? Är det bystmåttet som avses i diagrammet (där jag antar att halva måttet står)?
06.05.2025 - 06:46Odpowiedź DROPS Design :
Hei Anna. Se på målene som er oppgitt på målskissen til toppen, finn frem en topp du allerede har og liker passformen på og sammenlign med målene i målskissen med din topp for å finne den størrelsen du ønsker å strikke etter. Målene 40-44-48-53-59-65 er brystmålene på toppen, og ja, det er halve målet. mvh DROPS Design
12.05.2025 - 08:53
![]() Ali napisała::
Ali napisała::
Hello I would like some advice/help on the front piece: Work 2 edge stitches in garter stitch, * knit 2, purl 2 *, work from *-* 1-1-1-2-2-2 times in total, knit 2 and 2 stitches in garter stitch, then cast off the next 34-38-42-38-42-46 stitches for neck (cast off with knit over knit and purl over purl) So I have to work 2 in garter stitch then do I knit a few more or directly cast off the 34 stitches (for size S)? And is there a special technique for casting off purl and knit?
25.03.2025 - 23:11Odpowiedź DROPS Design :
Hi Ali, You cast off the correct number of stitches straight away after the 2 garter stitches. Here is a video showing how to cast off in rib: https://www.garnstudio.com/video.php?id=228&lang=en Happy knitting!
26.03.2025 - 06:55
![]() Ali napisała::
Ali napisała::
Hello I would like some advice/help on the front piece: Work 2 edge stitches in garter stitch, * knit 2, purl 2 *, work from *-* 1-1-1-2-2-2 times in total, knit 2 and 2 stitches in garter stitch, then cast off the next 34-38-42-38-42-46 stitches for neck (cast off with knit over knit and purl over purl) So I have to work 2 in garter stitch then do I knit a few more or directly cast off the 34 stitches (for size S)? And is there a special technique for casting off purl and knit stitches?
25.03.2025 - 23:11Odpowiedź DROPS Design :
Dear Ali, in size S you first work: 2 sts in garter stitch, K2, P2, K2, 2 sts in garter stitch = 10 sts for first shoulder, then cast off the next 34 sts and work the last 10 sts with 2 sts in garter stitch, K2, P2, K2, 2 sts in garter stitch. See how to cast off in rib here or find more techniques to cast off here. Happy knitting!
26.03.2025 - 08:36
|
|
Spiced Breeze#spicedbreezetop |
|
 |
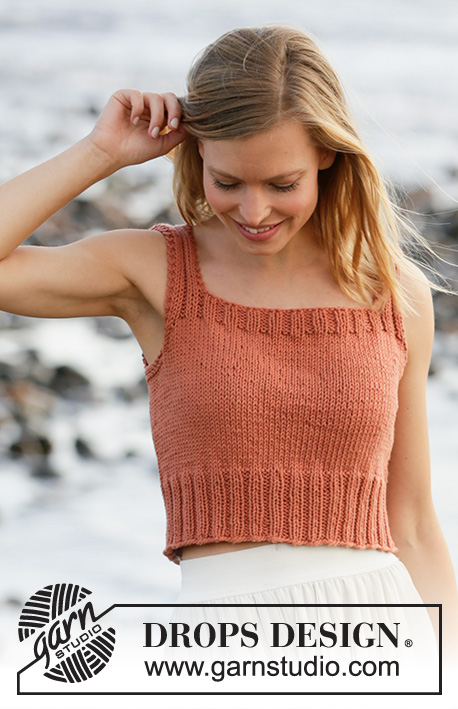 |
Top na drutach z włóczki DROPS Paris, dżersejem z brzegami ściągaczem. Od S do XXXL
DROPS 211-15 |
|
|
WYKORZYSTYWANE TECHNIKI: ---------------------------------------------------------- ŚCIEG FRANCUSKI (na okrągło): 1 ściągacz francuski na wysokość = 2 okrążenia, tzn. przerobić 1 okrążenie na prawo i 1 okrążenie na lewo. ŚCIEG FRANCUSKI (w tę i z powrotem): Przerabiać we wszystkich rzędach na prawo. 1 ściągacz francuski na wysokość = przerobić 2 rzędy na prawo. ZAMYKANIE OCZEK (podkroje rękawów): Zamykać na podkroje rękawów w odl. 2 oczek ściegiem francuskim od brzegów. Oczka są zamykane na prawej stronie robótki. Zamykać za 2 oczkami brzegowymi ściegiem francuskim następująco: zdjąć 1 oczko jak do przerobienia na prawo, 1 oczko prawe, przełożyć oczko zdjęte nad przerobionym oczkiem (= zostaje zamknięte 1 oczko). Zamykać przed 2 oczkami brzegowymi ściegiem francuskim następująco: zaczynając 2 oczka przed 2 oczkami brzegowymi, przerobić 2 oczka razem na prawo (= zostaje zamknięte 1 oczko). ---------------------------------------------------------- ROBÓTKĘ ROZPOCZYNAMY TUTAJ: ---------------------------------------------------------- TOP - SKRÓCONY OPIS ROBÓTKI: Przerabiany od dołu do góry, na okrągło na drutach z żyłką, do podkrojów rękawów. Dalej przerabiać przód i tył oddzielnie w tę i z powrotem na drutach z żyłką. Kończyć zszywając szelki. TYŁ & PRZÓD: Na drutach z żyłką nr 4,5 nabrać 136-148-164-180-200-220 oczek włóczką Paris. Przerobić 1 okrążenie na prawo. Dalej przerabiać ściągaczem na okrągło (= 2 oczka prawe/2 oczka lewe) przez 8 cm. Umieścić 1 nitkę marker na początku okrążenia + kolejny marker za 68-74-82-90-100-110 oczkami. Nitki markery wyznaczają boki topu. Dalej przerabiać na drutach z żyłką nr 5 dżersejem na okrągło. ZACHOWAĆ TAKIE SAMO NAPRĘŻENIE NICI JAK W PRZYPADKU PRÓBKI! Gdy długość robótki wynosi 21-22-23-24-25-26 cm, przerobić 2 ściągacze ściegiem francuskim - patrz opis powyżej, ponad 10-10-14-14-20-24 oczkami z każdej strony (nitki markery znajdują się na środku tych 10-10-14-14-20-24 oczek - przerabiać pozostałe oczka dżersejem). W 1-szym okrążeniu za 2 ściągaczami francuskimi, zamykać na podkroje rękawów następująco: zamknąć 3-3-5-5-8-10 oczek, przerobić 62-68-72-80-84-90 oczek dżersejem, zamknąć 6-6-10-10-16-20 oczek (nitka marker znajduje się na środku tych 6-6-10-10-16-20 oczek), przerobić 62-68-72-80-84-90 oczek dżersejem i zamknąć 3-3-5-5-8-10 ostatnich oczek. Odciąć nitkę. Kończyć przód i tył oddzielnie. PRZÓD: = 62-68-72-80-84-90 oczek. Zaczynając na lewej stronie robótki, dalej przerabiać w tę i z powrotem dżersejem, z 2 oczkami brzegowymi ściegiem francuskim z każdej strony. W TYM SAMYM CZASIE w 1-szym rzędzie na prawej stronie robótki zamknąć 1 oczko z każdej strony na podkroje rękawów - patrz ZAMYKANIE OCZEK. Zamykać tak samo w sumie 4-5-5-7-7-8 razy z każdej strony co 2 rzędy (tj. w każdym rzędzie na prawej stronie robótki) = zostaje 54-58-62-66-70-74 oczka. Po zamknięciu ostatniego oczka na podkroje rękawów, przerobić 1 rząd na lewo na lewej stronie robótki z 2 oczkami brzegowymi ściegiem francuskim z każdej strony. Dalej przerabiać na drutach z żyłką nr 4,5 i przerabiać kolejny rząd na prawej stronie robótki następująco: 2 oczka brzegowe ściegiem francuskim, *2 oczka prawe, 2 oczka lewe*, powtarzać od *-* aż zostaje 4 oczka, 2 oczka prawe i zakończyć przerabiając 2 oczka brzegowe ściegiem francuskim. Dalej przerabiać ściągaczem tak samo przez 3 cm. W następnym rzędzie na prawej stronie robótki, zamykać na dekolt następująco: 2 oczka brzegowe ściegiem francuskim, *2 oczka prawe, 2 oczka lewe*, przerabiać od *-* w sumie 1-1-1-2-2-2 razy, 2 oczka prawe i 2 oczka ściegiem francuskim, zamknąć 34-38-42-38-42-46 następnych oczek na dekolt (zamykać oczka tak jak schodzą z drutu), przerobić 2 oczka ściegiem francuskim, *2 oczka prawe, 2 oczka lewe*, przerabiać od *-* w sumie 1-1-1-2-2-2 razy, 2 oczka prawe i kończyć przerabiając 2 oczka brzegowe ściegiem francuskim. Jest teraz 10-10-10-14-14-14 oczek z każdej strony na szelki. Kończyć szelki oddzielnie. SZELKI: = 10-10-10-14-14-14 oczek. Przerabiać w tę i z powrotem jak wcześniej, ściągaczem z 2 oczkami brzegowymi ściegiem francuskim z każdej strony, aż długość robótki (z szelką włącznie) wynosi 38-40-42-44-46-48 cm od rzędu nabierania oczek (lub ma inną długość wg uznania). Zakończyć. Drugą szelkę wykonać w taki sam sposób. TYŁ: = 62-68-72-80-84-90 oczek. Zaczynając na lewej stronie robótki, dalej przerabiać w tę i z powrotem dżersejem z 2 oczkami brzegowymi ściegiem francuskim z każdej strony. W TYM SAMYM CZASIE w 1-szym rzędzie na prawej stronie robótki zamknąć 1 oczko z każdej strony na podkroje rękawów - patrz ZAMYKANIE OCZEK. Zamykać tak samo w sumie 4-5-5-7-7-8 razy z każdej strony co 4 rzędy (a nie co 2 rzędy jak na przodzie) = 54-58-62-66-70-74 oczka. Po zamknięciu ostatniego oczka, przerobić 1 rząd na lewo na lewej stronie robótki z 2 oczkami brzegowymi ściegiem francuskim z każdej strony. Dalej przerabiać na drutach z żyłką nr 4,5 i przerabiać kolejny rząd na prawej stronie robótki następująco: 2 oczka brzegowe ściegiem francuskim, *2 oczka prawe, 2 oczka lewe*, powtarzać od *-* aż zostaje 4 oczka, 2 oczka prawe i zakończyć przerabiając 2 oczka brzegowe ściegiem francuskim. Dalej przerabiać ściągaczem tak samo przez 3 cm. W następnym rzędzie na prawej stronie robótki zamykać na dekolt następująco: 2 oczka brzegowe ściegiem francuskim, *2 oczka prawe, 2 oczka lewe*, przerabiać od *-* w sumie 1-1-1-2-2-2 razy, przerobić 2 oczka prawe i 2 oczka ściegiem francuskim, zamknąć 34-38-42-38-42-46 następnych oczek na dekolt (zamknąć oczka tak jak schodzą z drutu), przerobić 2 oczka ściegiem francuskim, *2 oczka prawe, 2 oczka lewe*, przerabiać od *-* w sumie 1-1-1-2-2-2 razy, przerobić 2 oczka prawe i kończyć przerabiając 2 oczka brzegowe ściegiem francuskim. Jest teraz 10-10-10-14-14-14 oczek z każdej strony na szelki. Przerabiać szelki oddzielnie, tak jak z przodu. WYKOŃCZENIE: Zszyć ramiona. |
|
 |
|
Skończyłaś ten wzór?Otaguj swoje zdjęcia #dropspattern #spicedbreezetop lub prześlij je do #dropsfan gallery. Potrzebujesz pomocy w związku z tym wzorem?Zobacz 21 instrukcje video, sekcję Komentarze/Pytania i jeszcze więcej, wchodząc na stronę wzoru na garnstudio.com © 1982-2026 DROPS Design A/S. Wszelkie prawa zastrzeżone. Ten dokument, w całości, jest chroniony prawem. Zobacz co możesz robić z naszymi wzorami na dole każdego wzoru na naszej stronie. |
|


Posiadając 40 lat doświadczenia w projektowaniu wzorów na druty i szydełko, DROPS Design oferuje jedną z największych kolekcji bezpłatnych wzorów w internecie – przetłumaczonych na 17 języków. Obecnie jest dostępnych 324 katalogów i 12290 wzorów w języku polskim.
Dokładamy wszelkich starań, aby oferować Wam druty i szydełka, inspiracje, fachowe porady oraz doskonałej jakości włóczki w najlepszych cenach! Zamierzasz wykorzystać nasze wzory inaczej niż tylko do osobistego użytku? Przeczytaj jakie masz prawa w Copyright, który znajdziesz na końcu każdego wzoru. Miłej pracy!
Dodaj komentarz do modelu DROPS 211-15
Chcielibyśmy się dowiedzieć co masz do powiedzenia o tym wzorze!
Jeśli chcesz zadać pytanie i szybko uzyskać odpowiedź, upewnij się, że została wybrana właściwa kategoria w formularzu poniżej. Pola obowiązkowe są oznaczone *.