
Categorías populares
¿Buscas un hilo?


Comentarios / Preguntas (90)
![]() Annika escribió:
Annika escribió:
Fin!
24.06.2025 - 13:12
![]() Libby escribió:
Libby escribió:
I’m currently knitting the straps and the only length stated is for the entire piece - do you have a suggested strap length by itself? I feel like if the rest of the front piece varied from the pattern then I can no longer judge when to stop the straps (especially when only knitting one side first)
26.05.2025 - 12:41DROPS Design respondió:
Dear Libby, we only have here the total length of piece, so that you can measure from where you stopped towards the measurement for your size to get the height of the strap. You can also count for your size the number of rows required for decreasing + the 3 cm ribbing - remove this from the total length to get the approximate length for straps. Happy knitting!
26.05.2025 - 14:26
![]() Hanna escribió:
Hanna escribió:
Hi I just have a question about the back part of the piece. If I am decreasing every 4th row, and decreasing the same amount as in the front, won't the back piece be twice as long? Is that supposed to be the case? This does not appear to be the case in the diagram, so I am a little confused.
22.05.2025 - 12:57DROPS Design respondió:
Dear Hanna, correct, back piece will be higher than front piece as you will decrease the same number of times than on front piece but on every 4th row instead of on every 2nd row. Happy knitting!
22.05.2025 - 15:49
![]() Luna escribió:
Luna escribió:
So, when I start working back and forth. Should I have 4 sts (for the garter stitch edge) then SKPO, knit til the last 6 sts where 4 sts is for the garter stitch and then K2tog? Is this the correct way to decrease? Or should it be K2tog then the last 4 sts for the garter edge.
18.05.2025 - 20:47DROPS Design respondió:
Hi Luna, The 4 garter stitches are the first 4 stitches and the last 4 stitches on each row. You decrease as you say, after the first 4 stitches at the beginning of the row, then before the last 4 stitches at the end of the row. Regards, Drops Team.
19.05.2025 - 06:57
![]() Luna escribió:
Luna escribió:
Please explain when do I start to cast off. So, I have a marker for both sides. Should I start to cast off after each marker? I have one marker as from BOR and the other which marks the side.
18.05.2025 - 20:04DROPS Design respondió:
Dear Luna, you mean for armholes? From the beginning of the row cast off the first 3, 5, 8 or 10 sts (see size), work the next stitches as stated until 3,5,8 or 10 sts remain before next marker then cast off the next 6,10,16 or 20 sts, work until 3,5,8or 10 sts remain before end of the round and cast off these stitches, cut the yarn and pull it through the last stitch. Now work the 62-90 sts on front piece back and forth (back piece will be worked afterwards). Happy knitting!
19.05.2025 - 08:44
![]() Anna Eriksson escribió:
Anna Eriksson escribió:
Jag har svårt att förstå vilken storlek jag ska sticka. Brukar vara s och ibland m, hur räknar jag ut lättast vilken storlek jag ska sticka? Är det bystmåttet som avses i diagrammet (där jag antar att halva måttet står)?
06.05.2025 - 06:46DROPS Design respondió:
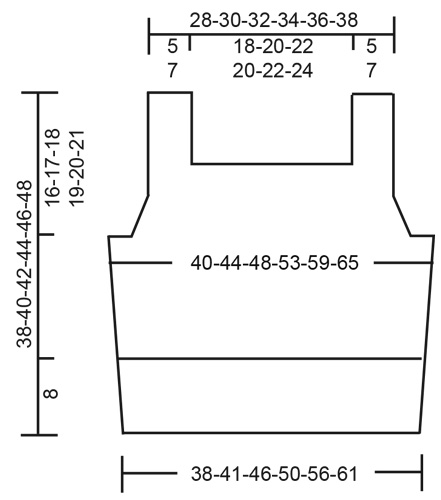
Hei Anna. Se på målene som er oppgitt på målskissen til toppen, finn frem en topp du allerede har og liker passformen på og sammenlign med målene i målskissen med din topp for å finne den størrelsen du ønsker å strikke etter. Målene 40-44-48-53-59-65 er brystmålene på toppen, og ja, det er halve målet. mvh DROPS Design
12.05.2025 - 08:53
![]() Ali escribió:
Ali escribió:
Hello I would like some advice/help on the front piece: Work 2 edge stitches in garter stitch, * knit 2, purl 2 *, work from *-* 1-1-1-2-2-2 times in total, knit 2 and 2 stitches in garter stitch, then cast off the next 34-38-42-38-42-46 stitches for neck (cast off with knit over knit and purl over purl) So I have to work 2 in garter stitch then do I knit a few more or directly cast off the 34 stitches (for size S)? And is there a special technique for casting off purl and knit?
25.03.2025 - 23:11DROPS Design respondió:
Hi Ali, You cast off the correct number of stitches straight away after the 2 garter stitches. Here is a video showing how to cast off in rib: https://www.garnstudio.com/video.php?id=228&lang=en Happy knitting!
26.03.2025 - 06:55
![]() Ali escribió:
Ali escribió:
Hello I would like some advice/help on the front piece: Work 2 edge stitches in garter stitch, * knit 2, purl 2 *, work from *-* 1-1-1-2-2-2 times in total, knit 2 and 2 stitches in garter stitch, then cast off the next 34-38-42-38-42-46 stitches for neck (cast off with knit over knit and purl over purl) So I have to work 2 in garter stitch then do I knit a few more or directly cast off the 34 stitches (for size S)? And is there a special technique for casting off purl and knit stitches?
25.03.2025 - 23:11DROPS Design respondió:
Dear Ali, in size S you first work: 2 sts in garter stitch, K2, P2, K2, 2 sts in garter stitch = 10 sts for first shoulder, then cast off the next 34 sts and work the last 10 sts with 2 sts in garter stitch, K2, P2, K2, 2 sts in garter stitch. See how to cast off in rib here or find more techniques to cast off here. Happy knitting!
26.03.2025 - 08:36
![]() Malene escribió:
Malene escribió:
Hei. Jeg sitter fast hvor jeg skal felle 6 masker i hver side til arm hull. Forstår ikke hvordan jeg skal felle av 3 masker, så å strikke to kant/rille masker. Felletips sier f.eks. strikk to masker sammen= en maske felt, men hva med de to andre maskene som skal felles? Hvis jeg skal følge felle tipsene må jeg bruke kantmaskene til felling😅
13.03.2025 - 18:10DROPS Design respondió:
Hei Malene, Når man feller av bruker man samme metoden som når man feller kant på slutten av arbeidet. Så her gjelder ikke Felletips som er brukt når man reduserer antall masker uten å lage hull. Etter man har felt av til begge ermehull, fortsetter man fram og tilbake, først med forstykke for seg, deretter med bakstykke. God fornøyelse!
14.03.2025 - 07:44
![]() Ali escribió:
Ali escribió:
Hello, as a beginner knitter, I am knitting this pattern in a round. I am stuck on how to continue it as I have gotten to the garter stitch part (in the BODY section) and I\'m not sure If I have to decrease and then cast off or just cast off? Also is there a special technique or trick on how to cast off and continue the piece separately by front and back, will I need another set of needles? Thanks
12.03.2025 - 22:41DROPS Design respondió:
Dear Ali, after you have worked the 2 ridges on the sides (armholes), just work the next round as explained, casting off stitches for armhole, working the stitches for front and back piece in stocking stitch and cut the yarn. Then slip the stitches for back piece on a thread or another needle and continue front piece only joining the yarn to work first row from WS. When front piece is done, you will work back piece. Happy knitting!
14.03.2025 - 08:13
|
|
Spiced Breeze#spicedbreezetop |
|
 |
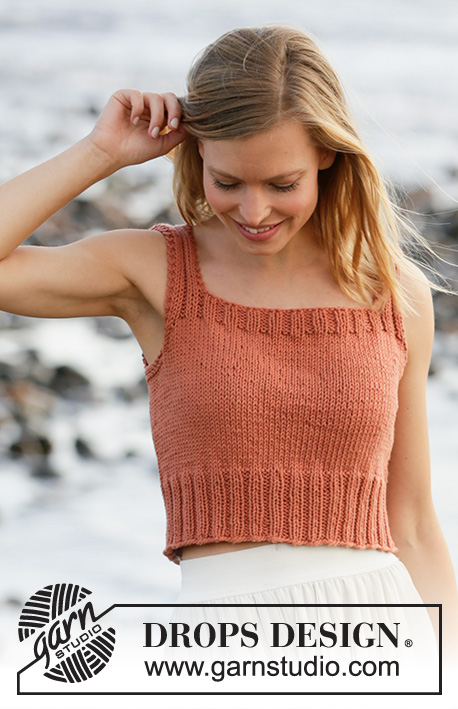 |
Top de punto en DROPS Paris. La pieza está tejida en punto jersey con orillas en resorte. Tallas: S – XXXL.
DROPS 211-15 |
|
|
EXPLICACIONES PARA REALIZAR EL PATRÓN: ------------------------------------------------ PUNTO MUSGO (tejido en redondo): 1 surco verticalmente = 2 vueltas; es decir, tejer 1 vuelta de derecho y 1 vuelta de revés. PUNTO MUSGO (de ida y vuelta): Tejer todas las hileras de derecho. 1 surco verticalmente = tejer 2 hileras de derecho. TIP PARA DISMINUIR (aplica a las sisas): Disminuir para las sisas en el interior de 2 puntos de orillo en punto musgo. Todas las disminuciones son hechas por el lado derecho. Disminuir de la manera siguiente después de 2 puntos de orillo en punto musgo: Deslizar 1 punto como de derecho, tejer 1 punto derecho, pasar el punto deslizado por encima del punto tejido (= 1 punto disminuido). Disminuir de la manera siguiente antes de 2 puntos de orillo en punto musgo: Comenzar 2 puntos antes de los 2 puntos de orillo y tejer 2 puntos juntos de derecho (= 1 punto disminuido). ------------------------------------------------ COMENZAR LA PIEZA AQUÍ: ------------------------------------------------ TOP – RESUMEN DE LA PIEZA: La pieza se teje en redondo en aguja circular, a partir de la parte de abajo hasta las sisas. Después tejer el frente y la pieza de la espalda de ida y vuelta en aguja circular separadamente. Después coser las costuras de los hombros. CUERPO: Montar 136-148-164-180-200-220 puntos en aguja circular tamaño 4.5 mm con Paris. Tejer 1 vuelta de derecho. Después tejer el resorte en redondo (= 2 derechos/2 reveses) durante 8 cm. Insertar 1 hilo marcador al principio de la vuelta y 1 hilo marcador después de 68-74-82-90-100-110 puntos. Los hilos marcadores marcan los lados del cuerpo. Cambiar a aguja circular tamaño 5 mm y tejer en punto jersey en redondo. ¡RECORDAR MANTENER LA MISMA TENSIÓN DE TEJIDO DE LA MUESTRA! Cuando la pieza mida 21-22-23-24-25-26 cm, tejer 2 surcos en PUNTO MUSGO – leer explicación arriba, sobre los 10-10-14-14-20-24 puntos centrales a cada lado (los hilos marcadores están en el centro de estos 10-10-14-14-20-24 puntos – tejer los otros puntos en punto jersey). En la primera vuelta después de los 2 surcos, rematar para las sisas de la manera siguiente: Rematar 3-3-5-5-8-10 puntos, tejer 62-68-72-80-84-90 puntos en punto jersey, rematar 6-6-10-10-16-20 puntos (el hilo marcador está en el centro de estos 6-6-10-10-16-20 puntos), tejer 62-68-72-80-84-90 puntos en punto jersey, y rematar los 3-3-5-5-8-10 puntos restantes. Cortar el hilo. Terminar el frente y la pieza de la espalda separadamente. FRENTE: = 62-68-72-80-84-90 puntos. Comenzar por el lado revés y continuar con punto jersey de ida y vuelta y 2 puntos de orillo en punto musgo a cada lado. AL MISMO TIEMPO, en la primera hilera por el lado derecho, disminuir 1 punto a cada lado para las sisas – leer TIP PARA DISMINUIR. Disminuir así a cada 2 hileras (es decir, en cada hilera por el lado derecho) 4-5-5-7-7-8 veces en total a cada lado = restan 54-58-62-66-70-74 puntos. Después de la última disminución para las sisas, tejer 1 hilera de revés por el lado revés con 2 puntos de orillo en punto musgo a cada lado. Cambiar a aguja circular tamaño 4.5 mm y tejer la hilera siguiente por el lado derecho de la manera siguiente: 2 puntos de orillo en punto musgo, * 2 derechos, 2 reveses *, repetir de *a* hasta que resten 4 puntos, tejer 2 puntos derechos y terminar con 2 puntos de orillo en punto musgo. Continuar el resorte así durante 3 cm. En la hilera siguiente por el lado derecho, rematar para el escote de la manera siguiente: Tejer 2 puntos de orillo en punto musgo, * 2 derechos, 2 reveses *, tejer de *a* 1-1-1-2-2-2 veces en total, tejer 2 puntos derechos y 2 puntos en punto musgo, después rematar los 34-38-42-38-42-46 puntos siguientes para el escote (rematar con derecho sobre derecho y revés sobre revés), tejer 2 puntos en punto musgo, * 2 derechos, 2 reveses *, tejer de *a* 1-1-1-2-2-2 veces en total, tejer 2 puntos derechos y terminar con 2 puntos de orillo en punto musgo. Ahora hay 10-10-10-14-14-14 puntos restantes a cada lado de la pieza para los tirantes. Terminar los tirantes separadamente. TIRANTE: = 10-10-10-14-14-14 puntos. Tejer en resorte de ida y vuelta como antes con 2 puntos de orillo en punto musgo a cada lado hasta que la pieza complete mida 38-40-42-44-46-48 cm a partir de la orilla de montaje (o el largo deseado). Rematar. Tejer el otro tirante de la misma manera. ESPALDA: = 62-68-72-80-84-90 puntos. Comenzar por el lado revés y continuar con punto jersey de ida y vuelta y 2 puntos de orillo en punto musgo a cada lado. AL MISMO TIEMPO, en la primera hilera por el lado derecho, disminuir 1 punto a cada lado para las sisas – leer TIP PARA DISMINUIR. Disminuir así a cada 4ª hilera (no a cada 2 hileras como en la pieza del frente) 4-5-5-7-7-8 veces en total a cada lado = 54-58-62-66-70-74 puntos. Después de la última disminución para las sisas, tejer 1 hilera de revés por el lado revés con 2 puntos de orillo en punto musgo a cada lado. Cambiar a aguja circular tamaño 4.5 mm y tejer la hilera siguiente por el lado derecho de la manera siguiente: 2 puntos de orillo en punto musgo, * 2 derechos, 2 reveses *, repetir de *a* hasta que resten 4 puntos, tejer 2 puntos derechos y terminar con 2 puntos de orillo en punto musgo. Continuar el resorte así durante 3 cm. En la hilera siguiente por el lado derecho, rematar para el escote de la manera siguiente: Tejer 2 puntos de orillo en punto musgo, * 2 derechos, 2 reveses *, tejer de *a* 1-1-1-2-2-2 veces en total, tejer 2 puntos derechos y 2 puntos en punto musgo, después rematar los 34-38-42-38-42-46 puntos siguientes para el escote (rematar con derecho sobre derecho y revés sobre revés), tejer 2 puntos en punto musgo, * 2 derechos, 2 reveses *, tejer de *a* 1-1-1-2-2-2 veces en total, tejer 2 puntos derechos y terminar con 2 puntos de orillo en punto musgo. Ahora hay 10-10-10-14-14-14 puntos restantes a cada lado para los tirantes. Tejer los tirantes separadamente de la misma manera como en la pieza del frente. ENSAMBLAJE: Coser las costuras de los hombros. |
|
|
|
¿Terminaste este patrón?Entonces, etiqueta tus fotos con #dropspattern #spicedbreezetop o envíalas a la galería #dropsfan. ¿Necesitas ayuda con este patrón?Encontrarás 21 videos tutoriales, un espacio para comentarios/preguntas y más visitando la página del patrón en garnstudio.com © 1982-2025 DROPS Design A/S. Todos los derechos reservados. Este documento, incluyendo todas sus sub-secciones, está protegido por los derechos de autor (copyright). Lee más acerca de lo que puedes hacer con nuestros patrones en la parte de abajo de cada patrón de nuestro sitio. |
|


Con más de 40 años en el diseño de modelos de punto y de ganchillo, DROPS Design ofrece una de las más vastas colecciones de patrones gratuitos en el internet - traducidos en 17 idiomas. Al día de hoy, contamos con 314 catálogos y 11822 patrones - de los cuales 11158 están traducidos en español.
Nosotros trabajamos con mucho esmero para brindarte lo mejor que las labores de punto y ganchillo tienen para ofrecer,inspiración y consejos, así como hilos de magnífica calidad a precios increíbles! Te gustaría usar nuestros patrones para otro fin además del uso personal? Puedes leer acerca de lo que estás permitida a hacer en el texto de Copyright en la parte de abajo de todos nuestros patrones. Felices labores!
Escribe un comentario sobre DROPS 211-15
¡Nos encantaría saber qué piensas acerca de este patrón!
Si quieres escribir una pregunta referente al patrón, por favor asegúrate de elegir la categoría correcta en el formulario debajo, para acelerar el proceso de respuesta. Los campos obligatorios están marcados con un *.