
Popularne kategorie
Szukasz włóczki?


Komentarze / Pytania (33)
![]() Lonnie Braagaard napisała::
Lonnie Braagaard napisała::
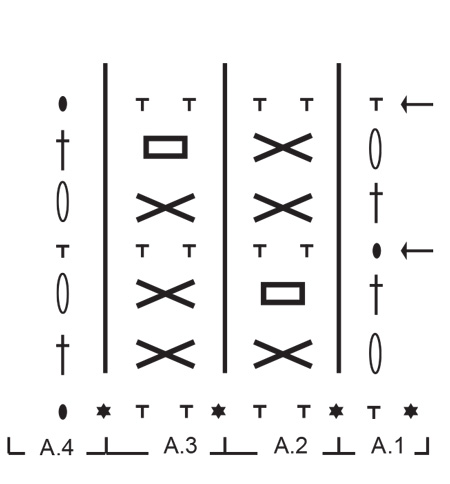
Jeg forsøger at hækle huen, men kan ikke forstå starten af opskriften. 1. række er hæklet og jeg har 68 fastmasker. 2. række ? der hækles iefter diagram men hvad skal der hækles? *T*TT og så videre eller? Håber jeg kan få hjælp
27.10.2021 - 15:14Odpowiedź DROPS Design :
Hej Lonnie, nej, * = denne række skal ikke hækles, den er allerede hæklet og viser kun hvordan næste række skal hækles i maskerne - det vil sige at du hækler næste række :)
28.10.2021 - 14:07
![]() Olga napisała::
Olga napisała::
Hola, he comenzado a hacer el cuello. Si lo pongo en plano sobre la mesa me queda circular, no un rectángulo, como pensaba que tendría que quedar. Pienso que pasa esto porque en la primera vuelta dice que hay que saltarse una cadena. ¿Esto es correcto? O yo no lo he entendido bien? Gracias
19.05.2021 - 15:40Odpowiedź DROPS Design :
Hola Olga, la forma obtenida no es por la cadeneta saltada, sino que por la tensión del tejido. Efectivamente, se tiene que saltar una cadeneta; siempre se montan más cadenetas que las necesarias para evitar que la labor se tense.
30.05.2021 - 20:53
![]() Jean napisała::
Jean napisała::
Thanks. However the instructions for the box (□) say 'skip 1 puff-stitch + 1 chain stitch, work 1 treble crochet in the next treble crochet' - this uses 3 stitches. The instructions for the cross (X) say 'skip 1 stitch, work 1 treble crochet in next stitch' - this uses 2 stitches. It worked in the second row of the pattern fine because the box (□)was used all the way along the row (not the cross X). Please could you get someone to explain this. Thanks.
14.04.2021 - 13:10
![]() Jean napisała::
Jean napisała::
The very top row of the pattern (before the last row of double crochet) doesn't seem to work for me. I am working it right to left, A1 over 1st stitch, A2 until the last 3 stitches, A3 over last 2 stitches and A1 over last stitch. Because A2 is a cross (X) and not a box (□) (like row No 2), there ends up being more puff stitches because the chain stitch isn't being missed (there is a puff stitch being made every 2 stitches instead of 3). Should this symbol not be a box to prevent this?
13.04.2021 - 21:08Odpowiedź DROPS Design :
Dear Jean, the X is worked over 2 stitches (1 treble in the 2. one, and one puff into the first one, cossing the tr), and the square is also wprked over two stitches (puff stitch into the 2. stotch, and treble into the first one) so you should not end up (both symbols have crossed stitches, only teh direction is different), so you should not end up with extra stitches. Happy Crafting!
13.04.2021 - 21:58
![]() Annette Fuglsang napisała::
Annette Fuglsang napisała::
Hej ! I flere af Drops opskrifter møder jeg 3 tal med bindestreg imellem f. eks. i Drops 204-16: "hækl 1 fastmaske i hver af de 0-2-1 næste luftmasker, . . . " Hvad betyder 0-2-1 næste luftmaske ? Eller i strikkeopskriften Drops Clementin Hat "Strik 0-1-0 maske ret, strik derefter . . ." Hvad betyder det ? Med venlig hilsen Annette
25.02.2021 - 06:50Odpowiedź DROPS Design :
Hej Annette, det er tallene i de 3 forskellige størrelser. Strikker du den mindste, følger du det første tal igennem hele opskriften osv. God fornøjelse!
25.02.2021 - 14:20
![]() Annica Lindgren napisała::
Annica Lindgren napisała::
Efter att ha virkat de två första varven (först fastmaskor... sedan första varvet på diagrammet) står: "Fortsätt mönstret fram och tillbaka så". Hur menas? Är det det nedersta varvet som ska upprepas till 20 cm och för att sedan gå uppåt i diagrammet? Eller ska jag följa hela diagrammet uppåt direkt? Med vänlig hälsning, Annica
31.01.2021 - 20:02Odpowiedź DROPS Design :
Hei Annica. Den nederst raden i diagrammet hekler du kun 1 gang, slik det står beskrevet i oppskriften. I diagramteksten med sort stjerne står det: denne raden skal ikke hekles, den er allerede heklet og viser kun hvordan neste rad skal hekles i maskene . Så du skal kun repetere de 6 radene i diagrammet (starter med 3 luftmasker) i høyden. God Fornøyelse!
08.02.2021 - 10:18
![]() Béatrice Lassalle napisała::
Béatrice Lassalle napisała::
Bonjour, Pour faire mon échantillon, vous dites : "13 double-brides/mailles serrées de large avec 1 fil de chaque qualité = 10 cm." Je ne comprends pas bien : je fais des double-brides ou des mailles serrées ? Et dans la hauteur, comment je peux voir ce qu'il y a dans 10 cm ? Merci de me répondre car je reste bloquée sur mon échantillon !
17.11.2020 - 11:14Odpowiedź DROPS Design :
Bonjour Mme Lasalle, vos mailles doivent être toutes de la même largeur, autrement dit 13 double-brides = 13 mailles serrées = 10 cm de large. La hauteur est indiquée pour A.2 = 3 rangs de A.2 = environ 3,25 cm. Bon crochet!
17.11.2020 - 13:56
![]() Roro napisała::
Roro napisała::
Thanks so much for your patience. That explains well how the row of 78 dbl crochet stitches are worked into. However, after you have done the first row of puff stitches, and then count the stitches, there are 116 stitches. This is because each X box contains 3 stitches (a treble, a chain and a puff) and this is being worked into 2 dc stitches. So at the end of the row you have 38 extra stitches (because there are 38 puff stitches). Can you possibly work out why I am going wrong here. Thanks
30.07.2020 - 09:40Odpowiedź DROPS Design :
Dear Roro, work simply following the diagram and video previously linked, making sure you have 38 puff stitches on every row - if your tension is right, you should have then the right measurements. Happy crocheting!
30.07.2020 - 12:34
![]() Roro napisała::
Roro napisała::
Thanks for your response. However, there is an increase from the row of double crochets to the 1st row of puff stitches if you follow the pattern (see question below). In the pattern it looks like each 3rd double crochet is possibly missed, which would actually even out the number of stitches if that was the case - is this where I'm possibly going wrong? Thanks for your patience.
29.07.2020 - 18:01Odpowiedź DROPS Design :
Dear Roro, on neck warmer you cast on 94-101-108 sts and work first row skipping chains evenly so that there are 78-84-90 sts at the end of this first row. Then work: A.1 over 1st st, repeat A.2 until 3 sts remain = repeat A.2 a total of 37-40-43 times in width (= over the next 74-80-86 sts), and finish with A.3 (= 2 sts) and A.4 over the last stitch = 1+74-80-86+2+1=78-84-90 sts and 38-41-44 puff stitches. Hope this help. Happy crocheting!
30.07.2020 - 08:54
![]() Roro napisała::
Roro napisała::
Thanks for all your help. The fundamental reason I don't understand this pattern is this: On the 1st row (after dbl crochet row ) the puff stitches which produce 3 stitches (1 treble + 1 chain + 1 puff) are worked into 2 dbl crochet stitches (1 missed - into which a puff stitch goes after the treble + 1 for the treble). This results in an increase of stitches. That would maybe make sense in the 1st row of the item, but not further up. Should the 'X' box say 'miss 2 stitches' instead? Thanks
29.07.2020 - 16:02Odpowiedź DROPS Design :
Dear Roro, there shouldn't be any increase, you should work "straight", each treble will be worked in the treble from the previous row so that the number of sts will remain constant. This video shows how to crochet these 2 rows with same symbols. Happy crocheting!
29.07.2020 - 17:11
|
|||||||||||||||||||||||||
Fields of Blue#fieldsofblueset |
|||||||||||||||||||||||||
 |
 |
||||||||||||||||||||||||
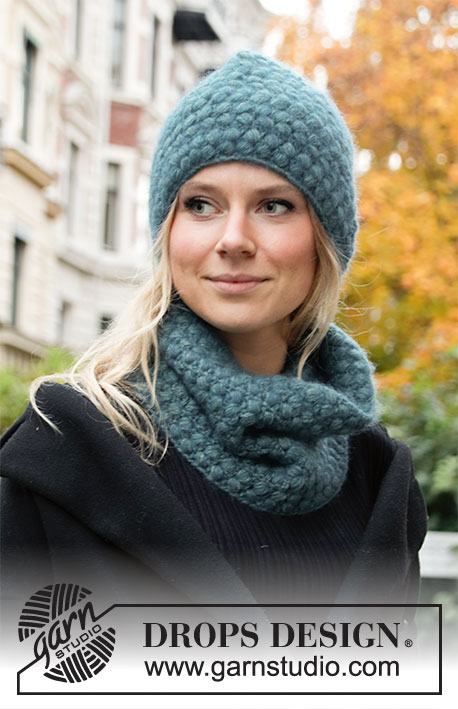
Czapka i komin wykonane bufkami (puff stitch) na szydełku, z włóczek DROPS Sky i DROPS Kid-Silk.
DROPS 204-16 |
|||||||||||||||||||||||||
|
------------------------------------------------------- WYKORZYSTYWANE TECHNIKI: ------------------------------------------------------- ŚCIEG FANTAZYJNY (czapka i komin): Patrz schematy A.1 - A.4. OCZKA ŁAŃCUSZKA: Jeżeli przerabiamy za pomocą samego czubka szydełka, oczka łańcuszka mogą być zbyt małe; długość 1 oczka łańcuszka musi być taka sama jak szerokość 1 półsłupka /1 słupka. 1 BUFKA: Przerabiać w to samo oczko następująco (ważne, aby przerabiać w oczko, a nie wokół oczka): * wykonać 1 narzut, wbić szydełko w oczko, wykonać 1 narzut i go przeciągnąć przez oczko; dwa narzuty muszą być długie (aby bufki nie były zbyt małe i zbite należy wyciągać narzut na długość ok. 2 cm)*, powtarzać od *-* w sumie 5 razy, wykonać 1 narzut i przeciągnąć nitkę przez wszystkie pętelki na szydełku. ZAMYKANIE OCZEK (w regularnych odstępach/równomiernie): Aby obliczyć gdzie zamykać oczka, należy wziąć ogólną liczbę oczek (np. 63 oczka) i podzielić ją przez liczbę oczek jaka ma być zamknięta (np. 28) = 2,3. W tym przykładzie będziemy zamykać oczka przerabiając razem ok. każde pierwsze i drugie oczko następująco: wbić szydełko w następne oczko, wykonać 1 narzut i przeciągnąć go przez oczko, wbić szydełko w następne oczko, wykonać 1 narzut i przeciągnąć go przez oczko, wykonać kolejny narzut i przeciągnąć go przez 3 pętelki na szydełku (= zamknięte 1 oczko). ------------------------------------------------------- ROBÓTKĘ ROZPOCZYNAMY TUTAJ: ------------------------------------------------------- CZAPKA – SKRÓCONY OPIS ROBÓTKI: Przerabiana od dołu do góry, w tę i z powrotem, zaczynając od środka tyłu, zszywana na środku tyłu. CZAPKA: Na szydełku nr 5,5 wykonać 75-77-82 oczka łańcuszka 1 nitką Sky + 1 nitką Kid-Silk (= 2 nitki razem). Przerabiać 1-szy rząd następująco: 1 półsłupek w 3-cie oczko łańcuszka od szydełka, 1 półsłupek w każde z 0-2-1 następnych oczek łańcuszka, *ominąć 1 oczko łańcuszka, 1 półsłupek w każde z 5 następnych oczek łańcuszka*, powtarzać od *-* do końca rzędu = 62-64-68 półsłupków. Przerabiać kolejny rząd następująco: schemat A.1 ponad pierwszym oczkiem, powtarzać schemat A.2, aż zostaje 3 oczka, schemat A.3 ponad 2 następnymi oczkami i zakończyć przerabiając schemat A.4 ponad ostatnim oczkiem. Dalej przerabiać tak samo w tę i z powrotem. ZACHOWAĆ TAKIE SAMO NAPRĘŻENIE NICI JAK W PRZYPADKU PRÓBKI! Gdy długość robótki wynosi ok. 20-21-22 cm, równomiernie zamknąć 28-30-30 oczek, albo w rzędzie 3, albo 6 schematu (jeden z tych z tych oznaczonych strzałką w schemacie) – patrz ZAMYKANIE OCZEK = 34-34-38 oczek. Przerabiać jeszcze 2 rzędy bufkami. W następnym rzędzie (rząd półsłupków) zamykać oczka przerabiając każde 2 kolejne półsłupki razem = zostaje 17-17-19 półsłupków. Dalej przerabiać 2 rzędy półsłupków, przerabiając każde 2 kolejne półsłupki razem w każdym z tych rzędów = zostaje 5 półsłupków we wszystkich rozmiarach. Odciąć nitki, pozostawiając wystarczającą długość nitki na szew. Przeciągnąć nitki przez 5 oczek na górze czapki, zacisnąć i zakończyć. Długość czapki wynosi ok. 26-27-28 cm. WYKOŃCZENIE: Zszyć czapkę na środku tyłu – brzeg do brzegu, wkłuwając igłę w skrajne pętelki oczek brzegowych, aby szew był płaski. ------------------------------------------------------- KOMIN – SKRÓCONY OPIS ROBÓTKI: Przerabiany od dołu do góry, w tę i z powrotem, zaczynając od środka tyłu, ze szwem na końcu. KOMIN: Na szydełku nr 5,5 wykonać 94-101-108 oczek łańcuszka, 1 nitką Sky + 1 nitką Kid-Silk (= 2 nitki razem). Przerabiać 1-szy rząd następująco: 1 półsłupek w 3-cie oczko łańcuszka od szydełka, 1 półsłupek w każde z 1-2-3 następnych oczek łańcuszka, *ominąć 1 oczko łańcuszka, 1 półsłupek w każde z 5 następnych oczek łańcuszka*, powtarzać od *-* do końca rzędu = 78-84-90 półsłupków. Przerabiać następny rząd następująco: schemat A.1A ponad pierwszym oczkiem, schemat A.2, aż zostaje 3 oczka, schemat A.3 ponad 2 następnymi oczkami i zakończyć przerabiając schemat A.4 ponad ostatnim oczkiem. ZACHOWAĆ TAKIE SAMO NAPRĘŻENIE NICI JAK W PRZYPADKU PRÓBKI! Dalej przerabiać tak samo w tę i z powrotem, aż dł. robótki wynosi ok. 24-27-30 cm (lub ma inną długość wg uznania), ale zakończyć albo za rzędem 3 lub za rzędem 6 schematów. Odciąć nitkę, pozostawiając wystarczającą długość nitki na szew. WYKOŃCZENIE: Zszyć na środku tyłu – brzeg do brzegu, wkłuwając igłę w skrajne pętelki oczek brzegowych, aby szew był płaski. |
|||||||||||||||||||||||||
Objaśnienia do schematu |
|||||||||||||||||||||||||
|
|||||||||||||||||||||||||
 |
|||||||||||||||||||||||||
Skończyłaś ten wzór?Otaguj swoje zdjęcia #dropspattern #fieldsofblueset lub prześlij je do #dropsfan gallery. Potrzebujesz pomocy w związku z tym wzorem?Zobacz 7 instrukcje video, sekcję Komentarze/Pytania i jeszcze więcej, wchodząc na stronę wzoru na garnstudio.com © 1982-2026 DROPS Design A/S. Wszelkie prawa zastrzeżone. Ten dokument, w całości, jest chroniony prawem. Zobacz co możesz robić z naszymi wzorami na dole każdego wzoru na naszej stronie. |
|||||||||||||||||||||||||


Posiadając 40 lat doświadczenia w projektowaniu wzorów na druty i szydełko, DROPS Design oferuje jedną z największych kolekcji bezpłatnych wzorów w internecie – przetłumaczonych na 17 języków. Obecnie jest dostępnych 324 katalogów i 12290 wzorów w języku polskim.
Dokładamy wszelkich starań, aby oferować Wam druty i szydełka, inspiracje, fachowe porady oraz doskonałej jakości włóczki w najlepszych cenach! Zamierzasz wykorzystać nasze wzory inaczej niż tylko do osobistego użytku? Przeczytaj jakie masz prawa w Copyright, który znajdziesz na końcu każdego wzoru. Miłej pracy!
Dodaj komentarz do modelu DROPS 204-16
Chcielibyśmy się dowiedzieć co masz do powiedzenia o tym wzorze!
Jeśli chcesz zadać pytanie i szybko uzyskać odpowiedź, upewnij się, że została wybrana właściwa kategoria w formularzu poniżej. Pola obowiązkowe są oznaczone *.