
Popularne kategorie
Szukasz włóczki?


Komentarze / Pytania (23)
![]() Leeanne napisała::
Leeanne napisała::
Addtnl. info for my last comments: I was confused by the first sentence in the short rows instructions stating to do 6 rows over all stitches. I thought that was part of the directions and the piece started with 6 rows before starting the short row repeat cycle but that is incorrect. This sentence is just telling you that there are 6 rows included in the short row instruction cycle that are not, in fact, short rows – 6 full rows and 2 short rows (not in that order) are listed in the row cycle.
06.09.2025 - 15:15
![]() Leeanne napisała::
Leeanne napisała::
(Cont. from previous two comments) next row starts with R3 and finishes with L3 and last row starts with L4 and finishes with R4. Then you start the cycle again with the first short row. So yes, the short row cycle is short row, full row, short row, full row, full row, full row, full row, full row as the pattern states (1 SR followed by 1 full row followed by 1 SR followed by 5 full rows). There are no edges in which you are not doing a picot edge instruction which allows for an even 8 row cycle
06.09.2025 - 15:08
![]() Leeanne napisała::
Leeanne napisała::
(continued from my previous comment) work the L2 row to the first marker and turn to work back to the “beginning” of the left side row, ending with L3, turn and start a new row with L4, working all the way across, ending with R4, (all the remaining rows in the cycle go all the way across – no more short rows) next row begins with R1 and goes all the way across to the last 4 stitches, ending in L1, turn and start with L2 and go all the way across to finish with R2, (cont. in next comment)
06.09.2025 - 15:03
![]() Leeanne napisała::
Leeanne napisała::
For anyone that needs it, here is the cycle of rows, combining picot edge with short rows instructions (it helps to draw this out on paper): start with right side 1 (R1) and work a short row (to first marker only, not all the way across), turn and work back to the beginning and knit the last four with R2, turn to start next row beginning with R3 and knit all the way across, ending this row with L1, then start the second short row with L2, (continued in next comment)
06.09.2025 - 14:58
![]() Leeanne napisała::
Leeanne napisała::
I figured it out! It is definitely not too complicated but they could have written this pattern differently so it wouldn’t take weeks or trial and error to figure out how to work the short rows in with the picot edge. Maybe we were just making it too complicated. I don’t have enough room to write the pattern in this comment so I’ll start a new one. It is easier to draw your lines and mark each end with the picot line number but I’ll try to write it here in my next comment.
06.09.2025 - 14:55
![]() Leeanne napisała::
Leeanne napisała::
I think I get it! I will test it in the morning and comment again trying to explain it for others if I have it right. My last two comments are wrong for sure. It helps to draw the rows as a picture on paper and mark the ends with the line number.
06.09.2025 - 05:10
![]() Leeanne napisała::
Leeanne napisała::
Revising my last comment: I now have it written as: short row, R1 &L1 on the same row, short row, R2 & L2, short row, R3 & L3, short row, R4 & L4. But this adds up to 8 rows on the sides and only 4 rows in the middle, not 6. Also not sure why the short rows directions refers to the middle stitches as being 70 (for the second size) when it’s only 30 (if excluding 25 on each end) or 72 (if excluding only the outermost 4 on each end).
06.09.2025 - 04:26
![]() Leanne napisała::
Leanne napisała::
The directions for the short rows are difficult to figure out. I’ve been working at this for a few weeks with my MIL, have restarted my project 7 times and we still don’t have it right. So we are alternating between right and left rows 1, 2, etc. when doing full rows? We are not doing any picot edge instructions when doing short rows, correct? To incoorporate the short rows, does it go: left row 1, right row 1, short row, left row 2, right row 2, short row, etc. through all four edge rows?
06.09.2025 - 02:40
![]() Leeanne napisała::
Leeanne napisała::
In addition to my last comment, I’m also confused because it says for garter stitch to knit two rows. The main directions says start with the right Picot edge, then knit the directions for garter stitch for the rest of the row, except for the last four and then knit the directions for the left edge on the last four. How do you knit two rows for the garter stitch directions in between doing the right and left edges?
14.07.2025 - 19:22Odpowiedź DROPS Design :
Dear Leeanne, the garter stitch structure is 2 knit rows. So whenever most of the stitches in the row are knitted, both from the right side and the wrong side, the resulting texture will be garter stitch. In the picot edges we are already using garter stitch, since all other stitches except for the 4 stitches on each side for the picot are knitted from the right side and the wrong side. So you just need to work as indicated; the edges will have the picot texture while the remaining stitches are knitted. Happy knitting!
19.07.2025 - 17:47
![]() Leeanne napisała::
Leeanne napisała::
A video of the actual pattern, please! This is so confusing. I’ve now learned how to do picot edges and short rows, but I can’t understand how to do both at the same time. How do you know which row of the picot edge you’re on if you’ve turned around and gone the other direction halfway through a row? And then when you start the next row do you count as if half the row is row 5 and half is row 6 or just continue with the next direction for that edge in sequence, ignoring row numbers?
14.07.2025 - 19:18Odpowiedź DROPS Design :
Dear Leeanne, please remember to mark your comments as questions so that we can see them and answer sooner. When you are combining the short rows and the picot edges, count only the rows where you reach the edges; those rows where you turn before reaching the edges are not taken into account for the picot edges on that side. Happy knitting!
19.07.2025 - 17:48
|
|
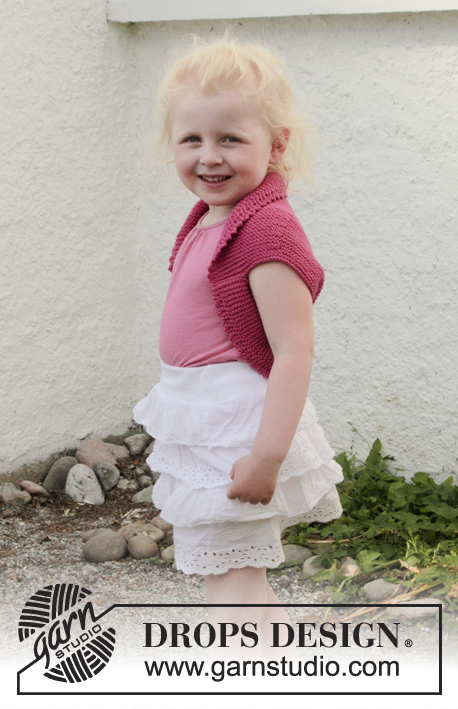
Berry Kiss#berrykissvest |
|
 |
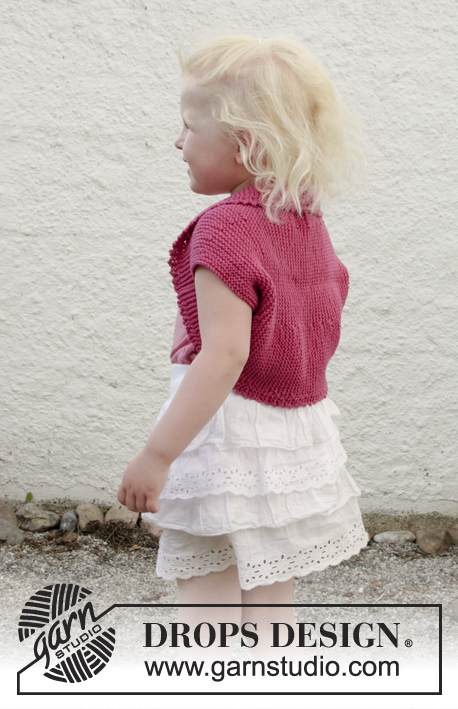 |
Bolerko na drutach z rzędami skróconymi, brzegiem pikotką i ściegiem francuskim, z włóczki DROPS Cotton Merino. Od 3 do 12 lat.
DROPS Children 28-7 |
|
|
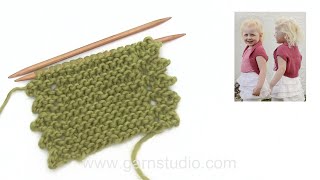
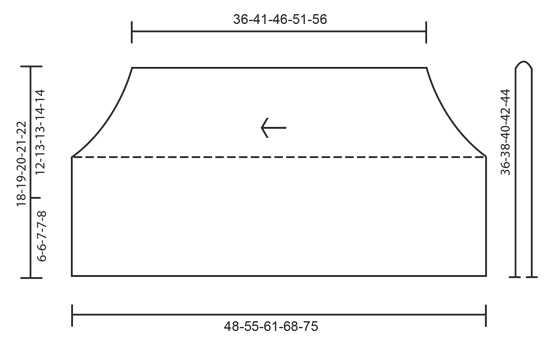
ŚCIEG FRANCUSKI (w tę i z powrotem): 1 ściągacz francuski = przerobić 2 rzędy na prawo. BRZEG PIKOTKĄ (w tę i z powrotem): PRAWA CZĘŚĆ: RZĄD 1 (= na prawej stronie robótki): przerabiać na prawo. RZĄD 2 (= na lewej stronie robótki): przerabiać na prawo aż zostają 4 oczka, przerobić je następująco: 2 oczka razem na prawo, 1 narzut, przerobić 2 razy na prawo każde z 2 ostatnich oczek = 2 dodatkowe oczka. RZĄD 3 (= na prawej stronie robótki): zdjąć 1-sze oczko jak do przerobienia na prawo, 1 oczko prawe, przełożyć oczko zdjęte nad przerobionym oczkiem, 1 oczko prawe i przełożyć ostatnie oczko na prawym drucie ponad pierwszym oczkiem, 2 oczka zostały zamknięte – następnie przerobić pozostałe oczka w rzędzie na prawo. RZĄD 4 (= na lewej stronie robótki): przerabiać na prawo. Powtórzyć rzędy 1 - 4. LEWA CZĘŚĆ: RZĄD 1 (= na prawej stronie robótki): przerabiać na prawo aż zostają 4 oczka, przerobić je następująco: 2 oczka razem na prawo, 1 narzut, przerobić 2 razy na prawo każde z 2 ostatnich oczek = 2 dodatkowe oczka. RZĄD 2 (= na lewej stronie robótki): zdjąć 1-sze oczko jak do przerobienia na prawo, 1 oczko prawe, przełożyć oczko zdjęte nad przerobionym oczkiem, 1 oczko prawe i przełożyć ostatnie oczko ponad 1-szym oczkiem na prawym drucie, zostały zamknięte 2 oczka – następnie przerobić pozostałe oczka w rzędzie na prawo. RZĄD 3 (= na prawej stronie robótki): przerabiać na prawo. RZĄD 4 (= na lewej stronie robótki): przerabiać na prawo. Powtórzyć rzędy 1 - 4. RZĘDY SKRÓCONE: Przerobić 6 rzędów ponad wszystkimi oczkami, *przerobić 24-25-26-27-28 oczek (do 1-szego markera), obrócić, zacisnąć nitkę i przerobić do końca rzędu. Przerobić 1 rząd ponad wszystkimi oczkami, obrócić, przerobić 24-25-26-27-28 oczek (do 1-szego markera), obrócić, zacisnąć nitkę i przerobić do końca rzędu. Przerobić 5 rzędów ponad wszystkimi oczkami*, powtórzyć od *-*. Inaczej mówiąc przerabiamy 6 rzędów ściegiem francuskim (= 3 ściągacze francuskie) ponad 66-70-72-80-86 oczkami środkowymi i 8 rzędów ściegiem francuskim (4 ściągacze francuskie) ponad oczkami z każdej strony w każdej serii. -------------------------------------------------------- BOLERKO: Przerabiane w poprzek robótki, w tę i z powrotem na drutach z żyłką, od jednego do drugiego podkroju rękawa. Następnie złożyć bolerko i zszyć boki. Na drutach z żyłką nr 4 nabrać 76-80-84-88-92 oczka włóczką Cotton Merino. Umieścić 1 marker w 24-25-26-27-28-me oczko z każdej strony (= 28-30-32-34-36 oczek między markerami). Przerabiać następująco – na prawej stronie robótki: BRZEG PIKOTKĄ, PRAWA CZĘŚĆ, ŚCIEG FRANCUSKI – patrz powyżej, ponad 68-72-76-80-84 następnymi oczkami, BRZEG PIKOTKĄ, LEWA CZĘŚĆ ponad 4 ostatnimi oczkami. ZACHOWAĆ TAKIE SAMO NAPRĘŻENIE NICI JAK W PRZYPADKU PRÓBKI! Dalej przerabiać ściegiem francuskim z brzegiem pikotką ponad 4 oczkami z każdej strony, W TYM SAMYM CZASIE wykonać RZĘDY SKRÓCONE – patrz powyżej! Gdy dł. robótki wynosi ok. 36-41-46-51-56 cm (mierzyć w najkrótszym miejscu) luźno zakończyć. WYKOŃCZENIE: Złożyć bolerko na pół – schemat pokazuje złożoną robótkę. Zszyć 6-6-7-7-8 cm od dołu, brzeg do brzegu, z każdej strony (= 12-13-13-14-14 cm na podkrój rękawa). |
|
 |
|
Skończyłaś ten wzór?Otaguj swoje zdjęcia #dropspattern #berrykissvest lub prześlij je do #dropsfan gallery. Potrzebujesz pomocy w związku z tym wzorem?Zobacz 18 instrukcje video, sekcję Komentarze/Pytania i jeszcze więcej, wchodząc na stronę wzoru na garnstudio.com © 1982-2026 DROPS Design A/S. Wszelkie prawa zastrzeżone. Ten dokument, w całości, jest chroniony prawem. Zobacz co możesz robić z naszymi wzorami na dole każdego wzoru na naszej stronie. |
|


Posiadając 40 lat doświadczenia w projektowaniu wzorów na druty i szydełko, DROPS Design oferuje jedną z największych kolekcji bezpłatnych wzorów w internecie – przetłumaczonych na 17 języków. Obecnie jest dostępnych 324 katalogów i 12290 wzorów w języku polskim.
Dokładamy wszelkich starań, aby oferować Wam druty i szydełka, inspiracje, fachowe porady oraz doskonałej jakości włóczki w najlepszych cenach! Zamierzasz wykorzystać nasze wzory inaczej niż tylko do osobistego użytku? Przeczytaj jakie masz prawa w Copyright, który znajdziesz na końcu każdego wzoru. Miłej pracy!
Dodaj komentarz do modelu DROPS Children 28-7
Chcielibyśmy się dowiedzieć co masz do powiedzenia o tym wzorze!
Jeśli chcesz zadać pytanie i szybko uzyskać odpowiedź, upewnij się, że została wybrana właściwa kategoria w formularzu poniżej. Pola obowiązkowe są oznaczone *.