
Popularne kategorie
Szukasz włóczki?


Komentarze / Pytania (139)
![]() Martine napisała::
Martine napisała::
Merci beaucoup. J'ai compris, mais je voudrais savoir si il est obligatoire pour ce modèle de faire la réhausse dos..je ne la vois pas sur la photo du modèle. Existe 'il une vue du dos au niveau de l'encolure pour que je me rende compte de l'effet visuel? Encore merci ;-)
24.03.2020 - 19:08Odpowiedź DROPS Design :
Bonjour Martine, la réhausse encolure dos permet simplement au pull d'être plus haut dans le dos que devant, autrement dit il permet de former une "vraie" encolure devant. Vous pouvez tout à fait ne pas la faire, l'encolure dos et devant seront alors identiques. Bon tricot!
25.03.2020 - 09:30
![]() Richard napisała::
Richard napisała::
Hello again. Sorry to trouble you. I have knitted 30 sts using double pointed needles. Then I have followed the pattern:- YO, slip 1 st, knit 2 sts tog, psso...Repeat to end. But when I count the stitches, I only have 21! What am I doing wrong. Tell me, the markers 4 total), are only placed on the sleeves (first & last st itch respectively) - that is correct! I hope you all are keeping clear of the dreadful environment, that the whole World is now facing. Thank you. Richard.
24.03.2020 - 16:23Odpowiedź DROPS Design :
Dear Richard, yes that's right, the marker is in the first stitch on sleeve (= middle stitch in A.3 at the beg of sleeve) + marker in the last st on sleeve (= middle stitch in A.3 at the end of sleeve), in between you should have (in L): 74 sts between both markers, then you will work A.3 (= 1st + 2nd st on sleeve = 1st + 2nd sleeve A.3), dec 1, K70, dec 1, A.3 (=1st +2nd st in A.3 = next to last st + last st on sleeve = the one with the marker + the one before marker). Hope this will help :)
24.03.2020 - 17:45
![]() Martine napisała::
Martine napisała::
Bonjour J'ai bien avancé sur ce modèle et j'en suis à la fin du diagramme A5. Il faut donc commencer la réhausse dos mais je ne comprends pas comment il faut faire...Mon fil est à la fin du tour sur 1 des aiguilles (je travaille avec 4 aiguilles en rond) comment faire pour commencer milieu dos? et du coup on travaille comme à 2 aiguilles donc 1 rg endroit, 1 rg envers? Merci beaucoup de m'éclairer...j'espère que vous pourrez le faire malgré le confinement.. Cordialement.
24.03.2020 - 15:42Odpowiedź DROPS Design :
Bonjour Martine, vous pouvez poser votre ouvrage à plat pour trouver le milieu dos, enfilez les mailles en attente sur un fil ou sur une aiguille circulaire si c'est plus simple pour vous. Ensuite vous tricotez en rangs donc à partir du milieu dos: 1 rang sur l'endroit jusqu'à ce qu'il reste 14 à 20 m avant le marqueur du milieu devant, tournez et tricotez sur l'envers jusqu'à ce qu'il reste 14 à 20 m de l'autre côté du marqueur du milieu devant (= vous aurez donc 28 à 40 m non tricotées au milieu devant), tournez et continuez ainsi en rangs raccourcis. cf vidéo. Bon tricot!
24.03.2020 - 17:02
![]() Richard napisała::
Richard napisała::
Hi again. Thanks for the reply. I will knit a test piece (of 40 sts) then proceed as if it were the sleeve. Then when I have knitted the sts I should be able to count the sts easily, to see if I have the right number. But where I am confused, the A3 pattern chart shows that 12 rounds are used! That means 12 rounds (where the YO makes holes, yet the holes do not show in the picture of the pattern. Or are they & I just cannot see them! Thank you. Richard.
23.03.2020 - 13:10Odpowiedź DROPS Design :
Since you will work 8 dec round every 4th round = you will work a total of 32 rounds with A.3, ie always 1 round with hole/1 round knitting all stitches. Happy knitting!
23.03.2020 - 13:39
![]() Richard napisała::
Richard napisała::
Hi again. Thanks for the reply. I will knit a test piece (of 40 sts) then proceed as if it were the sleeve. Then when I have knitted the sts I should be able to count the sts easily, to see if I have the right number. But where I am confused, the A3 pattern chart shows that 12 rounds are used! That means 12 rounds (where the YO makes holes, yet the holes do not show in the picture of the pattern. Or are they & I just cannot see them! Thank you. Richard.
23.03.2020 - 13:08Odpowiedź DROPS Design :
Dear Richard, there are just a few raglan rounds (8 decrease round on every 4th round in size L), that's why we cannot see them on the picture, they are coming before the round yoke part. But I made a mistake on previous answer, you should work 68 sts between decreases on sleeve (just always make sure the stitch with marker is the one in the middle of A.3 and that you decrease 1 stitch before + after A.3 so that your total number of sts should be then right after all raglan decreases = 308 sts. Happy knitting!
23.03.2020 - 13:38
![]() Richard napisała::
Richard napisała::
Hello. When I begin to knit the round, starting with the left sleeve (which has 76 sts); I should have 74sts (dec 1st at each end); but I have many less! This is always the case when I have tried (on two occassions). I bought the wool from a supplier in Denmark... Thanks. Richard.
23.03.2020 - 11:52Odpowiedź DROPS Design :
Dear Richard, not sure why you don't have, theh 74 sts now ... you should have 1 st from back piece, 1 st from sleeve (= with marker), 1 st from sleeve = 3 sts in A.3 dec to 1 with 1 yarn over before (= belongs to back piece) + 1 yarn over after (= belongs to sleeve), decrease 1 stitch then work until 5 sts remain before next marker = 72 sts decrease 1 st and work A.3. Happy knitting!
23.03.2020 - 12:41
![]() Richard napisała::
Richard napisała::
Thank you. I will try once more, as you say, but I may have to send you pictures of my work! I have tried , twice with the left sleeve & each time, I have many less sts than I should have (74)! Richard.
23.03.2020 - 10:02Odpowiedź DROPS Design :
Dear Richard, you cannot upload pictures here but you can send some to the store where you bought the yarn :) When you say you have 74 sts left, which piece does it match?
23.03.2020 - 11:42
![]() Richard napisała::
Richard napisała::
Hi, it's me again (at least I keep you busy :>) I'm still struggling! I have slipped the last st. from the back, so it is the first st. on the left sleeve. I've put a marker between this st & the first st of the sleeve. (transition between the back & the sleeve). Please tell me what I should do, now. I've tried various ways & end up with many less stitches than I should have (74)! The 'Lemon Parfait' that I finished recently for a woman of 84, was brilliant.
21.03.2020 - 18:08Odpowiedź DROPS Design :
Dear Richard, you now work A.3 at the transition of piece for raglan lines and decrease 1 stitch on each side of A.3: start with the last st on back piece on left needle, then make YO, dec, YO (= A.3), decrease 1 st for raglan, *work until 3 sts remain before next st with marker, decrease, and work YO, dec, YO (= A.3), decrease* repeat from *-* on each marker and finish round with 1 decrease (end of back piece), just before the first A.3 of the round. Hope this helps. You can also show your work to your store (even by mail), they could have a look at your piece and help you further if required. Happy knitting!
23.03.2020 - 09:37
![]() Richard napisała::
Richard napisała::
Yes - This is Richard.... Thanks a million - I live in the UK.
20.03.2020 - 16:13
![]() Richard napisała::
Richard napisała::
Thanks a million. Richard.
20.03.2020 - 16:11
|
|||||||||||||||||||
Nordic Summer#nordicsummersweater |
|||||||||||||||||||
 |
 |
||||||||||||||||||
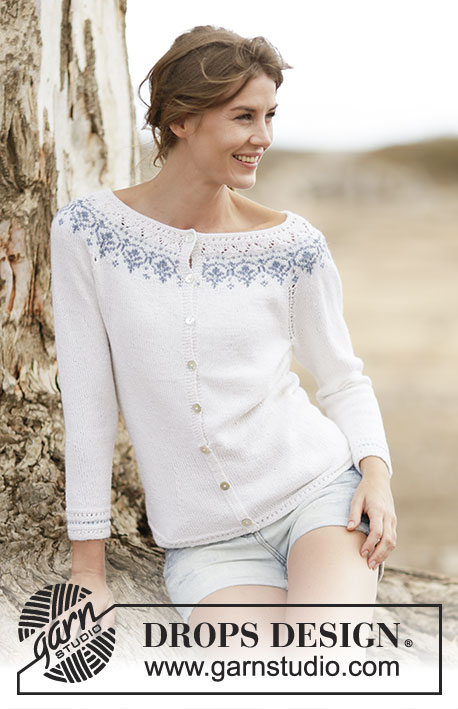
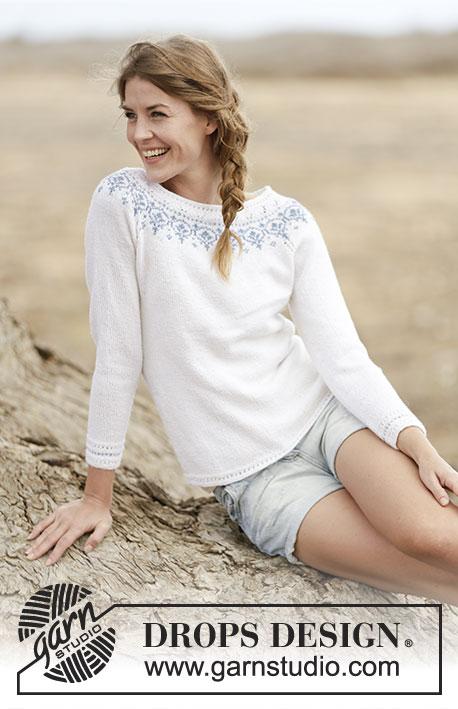
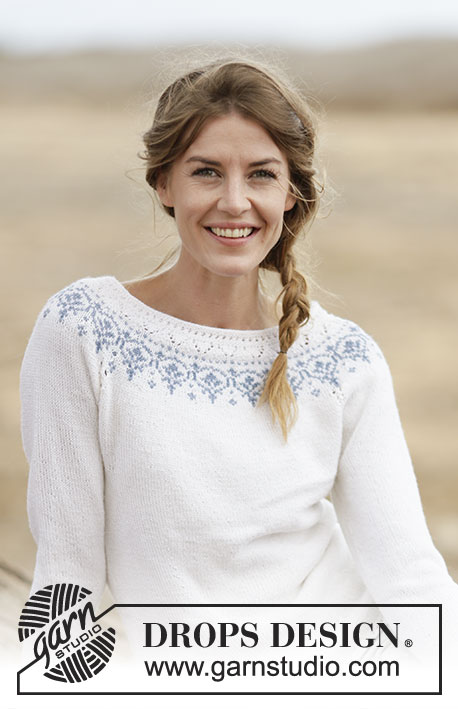
Sweter z reglanem DROPS z zaokrąglonym karczkiem, z włóczki „BabyMerino”. Od S do XXXL.
DROPS 161-33 |
|||||||||||||||||||
|
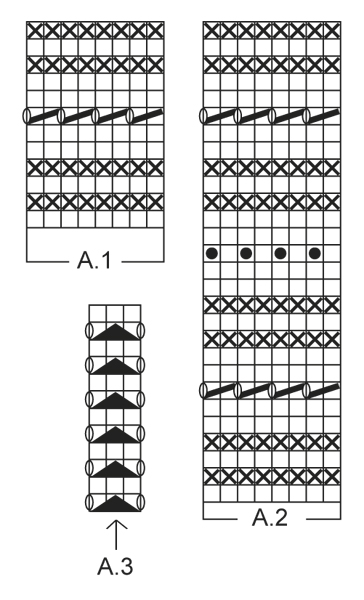
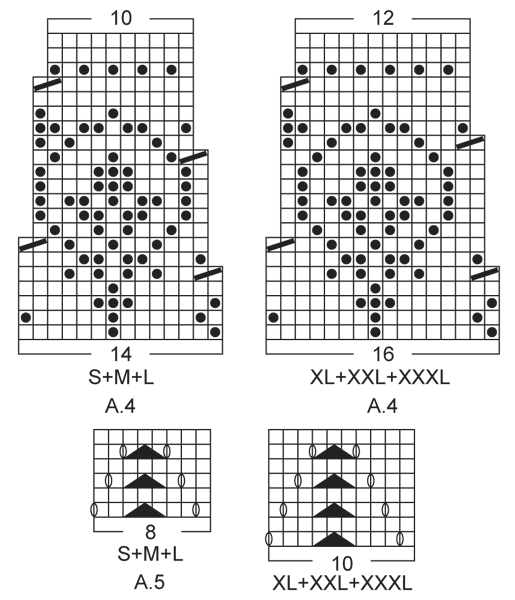
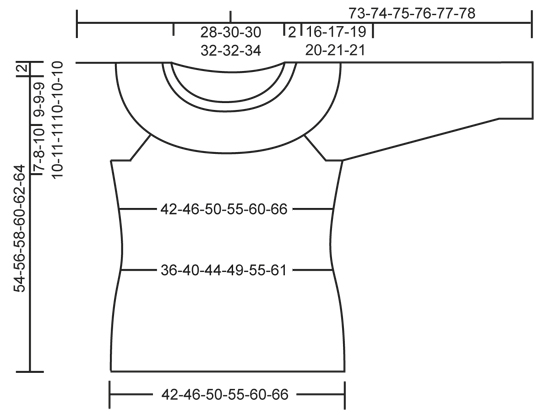
ŚCIEG FANTAZYJNY & ŻAKARD: Patrz schematy od A.1 do A.5. TALIA: Zamknąć o. na talię w miejscu 4 markerów. Zamknąć za 1-szym i 3-cim markerem następująco: 2 o. razem na prawo. Zamknąć gdy zostaje 2 o. przed 2-gim i 4-tym markerem następująco: zdjąć 1 o. jak do przerobienia na prawo, 1 o.p., przełożyć oczko zdjęte nad przerobionym oczkiem. DODAWANIE OCZEK: Dodać na talię w miejscu 4 markerów następująco: wykonać 1 narzut za 1-szym i 3-cim markerem i przed 2-gim i 4-tym markerem. W nast. okrążeniu przer. oczko przekręcone w miejscu narzutu na prawo, aby uniknąć dziur. REGLAN: Zamknąć na reglan z każdej strony schematu A.3, w miejscu każdego przejścia między rękawami i tyłem/przodem. Zamknąć po przerobieniu schematu A.3 następująco: zdjąć 1 o. jak do przerobienia na prawo, 1 o.p., przełożyć oczko zdjęte nad przerobionym oczkiem. Zamknąć 2 o. przed schematem A.3 następująco: 2 o. razem na prawo. ---------------------------------------------------------- TYŁ & PRZÓD: Przerabiane na okrągło na drutach z żyłką. Na drutach z żyłką nr 2,5 nabrać 200-220-240-264-288-316 o. kolorem białym. Przer. ściegiem fantazyjnym A.1. Gdy schemat A.1 zostanie przerobiony 1 raz na wysokość zacząć przer. na drutach z żyłką nr 3, dżersejem. ZACHOWAĆ TAKIE SAME NAPRĘŻENIE NICI JAK W PRZYPADKU PRÓBKI! Na wys. 8-8-8-8-10-10 cm od dołu robótki umieścić 4 markery następująco: umieścić 1-szy marker za 24-28-31-36-42-48 pierwszymi o., 2-gi marker za 52-54-58-60-60-62 nast. o., 3-ci marker za 48-56-62-72-84-96 nast. o. i 4-ty marker za 52-54-58-60-60-62 nast. o. (zostaje 24-28-31-36-42-48 o. za ost. markerem). Następnie zamknąć o. na talię w miejscu 4 markerów – patrz powyżej (= 4 zamknięte o.). Powt. zamykanie o. w sumie 7-7-7-7-6-6 razy co 4 okr. = 172-192-212-236-264-292 o. Na wys. 22 cm od dołu robótki dla każdego rozmiaru dodać o. za 1-szym i 3-cim markerem oraz przed 2-gim i 4-tym markerem – PATRZ DODAWANIE OCZEK (= 4 dodane o.). Powt. dodawanie o. w sumie 7-7-7-7-6-6 razy co 4-4-6-6-8-8 okr. = 200-220-240-264-288-316 o. Dalej przer. aż dł. robótki wynosi 38-39-39-40-41-43 cm. Przer. kolejne okrążenie następująco: zamknąć 5-5-5-6-6-6 o. na podkrój rękawa, przer. 90-100-110-120-132-146 o. dżersejem (= przód), zamknąć 10-10-10-12-12-12 o. na podkrój rękawa, przer. 90-100-110-120-132-146 o. dżersejem (= tył) i zamknąć 5-5-5-6-6-6 ost. o. na podkrój rękawa. Zostawić na drucie pomocniczym i wykonać rękawy. RĘKAWY: Przerabiane na okrągło na drutach pończoszniczych. Na drutach pończoszniczych nr 2,5 nabrać 56-56-58-60-62-64 o. kolorem białym. Przer. ściegiem fantazyjnym A.2. Gdy schemat A.2 zostanie przerobiony 1 raz na wysokość wziąć druty pończosznicze nr 3, umieścić 1 marker na początku okrążenia (= środek pod spodem rękawa) i przer. dżersejem. Na wys. 8 cm od dołu robótki dodać 2 o. na środku pod rękawem. Powt. dodawanie o. w sumie 12-14-14-16-16-17 razy co 9-7-7-6-6-5 okr. = 80-84-86-92-94-98 o. Na wys. 41-40-39-38-38-38 cm od dołu robótki (UWAGA: krócej dla większych rozmiarów, gdyż główka rękawa jest dłuższa, a ramiona szersze) zamknąć 10-10-10-12-12-12 o. na środku pod rękawem (tj. zamknąć 5-5-5-6-6-6 o. z każdej strony markera) = zostaje 70-74-76-80-82-86 o. Zostawić na drucie pomocniczym i wykonać drugi rękaw. KARCZEK: Przełożyć oczka rękawów na te same druty z żyłką co tył i przód następująco: dalej przer. kolorem białym i przer. oczka 1-szego rękawa, W TYM SAMYM CZASIE włożyć 1 marker w 1-sze o. i kolejny marker w ost. oczko rękawa, przer. oczka przodu, dalej oczka drugiego rękawa, W TYM SAMYM CZASIE włożyć 1 marker w 1-sze o. i kolejny marker w ost. oczko rękawa i przer. oczka tyłu = 320-348-372-400-428-464 o. i 4 markery. Dalej przer. dżersejem na okrągło, W TYM SAMYM CZASIE przer. schemat A.3 w miejscu każdego przejścia między tyłem/przodem i rękawami (strzałka w schemacie powinna odpowiadać oczku z markerem). W TYM SAMYM CZASIE zamknąć na reglan z każdej strony schematu A.3 w miejscu każdego przejścia między tyłem/przodem i rękawami – patrz powyżej (= 8 zamkniętych o.). Powt. zamykanie o. na reglan w sumie 6-7-8-8-9-9 razy co 4 okr. = 272-292-308-336-356-392 o. Po ost. zamknięciu o. przer. 1 okr. na prawo, W TYM SAMYM CZASIE równomiernie zamknąć 20-26-28-32-36-40 o. = 252-266-280-304-320-352 o. Dalej przer. na okrągło, wg schematu A.4, W TYM SAMYM CZASIE zamykać o. jak w schemacie - patrz schemat odpowiedni dla rozmiaru. Gdy schemat A.4 zostanie przerobiony 1 raz na wysokość jest 180-190-200-228-240-264 o. Przer. 1 okr. na prawo kolorem białym, W TYM SAMYM CZASIE równomiernie zamknąć 4-6-8-28-30-44 o. = 176-184-192-200-210-220 o. Przer. teraz schemat A.5 – patrz schemat odpowiedni dla rozmiaru. Gdy schemat A.5 zostanie przerobiony 1 raz na wysokość wykonać podwyższenie na dekolt tyłu. Umieścić 1 marker na środku przodu. Zacząć na środku tyłu i przer. na prawo (kolorem białym) aż zostaje 14-14-16-16-18-20 o. przed markerem. Obrócić, przer. rząd powrotny na prawo, aż zostaje 14-14-16-16-18-20 o. przed markerem z drugiej strony. Obrócić, przer. na prawo aż zostaje 30-30-34-34-38-42 o. przed markerem. Obrócić, przer. rząd powrotny na prawo aż zostaje 30-30-34-34-38-42 o. przed markerem z drugiej strony. Obrócić, przer. na prawo aż zostaje 46-46-52-52-58-64 o. przed markerem. Obrócić, przer. rząd powrotny na prawo aż zostaje 46-46-52-52-58-64 o. przed markerem z drugiej strony. Obrócić, przer. na prawo aż zostaje 62-62-70-70-76-86 o. przed markerem. Obrócić, przer. rząd powrotny na prawo aż zostaje 62-62-70-70-76-86 o. przed markerem z drugiej strony. Obrócić i przer. rząd powrotny na prawo, do początku okrążenia. WYKOŃCZENIE DEKOLTU: Dalej przer. na drutach z żyłką nr 2,5 i przer. na okrągło przez wszystkie oczka wg schematu A.1, W TYM SAMYM CZASIE równomiernie zamknąć 30-28-36-34-44-44 o. = 146-156-156-166-166-176 o. Gdy schemat A.1 zostanie przerobiony 1 raz na wysokość zakończyć luźno na prawo. WYKOŃCZENIE: Zszyć otwory pod rękawami |
|||||||||||||||||||
Objaśnienia do schematu |
|||||||||||||||||||
|
|||||||||||||||||||
 |
|||||||||||||||||||
 |
|||||||||||||||||||
 |
|||||||||||||||||||
Skończyłaś ten wzór?Otaguj swoje zdjęcia #dropspattern #nordicsummersweater lub prześlij je do #dropsfan gallery. Potrzebujesz pomocy w związku z tym wzorem?Zobacz 30 instrukcje video, sekcję Komentarze/Pytania i jeszcze więcej, wchodząc na stronę wzoru na garnstudio.com © 1982-2026 DROPS Design A/S. Wszelkie prawa zastrzeżone. Ten dokument, w całości, jest chroniony prawem. Zobacz co możesz robić z naszymi wzorami na dole każdego wzoru na naszej stronie. |
|||||||||||||||||||


Posiadając 40 lat doświadczenia w projektowaniu wzorów na druty i szydełko, DROPS Design oferuje jedną z największych kolekcji bezpłatnych wzorów w internecie – przetłumaczonych na 17 języków. Obecnie jest dostępnych 324 katalogów i 12290 wzorów w języku polskim.
Dokładamy wszelkich starań, aby oferować Wam druty i szydełka, inspiracje, fachowe porady oraz doskonałej jakości włóczki w najlepszych cenach! Zamierzasz wykorzystać nasze wzory inaczej niż tylko do osobistego użytku? Przeczytaj jakie masz prawa w Copyright, który znajdziesz na końcu każdego wzoru. Miłej pracy!
Dodaj komentarz do modelu DROPS 161-33
Chcielibyśmy się dowiedzieć co masz do powiedzenia o tym wzorze!
Jeśli chcesz zadać pytanie i szybko uzyskać odpowiedź, upewnij się, że została wybrana właściwa kategoria w formularzu poniżej. Pola obowiązkowe są oznaczone *.