
Popularne kategorie
Szukasz włóczki?


Komentarze / Pytania (139)
![]() Odette napisała::
Odette napisała::
Kann ich auch auf normale Stricknadeln stricken bis arm Höhe, danach alles auf ein Nadeln stricken , habe dann ein naht, ich kann leider nicht mit ein rundstricknadel stricken
16.07.2020 - 18:24Odpowiedź DROPS Design :
Liebe Odette, hier wird erklärt, wie man eine Anleitung für Hin- und Rück-Reihen anpasst. Viel Spaß beim stricken!
17.07.2020 - 08:03
![]() Joëlle napisała::
Joëlle napisała::
Beste, ik begrijp de raglan niet, zoals ik het lees en doe loopt het patroon van A3 altijd naar links aan beide kanten van de mouw, denk niet dat dit de bedoeling. I, brei elke 4de naald als volgt, na de markeerder, 1 rechts aflhalen, 2 St rechts breien en afgehaalde St overhalen, 1 omsl, dan raglan 1 r afh, 1r, afgeh St overhalen, verder breien tot 2 St voor de maarkeerder, 2 r samen breien, 1 omsl. Kunnen jullie mij verder helpen, alvast bedankt, Joëlle
05.06.2020 - 00:04Odpowiedź DROPS Design :
Dag Joëlle,
A.3 zit precies op de overgang van de mouw naar het pand en waar de pijl in A.3 staat (dus het midden van A.3) zit de markeerdraad. Je meerdert aan beide kanten van A.3 voor de raglan, dus aan de kant van de mouw en aan de kant van het pand. A.3 en de markeerdraad blijft in de hoogte steeds op dezelfde plek.
2 steken voordat A.3 begint brei je 2 steken samen, dan brei je A.3 en dan haal je 1 steek recht af, brei je 1 steek en haal je de afgehaalde steek over de gebreide steek. 18.06.2020 - 13:29
![]() Els Van Zantvliet napisała::
Els Van Zantvliet napisała::
Ik ben net begonnen en heb de eerste 8 cm gebreid. nu heb ik de steekmarkeerders geplaatst. Nu lees ik het volgende: TAILLE: Minder voor de taille bij de 4 markeerders. Minder als volgt na de 1e en 3e markeerder: 2 r samen. Minder als volgt als er 2 st over zijn voor de 2e en 4e markeerder: 1 r afh, 1 r, afgeh st overh. Dan klopt mijn telling toch niet? Ik brei maat xl. dan heb ik toch maar 14 steken geminderd ipv totaal 28? alvast bedankt. Groetjes Els
18.05.2020 - 08:28Odpowiedź DROPS Design :
Dag Els,
Voor de taille minder je telkens bij alle 4 de markeerders, dus je maakt 4 minderingen per mindernaald, waardoor je op 28 minderingen in totaal komt.
19.05.2020 - 13:26
![]() Richard napisała::
Richard napisała::
Brilliant. Thank you all very very much. Take care...
09.04.2020 - 19:19
![]() Richard napisała::
Richard napisała::
Hi, once again. Thank you for your last reply. My final question is:- Because I finish A5 at the beginning of left sleeve, do I CAST OFF?.....OR do I join new yarn in white to the mid back & then, knit as described up to 16 sts before the mid front marker?? Hopefully you can help me to complete the is garment. It is for a woman of 84. Thanks all.
09.04.2020 - 18:20Odpowiedź DROPS Design :
Dear Richard, no you don't need to cast off just work from the current begin of the rounds until 16 sts remain before marker on front piece, turn and work row back same way. You will work last row of the short rows to your beg of round again to work neck edge. Happy knitting!
09.04.2020 - 18:34
![]() Richard napisała::
Richard napisała::
Hi, again I don't understand, because the pattern states "When A5 has been worked, work an elevation in the back of neck. Insert 1 marker mid front. Beg mid back and K (with white) until 16 sts remain before the marker". Now, you are saying "you have to work to the mid back (find it as explained previously) and another one on the mid front". I'm so sorry, but how can this be? I really appreciate all your efforts to help me.
09.04.2020 - 17:25Odpowiedź DROPS Design :
Dear Richard, I'm sorry to have been confusing, you don't need marker on mid back here, so you just need to find the mid front (put the piece flat and insert a marker on mid front), and now work the short rows working until the given number of stitches remain before the marker on mid front (you will work more rows on the other stitches but always less stitches). Hope this is clearer now, sorry for confusion. Happy knitting!
09.04.2020 - 18:05
![]() Richard napisała::
Richard napisała::
Thank you, thank you... But please tell me, as I have finished A5 on the last stitch of the back, do I cut the yarn & then rejoin a new yarn (in white) as you say, at the mid-back. Then I would knit until 16 sts before the marker of the mid-front : then turn?? I am so near to finishing & will post a photo to the Drops Gallery, when I have done so. Thank you all, during this most difficult time.
09.04.2020 - 14:24Odpowiedź DROPS Design :
Dear Richard, you have to work to the mid back (find it as explained previously) and another one on the mid front. Now work from RS until 16 sts remain before marker on mid front, turn and work from WS until 16 sts remain before marker on mid front on the other side (= there are now 32 unworked sts on mid front), turn and continue working back & forth leaving then always more stitches before marker mid front at the end of each row both from RS and WS. Happy knitting!
09.04.2020 - 16:37
![]() Richard napisała::
Richard napisała::
Good morning. How do I get to work the elevation in the back of neck? I understand how this works, but if my piece finishes at the end of the back/beginning of left sleeve; how do I begin knitting from the mid-back? Do I cast off & then begin at the mid-back with a new yarn. Also, when I 'turn', do I 'knit' or 'purl'?? Sorry to trouble you at this difficult time. Richard.
08.04.2020 - 11:18Odpowiedź DROPS Design :
Dear Richard, elevation is worked in garter stitch: you will knit from RS and knit from WS. Happy knitting :)
09.04.2020 - 16:34
![]() Richard napisała::
Richard napisała::
Hi, everyone. I trust that you are all well, in this difficult time. Having completed A4, the remaining A5 does not present a problem. However, because I will finish at the beginning of the left sleeve, how do I get to work the elevation in the back of neck? The instructions are to insert 1 marker mid-front! How do I end the yarn between the back & the left sleeve? Do I join new yarn at mid neck, to continue. Thank you. Richard.
06.04.2020 - 10:59Odpowiedź DROPS Design :
Dear Richard, lie your work flat so that you can find the mid back of jumper, insert a marker ther and work to this marker, then start the elevation from this marker. Happy knitting!
09.04.2020 - 14:14
![]() Richard napisała::
Richard napisała::
OK. Thanks.
03.04.2020 - 11:50
|
|||||||||||||||||||
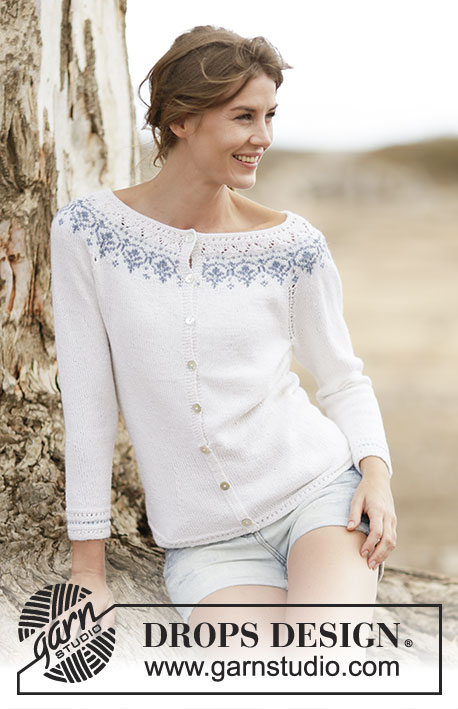
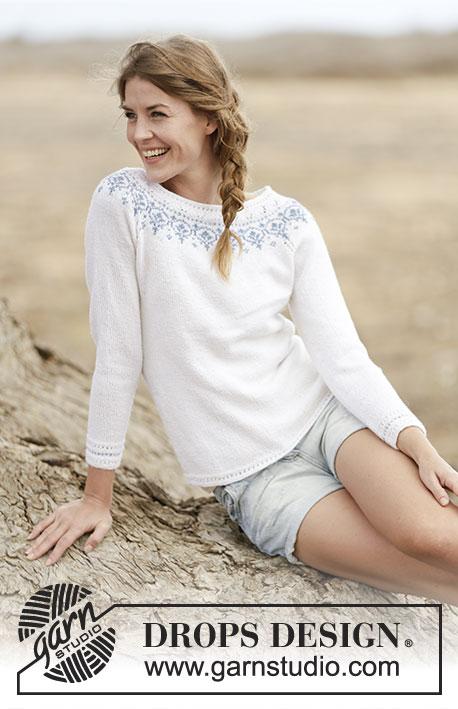
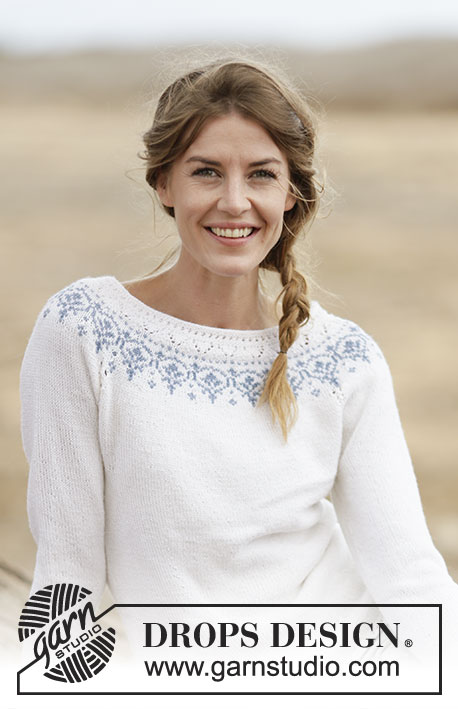
Nordic Summer#nordicsummersweater |
|||||||||||||||||||
 |
 |
||||||||||||||||||
Sweter z reglanem DROPS z zaokrąglonym karczkiem, z włóczki „BabyMerino”. Od S do XXXL.
DROPS 161-33 |
|||||||||||||||||||
|
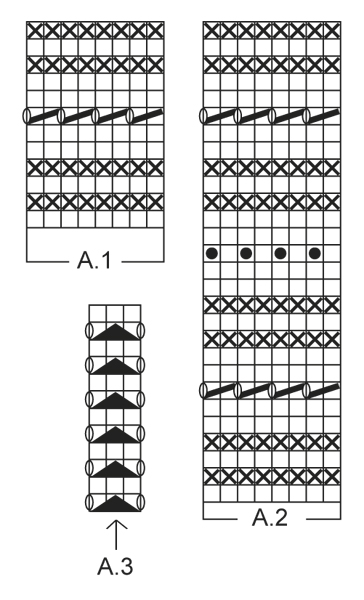
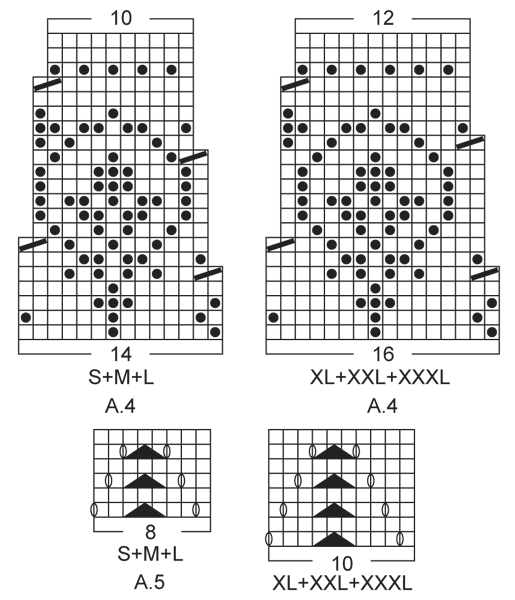
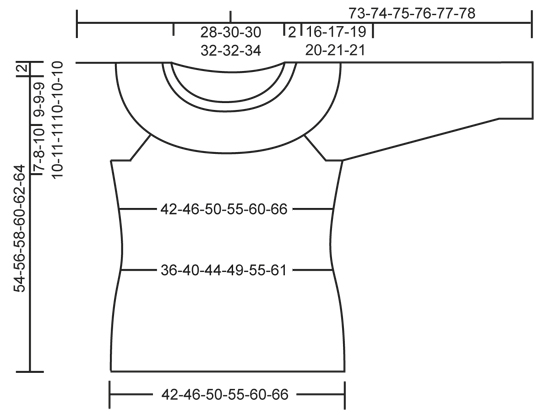
ŚCIEG FANTAZYJNY & ŻAKARD: Patrz schematy od A.1 do A.5. TALIA: Zamknąć o. na talię w miejscu 4 markerów. Zamknąć za 1-szym i 3-cim markerem następująco: 2 o. razem na prawo. Zamknąć gdy zostaje 2 o. przed 2-gim i 4-tym markerem następująco: zdjąć 1 o. jak do przerobienia na prawo, 1 o.p., przełożyć oczko zdjęte nad przerobionym oczkiem. DODAWANIE OCZEK: Dodać na talię w miejscu 4 markerów następująco: wykonać 1 narzut za 1-szym i 3-cim markerem i przed 2-gim i 4-tym markerem. W nast. okrążeniu przer. oczko przekręcone w miejscu narzutu na prawo, aby uniknąć dziur. REGLAN: Zamknąć na reglan z każdej strony schematu A.3, w miejscu każdego przejścia między rękawami i tyłem/przodem. Zamknąć po przerobieniu schematu A.3 następująco: zdjąć 1 o. jak do przerobienia na prawo, 1 o.p., przełożyć oczko zdjęte nad przerobionym oczkiem. Zamknąć 2 o. przed schematem A.3 następująco: 2 o. razem na prawo. ---------------------------------------------------------- TYŁ & PRZÓD: Przerabiane na okrągło na drutach z żyłką. Na drutach z żyłką nr 2,5 nabrać 200-220-240-264-288-316 o. kolorem białym. Przer. ściegiem fantazyjnym A.1. Gdy schemat A.1 zostanie przerobiony 1 raz na wysokość zacząć przer. na drutach z żyłką nr 3, dżersejem. ZACHOWAĆ TAKIE SAME NAPRĘŻENIE NICI JAK W PRZYPADKU PRÓBKI! Na wys. 8-8-8-8-10-10 cm od dołu robótki umieścić 4 markery następująco: umieścić 1-szy marker za 24-28-31-36-42-48 pierwszymi o., 2-gi marker za 52-54-58-60-60-62 nast. o., 3-ci marker za 48-56-62-72-84-96 nast. o. i 4-ty marker za 52-54-58-60-60-62 nast. o. (zostaje 24-28-31-36-42-48 o. za ost. markerem). Następnie zamknąć o. na talię w miejscu 4 markerów – patrz powyżej (= 4 zamknięte o.). Powt. zamykanie o. w sumie 7-7-7-7-6-6 razy co 4 okr. = 172-192-212-236-264-292 o. Na wys. 22 cm od dołu robótki dla każdego rozmiaru dodać o. za 1-szym i 3-cim markerem oraz przed 2-gim i 4-tym markerem – PATRZ DODAWANIE OCZEK (= 4 dodane o.). Powt. dodawanie o. w sumie 7-7-7-7-6-6 razy co 4-4-6-6-8-8 okr. = 200-220-240-264-288-316 o. Dalej przer. aż dł. robótki wynosi 38-39-39-40-41-43 cm. Przer. kolejne okrążenie następująco: zamknąć 5-5-5-6-6-6 o. na podkrój rękawa, przer. 90-100-110-120-132-146 o. dżersejem (= przód), zamknąć 10-10-10-12-12-12 o. na podkrój rękawa, przer. 90-100-110-120-132-146 o. dżersejem (= tył) i zamknąć 5-5-5-6-6-6 ost. o. na podkrój rękawa. Zostawić na drucie pomocniczym i wykonać rękawy. RĘKAWY: Przerabiane na okrągło na drutach pończoszniczych. Na drutach pończoszniczych nr 2,5 nabrać 56-56-58-60-62-64 o. kolorem białym. Przer. ściegiem fantazyjnym A.2. Gdy schemat A.2 zostanie przerobiony 1 raz na wysokość wziąć druty pończosznicze nr 3, umieścić 1 marker na początku okrążenia (= środek pod spodem rękawa) i przer. dżersejem. Na wys. 8 cm od dołu robótki dodać 2 o. na środku pod rękawem. Powt. dodawanie o. w sumie 12-14-14-16-16-17 razy co 9-7-7-6-6-5 okr. = 80-84-86-92-94-98 o. Na wys. 41-40-39-38-38-38 cm od dołu robótki (UWAGA: krócej dla większych rozmiarów, gdyż główka rękawa jest dłuższa, a ramiona szersze) zamknąć 10-10-10-12-12-12 o. na środku pod rękawem (tj. zamknąć 5-5-5-6-6-6 o. z każdej strony markera) = zostaje 70-74-76-80-82-86 o. Zostawić na drucie pomocniczym i wykonać drugi rękaw. KARCZEK: Przełożyć oczka rękawów na te same druty z żyłką co tył i przód następująco: dalej przer. kolorem białym i przer. oczka 1-szego rękawa, W TYM SAMYM CZASIE włożyć 1 marker w 1-sze o. i kolejny marker w ost. oczko rękawa, przer. oczka przodu, dalej oczka drugiego rękawa, W TYM SAMYM CZASIE włożyć 1 marker w 1-sze o. i kolejny marker w ost. oczko rękawa i przer. oczka tyłu = 320-348-372-400-428-464 o. i 4 markery. Dalej przer. dżersejem na okrągło, W TYM SAMYM CZASIE przer. schemat A.3 w miejscu każdego przejścia między tyłem/przodem i rękawami (strzałka w schemacie powinna odpowiadać oczku z markerem). W TYM SAMYM CZASIE zamknąć na reglan z każdej strony schematu A.3 w miejscu każdego przejścia między tyłem/przodem i rękawami – patrz powyżej (= 8 zamkniętych o.). Powt. zamykanie o. na reglan w sumie 6-7-8-8-9-9 razy co 4 okr. = 272-292-308-336-356-392 o. Po ost. zamknięciu o. przer. 1 okr. na prawo, W TYM SAMYM CZASIE równomiernie zamknąć 20-26-28-32-36-40 o. = 252-266-280-304-320-352 o. Dalej przer. na okrągło, wg schematu A.4, W TYM SAMYM CZASIE zamykać o. jak w schemacie - patrz schemat odpowiedni dla rozmiaru. Gdy schemat A.4 zostanie przerobiony 1 raz na wysokość jest 180-190-200-228-240-264 o. Przer. 1 okr. na prawo kolorem białym, W TYM SAMYM CZASIE równomiernie zamknąć 4-6-8-28-30-44 o. = 176-184-192-200-210-220 o. Przer. teraz schemat A.5 – patrz schemat odpowiedni dla rozmiaru. Gdy schemat A.5 zostanie przerobiony 1 raz na wysokość wykonać podwyższenie na dekolt tyłu. Umieścić 1 marker na środku przodu. Zacząć na środku tyłu i przer. na prawo (kolorem białym) aż zostaje 14-14-16-16-18-20 o. przed markerem. Obrócić, przer. rząd powrotny na prawo, aż zostaje 14-14-16-16-18-20 o. przed markerem z drugiej strony. Obrócić, przer. na prawo aż zostaje 30-30-34-34-38-42 o. przed markerem. Obrócić, przer. rząd powrotny na prawo aż zostaje 30-30-34-34-38-42 o. przed markerem z drugiej strony. Obrócić, przer. na prawo aż zostaje 46-46-52-52-58-64 o. przed markerem. Obrócić, przer. rząd powrotny na prawo aż zostaje 46-46-52-52-58-64 o. przed markerem z drugiej strony. Obrócić, przer. na prawo aż zostaje 62-62-70-70-76-86 o. przed markerem. Obrócić, przer. rząd powrotny na prawo aż zostaje 62-62-70-70-76-86 o. przed markerem z drugiej strony. Obrócić i przer. rząd powrotny na prawo, do początku okrążenia. WYKOŃCZENIE DEKOLTU: Dalej przer. na drutach z żyłką nr 2,5 i przer. na okrągło przez wszystkie oczka wg schematu A.1, W TYM SAMYM CZASIE równomiernie zamknąć 30-28-36-34-44-44 o. = 146-156-156-166-166-176 o. Gdy schemat A.1 zostanie przerobiony 1 raz na wysokość zakończyć luźno na prawo. WYKOŃCZENIE: Zszyć otwory pod rękawami |
|||||||||||||||||||
Objaśnienia do schematu |
|||||||||||||||||||
|
|||||||||||||||||||
 |
|||||||||||||||||||
 |
|||||||||||||||||||
 |
|||||||||||||||||||
Skończyłaś ten wzór?Otaguj swoje zdjęcia #dropspattern #nordicsummersweater lub prześlij je do #dropsfan gallery. Potrzebujesz pomocy w związku z tym wzorem?Zobacz 30 instrukcje video, sekcję Komentarze/Pytania i jeszcze więcej, wchodząc na stronę wzoru na garnstudio.com © 1982-2026 DROPS Design A/S. Wszelkie prawa zastrzeżone. Ten dokument, w całości, jest chroniony prawem. Zobacz co możesz robić z naszymi wzorami na dole każdego wzoru na naszej stronie. |
|||||||||||||||||||


Posiadając 40 lat doświadczenia w projektowaniu wzorów na druty i szydełko, DROPS Design oferuje jedną z największych kolekcji bezpłatnych wzorów w internecie – przetłumaczonych na 17 języków. Obecnie jest dostępnych 324 katalogów i 12290 wzorów w języku polskim.
Dokładamy wszelkich starań, aby oferować Wam druty i szydełka, inspiracje, fachowe porady oraz doskonałej jakości włóczki w najlepszych cenach! Zamierzasz wykorzystać nasze wzory inaczej niż tylko do osobistego użytku? Przeczytaj jakie masz prawa w Copyright, który znajdziesz na końcu każdego wzoru. Miłej pracy!
Dodaj komentarz do modelu DROPS 161-33
Chcielibyśmy się dowiedzieć co masz do powiedzenia o tym wzorze!
Jeśli chcesz zadać pytanie i szybko uzyskać odpowiedź, upewnij się, że została wybrana właściwa kategoria w formularzu poniżej. Pola obowiązkowe są oznaczone *.