
Popularne kategorie
Szukasz włóczki?


Komentarze / Pytania (113)
![]() Brenda napisała::
Brenda napisała::
Any chance of doing a video tutorial on you-tube. I really like this headband, but am confused with the written pattern.
01.12.2022 - 01:02Odpowiedź DROPS Design :
Dear Brenda, you will find videos relative to the techniques used in that pattern at the bottom of the pattern, feel free to ask your question here so that we can help you further in the part of the pattern you don't understand. Happy knitting!
01.12.2022 - 11:46
![]() Kathy napisała::
Kathy napisała::
I am on the first increase row to 24 stitches and following the established rib pattern but there are not enough stitches to complete the rib pattern! What do I do?
11.10.2021 - 01:08Odpowiedź DROPS Design :
Hi Kathy, You increase all P1 to P2 (5 stitches increased) which gives you 24 stitches. You now have 1 stitch in garter stitch, 5 x K2, P2 (20 stitches), K2 and 1 stitch in garter stitch = 24 stitches. Happy knitting!
11.10.2021 - 07:04
![]() Iris napisała::
Iris napisała::
Hallo! Ich bin ziemliche Anfängerin und komme mit der Anleitung nicht ganz zurecht. Betrifft das Fertigstellen des Stirnbands mit den Maschen auf einem Hilfsfaden. Habe leider auch kein passendes Videotutorial dazu finden können. Wie lange muß der Hilfsfaden sein? und wird er mithineingenäht? Danke im Voraus für die Hilfe!
01.01.2021 - 22:03Odpowiedź DROPS Design :
Liebe Iris, die stillgelegten Maschen werden wie in diesem Video zusammen mit der Anschlagskante - wie in diesem Video zusammen genäht, dh so eine "Mischung" je nach den Maschen. Viel Spaß beim zusammennähen!
04.01.2021 - 14:43
![]() Diana Connolly napisała::
Diana Connolly napisała::
This increase is called a make 1 in English. If you’d written it like this many here wouldn’t have had so many problems, make 1 is a term used when you increase by picking up the loop between stitches. Hope this helps.
27.10.2020 - 21:20
![]() Kirsty napisała::
Kirsty napisała::
Hi, wow many thanks for your helpful video reply. I really appreciate it. Love your site. Well wishes, Kirsty
28.06.2020 - 20:24
![]() Sherie Rodrigues napisała::
Sherie Rodrigues napisała::
To all the knitters who commented and asked questions, and to all the staff who answered the questions, I say THANK YOU. Without your help I may not have worked the pattern out by myself, but I am so glad I did. It is simple, when the light bulb goes off. I would suggest you look at the questions and answers until it makes sense. I do so LOVE this pattern . Thanks again everyone. Regards and happy knitting.
10.06.2020 - 15:30
![]() Karren napisała::
Karren napisała::
Thank you so much for the guidance in my pattern. I am almost finished and think I will love it. Karren
18.04.2020 - 01:05
![]() Karren napisała::
Karren napisała::
I do not understand what I am supposed to do on the wrong side of the pattern in between the increase rows. The increases occur on the right side. Does the ribbing continue through out the whole pattern?
17.04.2020 - 00:53Odpowiedź DROPS Design :
Dear Karren, you increase in the P-sections seen from RS (these sts are worked K from WS), when working from WS you will K over K and P over P, and the number of K stitches from WS will increase (then decrease on the 2nd half of piece) as the P stitches from WS increases. Happy knitting!
17.04.2020 - 09:01
![]() Judith napisała::
Judith napisała::
I was sold a yarn that gets 2 st/inch on an 8 needle and is not too stiff. will the pattern work as written? Do I knit first stitch, then do the edge stitch? hat seem strange to me, so I am asking. I thought the edge stitch would be first. Thank you
16.12.2019 - 04:45Odpowiedź DROPS Design :
Dear Judith, please check your tension - read more here about tension. Pattern is worked in rib with 1 edge stitch in garter stitch on each side. Happy knitting!
16.12.2019 - 09:10
![]() Shannon napisała::
Shannon napisała::
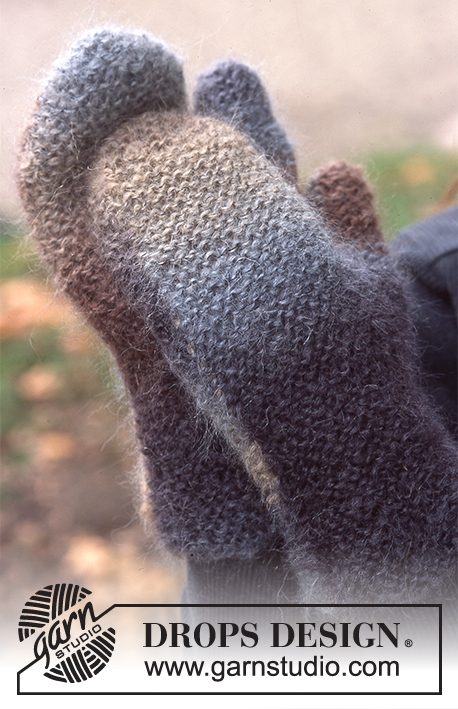
What is the multi colored yarn in the second picture?
14.12.2019 - 04:07Odpowiedź DROPS Design :
Dear Shannon, in the second picture, the mittens are made with Vivaldi ( from group C) but this yarn is discontinued. Happy knitting!
15.12.2019 - 18:41
|
|
Saturn Rings |
|
|
|
|
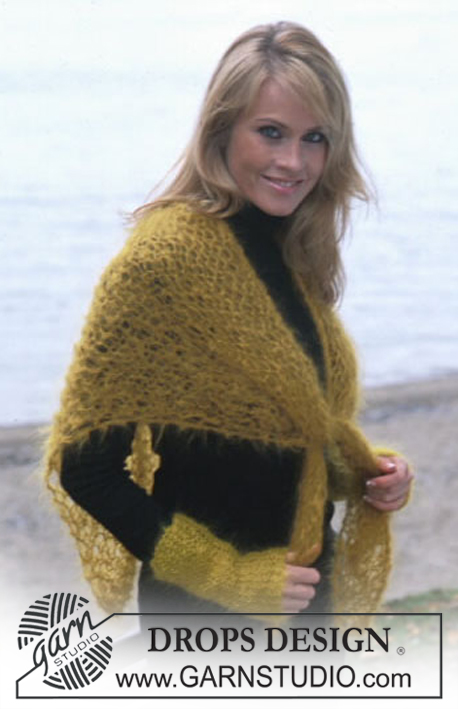
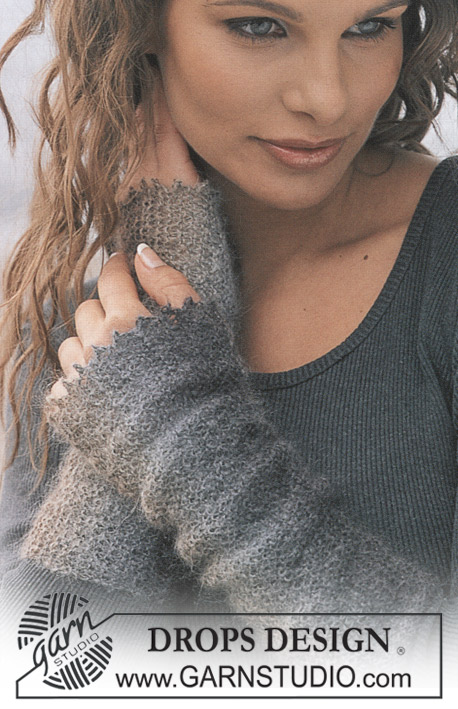
Opaska Drops z włóczki Alaska i szal z włóczki Vienna
DROPS 86-10 |
|
|
WYKONANIE Zacząć od środka tyłu. Nabrać 19 o. i przer. ściągaczem następująco: RZ. 1 (na prawej stronie robótki): 1 o. brzeg. ściegiem francuskim, *2 o.p., 1 o.l.* powt. od *do* 5 razy, zakończyć przerabiając 2 o.p., 1 o. brzeg. ściegiem francuskim RZ. 2 (na lewej stronie robótki): 1 o. brzeg. ściegiem francuskim, *2 o.l., 1 o.p.* powt. od *do* 5 razy , zakończyć przerabiając 2 o.l., 1 o. brzeg. ściegiem francuskim Oczka dodawać na prawej stronie robótki. Na wys. 8 cm od dołu robótki dodać 1 o.l. w każdej grupie oczek lewych = 24 o. Na wys. 14 cm od dołu robótki dodać 1 o.l. we wszystkich grupach 2 o.l. = 29 o. Na wys. 18 cm od dołu robótki dodać 1 o.l. w każdej grupie 3 o.l. = 34 o. Na wys. 21 cm od dołu robótki dodać 1 o.l. w każdej grupie 4 o.l. = 39 o. Na wys. 24 cm od dołu robótki umieścić marker = środek opaski. Następnie mierzyć od markera : Na wys. 3 cm od markera zamknąć 1 o.l. w każdej grupie 5 o.l. = 34 o. Na wys. 6 cm od markera zamknąć 1 o.l. w każdej grupie 4 o.l. = 29 o. Na wys. 10 cm od markera zamknąć 1 o.l. w każdej grupie 3 o.l. = 24 o. Na wys. 16 cm od markera zamknąć 1 o.l. w każdej grupie 2 o.l. = 19 o. Na wys. 48 cm od dołu robótki dołączyć do pierwszego rzędu – nabierania oczek (nie zamykać przed zszywaniem). SZAL DROPS z włóczki VIENNA Wymiary: Długość na środku tyłu: ok. 100 cm Szerokość na górze: ok. 205 cm. Materiał: Drops Vienna od Garnstudio 200 g kolor nr 43, jasny brąz Druty proste DROPS nr 15 - lub innego rozmiaru, aby przerabiając bardzo luźno ściegiem francuskim próbkę 5 o. x 9 rz. otrzymać próbkę o wymiarach 10 x 10 cm WYKONANIE Nabrać 4 o. i przer. ściegiem francuskim, dodać 1 o. z każdej strony co 2 rz. przerabiając 2 razy to samo oczko. Dalej dodawać o. tak samo, aż otrzymamy 50 o. Dł. robótki wynosi ok. 102 cm. Teraz zamykać o. z tych samych stron co były dodawane – zamknąć o. co 2 rz. przerabiając 2 pierwsze/ostatnie o. razem na prawo. Dalej zamykać o., aż będzie ich 4. Dł. robótki wynosi ok. 205 cm. Zamknąć wszystkie oczka. Frędzle: przewlec frędzle wzdłuż 2 boków szala co ok. 4-5 cm – zacząć od rogu. Odciąć 6 nitek o dł. 35 cm każda, złożyć na pół, przeciągnąć otrzymaną pętelkę przez oczko na brzegu szala i przeciągnąć końce nitki przez pętelkę. |
|
Skończyłaś ten wzór?Otaguj swoje zdjęcia #dropspattern lub prześlij je do #dropsfan gallery. Potrzebujesz pomocy w związku z tym wzorem?Zobacz 16 instrukcje video, sekcję Komentarze/Pytania i jeszcze więcej, wchodząc na stronę wzoru na garnstudio.com © 1982-2026 DROPS Design A/S. Wszelkie prawa zastrzeżone. Ten dokument, w całości, jest chroniony prawem. Zobacz co możesz robić z naszymi wzorami na dole każdego wzoru na naszej stronie. |


Posiadając 40 lat doświadczenia w projektowaniu wzorów na druty i szydełko, DROPS Design oferuje jedną z największych kolekcji bezpłatnych wzorów w internecie – przetłumaczonych na 17 języków. Obecnie jest dostępnych 324 katalogów i 12290 wzorów w języku polskim.
Dokładamy wszelkich starań, aby oferować Wam druty i szydełka, inspiracje, fachowe porady oraz doskonałej jakości włóczki w najlepszych cenach! Zamierzasz wykorzystać nasze wzory inaczej niż tylko do osobistego użytku? Przeczytaj jakie masz prawa w Copyright, który znajdziesz na końcu każdego wzoru. Miłej pracy!
Dodaj komentarz do modelu DROPS 86-10
Chcielibyśmy się dowiedzieć co masz do powiedzenia o tym wzorze!
Jeśli chcesz zadać pytanie i szybko uzyskać odpowiedź, upewnij się, że została wybrana właściwa kategoria w formularzu poniżej. Pola obowiązkowe są oznaczone *.