
Categorie popolari
State cercando un filato?


Commenti / Domande (72)
![]() Pat Marshall ha scritto:
Pat Marshall ha scritto:
Hello, I am confused about when I am to apply A.1 and A.2 "When A.1 have been completed in height, work A2. over A.1. Repeat A.2 in height to finish length". I need more explanation. I did A.1 and then started to repeat it, but I do not have the pattern as shown. Do I work the 6 pattern rows of A.1 and then the 6 pattern rows of A.2?
11.11.2020 - 16:53DROPS Design ha risposto:
Hi Pat, Yes, A.1 is only worked once in height (i.e. 6 rows), then you continue repeating A.2 in height until the jumper is finished. Happy knitting!
12.11.2020 - 08:25
![]() Erin Colin ha scritto:
Erin Colin ha scritto:
Hi there! I am having some trouble getting started on the sleeves. I have placed my 43 sleeve stitches back on my needles. The next part confuses me though. The instructions say to knit up 6 stitches in the undersleeve, but then to place a marker thread in the middle of those 6 stitches and start the round there. I'm confused as to how I start the round in the middle of the new stitches if my working yarn is at the end of those 6 new stitches? Maybe I am overthinking this? Thank You!
06.11.2020 - 06:01DROPS Design ha risposto:
Dear Mrs Colin, this lesson shows how to work a jumper top down and from picture 18B how to pick up sts mid under sleeve - just insert a marker in the middle of the 6 new stitches and consider the round starts after the marker. Hope this helps Happy Happy knitting!
06.11.2020 - 08:39
![]() Marcia Turk-Mcneill ha scritto:
Marcia Turk-Mcneill ha scritto:
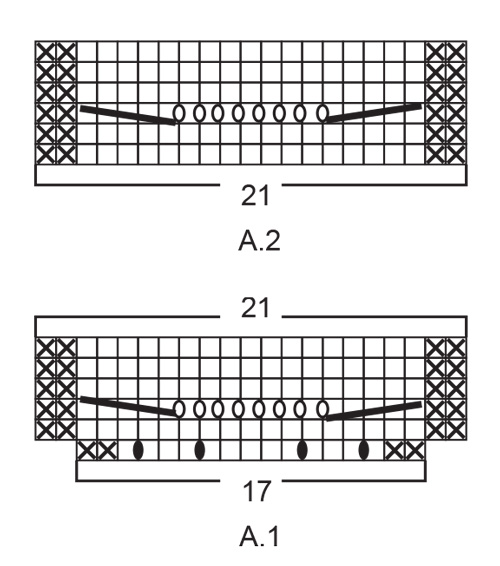
Sorry, I’m still confused about the a21 diagram for the lace on the front of this sweater, after I decrease, I make 1 yarn over and then knit 7 and then one more yarn over? On the diagram, it looks as though I should do a yarn over every other knit stitch, but that makes the lace panel very wide. Is this correct? Should the lace section stay to 21 stitches or increase as the sweater is made. Is there a written out version of the diagram?
21.10.2020 - 08:19DROPS Design ha risposto:
Dear Mrs Turk-Mcneill, work the 3rd row in A.1/A.2 like this: P2, knit 5 stitches together (= decrease 4 sts), *YO, K1*, work from *-* a total of 7 times, YO (= there are now 8 yarn overs), knit 5 stitches together, (= decrease 4 sts), P2 = you decreased 4 sts 2 times and increased 8 sts = number of stitches is still the same. This means you still have 21 sts for these diagrams. Hope this helps. Happy knitting!
21.10.2020 - 08:52
![]() Marcia Turk-Mcneill ha scritto:
Marcia Turk-Mcneill ha scritto:
Hello! I’m a bit confused about pattern a.2. For the increases (ovals) how many stitches should be in between the ovals? I feel like I should only increase by 8 stitches, but knitting every other stitch adds too many.
21.10.2020 - 07:45DROPS Design ha risposto:
Hi Marcia, You make 1 yarn over, then knit 1 x 7 and then finish with 1 yarn over. This increases 8 stitches. Happy knitting!
21.10.2020 - 07:47
![]() Rene Gould ha scritto:
Rene Gould ha scritto:
I'm sorry I forgot to tell you which pattern I'm doing it's the clover sweater thank you
18.09.2020 - 01:09DROPS Design ha risposto:
See answer below :)
18.09.2020 - 08:40
![]() Rene Gould ha scritto:
Rene Gould ha scritto:
Hi I can't use double pointed needles is there another way I can use for sleeves etc thank you
18.09.2020 - 01:06DROPS Design ha risposto:
Dear Mrs Gould, sure you can use a short circular needle (if it's not too long in the size), or use the longer circular needle and the magic loop technique . Happy knitting!
18.09.2020 - 08:40
![]() Joaquim ha scritto:
Joaquim ha scritto:
Bonjour, j’aimerais tricoter ce modèle en 14 et 16 ans Quel nombre de mailles pour commencer l’empiètement puis en largeur et hauteur pour dos et devant et les manches Merci de votre réponse
14.09.2020 - 09:08DROPS Design ha risposto:
Bonjour Mme Joaquim, nous ne sommes malheureusement pas en mesure de pouvoir adapter chacun de nos modèles à chaque demande ; merci de bien vouloir contacter votre magasin ou bien un forum spécialisé pour toute assistance complémentaire. Merci pour votre compréhension. Bon tricot!
14.09.2020 - 09:47
![]() Anna-Karin Allansson ha scritto:
Anna-Karin Allansson ha scritto:
Jag stickar 7/8 år men det blir inte 200 efter 16 ökningar. Ska framstycket vara 4 maskor mer än bakstycket?
21.08.2020 - 19:39
![]() Jaypatto ha scritto:
Jaypatto ha scritto:
G’day, thanks for a lovely pattern. The front looks complicated but it’s very easy! My question, there are an odd number of stitches specified for the sleeve before the rib band starts. Because the band is knitted in the round, shouldn’t this number be even as it was for both the neck and bottom band?
18.07.2020 - 05:31DROPS Design ha risposto:
Dear Jaypatto, you can increase only 1 stitch or 1 more stitch (as prefered) to get an even number of stitches so that the rib will fit in the round. Happy knitting!
20.07.2020 - 09:13
![]() Ingrid Engkrog ha scritto:
Ingrid Engkrog ha scritto:
Holder på å strikke genser str. 7/8 år...men forstår ikke hvorfor det skal økes på omgangen nede før en strikker bråtet...skulle tro det var omvendt, at en skal felle noen masker...men det holder vel å bruke å bruke tynnere pinne...har jeg misforstått noe her eller ?
12.03.2020 - 10:42DROPS Design ha risposto:
Hei Ingrid. I mange oppskrifter, gjerne eldre oppskrifter, skulle vrangborden være stram/strammere enn selve plagget. Nå ønsker man heller at vrangborden skal falle pent sammen med resten av plagget og da økes det masker før vrangborden. Strikkes det f.eks en vrangbord med 2 rett/2 vrang vil det trekkes seg sammen litt, slik det blir en penere overgang mellom plagg og vrangbord. God Fornøyelse!
16.03.2020 - 12:21
|
|||||||||||||||||||
Clover#cloversweater |
|||||||||||||||||||
 |
 |
||||||||||||||||||
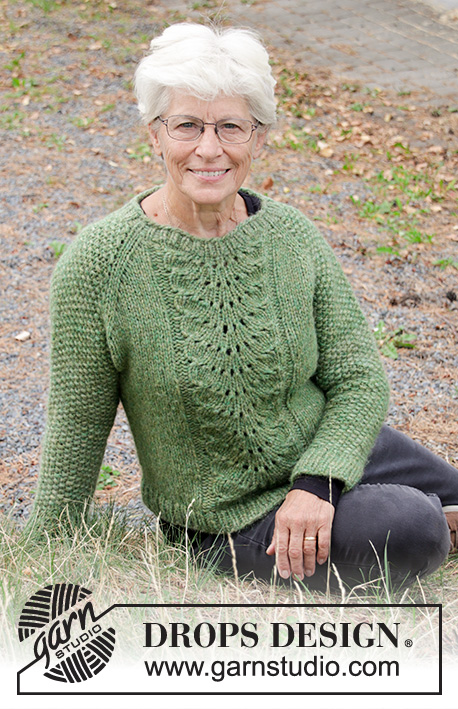
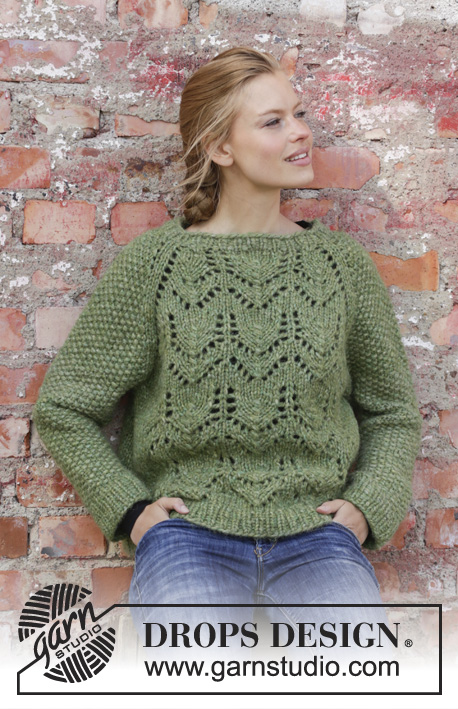
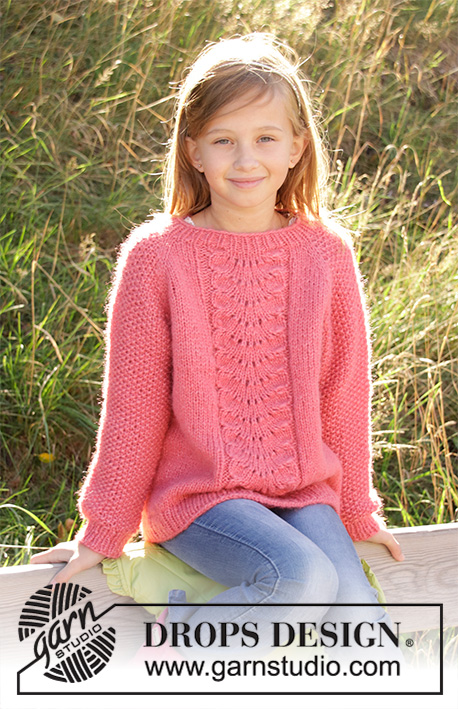
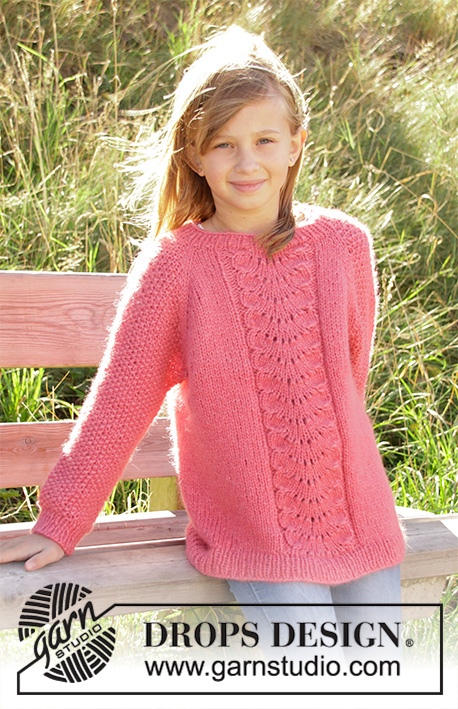
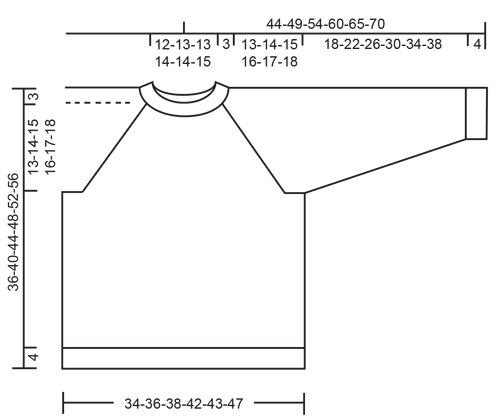
Maglione per bambini lavorato ai ferri in DROPS Air o DROPS Paris. Lavorato dall’alto in basso con motivo traforato e raglan. Taglie 2-12 anni.
DROPS Children 34-4 |
|||||||||||||||||||
|
---------------------------------------------------------- SPIEGAZIONI DEL MODELLO: ---------------------------------------------------------- MOTIVO: Vedere i diagrammi A.1 e A.2. I diagrammi mostrano tutti i ferri del motivo visti dal diritto del lavoro. SUGGERIMENTO PER GLI AUMENTI/DIMINUZIONI (distribuiti in modo uniforme): Per stabilire ogni quanto aumentare/diminuire in modo uniforme, prendere il n° totale di maglie sul ferro (ad esempio 54 maglie) e dividerlo per il n° di aumenti/diminuzioni da fare (ad esempio 6) = 9. In questo esempio aumentare facendo 1 gettato circa dopo ogni 9° maglia. Sul giro successivo lavorare i gettati a ritorto per evitare buchi. Durante le diminuzioni, lavorare insieme a diritto ogni 8° e 9° maglia (in questo esempio). GRANA DI RISO: GIRO 1: * 1 maglia diritto, 1 maglia rovescio *, lavorare *-*. GIRO 2: diritto su rovescio e rovescio su diritto. Ripetere il giro 2. RAGLAN: Aumentare 1 maglia a ogni lato delle 2 maglie diritto in ogni punto di passaggio tra le maniche e il corpo (= 8 aumenti sul giro). Aumentare 1 maglia facendo 1 gettato. Sul giro successivo lavorare i gettati a ritorto per evitare buchi. Poi lavorare le nuove maglie a grana di riso sulle maniche e a maglia rasata sul davanti e dietro. SUGGERIMENTO PER LE DIMINUZIONI (applicato alle maniche): Diminuire 1 maglia a ogni lato del segnapunti come segue: Lavorare fino a quando rimane 1 maglia prima del segnapunti, 3 maglie insieme a rovescio. In questo modo, 3 maglie diventano 1 maglia; poi spostare il segnapunti alla maglia prima di questa maglia. ------------------------------------------------------- INIZIO DEL LAVORO: ------------------------------------------------------- MAGLIONE – BREVE RIASSUNTO DEL LAVORO: Lavorato in tondo con i ferri circolari, dall’alto in basso. Alla fine dello sprone continuare il corpo in tondo con i ferri circolari. Lavorare le maniche in tondo con i ferri circolari/ferri a doppia punta. SPRONE: Avviare 54-54-58-62-64-68 maglie con i ferri circolari n° 4,5 mm e Air o Paris. Lavorare 1 giro diritto. Poi lavorare a coste in tondo (= 1 maglie diritto / 1 maglia rovescio) per 3 cm. Lavorare 1 giro diritto in cui aumentare 6-6-6-6-8-16 maglie in modo uniforme – leggere il SUGGERIMENTO PER GLI AUMENTI/DIMINUZIONI = 60-60-64-68-72-84 maglie. Passare ai ferri circolari n° 5,5 mm. Inserire qui 1 segnapunti –ORA MISURARE IL LAVORO DA QUI! Ora inserire 4 segnapunti (senza lavorare le maglie) come segue: Inserire 1 segnapunti all’inizio del giro (= nel punto di passaggio tra le maniche e il dietro), 1 segnapunti dopo 21-21-23-25-25-31 maglie (= dietro), 1 segnapunti dopo altre 9-9-9-9-11-11 maglie (= manica), 1 segnapunti dopo altre 21-21-23-25-25-31 maglie (= davanti). Rimangono 9-9-9-9-11-11 maglie prima del 1° segnapunti (= manica). Lavorare il giro successivo come segue: Il giro inizia all’altezza del 1° segnapunti, nel punto di passaggio tra il dietro e le maniche. Lavorare 1 maglia diritto, 1 gettato, lavorare 19-19-21-23-23-29 maglie a maglia rasata (= dietro), 1 gettato, 2 maglie diritto (il segnapunti è al centro di queste 2 maglie), 1 gettato, lavorare 7-7-7-7-9-9 maglie a GRANA DI RISO – leggere la descrizione sopra (= manica), 1 gettato, 2 maglie diritto (il segnapunti è al centro di queste 2 maglie), 1 gettato, lavorare 1-1-2-3-3-6 maglie a maglia rasata, lavorare A.1 (= 17 maglie = davanti), 1-1-2-3-3-6 maglie a maglia rasata, 1 gettato, 2 maglie diritto (il segnapunti è al centro di queste 2 maglie), 1 gettato, lavorare 7-7-7-7-9-9 maglie a grana di riso (= manica), 1 gettato e 1 maglia diritto. FARE ATTENZIONE ALLA TENSIONE DEL LAVORO! Il primo aumento del RAGLAN – leggere la descrizione sopra, ora è finito (= 8 aumenti sul giro). Continuare con questo motivo e con gli aumenti del raglan ogni 2 giri per un totale di 13-14-15-16-17-17 volte (compreso il 1° aumento descritto sopra). NOTA: Alla fine di A.1, lavorare A.2 (= 21 maglie) su A.1. Ripetere A.2 in altezza fino alla fine del lavoro. Alla fine dell’ultimo aumento per il raglan ci sono 168-176-188-200-212-224 maglie sul ferro. Continuare con il motivo come prima, ma senza aumenti fino a quando il lavoro misura 13-14-15-16-17-18 cm dal segnapunti all’inizio dello sprone. Lavorare il giro successivo con il motivo e a maglia rasata come prima ma iniziare il giro 1 maglia prima (prima delle 2 maglie a maglia rasata tra le maniche e il dietro). Lavorare a maglia rasata su 49-51-55-59-61-67 maglie (= dietro), mettere le 33-35-37-39-43-43 maglie successive in sospeso (= manica), avviare 4-4-4-6-6-6 nuove maglie sul ferro (= a lato sotto la manica), continuare a maglia rasata e con il motivo sulle 53-55-59-63-65-71 maglie successive (= davanti), mettere le 33-35-37-39-43-43 maglie successive in sospeso (= l’altra manica), avviare 4-4-4-6-6-6 nuove maglie sul ferro (= a lato sotto la manica). Finire il corpo e le maniche in modo separato. ORA MISURARE IL LAVORO DA QUI! CORPO: Ora ci sono 110-114-122-134-138-150 maglie sul ferro. Continuare a maglia rasata e con il motivo A.2 in tondo come prima. Quando il lavoro misura 16-19-22-25-28-31 cm dalla divisione, lavorare 1 giro diritto in cui aumentare 10-12-14-16-18-20 maglie in modo uniforme sul giro = 120-126-136-150-156-170 maglie. Passare ai ferri circolari n° 4,5 mm e lavorare a coste (= 1 maglia diritto / 1 maglia rovescio) per 4 cm. Intrecciare senza stringere con diritto su diritto e rovescio su rovescio – per evitare che il bordo di chiusura sia tirato, potete intrecciare usando un ferro della misura di 5,5 mm. Tagliare e affrancare il filo. MANICA: Mettere le maglie del fermamaglie a un lato del lavoro sui ferri circolari corti/ferri a doppia punta n° 5,5 mm (= 33-35-37-39-43-43 maglie). Riprendere 1 maglia in ognuna delle 4-4-4-6-6-6 maglie avviate sotto la manica = 37-39-41-45-49-49 maglie. Inserire 1 segnapunti al centro di queste 4-4-4-6-6-6 maglie e iniziare qui il giro. Lavorare a grana di riso. Quando il lavoro misura 2 cm dalla divisione diminuire 2 maglie al centro sotto la manica – leggere il SUGGERIMENTO PER LE DIMINUZIONI. Diminuire in questo modo ogni 2½-3-3½-4-4½-5½ cm per un totale di 6-6-7-7-7-7 volte = 25-27-27-31-35-35 maglie. Continuare a lavorare fino a quando la manica misura 18-22-26-30-34-38 cm dalla divisione. Lavorare 1 giro diritto in cui aumentare 3-3-3-3-3-3 maglie per tutte le taglie = 28-30-30-34-38-38 maglie. Passare ai ferri a doppia punta n° 4,5 mm e lavorare a coste (1 maglia diritto / 1 maglia rovescio) per 4 cm. Intrecciare senza stringere con diritto su diritto e rovescio su rovescio – per evitare che il bordo di chiusura sia tirato, potete intrecciare usando un ferro della misura di 5,5 mm. Tagliare e affrancare il filo. Lavorare l’altra manica nello stesso modo. |
|||||||||||||||||||
Spiegazioni del diagramma |
|||||||||||||||||||
|
|||||||||||||||||||
 |
|||||||||||||||||||
 |
|||||||||||||||||||
Avete terminato questo modello?Allora taggate le vostre foto con #dropspattern #cloversweater o inviatele alla #dropsfan gallery. Avete bisogno di aiuto con questo modello?Troverete 25 video tutorial, una sezione per i commenti/domande e molto altro guardando il modello su www.garnstudio.com © 1982-2026 DROPS Design A/S. Ci riserviamo tutti i diritti. Questo documento, compreso tutte le sue sotto-sezioni, è protetto dalle leggi sul copyright. Potete leggere quello che potete fare con i nostri modelli alla fine di ogni modello sul nostro sito. |
|||||||||||||||||||


Con oltre 40 anni di esperienza nel design di modelli di maglia e uncinetto, DROPS Design offre la più estesa collezione di modelli gratuiti su internet - tradotti in 17 lingue. Ad oggi vi possiamo fornire 324 cataloghi e 12290 modelli - 9561 dei quali sono tradotti in Italiano.
Ci stiamo impegnando molto per darvi il meglio che vi possiamo offrire in termini di maglia e uncinetto, ispirazioni e consigli così come filati di grande qualità ad un prezzo incredibile! Volete utilizzare i nostri modelli per qualcosa d'altro oltre al vostro uso personale? Potete leggere tutto ciò che è consentito nel testo sul Copyright in basso su tutte le pagine dei nostri modelli. Buon lavoro!
Lasciare un commento sul modello DROPS Children 34-4
Noi saremmo felici di ricevere i tuoi commenti e opinioni su questo modello!
Se vuoi fare una domanda, fai per favore attenzione a selezionare la categoria corretta nella casella qui sotto per velocizzare il processo di risposta. I campi richiesti sono indicati da *.