
Categorie popolari
State cercando un filato?


Commenti / Domande (72)
![]() Astrid ha scritto:
Astrid ha scritto:
Hej! Jag stickar DROPS CHILDREN / 34 / 4. I beskrivningen ser det ut som att man ska ha ett ojämnt antal maskor för varje ärm (37-39-41-45-49-49). Såg att en annan (danska) frågat om detta tidigare men då svarade ni att man ska ta bort en maska. Är inte det ett fel i beskrivningen? För mosstickning måste det väl vara jämnt antal för att inte bli fult under ärmen?
20.09.2021 - 10:24DROPS Design ha risposto:
Hej Astrid. Den danska frågan gällde resåren och där har det nu kommit en rättelse. Gällande mosstickning så ska det vara ett ojämnt antal maskor, sista maskan på varet blir då rät och då blir första maskan på varv 2 avig och hamnar då över den räta maskan på varv 1. Mvh DROPS Design
22.09.2021 - 09:58
![]() Christina Christensen ha scritto:
Christina Christensen ha scritto:
Jeg har lavet strikkeprøve i Air (pinde 5,5) og vasket denne. Det giver 17,5 masker i bredden og 26 pinde i højden i glatstrik. Før vask var tallene 16 gange 26. Det virker noget skævt i forhold til opskriftens 16 masker gange 20 pinde og bliver vel næppe løst ved at gå op i pinde 6?
10.09.2021 - 18:19DROPS Design ha risposto:
Hei Christina. Ville ha strikket med med pinne 5,5 som er opplyst i oppskriften og ville ha prøvd å strikket en nye strikkeprøve der du får riktig pinne i høyden. Når du vasker, la den tørke i fasong/den strikkefastheten som er oppgitt. mvh DROPS design
20.09.2021 - 11:33
![]() Monika ha scritto:
Monika ha scritto:
Jag försökte lägga upp 64 maskor på rundsticka men det fungerar inte då maskantalet är för litet för 40 cm rundsticka ska halsringmungen verkligen vara så liten? Har visserligen ett annat garn, ett acrylgarn "we love yarn" men verkar ju vara samma tjocklek? Mvh Minika
16.08.2021 - 12:15DROPS Design ha risposto:
Hei Monika. Om du ser på målskissen nederst på oppskriften ser du målene på halsen. Om du strikker med DROPS LOVE YOU #8 er dette 100 Bomull, ikke akryl, og det garnet kan du erstatte DROPS Air med. Om det er et garn som ikke er fra oss, kan jeg ikke utale meg om den er like tykk som DROPS Air eller DROPS LOVE YOU #8 og kan brukes på denne oppskriften. mvh DROPS design
16.08.2021 - 14:48
![]() Dagny Rasmussen ha scritto:
Dagny Rasmussen ha scritto:
Er de meget små i størrelser, synes at str 7-8år har en meget lille åbning også selv om det hele stemmer
22.07.2021 - 13:16DROPS Design ha risposto:
Hej Dagny, Nej, men du kan se målene til de forskellige størrelser i måleskitsen nederst i opskriften :)
04.08.2021 - 08:46
![]() Karen Figueroa ha scritto:
Karen Figueroa ha scritto:
I wish there was a way to get the comments/questions translated into the same language as the pattern.
03.06.2021 - 17:29
![]() Debora ha scritto:
Debora ha scritto:
Hola, estoy haciendo el talle 12, para los aumentos por ej dice 68/16aum=4,25, ( cada 4,25 puntos) no me da un numero entero.. Si yo divido 68/4=17, aum, cada 4 puntos.!!
06.04.2021 - 10:12DROPS Design ha risposto:
Hola Debora, mira la leccion drops AQUI . Buen trabajo!
06.04.2021 - 20:13
![]() Sybille ha scritto:
Sybille ha scritto:
Liebes Drops-Team, in Ihren Videos wird zweimal gezeigt wie man 5 Maschen rechts verschränkt zusammenstrickt. Ein Video hat aber die falsche Unterschrift. Das Video wie 5 Maschen rechts zusammen gestrickt werden fehlt leider. Herzliche Grüße und vielen Dank für Ihre tollen Anleitungen. Sybille
09.02.2021 - 14:12DROPS Design ha risposto:
Liebe Sylbille, danke für den Hinweis, das Video werden wir neu hochladen; inzwischen kann vielleicht das für 4 Maschen rechts zusammen helfen, diese Abanhme wird genauso gleich gemacht, nur mit 5 anstatt 4 Maschen. Viel Spaß beim stricken!
26.04.2021 - 14:10
![]() Jette Skougaard ha scritto:
Jette Skougaard ha scritto:
Hvorfor skal der bruges dobbelt så meget garn med Paris 300 g og ½ 150 g garnmængde med Air. Voksenudgaven 196-4 strikkes med 2 tråden i Air. Men det angiver I kke noget om i børneudgaven 34-4? Det er vel en fejl. Og hvis der skal strikkes med 2 tråde i 34-4 kan garnmængden ikke være korrekt. Jeg fik 3½ nøgle garn til rest med Paris! Hjælp den fortrivlede Jette
19.01.2021 - 13:11DROPS Design ha risposto:
Hej Jette, Denne bluse strikkes i en tråd DROPS Air, vælger du at strikke den i bomuld, så bliver den tungere da der ikke er lige så mange meter på 50 gram. Det er to helt forskellige kvaliteter :)
20.01.2021 - 16:30
![]() Cat ha scritto:
Cat ha scritto:
Bonjour Il manque 4 mailles après avoir fait le rang d 'augmentation avec les 8 jetés. Je l'ai refait plusieurs fois et le résultat est le même. Pouvez vous m'aider Merci beaucoup
26.11.2020 - 10:48DROPS Design ha risposto:
Bonjour Cat, parlez-vous des 8 jetés faits pour la 1ère augmentation du raglan? Autrement dit, le 1er rang de A.1? Avez-vous bien augmenté comme indiqué dans A.1? Vous devez faire 4 jetés (augmentations) au 1er rang de A.1, ces jetés se tricotent torse à l'endroit au tour suivant pour éviter des trous. Bon tricot!
26.11.2020 - 16:43
![]() Marsha Preis ha scritto:
Marsha Preis ha scritto:
I don't see a guage listed. It states use a smaller needle or a larger needle, but I don't see what the expected guage is.
12.11.2020 - 22:00DROPS Design ha risposto:
Dear Mrs Preis, you will find the gauge under KNITTING GAUGE just above the needle size and the informations about using a smaller or a larger needle, ie: 16 stitches in width and 20 rows in height with stockinette stitch = 10 x 10 cm = 4” x 4”.. Happy knitting!
13.11.2020 - 08:18
|
|||||||||||||||||||
Clover#cloversweater |
|||||||||||||||||||
 |
 |
||||||||||||||||||
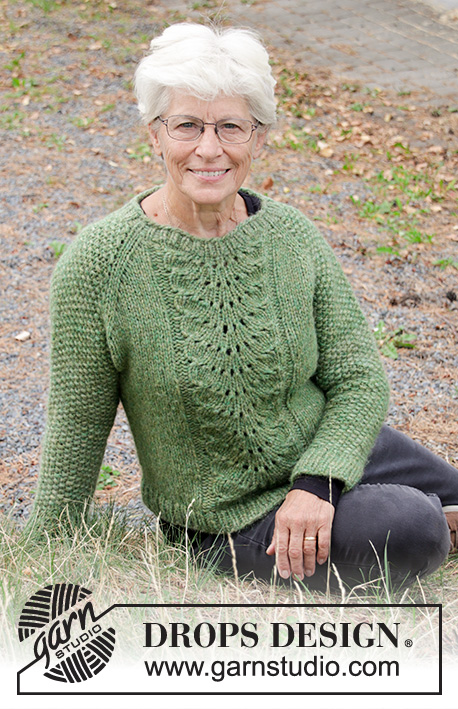
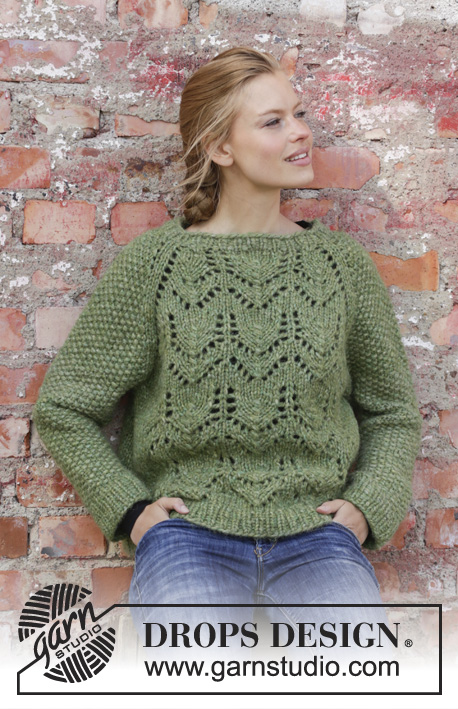
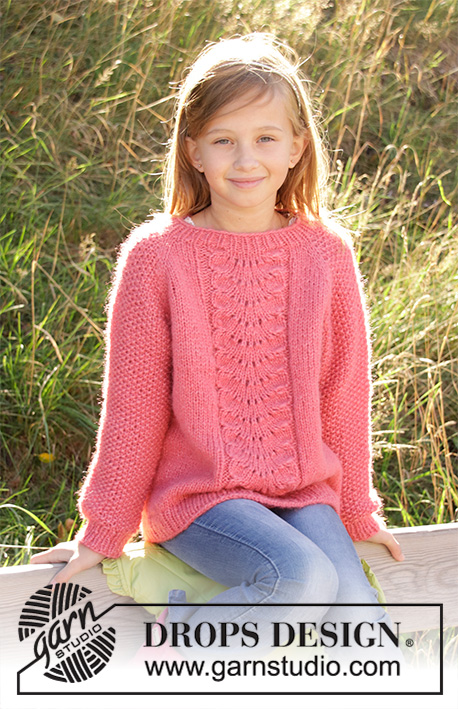
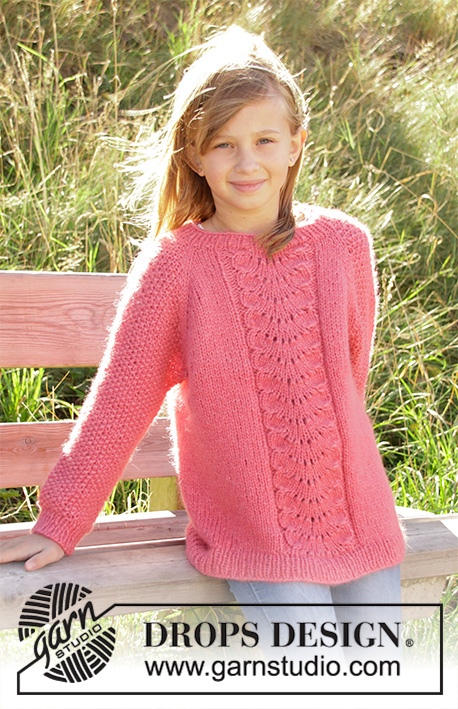
Maglione per bambini lavorato ai ferri in DROPS Air o DROPS Paris. Lavorato dall’alto in basso con motivo traforato e raglan. Taglie 2-12 anni.
DROPS Children 34-4 |
|||||||||||||||||||
|
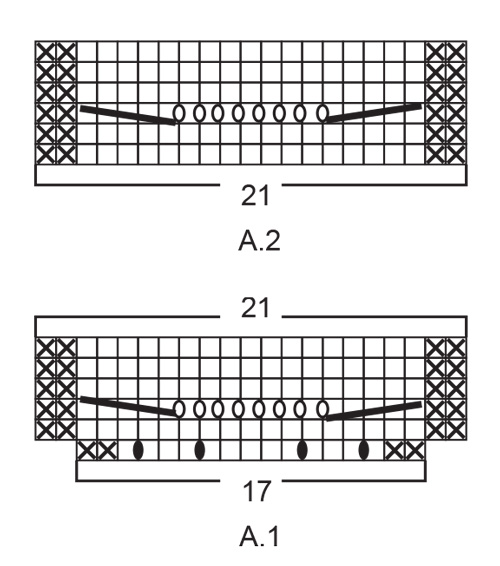
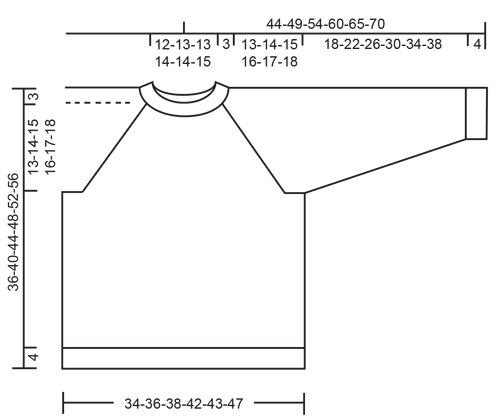
---------------------------------------------------------- SPIEGAZIONI DEL MODELLO: ---------------------------------------------------------- MOTIVO: Vedere i diagrammi A.1 e A.2. I diagrammi mostrano tutti i ferri del motivo visti dal diritto del lavoro. SUGGERIMENTO PER GLI AUMENTI/DIMINUZIONI (distribuiti in modo uniforme): Per stabilire ogni quanto aumentare/diminuire in modo uniforme, prendere il n° totale di maglie sul ferro (ad esempio 54 maglie) e dividerlo per il n° di aumenti/diminuzioni da fare (ad esempio 6) = 9. In questo esempio aumentare facendo 1 gettato circa dopo ogni 9° maglia. Sul giro successivo lavorare i gettati a ritorto per evitare buchi. Durante le diminuzioni, lavorare insieme a diritto ogni 8° e 9° maglia (in questo esempio). GRANA DI RISO: GIRO 1: * 1 maglia diritto, 1 maglia rovescio *, lavorare *-*. GIRO 2: diritto su rovescio e rovescio su diritto. Ripetere il giro 2. RAGLAN: Aumentare 1 maglia a ogni lato delle 2 maglie diritto in ogni punto di passaggio tra le maniche e il corpo (= 8 aumenti sul giro). Aumentare 1 maglia facendo 1 gettato. Sul giro successivo lavorare i gettati a ritorto per evitare buchi. Poi lavorare le nuove maglie a grana di riso sulle maniche e a maglia rasata sul davanti e dietro. SUGGERIMENTO PER LE DIMINUZIONI (applicato alle maniche): Diminuire 1 maglia a ogni lato del segnapunti come segue: Lavorare fino a quando rimane 1 maglia prima del segnapunti, 3 maglie insieme a rovescio. In questo modo, 3 maglie diventano 1 maglia; poi spostare il segnapunti alla maglia prima di questa maglia. ------------------------------------------------------- INIZIO DEL LAVORO: ------------------------------------------------------- MAGLIONE – BREVE RIASSUNTO DEL LAVORO: Lavorato in tondo con i ferri circolari, dall’alto in basso. Alla fine dello sprone continuare il corpo in tondo con i ferri circolari. Lavorare le maniche in tondo con i ferri circolari/ferri a doppia punta. SPRONE: Avviare 54-54-58-62-64-68 maglie con i ferri circolari n° 4,5 mm e Air o Paris. Lavorare 1 giro diritto. Poi lavorare a coste in tondo (= 1 maglie diritto / 1 maglia rovescio) per 3 cm. Lavorare 1 giro diritto in cui aumentare 6-6-6-6-8-16 maglie in modo uniforme – leggere il SUGGERIMENTO PER GLI AUMENTI/DIMINUZIONI = 60-60-64-68-72-84 maglie. Passare ai ferri circolari n° 5,5 mm. Inserire qui 1 segnapunti –ORA MISURARE IL LAVORO DA QUI! Ora inserire 4 segnapunti (senza lavorare le maglie) come segue: Inserire 1 segnapunti all’inizio del giro (= nel punto di passaggio tra le maniche e il dietro), 1 segnapunti dopo 21-21-23-25-25-31 maglie (= dietro), 1 segnapunti dopo altre 9-9-9-9-11-11 maglie (= manica), 1 segnapunti dopo altre 21-21-23-25-25-31 maglie (= davanti). Rimangono 9-9-9-9-11-11 maglie prima del 1° segnapunti (= manica). Lavorare il giro successivo come segue: Il giro inizia all’altezza del 1° segnapunti, nel punto di passaggio tra il dietro e le maniche. Lavorare 1 maglia diritto, 1 gettato, lavorare 19-19-21-23-23-29 maglie a maglia rasata (= dietro), 1 gettato, 2 maglie diritto (il segnapunti è al centro di queste 2 maglie), 1 gettato, lavorare 7-7-7-7-9-9 maglie a GRANA DI RISO – leggere la descrizione sopra (= manica), 1 gettato, 2 maglie diritto (il segnapunti è al centro di queste 2 maglie), 1 gettato, lavorare 1-1-2-3-3-6 maglie a maglia rasata, lavorare A.1 (= 17 maglie = davanti), 1-1-2-3-3-6 maglie a maglia rasata, 1 gettato, 2 maglie diritto (il segnapunti è al centro di queste 2 maglie), 1 gettato, lavorare 7-7-7-7-9-9 maglie a grana di riso (= manica), 1 gettato e 1 maglia diritto. FARE ATTENZIONE ALLA TENSIONE DEL LAVORO! Il primo aumento del RAGLAN – leggere la descrizione sopra, ora è finito (= 8 aumenti sul giro). Continuare con questo motivo e con gli aumenti del raglan ogni 2 giri per un totale di 13-14-15-16-17-17 volte (compreso il 1° aumento descritto sopra). NOTA: Alla fine di A.1, lavorare A.2 (= 21 maglie) su A.1. Ripetere A.2 in altezza fino alla fine del lavoro. Alla fine dell’ultimo aumento per il raglan ci sono 168-176-188-200-212-224 maglie sul ferro. Continuare con il motivo come prima, ma senza aumenti fino a quando il lavoro misura 13-14-15-16-17-18 cm dal segnapunti all’inizio dello sprone. Lavorare il giro successivo con il motivo e a maglia rasata come prima ma iniziare il giro 1 maglia prima (prima delle 2 maglie a maglia rasata tra le maniche e il dietro). Lavorare a maglia rasata su 49-51-55-59-61-67 maglie (= dietro), mettere le 33-35-37-39-43-43 maglie successive in sospeso (= manica), avviare 4-4-4-6-6-6 nuove maglie sul ferro (= a lato sotto la manica), continuare a maglia rasata e con il motivo sulle 53-55-59-63-65-71 maglie successive (= davanti), mettere le 33-35-37-39-43-43 maglie successive in sospeso (= l’altra manica), avviare 4-4-4-6-6-6 nuove maglie sul ferro (= a lato sotto la manica). Finire il corpo e le maniche in modo separato. ORA MISURARE IL LAVORO DA QUI! CORPO: Ora ci sono 110-114-122-134-138-150 maglie sul ferro. Continuare a maglia rasata e con il motivo A.2 in tondo come prima. Quando il lavoro misura 16-19-22-25-28-31 cm dalla divisione, lavorare 1 giro diritto in cui aumentare 10-12-14-16-18-20 maglie in modo uniforme sul giro = 120-126-136-150-156-170 maglie. Passare ai ferri circolari n° 4,5 mm e lavorare a coste (= 1 maglia diritto / 1 maglia rovescio) per 4 cm. Intrecciare senza stringere con diritto su diritto e rovescio su rovescio – per evitare che il bordo di chiusura sia tirato, potete intrecciare usando un ferro della misura di 5,5 mm. Tagliare e affrancare il filo. MANICA: Mettere le maglie del fermamaglie a un lato del lavoro sui ferri circolari corti/ferri a doppia punta n° 5,5 mm (= 33-35-37-39-43-43 maglie). Riprendere 1 maglia in ognuna delle 4-4-4-6-6-6 maglie avviate sotto la manica = 37-39-41-45-49-49 maglie. Inserire 1 segnapunti al centro di queste 4-4-4-6-6-6 maglie e iniziare qui il giro. Lavorare a grana di riso. Quando il lavoro misura 2 cm dalla divisione diminuire 2 maglie al centro sotto la manica – leggere il SUGGERIMENTO PER LE DIMINUZIONI. Diminuire in questo modo ogni 2½-3-3½-4-4½-5½ cm per un totale di 6-6-7-7-7-7 volte = 25-27-27-31-35-35 maglie. Continuare a lavorare fino a quando la manica misura 18-22-26-30-34-38 cm dalla divisione. Lavorare 1 giro diritto in cui aumentare 3-3-3-3-3-3 maglie per tutte le taglie = 28-30-30-34-38-38 maglie. Passare ai ferri a doppia punta n° 4,5 mm e lavorare a coste (1 maglia diritto / 1 maglia rovescio) per 4 cm. Intrecciare senza stringere con diritto su diritto e rovescio su rovescio – per evitare che il bordo di chiusura sia tirato, potete intrecciare usando un ferro della misura di 5,5 mm. Tagliare e affrancare il filo. Lavorare l’altra manica nello stesso modo. |
|||||||||||||||||||
Spiegazioni del diagramma |
|||||||||||||||||||
|
|||||||||||||||||||
 |
|||||||||||||||||||
 |
|||||||||||||||||||
Avete terminato questo modello?Allora taggate le vostre foto con #dropspattern #cloversweater o inviatele alla #dropsfan gallery. Avete bisogno di aiuto con questo modello?Troverete 25 video tutorial, una sezione per i commenti/domande e molto altro guardando il modello su www.garnstudio.com © 1982-2026 DROPS Design A/S. Ci riserviamo tutti i diritti. Questo documento, compreso tutte le sue sotto-sezioni, è protetto dalle leggi sul copyright. Potete leggere quello che potete fare con i nostri modelli alla fine di ogni modello sul nostro sito. |
|||||||||||||||||||


Con oltre 40 anni di esperienza nel design di modelli di maglia e uncinetto, DROPS Design offre la più estesa collezione di modelli gratuiti su internet - tradotti in 17 lingue. Ad oggi vi possiamo fornire 324 cataloghi e 12290 modelli - 9561 dei quali sono tradotti in Italiano.
Ci stiamo impegnando molto per darvi il meglio che vi possiamo offrire in termini di maglia e uncinetto, ispirazioni e consigli così come filati di grande qualità ad un prezzo incredibile! Volete utilizzare i nostri modelli per qualcosa d'altro oltre al vostro uso personale? Potete leggere tutto ciò che è consentito nel testo sul Copyright in basso su tutte le pagine dei nostri modelli. Buon lavoro!
Lasciare un commento sul modello DROPS Children 34-4
Noi saremmo felici di ricevere i tuoi commenti e opinioni su questo modello!
Se vuoi fare una domanda, fai per favore attenzione a selezionare la categoria corretta nella casella qui sotto per velocizzare il processo di risposta. I campi richiesti sono indicati da *.