
Categorie popolari
State cercando un filato?


Commenti / Domande (24)
![]() Conni Jørgensen ha scritto:
Conni Jørgensen ha scritto:
Hvorfor står der i opskriften “ der er rettelser- klink her” - men linket virker ikke.
02.08.2024 - 22:43DROPS Design ha risposto:
Hej Conni, Jo når du klikker på linket ser du at vi har skrevet at det er 1 kantmaske retstrik i hver side :)
06.08.2024 - 14:01
![]() Ruth ha scritto:
Ruth ha scritto:
Hallo, wenn ich den Rand kraus rechts stricke, rollt er sich ein. Was kann ich gegen das Einrollen tun? // Hi there, I am doing a garter stitch at the end of each row. The cardigan now rolls itself inwards at the end of each row. What can I do about it? Thanks, best, Ruth
09.12.2023 - 09:41DROPS Design ha risposto:
Liebe Ruth, danach werden Sie die Maschen für die Blende auffsassen, dann wird der Rand nicht mehr rollen. Viel Spaß beim stricken!
11.12.2023 - 10:02
![]() Jane Milton ha scritto:
Jane Milton ha scritto:
I'm knitting thin in the smallest size. After the yoke A1 pattern, and I have begun the body, the instructions say to knit 3cm then do the increases. Then it says to increase every 7cm three times. in my counting, this means that there would be 3+21 cm, a total of 24 cms. However, the instructions say to continue after the last increase until piece measures 19cm. I'm confused as that is a 5cm difference! Can you please clarify the instructions for me?
17.02.2023 - 23:08DROPS Design ha risposto:
Dear Jane, you increase for the first time when the piece measures 3 cm and every 7 cm 2 more times (so you have increased 3 times in total; 138 + 12 (= 4 increases 3 times) = 150 sts. So, after the increases, the piece will measure 3+7+7= 17 cm. That is, you will have to work 2 cm more after the last increase. Happy knitting!
19.02.2023 - 22:22
![]() Poonam Kirpal ha scritto:
Poonam Kirpal ha scritto:
How much should be the length of the bodice after A1 pattern for adults say Height 5 ft 3 inches
06.06.2022 - 12:23DROPS Design ha risposto:
Dear Poonam, we don't make custom patterns. You can check a similar pattern for adults here: https://www.garnstudio.com/pattern.php?id=7107&cid=19. Happy knitting!
06.06.2022 - 13:33
![]() Marie ha scritto:
Marie ha scritto:
Placer 1 marqueur de chaque côté, au milieu des 6 nouvelles m montées. Continuer en jersey avec 1 m point mousse de chaque côté. À 3 cm, augmenter 1 m de chaque côté des marqueurs (= 4 augmentations). je ne comprends pas pour les marqueurs et augm, doit on poser un marq, 3mailles,un marqueur,3 mailles ,1marqueurs,les augmentations se font au mileu des 6 m? Merci pour votre aide
26.01.2022 - 17:07DROPS Design ha risposto:
Bonjour Marie, cette leçon montre comment tricoter un pull de haut en bas; et notamment à partir de la photo 17 comment reprendre les manches, monter les mailles sous la manche (18A) et diminuer (21, 22) au milieu sous la manche (cf cette vidéo). Bon tricot!
26.01.2022 - 17:19
![]() Marianne Plaskett ha scritto:
Marianne Plaskett ha scritto:
I can see the rows where I have to increase the number of stitches but there is no instruction on how many stitches need to be increased. I have read the pattern several times and cannot find the details about increasing.
19.02.2021 - 13:20DROPS Design ha risposto:
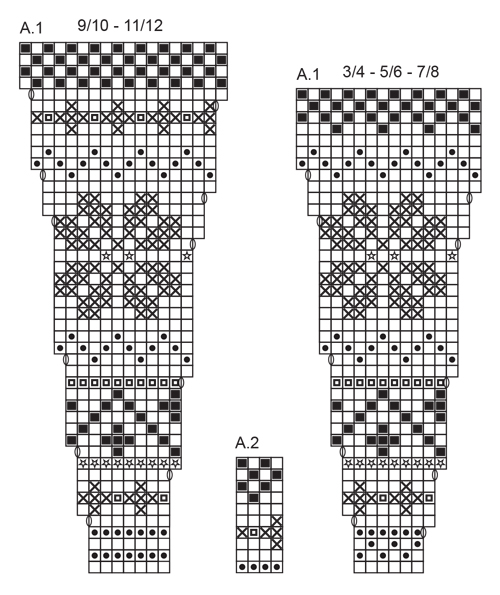
Dear Mrs Plasket, when working diagram A.1, the increases are drawn in the diagram (with the last symbole = a yarn over made either at the beg or at the end of a repeat). This means you just have to work the diagram appropriate to the size increasing as the diagram is showing. Hope this helps. Happy knitting!
19.02.2021 - 15:09
![]() Berit Forsberg Tripkou ha scritto:
Berit Forsberg Tripkou ha scritto:
I can not print the whole diagram for DROPS Children 27-5. It is just coming the first 11 rows, That is making the whole knitting a little bit complex. It is not easy to read the pattern if I take a photo from the picture at the computer,,, So can you tell me what is wrong. I have tried 2 times to print the whole diagram...
31.10.2020 - 20:05DROPS Design ha risposto:
Dear Mrs Forsberg Tripkou, we could print this pattern succesfully (in Swedisch and in English) - remember to check that some previous settings weren't savec and do not allow you to print all pages. Happy knitting!
02.11.2020 - 08:07
![]() Mary ha scritto:
Mary ha scritto:
I’m on row 12 in A1 size 7/8 the pattern does not work for me if I finish the previous row with the last two stitches being the first stitch in diagram and a garter stitch. Any tips as to what I’m doing wrong?
12.02.2020 - 12:54DROPS Design ha risposto:
Dear Mary, do you have 10 sts in each A.1 (= 1 edge st, 15 x 10 sts (A.1), 1st st in A.1, 1 edge st = 153 sts on needle)? 12th row should be a WS row, this means you work: 1 edge st, 1st st in A.1 (= P with off-white), then repeat A.1 (= P1 with beige, P2 with off white, P3 with beige, P2 with off white, P1 with beige, P1 with off white) , 1 edge st in garter st. Hope this can help you. Happy knitting!
12.02.2020 - 14:38
![]() Götze Sigrid ha scritto:
Götze Sigrid ha scritto:
Könnte ich die Wolle bei Ihnen kaufen für diesen Pulli in Gr. 104. Gleiche Farbe wie angegeben.
13.11.2019 - 12:58DROPS Design ha risposto:
Liebe Frau Götze, hier finden Sie einen DROPS Laden in Deutschlang, wo Sie die Wolle finden können. Viel Spaß beim stricken!
13.11.2019 - 13:59
![]() Evelyn ha scritto:
Evelyn ha scritto:
I am trying to knit this pattern, however, I don’t understand the first parts of starting the chart. IE; knit 1 edge stitch, A1 chart.....(finish with a knit first stitch from chart and 1 edge stitch. I have tried and the second row doesn’t work.
06.04.2019 - 05:40DROPS Design ha risposto:
Dear Evelyn, for the jacket from RS work: 1 edge st in garter stitch, then repeat A.1 (reading diagram from the bottom corner on the right side towards the left) until 2 stitches remain, work now the first stich in A.1 (the stitch on the right side) and finish with 1 edge stitch. From WS work the first stitch in A.1 (the one on the right side), then repeat A.1 reading from the left towards the right. Learn more about reading diagrams here. Happy knitting!
08.04.2019 - 09:13
|
||||||||||||||||||||||
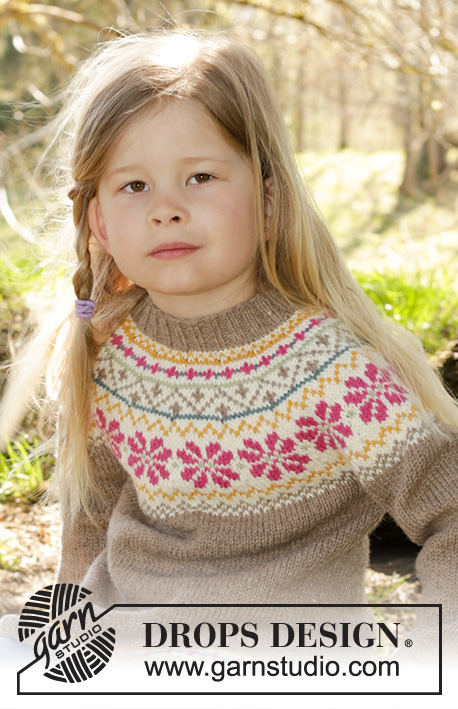
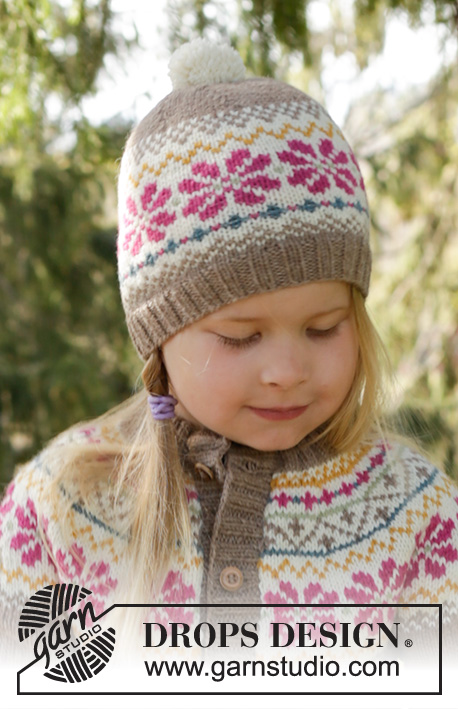
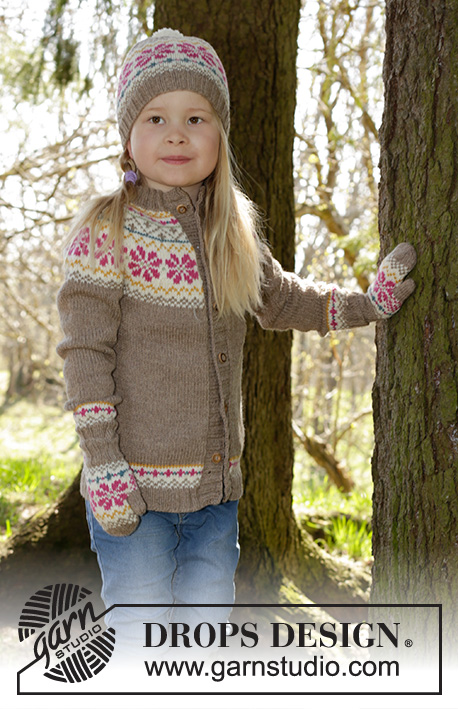
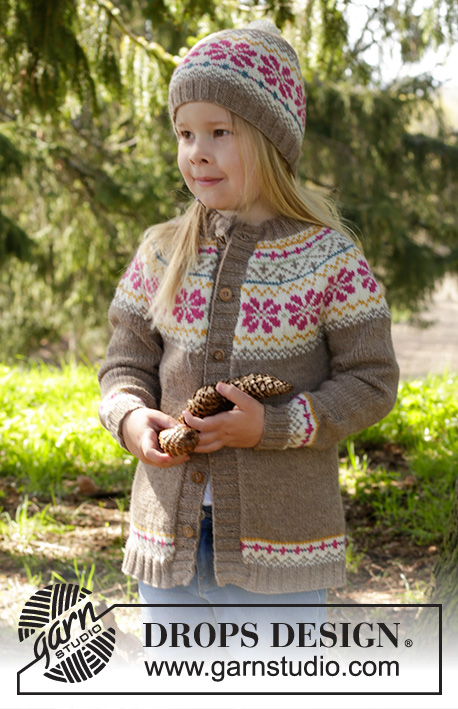
Prairie Fairy#prairiefairycardigan |
||||||||||||||||||||||
 |
 |
|||||||||||||||||||||
Cardigan lavorato ai ferri con sprone rotondo e motivo nordico in DROPS Lima. Taglie 3-12 anni.
DROPS Children 27-5 |
||||||||||||||||||||||
|
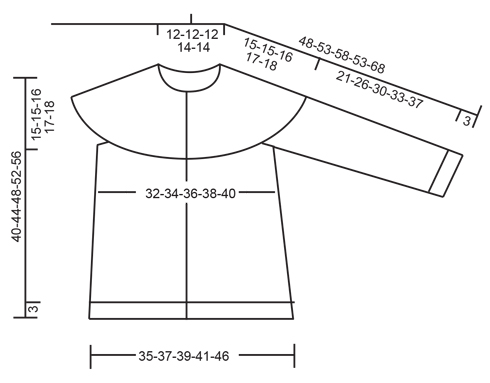
M LEGACCIO (avanti e indietro): Lavorare tutti i f a dir. 1 "costa" a m legaccio = 2 f dir. MOTIVO: Vedere i diagrammi A.1 e A.2. Lavorare tutto il motivo a m rasata. Scegliere il diagramma per la taglia corretta. SUGGERIMENTO PER IL LAVORO: Per evitare che la tensione del lavoro aumenti durante la lavorazione del motivo, è importante non tirare i capi sul dietro del lavoro. Passare ai f più grandi quando si lavora il motivo se questo dovesse in qualche modo risultare tirato. -------------------------------------------------------- CARDIGAN: Lavorato avanti e indietro sui f circolari dall’alto in basso. SPRONE: Avviare 84-88-92-96-100 m con i f circolari corti n° 3 mm con il beige. Lavorare 1 m a M LEGACCIO – leggere la spiegazione sopra, 2 m dir * 2 m dir, 2 m rov *, ripetere *-* e finire con 1 m a m legaccio. Lavorare a coste per 3-3-4-4-5 cm (= bordo del collo). Passare ai f circolari n° 4 mm. Lavorare 1 f dir e allo stesso tempo aggiustare il n° di m a 81-87-93-101-108. Inserire 1 segnapunti dopo 40-43-46-50-54 m = centro dietro. Poi lavorare un alzata sul dietro a m rasata come segue: lavorare 8 m dir dopo il segnapunti, girare, tirare il filo e lavorare 16 m rov, girare, tirare il filo e lavorare 24 m dir, girare, continuare lavorando 8 m in più a ogni giro fino a quando sono state lavorate 24-24-32-32-40 m a ogni lato del segnapunti al centro dietro, girare e lavorare il resto del f a dir, lavorare 1 f rov. Poi lavorare come segue: 1 m di vivagno a m legaccio, A.1 (= 13-14-15-14-15 ripetizioni in larghezza) finire con la 1° m del diagramma e 1 m di vivagno a m legaccio – vedere il diagramma per la taglia corretta. LEGGERE IL SUGGERIMENTO PER IL LAVORO! FARE ATTENZIONE ALLA TENSIONE DEL LAVORO! Passare ai f circolari più lunghi quando necessario. Quando è stato lavorato A.1, ci sono 211-227-243-255-273 m sul f. Lavorare 0-1-2-0-1 cm con il beige. Il lavoro ora misura circa 15-16-17-17-18 cm al centro davanti (misurati senza le coste sul collo). Continuare il lavoro con il beige e a m rasata. Per prima cosa lavorare 1 f e ALLO STESSO TEMPO distribuire 3-3-3-11-9 aumenti in modo uniforme = 214-230-246-266-282 m. Lavorare il f successivo come segue: lavorare 32-34-36-38-40 m (= davanti), trasferire le 44-48-52-58-62 m successive su un fermamaglie per le maniche (senza prima lavorarle), avviare 6 nuove m, lavorare 62-66-70-74-78 m (= dietro), trasferire le 44-48-52-58-62 m successive su un fermamaglie per le maniche (senza prima lavorarle), avviare 6 nuove m, lavorare 32-34-36-38-40 m (= davanti). CORPO: = 138-146-154-162-170 m. ORA MISURARE IL LAVORO DA QUI! Inserire 1 segnapunti a ogni lato, al centro delle 6 nuove m avviate. Continuare a m rasata con 1 m a m legaccio a ogni lato. Quando il lavoro misura 3 cm, aumentare 1 m a ogni lato dei segnapunti (= 4 aumenti). Aumentare ogni 7-9-10-12-13 cm 3 volte in totale = 150-158-166-174-182 m. Continuare a lavorare fino a quando il lavoro misura 19-23-26-29-32 cm. Lavorare A.2 con 1 m di vivagno a ogni lato. Passare ai f circolari n° 3 mm. Lavorare 1 f dir dal diritto del lavoro e ALLO STESSO TEMPO distribuire 14 aumenti in modo uniforme = 164-172-180-188-196 m. Lavorare 1 f dal rovescio del lavoro. Poi lavorare come segue: 1 m a m legaccio, 2 m dir, * 2 m rov, 2 m dir *, ripetere *-* e finire con 1 m a m legaccio. Lavorare a coste per 3 cm. Poi intrecciare a dir su dir e rov su rov. MANICA: Riportare le m da un fermamaglie sui f a doppia punta n° 4 mm, inoltre avviare 6 m al centro sotto la manica (inserire 1 segnapunti al centro di queste m) = 50-54-58-64-68 m. ORA MISURARE IL LAVORO DA QUI! Lavorare a m rasata in tondo con il beige. Quando le maniche misurano 2 cm, diminuire 1 m a ogni lato dei segnapunti. Ripetere le diminuzioni ogni 4½-3½-4-3-3½ cm 5-7-7-10-10 volte in totale = 40-40-44-44-48 m. Quando la manica misura 18-23-27-30-34 cm, lavorare il diagramma A.2, poi passare ai f a doppia punta n° 3 mm. Lavorare a coste = 2 m dir/2 m rov per 3 cm, poi intrecciare con dir su dir e rov su rov. Lavorare l’altra manica nello stesso modo sulle m sull’altro fermamaglie. BORDO: Dal diritto del lavoro riprendere circa 84-118 m lungo il davanti destro all’interno di 1 m di vivagno con i f circolari n° 3 mm con il beige. Lavorare 1 f rov dal rovescio del lavoro e ALLO STESSO TEMPO aumentare in modo uniforme a 102-110-118-130-142 m. Lavorare il f successivo come segue dal diritto del lavoro: 2 m di vivagno a m legaccio, * 2 m dir, 2 m rov *, ripetere *-* fino a quando rimangono 4 m e finire con 2 m dir e 2 m di vivagno a m legaccio. Continuare a coste in questo modo. ALLO STESSO TEMPO dopo 1 cm, diminuire per 6-6-7-7-7 asole in modo uniforme. 1 asola = lavorare 2 m insieme a fare 1 gettato (intrecciare 2 m rov visto dal diritto del lavoro risulterà più carino). L’asola superiore dev’essere a circa 1 cm dal bordo del collo e l’asola inferiore a circa 8-8-10-10-10 cm dal bordo inferiore. Quando il bordo misura 3 cm, intrecciare con dir su dir e rov su rov. Ripetere lungo il davanti sinistro ma non diminuire per le asole sul bordo sinistro. CONFEZIONE: Cucire le aperture sotto le maniche. Attaccare i bottoni sul bordo sinistro. |
||||||||||||||||||||||
Spiegazioni del diagramma |
||||||||||||||||||||||
|
||||||||||||||||||||||
 |
||||||||||||||||||||||
 |
||||||||||||||||||||||
Avete terminato questo modello?Allora taggate le vostre foto con #dropspattern #prairiefairycardigan o inviatele alla #dropsfan gallery. Avete bisogno di aiuto con questo modello?Troverete 32 video tutorial, una sezione per i commenti/domande e molto altro guardando il modello su www.garnstudio.com © 1982-2026 DROPS Design A/S. Ci riserviamo tutti i diritti. Questo documento, compreso tutte le sue sotto-sezioni, è protetto dalle leggi sul copyright. Potete leggere quello che potete fare con i nostri modelli alla fine di ogni modello sul nostro sito. |
||||||||||||||||||||||


Con oltre 40 anni di esperienza nel design di modelli di maglia e uncinetto, DROPS Design offre la più estesa collezione di modelli gratuiti su internet - tradotti in 17 lingue. Ad oggi vi possiamo fornire 325 cataloghi e 12298 modelli - 9569 dei quali sono tradotti in Italiano.
Ci stiamo impegnando molto per darvi il meglio che vi possiamo offrire in termini di maglia e uncinetto, ispirazioni e consigli così come filati di grande qualità ad un prezzo incredibile! Volete utilizzare i nostri modelli per qualcosa d'altro oltre al vostro uso personale? Potete leggere tutto ciò che è consentito nel testo sul Copyright in basso su tutte le pagine dei nostri modelli. Buon lavoro!
Lasciare un commento sul modello DROPS Children 27-5
Noi saremmo felici di ricevere i tuoi commenti e opinioni su questo modello!
Se vuoi fare una domanda, fai per favore attenzione a selezionare la categoria corretta nella casella qui sotto per velocizzare il processo di risposta. I campi richiesti sono indicati da *.