
Popular categories
Looking for a yarn?


Comments / Questions (59)
![]() Monika Averweg wrote:
Monika Averweg wrote:
Hallo, In dieser Weise in jeder 2. Runde insgesamt 0-0-3-3-4-5 x zunehmen, dann in jeder 4. Runde insgesamt 6-9-9-10-11-12 x, danach in jeder 6. Runde insgesamt 4-3-3-3-3-3 x und zuletzt in jeder 8. Runde insgesamt 1 x (d.h. es wurde insgesamt 11-13-16-17-19-21 x zugenommen) = 312-348-396-420-464-504 Maschen. ich verstehe die Zunahmen nicht. Ich weiß nicht wie ich zunehmen soll
05.12.2020 - 20:07DROPS Design answered:
Liebe Frau Averweg, Sie sollen insgesamt 16 Maschen zunehmen, dh 4 Maschen in jeder markierte Maschen zunehmen (= siehe ZUNAHMETIPP-2) - diese Zunahmen werden je nach der Größe in jeder 2. Runde, dann in jeder 4. Runde, dann in jeder 6. Runde und zuletzt in jeder 8. Runde gearbeitet. Gerne können Sie uns die Größe sagen, so kann man Ihnen erklären, wie Sie in Ihrer Größe zunehmen sollen. Viel Spaß beim stricken!
07.12.2020 - 08:04
![]() Soili wrote:
Soili wrote:
Mistä korjatut silmämäärät löytyy? Nyt ohjeessa olevilla ei onnistu... Where I can find correction? Won't work with those I can see now... :(
26.11.2020 - 18:24
![]() Mirva wrote:
Mirva wrote:
Hei. Onko käännöksessä virhe? Ohjeessa puhutaan ainaoikein-neuleesta, jota ei kuvassa näy. Tarkoitetaanko ainaoikein-silmukoiden kohdalla nurjia silmukoita? Ohje on muutenkin suomeksi todella sekava. Miten kaarroke lqajenaa, jos siinä ei lisätä silmukoita. Ohjeen mukaan siis kaarroke tehdään valmiiksi ja sitten lisäillään. Ihqn kuin tekstistä osa olisi hypännyt ohjeen loppupuolelle.
23.11.2020 - 21:20DROPS Design answered:
Hei, kaarrokkeessa neulotaan vuorotellen ainaoikeaa ja sileää neuletta. Kaarrokkeessa tehdään lisäyksiä ohjeen mukaisesti, lisäykset aloitetaan kaarrokkeen 3.kerroksella, ja niitä toistetaan, kunnes työssä on 312-348-396-420-464-504 silmukkaa.
12.03.2021 - 13:52
![]() Bamalu wrote:
Bamalu wrote:
Ich möchte die krausrippen von halsblende und passe in andersfarbigem garn stricken. wie verteilen sich die mengen dann ungefähr in größe m oder l? danke für eure hilfe!
16.11.2020 - 10:33DROPS Design answered:
Liebe Frau Bamalu, leider können wir nicht jede Anleitung nach jedem Wunsch umrechnen, wenden Sie sich bitte an Ihrem DROPS Laden, gerne wird man Ihnen dort weiterhelfen. Viel Spaß beim stricken!
16.11.2020 - 11:49
![]() Jette wrote:
Jette wrote:
Kan kun printe nogle af siderne, side 3,4,7 kommer tomme ud. Har prøvet flere gange, så mon fejlen er hos jer?
29.10.2020 - 10:24
![]() Rossetti wrote:
Rossetti wrote:
Navree d'insister mais si on tricote 7x (2 points mousse, 2 point jersey) les mailles 13 et 14 sont des poinst mousse. Et on doit ensuite roujter 2 point mousse. Il y a donc 4 points mousse consécutif. Avez-vous une solution pour ce problème ? Merci
20.10.2020 - 14:56DROPS Design answered:
Bonjour Mme Rossetti, oups, je transfère votre question à nos stylistes pour qu'elles puissent faire la correction nécessaire, désolée d'avoir mis si longtemps à saisir et merci pour votre insistance.
20.10.2020 - 16:39
![]() Rossetti wrote:
Rossetti wrote:
En me référant à votre commentaire de ce jour, il y a du coup une erreur pour le 2eme demi dos avec 4 maille point mousse consécutive (7x (2point mousse et 2 point jersey) +2 maille mousse) . Vous m'aviez expliqué différenent le 19 pour que ça convienne, mais ça ne convient toujours pas et il y a par conséquent toujours un défaut dans le dessin dans le dos. Avec vous une solution pour que cette erreur ne soit plus ? Merci de votre aide
20.10.2020 - 12:12DROPS Design answered:
Bonjour Mme Rosetti, vous tricotez 7 fois (2 m point mousse, 2 m jersey) (= on a donc bien 14 mailles), et on doit encore tricoter 2 mailles point mousse pour terminer le 2ème demi- dos et le tour. Le 1er demi- dos commence par 2 mailles jersey = le motif tombe juste. Vous terminez le tour par 2 m point mousse et le commencez par 2 m jersey. Bon tricot!
20.10.2020 - 13:21
![]() Rossetti wrote:
Rossetti wrote:
Bonjour, j'ai essayé plusieurs fois de faire le dessin mais impossible, du coup j'ai calculé le nombre de mailles : 16Jersey/mousse+1Envers+1Jersey+1Jersey +28Jersey/mousse+2Mousse+1Jersey +1Jersey +1Envers+28Jersey/mousse+2Mousse+1Envers+1Jersey+1Jersey+28Jersey/mousse+2mousse+1jersey+1jersey +1envers+14Jersey/mousse=132. Il semblerait qu'il manque 2 mailles mais je ne sais pas a quelle endroit et quel type de maille. Ou est-ce moi qui me trompe, si oui à quelle endroit? Merci
19.10.2020 - 20:27DROPS Design answered:
Bonjour Mme Rossetti, en taille S tricotez ainsi: demi-dos = (2 m jersey, 2 m point mousse) x 8, 1 m env (=marqueur-1) = 17m; épaule droite = 34 m (=1 m jersey, fil marqueur, 1 jeté, 1 m jersey, (2 m point mousse, 2 m jersey)x14, 2 m point mousse, 1 m jersey, fil marqueur, 1 jeté, 1 m jersey); fil marqueur; devant: 1 m env (= marqueur-2), (2 m point mousse, 2 m jersey)x14, 2 m point mousse, 1 m env = marqueur-3) = 32 m, épaule gauche = 34 m; Demi-dos:1 m env (marqueur), (2 m point mousse, 2 m jersey) x 7, 2 m point mousse (= 17 m) soit: 17+34+32+34+17 = 134 m. Bon tricot!
20.10.2020 - 10:30
![]() Rossetti wrote:
Rossetti wrote:
Bonjour, Je suis en train de tricoter ce modèle en S et au niveau du mi-dos je me retrouve avec 4 mailles en point mousse côte à côte ( ce qui semblerait être une rupture dans le dessin et cela ne semblerait pas centré) est-ce normal ?
18.10.2020 - 19:46DROPS Design answered:
Bonjour Mme Rossetti, en taille S, vous commencez le tour au demi-dos par 2 m jersey et terminez par le 2ème demi-dos ainsi: 1 m envers, (2 m point mousse, 2 m jersey)x 3 (=12 mailles) et 2 m point mouse (= 14 m point fantaisie). Ainsi, votre tour commence après les 2 dernières m point mousse du tour et avant les 2 premières m jersey du tour. Bon tricot!
19.10.2020 - 09:31
![]() Anna wrote:
Anna wrote:
Buongiorno. Non mi ritrovo nel conteggio della divisione delle maglie dopo aver lavorato il collo e gli aumenti. Esempio per una teglia S dovrei partire con 134 maglie. Metà destra dietro 16 maglie Spalla/Manica destra 28 Davanti 28 Spalla/Manica sinistra 28 Meta dietro sin 14 16+28+28+28+14 = 114 e non 134 come indicato (La discrepanza dei conteggi è su tutte le taglie) Grazie per l'attenzione. Cordiali saluti Anna
22.09.2020 - 17:26DROPS Design answered:
Buongiorno Anna, dopo il collo deve lavorare i paragrafi dello SPRONE esattamente come indicato e si troverà con il numero di maglie corretto. Buon lavoro!
25.09.2020 - 09:05
|
||||
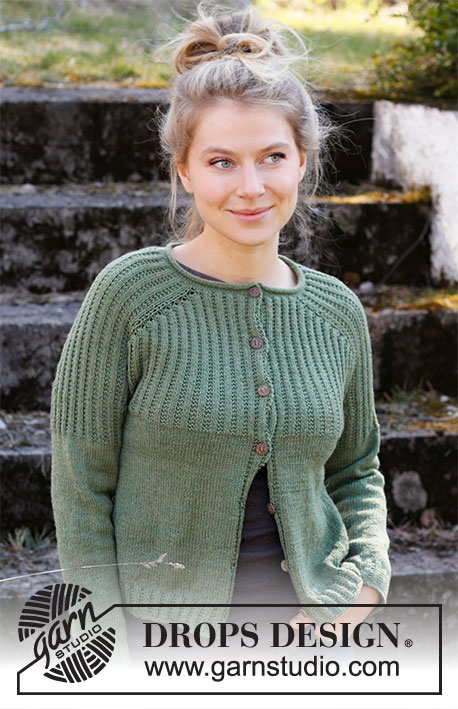
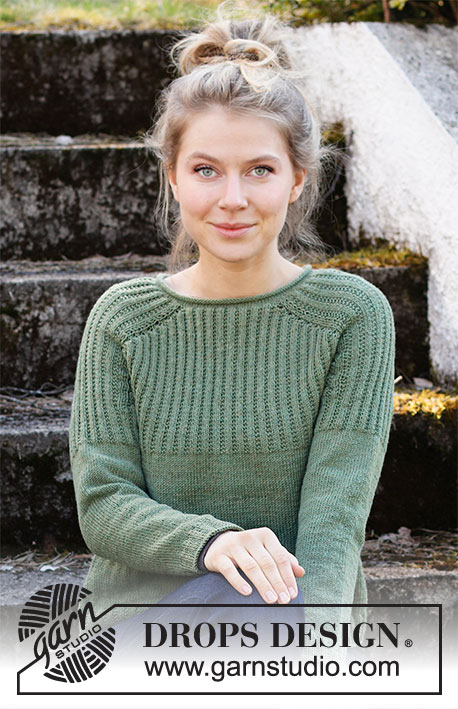
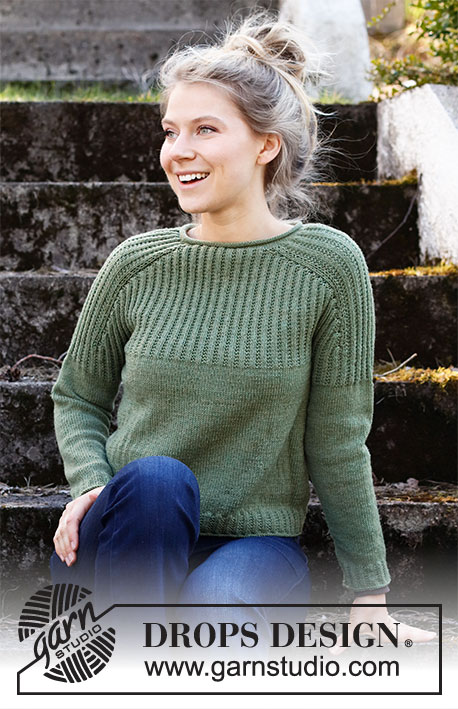
Lucky Clover Sweater#luckycloversweater |
||||
 |
 |
|||
Knitted jumper in DROPS BabyMerino. The piece is worked top down, with saddle shoulders and textured pattern. Sizes S - XXXL.
DROPS 215-9 |
||||
|
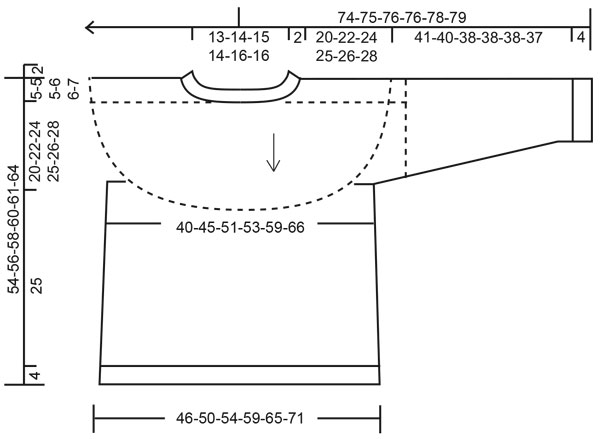
------------------------------------------------------- EXPLANATIONS FOR THE PATTERN: ------------------------------------------------------- RIDGE/GARTER STITCH (worked in the round): 1 ridge in height = 2 rounds; Knit 1 round and purl 1 round. INCREASE TIP-1 (evenly spaced): To work out how to increase evenly, count the total number of stitches on the needle (e.g. 110 stitches) and divide by the number of increases to be made (e.g. 24) = 4.58. In this example, increase by making 1 yarn over after alternately each 4th and 5th stitch. On the next round work the yarn overs twisted to avoid holes. INCREASE TIP-2: INCREASE 4 STITCHES IN MARKER-STITCHES 1 AND 3: Work 5 stitches in the purled stitch and move the marker as follows: * Purl the stitch, but do not slip it from the needle, make 1 yarn over the right needle *, work from *-* 2 times and purl the stitch 1 more time, move the marker to the last stitch worked (= 5 stitches worked in the same stitch). INCREASE 4 STITCHES IN MARKER-STITCHES 2 AND 4: Work 5 stitches in the purled stitch and move the marker as follows: Purl the stitch, move the marker to this stitch, * but do not slip it from the needle, make 1 yarn over the right needle, purl 1 stitch in the same stitch *, work from *-* 2 times (= 5 stitches worked in the same stitch). On the next round, work the stitches into the pattern; i.e. purl the marker-stitch, the remaining 4 stitches are worked into pattern with 2 stocking stitches and 2 garter stitches. The next increase is in the purled stitch (marker-stitch). Increase stitches for the front/back pieces. The number of shoulder stitches remains the same. INCREASE TIP-3 (for sides of body): Work until there are 2 stitches left before the marker thread, 1 yarn over, knit 4 (marker thread sits in the middle of these stitches), 1 yarn over. On the next round work the yarn overs twisted, to avoid holes. Then work the new stitches in stocking stitch. DECREASE TIP (for sleeves): Decrease 1 stitch on either side of the marker thread as follows: Work until there are 3 stitches left before the marker thread, knit 2 together, knit 2 (marker thread sits between these 2 stitches), slip 1 stitch as if to knit, knit 1 and pass the slipped stitch over the knitted stitch. CASTING-OFF TIP: To avoid the cast-off edge being tight you can cast off with a larger size needle. If the edge is still tight, make 1 yarn over after approx. each 4th stitch at the same time as casting off; the yarn overs are cast off as normal stitches. ------------------------------------------------------- START THE PIECE HERE: ------------------------------------------------------- JUMPER – SHORT OVERVIEW OF THE PIECE: The neck and yoke are worked in the round with circular needle, top down from mid back. The yoke is divided for body and sleeves and the body continued in the round with circular needle. The sleeves are worked in the round with double pointed needles, top down. NECK: Cast on 110-116-122-126-134-144 stitches with circular needle size 2.5 mm and BabyMerino. Work stocking stitch. When the piece measures 2 cm, increase 26-24-18-22-26-24 stitches evenly spaced on the next round – read INCREASE TIP-1 = 136-140-140-148-160-168 stitches. Work 1 round in stocking stitch. Change to circular needle size 3 mm. Insert 1 marker at the beginning of the round (= mid-back); the yoke is measured from this marker! YOKE: Now work pattern, insert 4 markers (in stitches) and 4 marker threads (between stitches) as follows: HALF BACK PIECE: Work * 2 stocking stitches, 2 garter stitches *, work from *-* over 16-16-16-16-20-20 stitches, purl 1 (insert marker 1 in this stitch; you will increase in this stitch later). RIGHT SHOULDER/SLEEVE: Work 1 stocking stitch, insert 1 marker thread (i.e. between 2 knitted stitches), 1 yarn over, 1 stocking stitch, * 2 garter stitches, 2 stocking stitches *, work from *-* over 28-28-28-32-32-36 stitches, 2 garter stitches, 1 stocking stitch, insert 1 marker thread (i.e. between 2 knitted stitches), 1 yarn over, 1 stocking stitch. FRONT PIECE: Purl 1 (insert marker 2 in this stitch; you will increase in this stitch later), * 2 garter stitches, 2 stocking stitches *, work from *-* over 28-32-32-32-36-36 stitches, 2 garter stitches, purl 1 (insert marker 3 in this stitch; you will increase in this stitch later). LEFT SHOULDER/SLEEVE: Work1 stocking stitch, insert 1 marker thread (i.e. between 2 knitted stitches), 1 yarn over, 1 stocking stitch, * 2 garter stitches, 2 stocking stitches *, work from *-* over 28-28-28-32-32-36 stitches, 2 garter stitches, 1 stocking stitch, insert 1 marker thread (i.e. between 2 knitted stitches), 1 yarn over, 1 stocking stitch. HALF BACK PIECE: Purl 1 (insert marker 4 in this stitch; you will increase in this stitch later) and work * 2 garter stitches, 2 stocking stitches *, work from *-* over 16-16-16-16-20-20 stitches and finish with 2 garter stitches. On the next round, slip the yarn overs at each marker thread off the needle; this is so the stitches before and after the increases for the saddle shoulders are not tight. Make 1 yarn over at each marker thread (between 2 knitted stitches) every 2nd round and slip the yarn overs off the needle on each subsequent round (number of stitches remains the same). Do this until the yoke is finished. Continue with stocking stitch over stocking stitch, purl over purl and garter stitch over garter stitch. On the next round, increase 4 stitches in each marker-stitch (i.e. purled stitches) – read INCREASE TIP-2 (= a total of 16 stitches increased). REMEMBER THE KNITTING TENSION! Increase like this every 2nd round a total of 0-0-3-3-4-5 times, then every 4th round a total of 6-9-9-10-11-12 times, every 6th round a total of 4-3-3-3-3-3 times and every 8th round 1 time (you have increased 11-13-16-17-19-21 times in total) = 312-348-396-420-464-504 stitches. Continue with the pattern until the piece measures 20-22-24-25-26-28 cm. Work 1 round in stocking stitch AT THE SAME TIME decrease 2-0-0-0-2-2 stitches evenly spaced. Now divide the piece for body and sleeves on the next round as follows: Knit 44-50-57-59-67-75 (= half back piece), place the next 68-74-84-92-98-102 stitches on a thread for the sleeve, cast on 8 new stitches under the sleeve, knit 86-100-114-118-132-148 (= front piece), place the next 68-74-84-92-98-102 stitches on a thread for the sleeve, cast on 8 new stitches under the sleeve, knit 44-50-57-59-67-75 (= half back piece). BODY: = 190-216-244-252-282-314 stitches. Insert 1 marker thread in the middle of the 8 stitches cast on under each sleeve. There are 94-108-122-126-140-156 stitches between marker threads on the back piece; allow the threads to follow your work onwards, they will be used when increasing in the sides. Work stocking stitch in the round. When the piece measures 5 cm from the division, increase 1 stitch on each side of both marker threads – read INCREASE TIP-3 (= 4 stitches increased). Increase like this every 2½-3-5-2-2½-3 cm a total of 7-6-4-8-7-6 times = 218-240-260-284-310-338 stitches. When the piece measures 25 cm from the division, increase 2-0-0-0-2-2 stitches evenly spaced = 220-240-260-284-312-340 stitches. Change to circular needle size 2.5 mm and work rib (= 2 garter stitches/ knit 2) over all stitches. Cast off with knit when the rib measures 4 cm – read CASTING-OFF TIP. The jumper measures approx. 54-56-58-60-61-64 cm, measured from the shoulder down. SLEEVE: Place the 68-74-84-92-98-102 stitches from the thread on the one side of the piece on double pointed needles size 3 mm and knit up 1 stitch in each of the 8 stitches cast on under the sleeve = 76-82-92-100-106-110 stitches. Insert a marker thread in the middle of the 8 stitches under the sleeve. You will later decrease on each side of this marker thread. Work pattern in the round, i.e. garter stitch over garter stitch, purl over purl and stocking stitch over stocking stitch. The new stitches under the sleeve are worked into the pattern (i.e. 2 stocking stitches, 2 garter stitches). The stitches which do not fit into this pattern, are worked in stocking stitch. When the sleeve measures 5 cm from the division continue with stocking stitch over all stitches. On the first round of this stocking stitch, decrease 2 stitches on each side of the marker thread – read DECREASE TIP. Decrease like this every cm a total of 5-5-5-6-6-7 times, then every 4-3½-2-1½-1½-1½ cm a total of 7-8-12-14-16-16 times = 52-56-58-60-62-64 stitches. When the sleeve measures 41-40-38-38-38-37 cm, increase 0-0-2-0-2-0 stitches evenly spaced = 52-56-60-60-64-64 stitches. Change to double pointed needles size 2.5 mm and work rib (knit 2, 2 garter stitches) for 4 cm. Cast off with knit. Work the other sleeve in the same way. |
||||
Diagram explanations |
||||
|
||||
 |
||||
Have you finished this pattern?Tag your pictures with #dropspattern #luckycloversweater or submit them to the #dropsfan gallery. Do you need help with this pattern?You'll find 25 tutorial videos, a Comments/Questions area and more by visiting the pattern on garnstudio.com. © 1982-2026 DROPS Design A/S. We reserve all rights. This document, including all its sub-sections, has copyrights. Read more about what you can do with our patterns at the bottom of each pattern on our site. |
||||


With over 40 years in knitting and crochet design, DROPS Design offers one of the most extensive collections of free patterns on the internet - translated to 17 languages. As of today we count 324 catalogues and 12290 patterns translated into English (UK/cm). 12290
We work hard to bring you the best knitting and crochet have to offer, inspiration and advice as well as great quality yarns at incredible prices! Would you like to use our patterns for other than personal use? You can read what you are allowed to do in the Copyright text at the bottom of all our patterns. Happy crafting!
Post a comment to pattern DROPS 215-9
We would love to hear what you have to say about this pattern!
If you want to leave a question, please make sure you select the correct category in the form below, to speed up the answering process. Required fields are marked *.