
Popular categories
Looking for a yarn?


Comments / Questions (59)
![]() Brigitte wrote:
Brigitte wrote:
Vielen Dank für die Erläuterung. Jetzt komme ich weiter.
08.12.2023 - 17:40
![]() Brigitte wrote:
Brigitte wrote:
Hallo, bei Größe S sind nach der Zunahme 136 Maschen auf der Nadel. Bei der Aufteilung der Passe 1/2 Rückenteil = 17 Maschen, rechte Schulter = 34 Maschen, Vorderteil= 32? Maschen, linke Schulter = 34 Maschen, 1/2 Rückenteil = 17 Maschen. Summe = 134 Maschen. Das Muster endet so auch in der Mitte nicht mit 2 Kraus Maschen. Was mache ich hier falsch? Herzliche Grüße Brigitte
07.12.2023 - 17:20DROPS Design answered:
Liebe Brigitte, es sind 19 Maschen für das 2. 1/2 Rückenteil am Ende der Runde: 1 Masche links, 16 Maschen (2 Maschen kraus rechts, 2 Maschen glatt rechts) und dann 2 Maschen kraus rechts. Viel Spaß beim stricken!
08.12.2023 - 08:32
![]() Andrea wrote:
Andrea wrote:
Hallo, Ihr habt CP am 31.7. geantwortet, dass bei Größe M 9x in jeder 2. Runde und 3x in jeder 4. Runde zugenommen wird. In der Anleitung steht aber 0x jede 2. Runde, 9x jede 4. und 3xjede 6. Runde. Ich bin verwirrt :-)
06.09.2023 - 14:33DROPS Design answered:
Liebe Andrea, irgendwas ist hier schief gegangen, in M werden Sie genauso wie bei der Anleitung zunehmen: in jeder 4. Runde 9 x + in jeder 6. Runde 3 Mal + in jeder 8. Runde 1 x (= 9+3+1= 13 Mal insgesamt). Viel Spaß beim stricken!
07.09.2023 - 09:31
![]() CP wrote:
CP wrote:
Hallo, laut meiner Rechnung sind es bei Größe M nach der letzten Zunahme bei der Passe 364 M statt nur 348. Kann es sein, dass da die 16 M die am Anfang zugenommen wurden vergessen wurden beim zählen? Falls die Zahl in der Anleitung nicht stimmt, hätte das ja auch Folgen für die folgenden Zahlen, z.B. für das Verhältnis der Aufteilung für Ärmel, Vorder- und Rückteil. Freue mich über eine Antwort. Ich kann keinen Feher in meiner Rechnung finden. Danke. LG CP
30.07.2023 - 09:24DROPS Design answered:
Liebe CP, es waren 140 Maschen am Anfang der Passe, dann nehmen Sie 16 Maschen insgesamt 13 Mal (9 Mal in jeder 2. Runde + 3 Mal in jeder 4. Runde + 1 Mal in jeder 8. Runde), so sind es: 140 + (13x16)=348. Viel Spaß beim stricken!
31.07.2023 - 10:47
![]() Annette wrote:
Annette wrote:
Pattern has 1 row stocking stitch BEFORE dividing body and sleeves. Body then begins and continues in Stocking Stitch. The sleeves begin in pattern- garter over garter, stocking over stocking and purl over purl for 5 cm. However the stitches picked up and on the waste yarn is the row or stocking stitch. I now have a line on the sleeves. Where did I go wrong?
18.02.2023 - 22:35DROPS Design answered:
Dear Annette, in the first row of the sleeves you work the sts from the waste yarn + knit up in the 8 stitches cast-on for the sleeve. Now, work over all stitches in the sleeve with the following pattern: 2 sts in garter stitch, 2 sts in stocking stitch. Now work 5cm with garter st over garter st and stocking st over stocking st. Happy knitting!
19.02.2023 - 19:59
![]() Kirsten Madsen wrote:
Kirsten Madsen wrote:
Hej. Hvordan undgår jeg, at der bliver et stort hul, når jeg tager 4 masker ud i en vrangmaske? På billedet ser det ikke ud som om der bliver huller. Vh Kirsten
12.02.2023 - 15:31DROPS Design answered:
Hei Kristen. Det vil nok bli et lite hull, men vil jevne seg ut ved bruk/vask. Om du ser på videoen: Hvordan tages der ud til sadelskulder ved at strikke 5 masker i samme maske, vil du se at det blir hull (store hull ved bruk at tykt garn). mvh DROPS Design
13.02.2023 - 13:30
![]() Celeste wrote:
Celeste wrote:
Grazie della risposta, mi riferisco all'inizio dello sprone, quando si inseriscono i segnapunti, ma credo che la risposta che mi avete fornito sia comunque sufficiente, dato che anche alla fine dello sprone ci sono meno maglie sul davanti rispetto al dietro. Scusate la banalità della domanda ma è la prima volta che mi cimento in un lavoro un po' più complesso con i ferri circolari. Grazie!
05.10.2022 - 09:02DROPS Design answered:
Buonasera Celeste, è corretto. può procedere seguendo il modello. Buon lavoro!
05.10.2022 - 23:18
![]() Celeste wrote:
Celeste wrote:
Buongiorno, trovo meraviglioso questo lavoro e mi sto cimentando nell'imparare nuove tecniche nelle quali non mi ero ancora avventurata, una domanda: leggendo le istruzioni per lo sprone in taglia S mi sono accorta che ci sono 36 maglie per il dietro, 36 maglie per le maniche ma solo 32 per il davanti, è possibile? Sbaglio qualcosa io?
04.10.2022 - 13:25DROPS Design answered:
Buonasera Celeste, a quale punto del modello fa riferimento? Alla fine dello sprone ci sono 88 maglie per il dietro, 68 maglie su ogni manica e 86 maglie per il davanti. Buon lavoro!
04.10.2022 - 19:43
![]() Iris Runge wrote:
Iris Runge wrote:
Was bedeutet glatt rechte Maschen glatt rechts , linke Maschen links und kraus rechte Maschen kraus rechts stricken ? Gibt es ein Video dazu ? Vielen Dank ! LG
08.09.2022 - 20:24DROPS Design answered:
Liebe Frau Runge, es bedeutet, daß die Maschen jetzt gestrickt werden, wie sie erscheinen, dh im Muster wie zuvor. Viel Spaß beim stricken!
09.09.2022 - 09:00
![]() Claudia Wiesenfeldt wrote:
Claudia Wiesenfeldt wrote:
Hallo, verstehe ich es richtig, dass bei der Passe an den Markierungsfäden in JEDER 2. Reihe ein Umschlag gearbeitet wird, (der dann wieder fallen gelassen wird), auch wenn später nur alle 4 oder 6 oder 8 Reihen zugenommen wird.? Oder Umschlag nur in den Reihen vor der nächsten Zunahme?
03.07.2022 - 14:51DROPS Design answered:
Liebe Frau Wiesenfeldt, bei jeder 2. Runde werden Sie 1 Umschlag am jeder Markierung machen, aber diese Umschläge lassen Sie bei der nächsten Runde fallen, diese Umschläge sind keine Zunahmen, sie helfen nur, die Arbeit nicht zu eng zu sein. Es wird bei der Passe wie unter ZUNAHMETIPP-2 in jeder 2. ; 4.; 6. und/oder 8. Runde zugenommen. Viel Spaß beim stricken!
04.07.2022 - 08:15
|
||||
Lucky Clover Sweater#luckycloversweater |
||||
 |
 |
|||
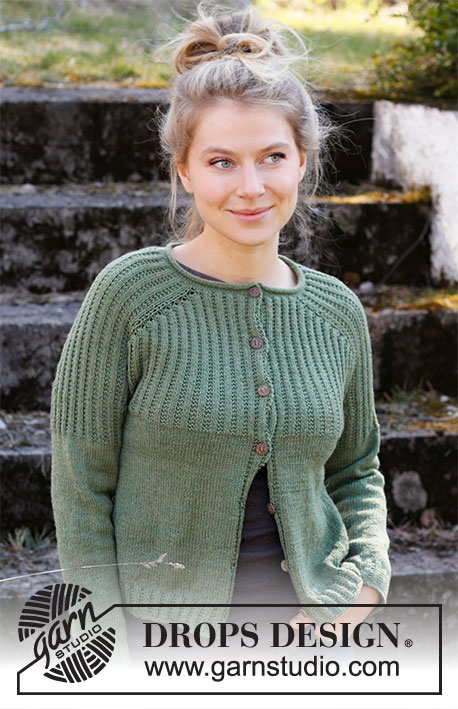
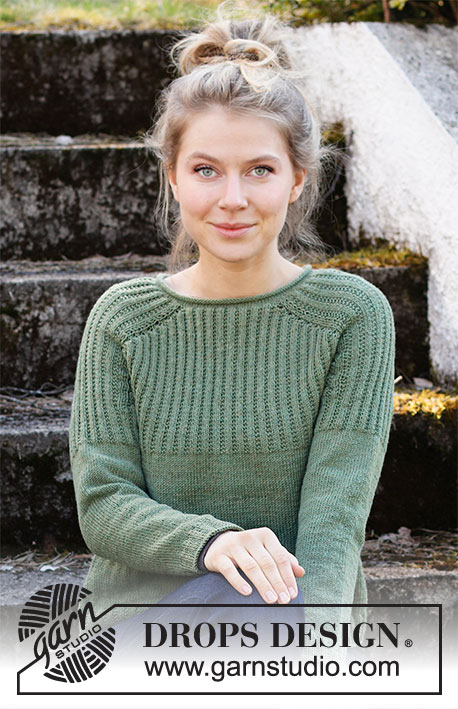
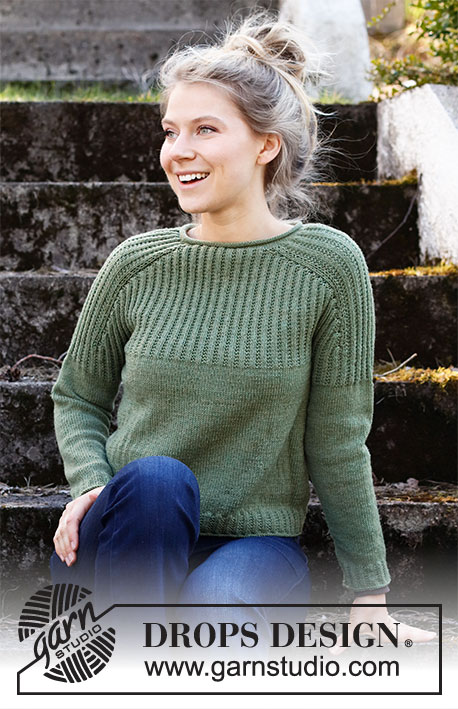
Knitted jumper in DROPS BabyMerino. The piece is worked top down, with saddle shoulders and textured pattern. Sizes S - XXXL.
DROPS 215-9 |
||||
|
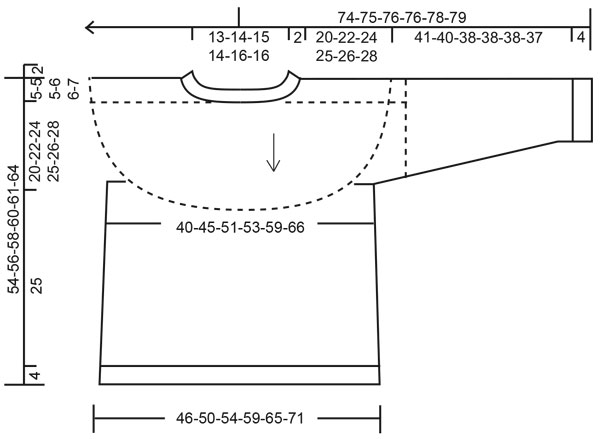
------------------------------------------------------- EXPLANATIONS FOR THE PATTERN: ------------------------------------------------------- RIDGE/GARTER STITCH (worked in the round): 1 ridge in height = 2 rounds; Knit 1 round and purl 1 round. INCREASE TIP-1 (evenly spaced): To work out how to increase evenly, count the total number of stitches on the needle (e.g. 110 stitches) and divide by the number of increases to be made (e.g. 24) = 4.58. In this example, increase by making 1 yarn over after alternately each 4th and 5th stitch. On the next round work the yarn overs twisted to avoid holes. INCREASE TIP-2: INCREASE 4 STITCHES IN MARKER-STITCHES 1 AND 3: Work 5 stitches in the purled stitch and move the marker as follows: * Purl the stitch, but do not slip it from the needle, make 1 yarn over the right needle *, work from *-* 2 times and purl the stitch 1 more time, move the marker to the last stitch worked (= 5 stitches worked in the same stitch). INCREASE 4 STITCHES IN MARKER-STITCHES 2 AND 4: Work 5 stitches in the purled stitch and move the marker as follows: Purl the stitch, move the marker to this stitch, * but do not slip it from the needle, make 1 yarn over the right needle, purl 1 stitch in the same stitch *, work from *-* 2 times (= 5 stitches worked in the same stitch). On the next round, work the stitches into the pattern; i.e. purl the marker-stitch, the remaining 4 stitches are worked into pattern with 2 stocking stitches and 2 garter stitches. The next increase is in the purled stitch (marker-stitch). Increase stitches for the front/back pieces. The number of shoulder stitches remains the same. INCREASE TIP-3 (for sides of body): Work until there are 2 stitches left before the marker thread, 1 yarn over, knit 4 (marker thread sits in the middle of these stitches), 1 yarn over. On the next round work the yarn overs twisted, to avoid holes. Then work the new stitches in stocking stitch. DECREASE TIP (for sleeves): Decrease 1 stitch on either side of the marker thread as follows: Work until there are 3 stitches left before the marker thread, knit 2 together, knit 2 (marker thread sits between these 2 stitches), slip 1 stitch as if to knit, knit 1 and pass the slipped stitch over the knitted stitch. CASTING-OFF TIP: To avoid the cast-off edge being tight you can cast off with a larger size needle. If the edge is still tight, make 1 yarn over after approx. each 4th stitch at the same time as casting off; the yarn overs are cast off as normal stitches. ------------------------------------------------------- START THE PIECE HERE: ------------------------------------------------------- JUMPER – SHORT OVERVIEW OF THE PIECE: The neck and yoke are worked in the round with circular needle, top down from mid back. The yoke is divided for body and sleeves and the body continued in the round with circular needle. The sleeves are worked in the round with double pointed needles, top down. NECK: Cast on 110-116-122-126-134-144 stitches with circular needle size 2.5 mm and BabyMerino. Work stocking stitch. When the piece measures 2 cm, increase 26-24-18-22-26-24 stitches evenly spaced on the next round – read INCREASE TIP-1 = 136-140-140-148-160-168 stitches. Work 1 round in stocking stitch. Change to circular needle size 3 mm. Insert 1 marker at the beginning of the round (= mid-back); the yoke is measured from this marker! YOKE: Now work pattern, insert 4 markers (in stitches) and 4 marker threads (between stitches) as follows: HALF BACK PIECE: Work * 2 stocking stitches, 2 garter stitches *, work from *-* over 16-16-16-16-20-20 stitches, purl 1 (insert marker 1 in this stitch; you will increase in this stitch later). RIGHT SHOULDER/SLEEVE: Work 1 stocking stitch, insert 1 marker thread (i.e. between 2 knitted stitches), 1 yarn over, 1 stocking stitch, * 2 garter stitches, 2 stocking stitches *, work from *-* over 28-28-28-32-32-36 stitches, 2 garter stitches, 1 stocking stitch, insert 1 marker thread (i.e. between 2 knitted stitches), 1 yarn over, 1 stocking stitch. FRONT PIECE: Purl 1 (insert marker 2 in this stitch; you will increase in this stitch later), * 2 garter stitches, 2 stocking stitches *, work from *-* over 28-32-32-32-36-36 stitches, 2 garter stitches, purl 1 (insert marker 3 in this stitch; you will increase in this stitch later). LEFT SHOULDER/SLEEVE: Work1 stocking stitch, insert 1 marker thread (i.e. between 2 knitted stitches), 1 yarn over, 1 stocking stitch, * 2 garter stitches, 2 stocking stitches *, work from *-* over 28-28-28-32-32-36 stitches, 2 garter stitches, 1 stocking stitch, insert 1 marker thread (i.e. between 2 knitted stitches), 1 yarn over, 1 stocking stitch. HALF BACK PIECE: Purl 1 (insert marker 4 in this stitch; you will increase in this stitch later) and work * 2 garter stitches, 2 stocking stitches *, work from *-* over 16-16-16-16-20-20 stitches and finish with 2 garter stitches. On the next round, slip the yarn overs at each marker thread off the needle; this is so the stitches before and after the increases for the saddle shoulders are not tight. Make 1 yarn over at each marker thread (between 2 knitted stitches) every 2nd round and slip the yarn overs off the needle on each subsequent round (number of stitches remains the same). Do this until the yoke is finished. Continue with stocking stitch over stocking stitch, purl over purl and garter stitch over garter stitch. On the next round, increase 4 stitches in each marker-stitch (i.e. purled stitches) – read INCREASE TIP-2 (= a total of 16 stitches increased). REMEMBER THE KNITTING TENSION! Increase like this every 2nd round a total of 0-0-3-3-4-5 times, then every 4th round a total of 6-9-9-10-11-12 times, every 6th round a total of 4-3-3-3-3-3 times and every 8th round 1 time (you have increased 11-13-16-17-19-21 times in total) = 312-348-396-420-464-504 stitches. Continue with the pattern until the piece measures 20-22-24-25-26-28 cm. Work 1 round in stocking stitch AT THE SAME TIME decrease 2-0-0-0-2-2 stitches evenly spaced. Now divide the piece for body and sleeves on the next round as follows: Knit 44-50-57-59-67-75 (= half back piece), place the next 68-74-84-92-98-102 stitches on a thread for the sleeve, cast on 8 new stitches under the sleeve, knit 86-100-114-118-132-148 (= front piece), place the next 68-74-84-92-98-102 stitches on a thread for the sleeve, cast on 8 new stitches under the sleeve, knit 44-50-57-59-67-75 (= half back piece). BODY: = 190-216-244-252-282-314 stitches. Insert 1 marker thread in the middle of the 8 stitches cast on under each sleeve. There are 94-108-122-126-140-156 stitches between marker threads on the back piece; allow the threads to follow your work onwards, they will be used when increasing in the sides. Work stocking stitch in the round. When the piece measures 5 cm from the division, increase 1 stitch on each side of both marker threads – read INCREASE TIP-3 (= 4 stitches increased). Increase like this every 2½-3-5-2-2½-3 cm a total of 7-6-4-8-7-6 times = 218-240-260-284-310-338 stitches. When the piece measures 25 cm from the division, increase 2-0-0-0-2-2 stitches evenly spaced = 220-240-260-284-312-340 stitches. Change to circular needle size 2.5 mm and work rib (= 2 garter stitches/ knit 2) over all stitches. Cast off with knit when the rib measures 4 cm – read CASTING-OFF TIP. The jumper measures approx. 54-56-58-60-61-64 cm, measured from the shoulder down. SLEEVE: Place the 68-74-84-92-98-102 stitches from the thread on the one side of the piece on double pointed needles size 3 mm and knit up 1 stitch in each of the 8 stitches cast on under the sleeve = 76-82-92-100-106-110 stitches. Insert a marker thread in the middle of the 8 stitches under the sleeve. You will later decrease on each side of this marker thread. Work pattern in the round, i.e. garter stitch over garter stitch, purl over purl and stocking stitch over stocking stitch. The new stitches under the sleeve are worked into the pattern (i.e. 2 stocking stitches, 2 garter stitches). The stitches which do not fit into this pattern, are worked in stocking stitch. When the sleeve measures 5 cm from the division continue with stocking stitch over all stitches. On the first round of this stocking stitch, decrease 2 stitches on each side of the marker thread – read DECREASE TIP. Decrease like this every cm a total of 5-5-5-6-6-7 times, then every 4-3½-2-1½-1½-1½ cm a total of 7-8-12-14-16-16 times = 52-56-58-60-62-64 stitches. When the sleeve measures 41-40-38-38-38-37 cm, increase 0-0-2-0-2-0 stitches evenly spaced = 52-56-60-60-64-64 stitches. Change to double pointed needles size 2.5 mm and work rib (knit 2, 2 garter stitches) for 4 cm. Cast off with knit. Work the other sleeve in the same way. |
||||
Diagram explanations |
||||
|
||||
 |
||||
Have you finished this pattern?Tag your pictures with #dropspattern #luckycloversweater or submit them to the #dropsfan gallery. Do you need help with this pattern?You'll find 25 tutorial videos, a Comments/Questions area and more by visiting the pattern on garnstudio.com. © 1982-2026 DROPS Design A/S. We reserve all rights. This document, including all its sub-sections, has copyrights. Read more about what you can do with our patterns at the bottom of each pattern on our site. |
||||


With over 40 years in knitting and crochet design, DROPS Design offers one of the most extensive collections of free patterns on the internet - translated to 17 languages. As of today we count 324 catalogues and 12290 patterns translated into English (UK/cm). 12290
We work hard to bring you the best knitting and crochet have to offer, inspiration and advice as well as great quality yarns at incredible prices! Would you like to use our patterns for other than personal use? You can read what you are allowed to do in the Copyright text at the bottom of all our patterns. Happy crafting!
Post a comment to pattern DROPS 215-9
We would love to hear what you have to say about this pattern!
If you want to leave a question, please make sure you select the correct category in the form below, to speed up the answering process. Required fields are marked *.