Comments / Questions (15)
![]() Lise wrote:
Lise wrote:
Hej Drops, jeg er også i tvivl om diagrammet. Er alle pinde tegnet ind i det? Jeg synes, at trøjen på fotografierne har et andet mønster, end det jeg får, når jeg følger diagrammet. Venlig hilsen Lise
28.08.2020 - 16:55DROPS Design answered:
Hei Lise. Diagrammet er oversendt til desigh avd. slik at de kan komme med en evnt rettelse. mvh DROPS design
31.08.2020 - 15:02
![]() Gunilla Nordlander wrote:
Gunilla Nordlander wrote:
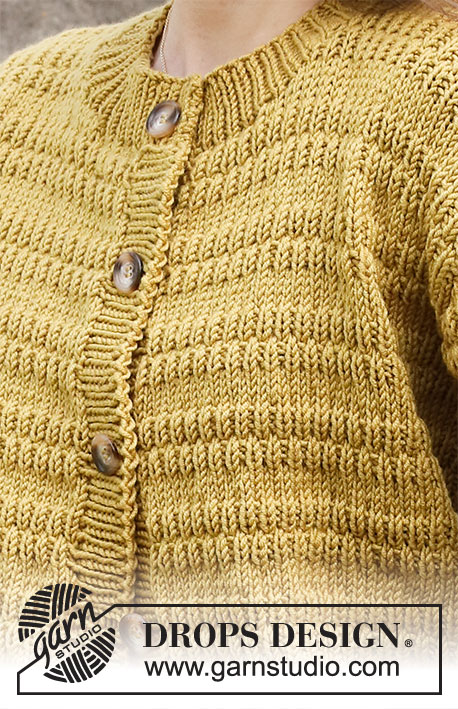
Vet inte om jag tyder mönsterdiagrammet A1 helt fel. Men jag tycker inte det stämmer överens med hur det ser ut på bilden av koftan. Om jag skulle sticka efter diagrammet skulle jag sticka 4v slätstickning, 2 v rät/avig, 1 v slätstickning, 2v rät/avig, 5v slätstickning. Börjar jag sedan om igen på diagrammet skulle det bli 9v slätstickning. På bilden tycker jag att det ser ut som 5v slätstickning, 3v rät/avig, 1v slätstickning, 3v rät/ avig.
21.08.2020 - 16:12
![]() Silke wrote:
Silke wrote:
Schlicht und doch interessant
06.06.2020 - 14:21
![]() Heidi Nielsen wrote:
Heidi Nielsen wrote:
Vintage Cardiganen minder mig om 40`ernes England på landet så jeg synes den skal hedde : Vintage
05.06.2020 - 18:07
![]() Carolina Björkman wrote:
Carolina Björkman wrote:
Spännande mönster och härlig färg
04.06.2020 - 15:46
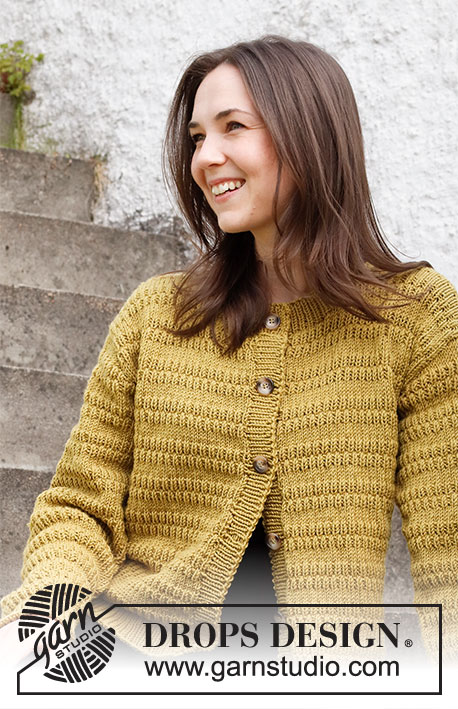
Mustard Seeds Cardigan#mustardseedscardigan |
|||||||
 |
 |
||||||
Knitted jacket in DROPS Merino Extra Fine. The piece is worked with textured pattern. Sizes S - XXXL.
DROPS 215-17 |
|||||||
|
------------------------------------------------------- EXPLANATIONS FOR THE PATTERN: ------------------------------------------------------- RIDGE/GARTER STITCH (worked back and forth): Knit all rows. 1 ridge in height = Knit 2 rows. PATTERN: See diagram A.1. DECREASE TIP (evenly spaced): To work out how to decrease evenly, count the total number of stitches on the needle (e.g. 111 stitches) minus the edge stitches (e.g. 2 stitches) and divide the remaining stitches by the number of decreases to be made (e.g. 17) = 6.4. In this example decrease by knitting together alternately each 5th and 6th stitch and each 6th and 7th stitch (approx.). INCREASE TIP (for sleeves): Work until there are 3 stitches left before the marker thread, 1 yarn over, knit 6 (marker thread sits between these 6 stitches), 1 yarn over. On the next round work the yarn overs twisted to avoid holes. Then work the new stitches into the pattern. BUTTONHOLES: Work buttonholes on the right band (when the garment is worn). Work 5-5-5-6-6-6 buttonholes on the band and 1 buttonhole on the neck 1 buttonhole = Knit 2 together and 1 yarn over; on the next row (wrong side) knit the yarn over to leave a hole. The bottom buttonhole is approx. 3 cm from the bottom edge and the next to top buttonhole 7 cm from the neck. The other 3-3-3-4-4-4 buttonholes are spaced out evenly in-between. The top buttonhole is then worked on the neck. ------------------------------------------------------- START THE PIECE HERE: ------------------------------------------------------- JACKET – SHORT OVERVIEW OF THE PIECE: The back and front pieces are worked separately, back and forth and then sewn together. The sleeves are worked in the round with short circular needle/double pointed needles. The bands and neck are worked to finish. BACK PIECE: Cast on 111-121-129-141-155-171 stitches (including 1 edge stitch on each side) with circular needle size 3.5 mm and Merino Extra Fine. Purl 1 row from the wrong side. The next row is worked as follows from the right side: 1 edge stitch in GARTER STITCH – read description above, * knit 1, purl 1 *, work from *-* until there are 2 stitches left, knit 1 and 1 edge stitch in garter stitch. Work this rib for 4 cm. When the rib is finished knit 1 row from the right side and decrease 17-19-19-21-23-27 stitches evenly spaced – read DECREASE TIP = 94-102-110-120-132-144 stitches. Purl 1 row from the wrong side with 1 edge stitch in garter stitch on each side. Change to circular needle size 4.5 mm. Now work pattern A.1 with 1 edge stitch in garter stitch on each side. REMEMBER THE KNITTING TENSION! When A.1 has been completed in height, repeat this diagram. Continue until the piece measures 33-34-35-36-37-38 cm. Now cast off stitches for the armholes at the beginning of each row on both sides as follows: Cast off 3 stitches 1 time, 2 stitches 1-2-2-3-4-5 times and 1 stitch 0-0-2-3-5-7 times = 84-88-92-96-100-104 stitches. Continue with the pattern until the piece measures 52-54-56-58-60-62 cm. Now place the middle 30-32-34-34-36-36 stitches on a thread for the neck and each shoulder is finished separately. Cast off 1 stitch on the next row from the neck = 26-27-28-30-31-33 stitches. Work until the piece measures 54-56-58-60-62-64 cm (= 21-22-23-24-25-26 cm from the bottom of the armholes), cast off. Work the other shoulder in the same way. RIGHT FRONT PIECE: Cast on 58-62-68-74-80-88 stitches (including 1 edge stitch on each side) with circular needle size 3.5 mm and Merino Extra Fine. Purl 1 row from the wrong side. The next row is worked as follows from the right side: Work 1 edge stitch in garter stitch, * knit 1, purl 1 *, work from *-* until there is 1 stitch left, 1 edge stitch in garter stitch. Work this rib for 4 cm. When the rib is finished knit 1 row from the right side and decrease 9-10-12-13-13-15 stitches evenly spaced = 49-52-56-61-67-73 stitches. Purl 1 row from the wrong side with 1 edge stitch in garter stitch on each side. Change to circular needle size 4.5 mm and work A.1 with 1 edge stitch in garter stitch on each side. When A.1 has been completed in height, repeat this diagram. Continue until the piece measures 33-34-35-36-37-38 cm. Now cast off stitches for the armhole at the beginning of each row from the wrong side as follows: Cast off 3 stitches 1 time, 2 stitches 1-2-2-3-4-5 times and 1 stitch 0-0-2-3-5-7 times = 44-45-47-49-51-53 stitches. When the piece measures 46-48-50-52-54-56 cm, work the next row from the right side as follows: Work the first 14-14-15-15-16-16 stitches as before and place these stitches on a thread for the neck, work the rest of the stitches as before. Continue the pattern and cast off stitches on each row from the neck as follows: Cast off 2 stitches 1 time and 1 stitch 2 times = 26-27-28-30-31-33 stitches. Continue working until the piece measures 54-56-58-60-62-64 cm (= 21-22-23-24-25-26 cm from the bottom of the armholes) – adjust to match the back piece, cast off. LEFT FRONT PIECE: Cast on 58-62-68-74-80-88 stitches (including 1 edge stitch on each side) with circular needle size 3.5 mm and Merino Extra Fine. Purl 1 row from the wrong side. The next row is worked as follows from the right side: Work 1 edge stitch in garter stitch, * purl 1, knit 1 *, work from *-* until there is 1 stitch left, 1 edge stitch in garter stitch. Work this rib for 4 cm. Continue as for the right front piece but cast off for the armhole at the beginning of a row from the right side and place stitches on a thread for the neck and then cast off at the beginning of rows from the wrong side. SLEEVE: Cast on 60-62-64-66-68-70 stitches double pointed needles size 3.5 mm. Knit 1 round, then work rib (knit 1, purl 1) in the round for 4 cm. Knit 1 round where you decrease 8 stitches evenly spaced = 52-54-56-58-60-62 stitches. Change to double pointed needles size 4.5 mm. Knit 1 more round. Insert a marker thread at the beginning of the round (= mid under the sleeve). Work A.1 in the round. When the piece measures 8 cm from the cast-on edge, begin to increase under the sleeve – read INCREASE TIP. Increase like this every 3-2½-2-2-1½-1 cm a total of 11-12-13-14-17-22 times = 74-78-82-86-94-106 stitches. When the sleeve measures 45-44-43-43-42-41 cm, cast off the middle 6 stitches under the sleeve for the armhole. Work the sleeve cap as follows: Continue the pattern back and forth and cast off stitches on each side as follows: Cast off 2 stitches 3-3-4-4-4-4 times and 1 stitch 1-1-1-1-2-3 times, then cast off 2 stitches on each side until the piece measures 51-51-51-51-51-51 cm. Cast off 3 stitches on each side, then cast off the remaining stitches. The sleeve measures approx. 52-52-52-52-52-52 cm. Work the other sleeve in the same way. ASSEMBLY: Sew the shoulder seams with grafting stitches inside the cast-off edge. Sew the sleeves to the body and sew the side seams. BANDS Right band: Start from the right side at the bottom of the right front piece and with circular needle size 3.5 mm. Knit up 109 to 135 stitches (number of stitches divisible by 2 + 1) inside the 1 edge stitch. Work rib as follows (row 1 = wrong side): 1 edge stitch in garter stitch, * purl 1, knit 1 *, work from *-* until there are 2 stitches left, purl 1 and 1 edge stitch in garter stitch. When the band measures 1½ cm, work the BUTTONHOLES – read description above. Continue working until the rib measures 3 cm. Loosely cast off with knit over knit and purl over purl. Left band: Start from the right side at the top of the left front piece and with circular needle size 3.5 mm and Merino Extra Fine. Knit up 109 to 135 stitches (number of stitches divisible by 2 + 1) inside the 1 edge stitch. Work rib as follows (row 1 = wrong side): 1 edge stitch in garter stitch, * purl 1, knit 1 *, work from *-* until there are 2 stitches left, purl 1 and 1 edge stitch in garter stitch. Continue the rib until the band measures 3 cm. Loosely cast off with knit over knit and purl over purl. NECK: Start from the right side with circular needle size 3.5 mm and knit up 115 to 129 stitches around the neck (including 8 stitches over each band and the stitches from both threads; number of stitches divisible by 2 + 1). Work rib back and forth as follows (row 1 = wrong side): 1 edge stitch in garter stitch, * purl 1, knit 1 *, work from *-* until there are 2 stitches left, purl 1 and 1 edge stitch in garter stitch. When the neck measures 1½ cm, work a buttonhole as follows – from the right side: Work 4 stitches, knit 2 together, 1 yarn over. On the next row knit the yarn over to leave a hole. Continue until the rib measures 4 cm. Cast off with knit over knit and purl over purl. ASSEMBLY-2: Sew the buttons onto the left band |
|||||||
Diagram explanations |
|||||||
|
|||||||
 |
|||||||
Have you finished this pattern?Tag your pictures with #dropspattern #mustardseedscardigan or submit them to the #dropsfan gallery. Do you need help with this pattern?You'll find 27 tutorial videos, a Comments/Questions area and more by visiting the pattern on garnstudio.com. © 1982-2025 DROPS Design A/S. We reserve all rights. This document, including all its sub-sections, has copyrights. Read more about what you can do with our patterns at the bottom of each pattern on our site. |
|||||||


Post a comment to pattern DROPS 215-17
We would love to hear what you have to say about this pattern!
If you want to leave a question, please make sure you select the correct category in the form below, to speed up the answering process. Required fields are marked *.