
Popular categories
Looking for a yarn?


Comments / Questions (29)
![]() Elizabeth wrote:
Elizabeth wrote:
Hello, I am making a large sweater. I just divided the sweater and put the sleeves on a thread. Now I am on the part where I have to insert a marker thread at 59 stitches from each side (=sides of body). Just to confirm, I start counting at the band stitches, which consist of 7 stitches, correct? My apologies for the question. I did start counting at the band stitches and I have 105 stitches in the middle. I just am asking for some confirmation.
25.08.2025 - 07:31DROPS Design answered:
Dear Elizabeth, that's correct, all stitches are taken into account. "Insert 1 marker thread 59 stitches in from each side (= sides of body). There are 105 stitches between marker threads on the back piece." Since you have 223 stitches, you have 59 + 59, on each side and 105 in the middle = 223 stitches. Happy knitting!
25.08.2025 - 12:56
![]() Mme Bevini Mo'ique wrote:
Mme Bevini Mo'ique wrote:
Je voudrais réaliser le modele 213-21 mais je ne comprends pas le diagramme .vous dites A1 et A2 six mailles .pour moi je compte 2 envers 1jetee 1endroit 1jetee 2envers soit 7 mailles .Ou est l erreur? Merci pour le retour
14.08.2025 - 17:21DROPS Design answered:
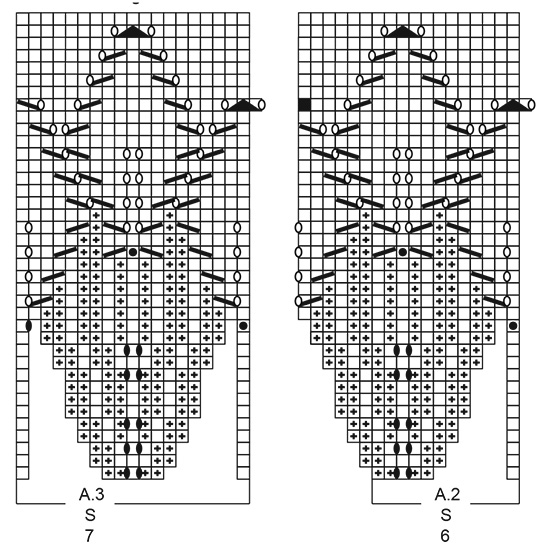
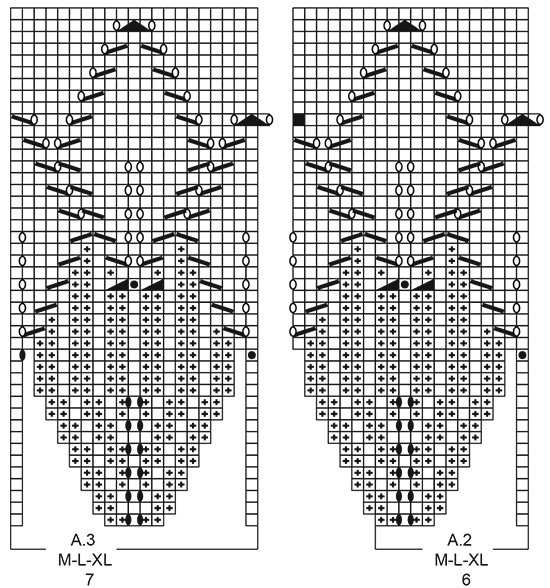
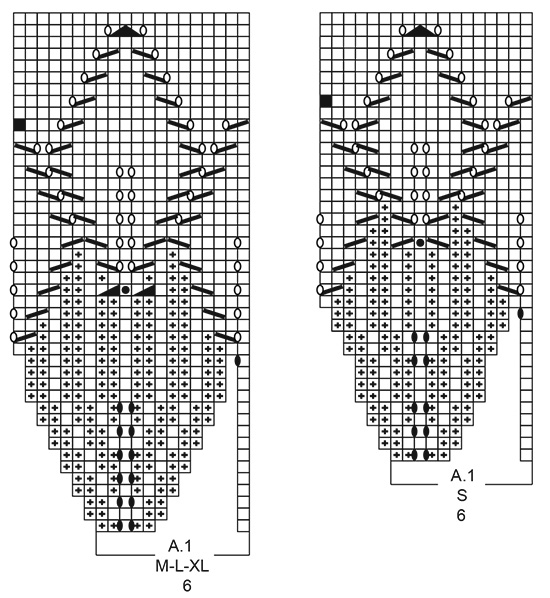
Bonjour Mme Bevini, le 1er rang de A.1 se tricote sur 6 mailles, car il commence par la maille endroit à droite du diagramme (cf encadré sous le diagramme), et, à la fin du 1er rang, on a augmenté 2 mailles, soit: 1 m end, 2 m env, (1 jeté), 1 m end, (1 jeté), 2 m env =1+2+1+2=6(+2 jetés)= on a 8 m dans A.1 et chaque A.2 après ce 1er rang. Bon tricot!
15.08.2025 - 07:39
![]() Elizabeth wrote:
Elizabeth wrote:
Hello again, When I work the wrong side of the chart, do I complete the increases that flank the center stitch? Or, is that just for the right side? Thanks you!
15.06.2025 - 06:26DROPS Design answered:
Dear Elizabeth, you work the charts as shown; in the wrong side rows of the charts there are no increases so the increases are only worked on the right side. Happy knitting!
15.06.2025 - 23:56
![]() Elizabeth Hughart wrote:
Elizabeth Hughart wrote:
How should yarn overs be worked on the wrong side of the chart? Should they be worked as knit or purl stitches? In the pattern instructions it says that when increases are done, on the purl side, to twist the yarn so that no holes are visible. But these instructions were for increases not necessarily related to the chart pattern. Please advise.
12.06.2025 - 06:12DROPS Design answered:
Dear Mrs Hughart, the black ovals should be worked twisted to avoid holes, either purled or knitted - just work them as shown in diagram, remember to read diagrams from the left towards the right from WS. Happy knitting!
12.06.2025 - 09:35
![]() Elizabeth Hughart wrote:
Elizabeth Hughart wrote:
Are the 7 band stitches included in the cast-on amounts or are they added to them? I'm making size large, so I would cast on 117 stitches, correct? I would not cast on 117 + 7, correct?
03.06.2025 - 06:15DROPS Design answered:
Hi Elizabeth, That is correct, the band stitches are included, so you cast on a total of 117 stitches. Regards, Drops Team.
03.06.2025 - 06:34
![]() LB wrote:
LB wrote:
This pattern is not good. I have knitted the yoke with the right gauge and size and it is far too large! Looks like a sack. Too bad, the lace pattern is beautiful.
29.03.2025 - 01:27
![]() Ramona wrote:
Ramona wrote:
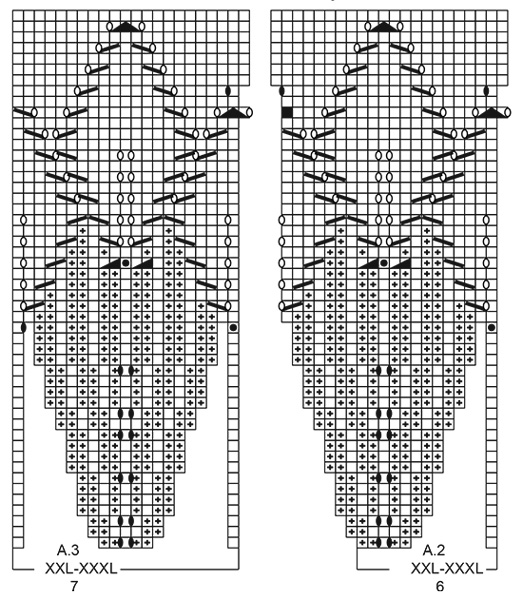
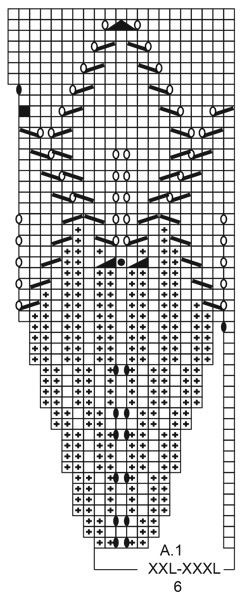
In Reihe 15 werden mehrmals bei A 2 + A3 aus 1 Masche 3 rechte Maschen gestrickt, in der folgenden Reihe sind jedoch nur 2 gezeichnet. Wie wird das gemacht? Lg
20.07.2024 - 18:50DROPS Design answered:
Liebe Ramona, die zweite zugenommene Masche (d.h. die 3. Masche der 3 rechten Maschen) ist im Diagramm auf der anderen Seite eingezeichnet - dadurch, dass die Diagramme in der Reihe fortlaufend wiederholt werden, ergeben sich dann für die 2 Zunahmen auch an der richtigen Stelle zwei zugenommene Maschen. Viel Spaß beim Stricken!
23.07.2024 - 00:14
![]() MUSSIER FRANCOISE wrote:
MUSSIER FRANCOISE wrote:
Merci pour la rapidité et la clarté de votre réponse
22.05.2024 - 18:59
![]() MUSSIER FRANCOISE wrote:
MUSSIER FRANCOISE wrote:
Bonjour je suis arrivée au rang 35 de A1 je ne comprends pas comment traiter la dernière maille (20éme) et comment je débute A2 merci pour vos explications slts 22/05/24
22.05.2024 - 14:00DROPS Design answered:
Bonjour Mme Mussier, la dernière maille de A.1 va se tricoter avec les 2 premières mailles de A.2, autrement dit, lorsqu'il reste 1 maille de A.1, commencez A.2: 1 jeté (= c'est maintenant la dernière maille de A.1), glissez 1 m à l'end (la dernière m de A.1), tricotez 2 m ens à l'end (les 2 premières m de A.2) et passez la m glissée par-dessus la m tricotée (= 1ère m de A.2), faites 1 jeté; continuez ainsi à chaque A.2, et vous tricoterez la dernière maille du dernier A.2 avec les 2 premières mailles de A.3 de la même façon. Bon tricot!
22.05.2024 - 14:07
![]() Jacqueline wrote:
Jacqueline wrote:
Bonjour et merci pour vos magnifiques modèles je viens seulement de comprendre que c'est A2 qu'il faut répété 14fois et un A 1 au début et A 3 à la fin je suis longue a la détente 😂
05.09.2023 - 11:15
|
|||||||||||||||||||||||||||||||
Lavender Charm#lavendercharmcardi |
|||||||||||||||||||||||||||||||
 |
 |
||||||||||||||||||||||||||||||
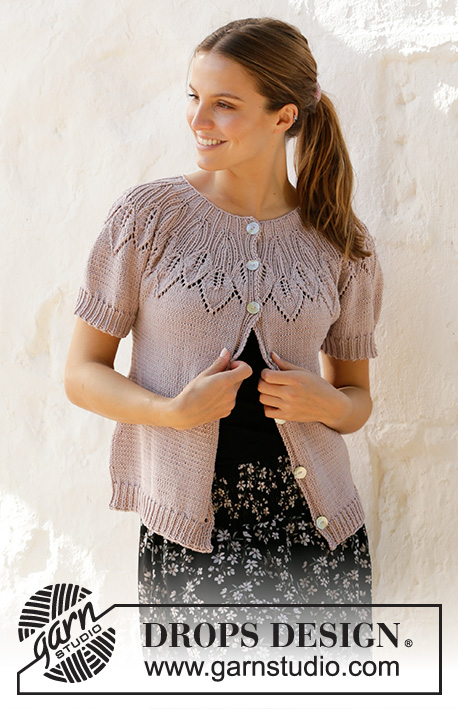
Knitted jacket with round yoke in DROPS Muskat. The piece is worked top down with short sleeves, leaf pattern and lace pattern. Sizes S - XXXL.
DROPS 213-21 |
|||||||||||||||||||||||||||||||
|
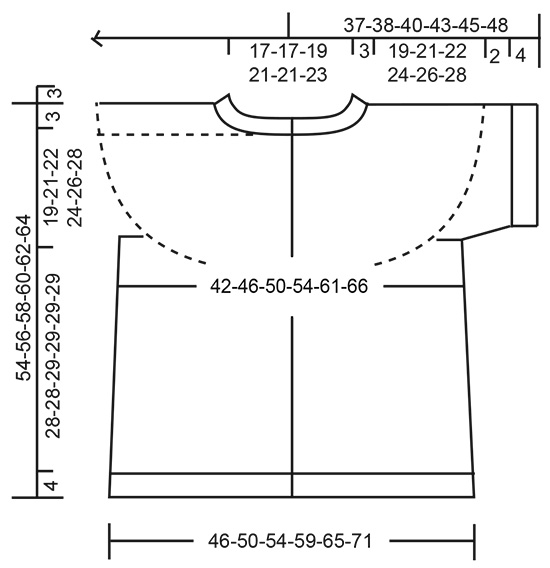
------------------------------------------------------- EXPLANATIONS FOR THE PATTERN: ------------------------------------------------------- RIDGE/GARTER STITCH (worked back and forth): Knit all rows. 1 ridge in height = Knit 2 rows. PATTERN: See diagrams A.1 to A.3. Choose diagram for your size. The diagrams show all rows in the pattern seen from the right side. INCREASE TIP (for sides of body): All increases are worked from the right side! Work until there are 2 stitches left before the marker thread, make 1 yarn over, knit 4 (marker thread sits between these 4 stitches) make 1 yarn over. On the next row purl the yarn overs twisted to avoid holes. Then work the new stitches in stocking stitch. CASTING-OFF TIP: To avoid the cast-off edge being tight you can cast off with a larger size needle. If the edge is still tight, make 1 yarn over after approx. each 4th stitch at the same time as casting off and the yarn overs are cast off as normal stitches. BUTTONHOLES: Work buttonholes on the right band (when the garment is worn). Work from the right side when there are 6 stitches left on the row as follows: Make 1 yarn over, knit 2 together and work the last 4 stitches as before. On the next row purl the yarn over to leave a hole. The first buttonhole is worked when the rib on the neck measures approx. 1½-2 cm. Then work the other 6-6-6-6-7-7 buttonholes with approx. 7½-7½-8-8½-7½-7½ cm between each one. ------------------------------------------------------- START THE PIECE HERE: ------------------------------------------------------- JACKET – SHORT OVERVIEW OF THE PIECE. The neck and yoke are worked back and forth with circular needle, from mid front and top down. The yoke is divided for body and sleeve-edges and the body continued back and forth with circular needle. The sleeve-edges are worked in the round with double pointed needles, top down. NECK: Cast on 111-111-117-129-129-135 stitches (including 7 band stitches on each side towards mid front) with circular needle size 3 mm and Muskat. Purl 1 row (= wrong side). The next row is worked as follows from the right side: Work 1 stitch in GARTER STITCH – see description above, knit 1, * purl 2, knit 1 *, work from *-* until there are 4 stitches left, purl 2, knit 1 and 1 stitch in garter stitch. Work the BUTTONHOLE – read description above. When the piece measures 3 cm, change to circular needle size 4 mm. Insert 1 marker after the band at the beginning of the row; the yoke will be measured from this marker! YOKE: Work as follows from the right side: 1 stitch in garter stitch, knit 1, purl 2, knit 1, purl 2 (= band), A.1 (= 6 stitches), A.2 (= 6 stitches) until there are 14 stitches left on the row (= 14-14-15-17-17-18 times in width), A.3 (= 7 stitches) and then purl 2, knit 1, purl 2, knit 1 and 1 stitch in garter stitch (band). REMEMBER THE KNITTING TENSION! When A.1 to A.3 have been worked 1 time in height there are 303-335-355-395-431-453 stitches on the needle. The piece measures approx. 14-16-16-16-18-18 cm from the marker. Work the bands as before and stocking stitch over the other stitches. When the piece measures 19-21-22-24-26-28 cm from the marker, divide the piece for body and sleeve-edges as follows: Work the 7 band stitches as before and stocking stitch over the next 41-45-49-53-60-64 stitches (= front piece), place the next 63-69-72-84-89-90 stitches on a thread for the sleeve-edge and cast on 6-6-6-6-8-10 new stitches under the sleeve, work stocking stitch over the next 81-93-99-107-119-131 stitches (= back piece), place the next 63-69-72-84-89-90 stitches on a thread for the sleeve-edge and cast on 6-6-6-6-8-10 new stitches under the sleeve, work 41-45-49-53-60-64 stitches in stocking stitch and the 7 band stitches as before (= front piece). BODY: = 189-209-223-239-269-293 stitches. Insert 1 marker thread 51-55-59-63-71-76 stitches in from each side (= sides of body). There are 87-99-105-113-127-141 stitches between marker threads on the back piece. Allow the threads to follow your work onwards; they will be used when increasing in the sides. Continue with stocking stitch and the 7 band stitches on each side as before. When the piece measures 4 cm from the division increase 1 stitch on each side of both marker threads – read INCREASE TIP (= 4 stitches increased). Increase like this every 4 cm a total of 5-4-4-5-5-5 times = 209-225-239-259-289-313 stitches. When the piece measures 28-28-29-29-29-29 cm from the division, increase 13-12-13-14-14-14 stitches evenly spaced = 222-237-252-273-303-327 stitches. Change to circular needle size 3 mm and continue as follows from the right side: Work 1 stitch in garter stitch, rib (= knit 1 / purl 2) until there are 2 stitches left and finish with knit 1 and 1 stitch in garter stitch. Cast off with knit from the right side when the rib measures 4 cm – read CASTING-OFF TIP. The piece measures 32-32-33-33-33-33 cm from the division. SLEEVE-EDGE: Place the 63-69-72-84-89-90 stitches from the thread on the one side of the piece on double pointed needles size 4 mm and knit up 1 stitch in each of the 6-6-6-6-8-10 stitches cast on under the sleeve = 69-75-78-90-97-100 stitches. Work stocking stitch in the round for 2 cm. Change to double pointed needles size 3 mm and work rib (= knit 1 / purl 2) AT THE SAME TIME as you decrease, on the first round, 0-0-0-0-1-1 stitch = 69-75-78-90-96-99 stitches. Cast off when the rib measures 4 cm, with knit over knit and purl over purl. Work the other sleeve-edge in the same way. ASSEMBLY: Sew buttons onto the left band. |
|||||||||||||||||||||||||||||||
Diagram explanations |
|||||||||||||||||||||||||||||||
|
|||||||||||||||||||||||||||||||
 |
|||||||||||||||||||||||||||||||
 |
|||||||||||||||||||||||||||||||
 |
|||||||||||||||||||||||||||||||
 |
|||||||||||||||||||||||||||||||
 |
|||||||||||||||||||||||||||||||
 |
|||||||||||||||||||||||||||||||
Have you finished this pattern?Tag your pictures with #dropspattern #lavendercharmcardi or submit them to the #dropsfan gallery. Do you need help with this pattern?You'll find 30 tutorial videos, a Comments/Questions area and more by visiting the pattern on garnstudio.com. © 1982-2026 DROPS Design A/S. We reserve all rights. This document, including all its sub-sections, has copyrights. Read more about what you can do with our patterns at the bottom of each pattern on our site. |
|||||||||||||||||||||||||||||||


With over 40 years in knitting and crochet design, DROPS Design offers one of the most extensive collections of free patterns on the internet - translated to 17 languages. As of today we count 324 catalogues and 12290 patterns translated into English (UK/cm). 12290
We work hard to bring you the best knitting and crochet have to offer, inspiration and advice as well as great quality yarns at incredible prices! Would you like to use our patterns for other than personal use? You can read what you are allowed to do in the Copyright text at the bottom of all our patterns. Happy crafting!
Post a comment to pattern DROPS 213-21
We would love to hear what you have to say about this pattern!
If you want to leave a question, please make sure you select the correct category in the form below, to speed up the answering process. Required fields are marked *.