
Popular categories
Looking for a yarn?


Comments / Questions (96)
![]() Joke wrote:
Joke wrote:
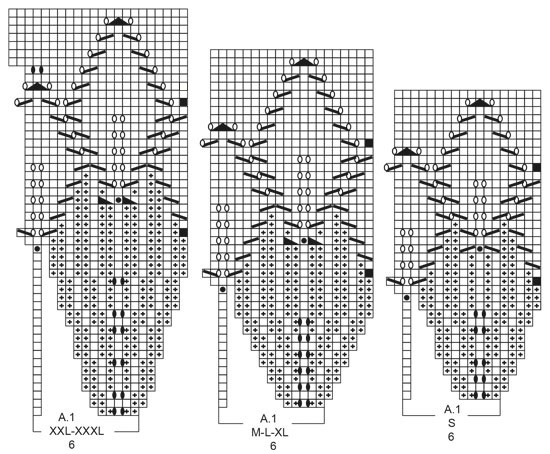
Hallo, bij dit patroon, maat XL, moet er bij A1 op de 17e rij het volgende gedaan worden : op de eerste herhaling van A.1 verplaatst u de naald 1 steek als volgt: Haal de eerste steek over de rechter naald zonder het te breien, brei dan A.1 in de rondte. Moet dit alleen bij de eerste steek gedaan worden of telkens bij de 19 herhalingen? Groetjes Joke
16.04.2026 - 18:56DROPS Design answered:
Dag Joke,
Dit doe je inderdaad bij elke herhaling van A.1 op die naald.
19.04.2026 - 18:23
![]() Bettina wrote:
Bettina wrote:
Tolle einfache Anleitung. Mein Pulli ist megaschön geworden. Habe die volle Freude damit!
18.07.2025 - 19:05
![]() AnnLouise Eggen wrote:
AnnLouise Eggen wrote:
Skal det strikkes 3masker i hver maske med sort prikk midten?økes 12 masker i 1. omgang?Deretter 3 masker i de nye maskene?
01.07.2025 - 11:48DROPS Design answered:
Hej AnnLouise, du tager ind/minsker på hver side af masken med sort prik :)
02.07.2025 - 12:19
![]() Linda Conley wrote:
Linda Conley wrote:
To clarify the black square rows 23 and 39, does this “displace round 1 stitch” mean each chart section is shifted 1 stitch to the left which means I must move every marker?
16.06.2025 - 11:38DROPS Design answered:
Dear Mrs Conley, at the beginning of these round, slip this stitch in the first repeat of the round, then work diagram: the last stitch each repeat will be worked together with the first stitch next repeat (so the symbol applies just on the first repeat of the round) => this is now the new first stitch next repeat; and, at the end of the round, work the last stitch last repeat together with the first stitch of this round to make the decrease => this is now the first stitch of the round. Happy knitting!
19.06.2025 - 09:51
![]() Caroline wrote:
Caroline wrote:
Vielen Dank für die schnelle Antwort👍🏻habe den ganzen Nachmittag herumgetüfftelt und heraus gefunden, dass man das Muster immer um eine Masche rückwärts versetzt😊 wäre schön wenn es irgendwie klarer beschrieben wär🥳lg caroline
11.06.2025 - 13:35
![]() Caroline wrote:
Caroline wrote:
Liebes Drops Team ich stricke den Pulli Listen to Nature und bei Reihe 20 habe ich jeweils am Anfang des Rapports eine rechte Masche zuwenig. Irgendwie stimmt es nach der 17.ten Reihe nicht mehr. Wie muss ich bei Reihe 18 weiterfahren nach dem verschieben in Reihe 17? Es wäre hilfreich, wenn das klarer stehen würde. Vielen Dank für ihre Antwort .
10.06.2025 - 14:01DROPS Design answered:
Liebe Caroline, stricken Sie Größe M, L oder XL? Dann am Ende 15. Reihe A.1 nehmen Sie 3 Maschen zu (= 3 M rechts am Ende 16. Runde), dann, am Anfang der 17. Runde wird die 1. Masche der Runde nicht gestrickt (siehe vor-letzte Symbol-Beschreibung), dann wird die letzte Masche vom jeden A.1 zusammen mit der ersten Maschen vom nächsten A.1 gestrickt - am Ende der Runde ist dann diese Masche (die letzte Abnahme vom letzten A.1 der Runde) die 1. Masche der Runde. Kann das Ihnen helfen? Oder meinten Sie eine andere Größe/Stelle?
10.06.2025 - 16:13
![]() Patricia wrote:
Patricia wrote:
Hola! En A.1 talle S fila 19, hay 4 disminuciónes y solo 3 aumentos, me queda un punto menos en la fila siguiente o el aumento centra es doble? Gracias
27.05.2025 - 17:57
![]() Milena wrote:
Milena wrote:
Buongiorno non riesco a riprodurre il punto di questa maglia taglia XL si potrebbe avere una spiegazione del diagramma del punto ho già riprovato più volte ma non riesco a capire grazie
30.04.2025 - 14:04DROPS Design answered:
Buongiorno Milena, deve lavorare il diagramma dal basso verso l'alto e da destra verso sinistra durante la lavorazione in tondo. Buon lavoro!
01.05.2025 - 15:56
![]() Cristina Betti wrote:
Cristina Betti wrote:
Ho fatto diversi dei vostri modelli, però mi chiedo: ma perché non fate l’alzata sullo scollo su tutti i modelli, così sono decisamente una cosa buttata lì…perché lo scollo pende sempre sul dorso, scomodi da portare .Male, molto male. Peccato.
18.03.2025 - 20:50
![]() Millie Derry wrote:
Millie Derry wrote:
My question is the same as many others: black square row 23, 39: will this effectively decrease as many stitches as there are repeats in my size? The words "DISPLACE round 1 stitch as follows" are confusing to me. The answer to Anna's question on 2/11/20 is missing, so that is no help. Perhaps a translation problem? LOVE the design, please help me finish it!
16.03.2025 - 22:08DROPS Design answered:
Dear Millie, "displace" means "move" in this situation; move the start of the round 1 stitch. In the very first repeat of A.1 in the round the first stitch of A.1 is passed over without working. Then start working chart A.1 over the next stitch. In all other repeats of A.1, the decrease at the end of the chart will be worked over the last stitch of the actual repeat of A.1 and the first stitch of the next repeat of A.1 (so you ignore the black square). And, at the end of the round, the last decrease in A.1 will be worked over the last stitch in the last repeat of A.1 and the first, unworked stitch. So we don't lose stitches due to the square. Happy knitting!
16.03.2025 - 22:21
|
|||||||||||||||||||||||||||||||
Listen to Nature#listentonaturesweater |
|||||||||||||||||||||||||||||||
 |
 |
||||||||||||||||||||||||||||||
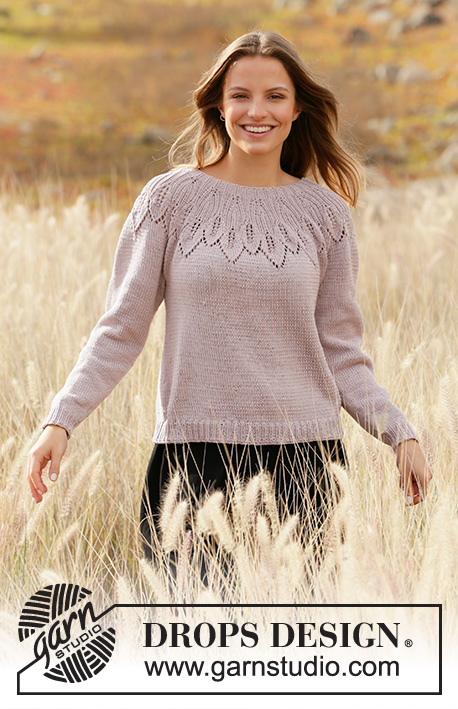
Knitted jumper with round yoke in DROPS Muskat. Piece is knitted top down with leaf pattern and lace pattern. Size: S - XXXL
DROPS 213-1 |
|||||||||||||||||||||||||||||||
|
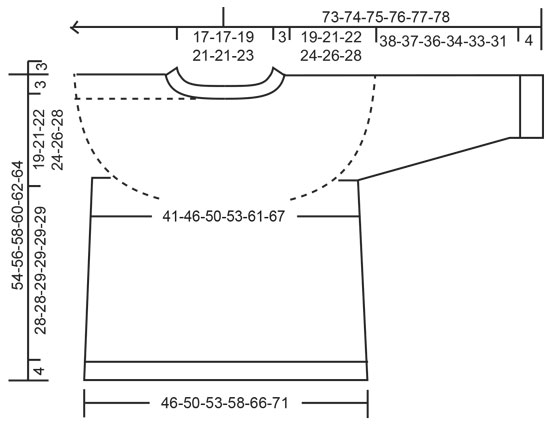
---------------------------------------------------------- EXPLANATION FOR THE PATTERN: ---------------------------------------------------------- PATTERN: See diagram A.1. Choose diagram for your size. INCREASE TIP (applies to sides of body): Work until 2 stitches remain before marker thread, 1 yarn over, knit 4 (marker thread is in the middle of these stitches), 1 yarn over. On next round knit yarn overs twisted to avoid holes. Then work the new stitches in stocking stitch. DECREASE TIP (applies to sleeves): Decrease 1 stitch on each side of marker thread as follows: Work until 3 stitches remain before marker thread and knit 2 together, knit 2 (marker thread is between these stitches), slip 1 stitch knitwise, knit 1, pass slipped stitch over stitch worked. CAST-OFF TIP: To avoid a tight cast-off edge you may use a larger needle. If this also is too tight, make 1 yarn over after approx. every 4th stitch and cast off these as regular stitches. ---------------------------------------------------------- START THE PIECE HERE: ---------------------------------------------------------- JUMPER - SHORT OVERVIEW OF THE PIECE: Work neck edge and yoke in the round on circular needle from mid back, top down. Now divide yoke for body and sleeves. Body is worked in the round on circular needle, top down. Work sleeves in the round on double pointed needles, top down. NECK EDGE: Cast on 96-96-102-114-114-120 stitches on circular needle size 3 mm with Muskat. Knit 1 round. Work rib (= purl 2/knit 1). When piece measures 3 cm, switch to circular needle size 4 mm. Insert 1 marker at the beginning of round mid back, measure yoke from this marker! YOKE: Work A.1 (= 6 stitches) in the round over all stitches (= 16-16-17-19-19-20 times in width). REMEMBER THE KNITTING TENSION! When A.1 has been worked 1 time vertically, there are 288-320-340-380-418-440 stitches on needle. Piece now measures 14-16-16-16-18-18 cm from marker. Knit in the round. When piece measures 19-21-22-24-26-28 cm from marker, divide piece for body and sleeves as follows: Work the first 40-45-49-53-60-65 stitches (= half back piece), slip the next 63-69-72-84-89-90 stitches on a stitch holder for sleeve and cast on 6-6-6-6-8-10 new stitches under sleeve, work the next 81-91-98-106-120-130 stitches (= front piece), slip the next 63-69-72-84-89-90 stitches on a stitch holder for sleeve and cast on 6-6-6-6-8-10 new stitches under sleeve, work the last 41-46-49-53-60-65 stitches (= half back piece). BODY: = 174-194-208-224-256-280 stitches. Insert 1 marker thread in the middle of the 6-6-6-6-8-10 stitches under sleeve in each side (= in the sides of body). There are 87-97-104-112-128-140 stitches between marker threads on front and back piece. Move the marker threads upwards when working; they should be used for increase later in the sides. Knit all stitches. When piece measures 4 cm from division, increase 1 stitch on each side of every marker thread - read INCREASE TIP (= 4 stitches increased). Increase like this every 4 cm 5-4-4-5-5-5 times in total = 194-210-224-244-276-300 stitches. When piece measures 28-28-29-29-29-29 cm from division, increase 13-12-13-14-15-15 stitches evenly = 207-222-237-258-291-315 stitches. Switch to circular needle size 3 mm and work rib (= knit 1/purl 2). Cast off by knitting when rib measures 4 cm - read CAST-OFF TIP. Piece measures 32-32-33-33-33-33 cm from where it was divided. SLEEVES: Slip the 63-69-72-84-89-90 stitches from stitch holder in one side of piece on double pointed needles size 4 mm and pick in addition up 1 stitch in each of the 6-6-6-6-8-10 new stitches cast on under sleeve = 69-75-78-90-97-100 stitches. Insert 1 marker thread in the middle of the 6-6-6-6-8-10 stitches under sleeve. Move the marker upwards when working. Decrease on each side of this marker thread later. Work in stocking stitch in the round. When piece measures 2 cm, decrease 1 stitch on each side of marker thread- read DECREASE TIP (= 2 stitches decreased). Decrease like this every 3-2-2-1½-1-1 cm 11-13-14-19-21-22 times in total = 47-49-50-52-55-56 stitches. When piece measures 38-37-36-34-33-31 cm, increase 1-2-1-2-2-1 stitches evenly on next round= 48-51-51-54-57-57 stitches. Switch to double pointed needles size 3 mm and work rib in the round (= knit 1/purl 2). When rib measures 4 cm, cast off knit over knit and purl over purl. Sleeve measures 42-41-40-38-37-35 cm from division. Work the other sleeve the same way. |
|||||||||||||||||||||||||||||||
Diagram explanations |
|||||||||||||||||||||||||||||||
|
|||||||||||||||||||||||||||||||
 |
|||||||||||||||||||||||||||||||
 |
|||||||||||||||||||||||||||||||
Have you finished this pattern?Tag your pictures with #dropspattern #listentonaturesweater or submit them to the #dropsfan gallery. Do you need help with this pattern?You'll find 25 tutorial videos, a Comments/Questions area and more by visiting the pattern on garnstudio.com. © 1982-2026 DROPS Design A/S. We reserve all rights. This document, including all its sub-sections, has copyrights. Read more about what you can do with our patterns at the bottom of each pattern on our site. |
|||||||||||||||||||||||||||||||


With over 40 years in knitting and crochet design, DROPS Design offers one of the most extensive collections of free patterns on the internet - translated to 17 languages. As of today we count 324 catalogues and 12291 patterns translated into English (UK/cm). 12291
We work hard to bring you the best knitting and crochet have to offer, inspiration and advice as well as great quality yarns at incredible prices! Would you like to use our patterns for other than personal use? You can read what you are allowed to do in the Copyright text at the bottom of all our patterns. Happy crafting!
Post a comment to pattern DROPS 213-1
We would love to hear what you have to say about this pattern!
If you want to leave a question, please make sure you select the correct category in the form below, to speed up the answering process. Required fields are marked *.