
Popular categories
Looking for a yarn?


Comments / Questions (98)
![]() Help wrote:
Help wrote:
Hi, I have been working my way through the pattern, but I’m not sure what to do after I have completed the 10th (size L) increase on A2. Not sure what this next line means” A.1 and A.3 have completed in height continue to repeat towards ragland-lines 7-8-9-10-11-12 more times (a total of 8-9-10-11-12 times),”. If you can give me guidance on this, it would be greatly appreciated.
02.01.2021 - 15:28DROPS Design answered:
Hi :) the increases for raglan are worked almost at the same time on sleeves (= starting on round 3 in A.1/A.3 and a total of 10 times on every 6th round) and on body throuhg A.1/A.3 (= repeat A.1/A.3 a total of 10 times in height = after diagram has been worked once in height, start again diagram from first row) then work only row 1 from diagrams A.1/A.3 in size L. Happy knitting!
04.01.2021 - 15:44
![]() Lise wrote:
Lise wrote:
Forstår jeg det korrekt at udtagninger kun skal ske midt på begge ærmer og at der ingen udtagninger er ved for/ærmer og bag/ærmer, som der normalt er ved raglanudtagning? Er det kun på hver 6. (str. L), der skal tages 4 masker ud, og på de resterende omgange kun 2?
21.11.2020 - 23:16DROPS Design answered:
Hej Lise, du tager de 4 masker ud midt på ærmet på hver 6.omgang. I overgangene mellem forst/ærmer og bagst/ærmer tager du ud ifølge diagrammet. God fornøjelse!
24.11.2020 - 15:39
![]() MARIA wrote:
MARIA wrote:
Dziękuję za odpowiedź, ale nie wniosła nic nowego .Opis został powtórzony z opisu swetra. Mam pytanie w sprawie dodawania oczek na rękawie. Czy dodajemy od trzeciego okrążenia w 21 oczku A2
10.11.2020 - 06:11DROPS Design answered:
Witaj Mario! Na rękawach dodajemy oczka zaczynając od 3-ciego okrążenia schematów. Marker na środku rękawa (nie pod spodem, tam była pomyłka i naniosłam korektę) jest włożony w 21-sze oczko schematu A.2 (oczko prawe), w to oczko będą dodawane 4 oczka co pewną liczbę okrążeń (patrz swój rozmiar). Powodzenia!
12.11.2020 - 14:46
![]() MARIA wrote:
MARIA wrote:
Witam, bardzo trudny opis. Zrobiłam 6 rzędów A1, A2, A3 i co dalej? 😪
09.11.2020 - 17:45DROPS Design answered:
Witaj Mario! Te schematy będą dalej powtarzane wg opisu: "dalej przerabiać na okrągło wg schematu A.2 między nitkami markerami na rękawach i wg schematów A.1/A.3 + dżersejem na tyle i przodzie robótki – W TYM SAMYM CZASIE w okrążeniu 3 schematów A.1/A.3 zacząć DODAWANIE OCZEK NA RĘKAWACH – patrz powyżej (= 4 oczka dodane na każdym rękawie)". Czasami opis wydaje się trudny, ale trzeba zdanie po zdaniu czytać i dokładnie się stosować. Zwykle zaznaczam markerem, aby się nie pogubić. Powodzenia!
09.11.2020 - 20:21
![]() Gisela wrote:
Gisela wrote:
Bei den Ärmeln in Gr. XL habe ich in der 1. Runde 96 M auf der Nadel. Nach 4 cm sollen in jeder 2. Runde 2 M abgenommen werden. Nachdem man dies insgesamt 4x gemacht hat, soll die Anzahl der Maschen 102 betragen. Das erschließt sich mir nicht, bei mir wären es 96 - 8 = 88 M. Wo ist der ydenkfehler?
22.07.2020 - 22:53DROPS Design answered:
Liebe Gisela, bei der Angabe der Maschenzahl für die Ärmel (82-88-96-102 Maschen) ist die Größe XL an die 2. Stelle gerückt, da die Größen aufgeteilt sind - Größe S und M wurden vorher gesondert beschrieben. 82-88-96-102 gilt also nur für Größe L-XL-XXL-XXXL. Für Ihre Größe bleiben also 88 Maschen übrig und das passt dann mit Ihrer Rechnung zusammen. :-) Weiterhin gutes Gelingen mit diesem schönen Pullover!
23.07.2020 - 10:16
![]() HP wrote:
HP wrote:
Bonjour, Je tricote la taille S et je ne comprends pas bien les augmentations pour les manches quand vous dites «EN MÊME TEMPS, au tour 3 de A.1/A.3, commencer les AUGMENTATIONS MANCHES »: -Doit on faire la première aug manches au tour 3 de A1/A3 ou bien d’abord tricoter 8 tours puis faire la première aug? Dans mon cas j’ai d’abord fait les 8 tours et au tour de l’aug manches je tombe sur A2 end/env. Est ce normal?
25.06.2020 - 10:08DROPS Design answered:
Bonjour HP, les augmentations des manches commencent au 3ème rang de l'empiècement. Puis en fonction de la taille tricotez 7 tours et augmentez au tour suivant (= on a ainsi déjà 2 fois tous les 8 tours). etc. Bon tricot!
25.06.2020 - 16:58
![]() Gisela wrote:
Gisela wrote:
Es sieht aber schöner aus, wenn die rechten Maschen der Halsblende über die Ärmel fortgeführt werden. Ich werde die 1. Reihe nach der Halsblende einfach eine Masche früher beginnen, also mit der letzten linken Masche der Halsblende, dann passt es. 😊
17.06.2020 - 15:54
![]() Gisela wrote:
Gisela wrote:
Nach der Halsblende beginnt A2 In Gr. XL immer mit einer linken Masche, somit ist die mittlere Ärmelmasche auch eine linke Masche, das kann doch nicht richtig sein? Die Halsblende ist 1 rechts, 1 links, darüber soll man erst 8M stricken (+ Zunahmen) und A1 über 1 Masche, somit fängt A2 mit der 10. Halsblendenmasche an, also einer linken Masche.
16.06.2020 - 23:59DROPS Design answered:
Liebe Gisela, A.2 beginnt (und endet - siehe Antwort unten) immer mit einer rechte Masche (1. Reihe in A.2 = 2 Maschen Li, 2. Reihe in A.2 = 1 M re, 1 M li). Diese glattrechte Masche ist die erste Masche in A.2 und muss die mittlere Masche sein. A2 muss nicht unbedingt die selben Maschen von der Halsblende folgen. dh es kann sein daß eine re M von der Halsblende wird dann eine Krausrechte Masche in A.2 sein. Viel Spaß beim stricken!
17.06.2020 - 08:25
![]() Gisela wrote:
Gisela wrote:
Wo finde ich ein Video über die Ärmelzunahme (4M in einer M zun.) ? Die Beschreibung ist total verwirrend.
16.06.2020 - 23:26DROPS Design answered:
Liebe Gisele, könnte dieses Video helfen? Beachten Sie, im Video wird es Patentmuster gestrickt, bei dem Pullover stricken Sie die Zunahmen genauso wie im Video, h: die Masche rechts stricken, 1 Umschlag, die Masche noch einmal rechts stricken, 1 Umschlag, die Maschen noch einmal rechts stricken = es wurden jetzt 5 Maschen aus 1 Masche gestrickt. Viel Spaß beim stricken!
17.06.2020 - 08:21
![]() Gisela wrote:
Gisela wrote:
Ich komme mit der ersten Reihe nach der Halsblende in XL nicht klar. Ich stricke 8M+2 Zun. - A1(1M+U=2M) - 40M A2 - A3=2M - 15M + 3 Zun. - A1=2M - 40M A2 - A3=2M - 7M+1 Zun. und komme nach der 1. Runde auf 124 M und nicht auf 126 M, wie in der Anleitung angegeben.
16.06.2020 - 21:13DROPS Design answered:
Liebe Gisela, es sind 41 Masche A.2 (= A.2 über 40 M + die erste Masche in A.2 so daß Muster symetrisch ist) - da sind die fehlende 2 Maschen :) Viel Spaß beim stricken!
17.06.2020 - 08:12
|
||||||||||
Winter Wheat#winterwheatsweater |
||||||||||
 |
 |
|||||||||
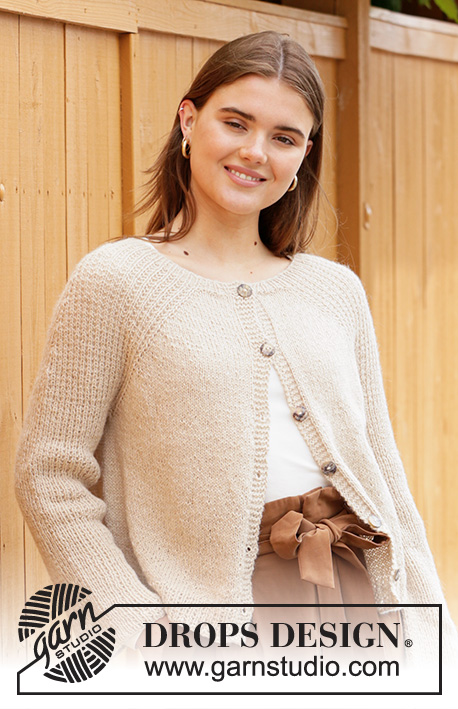
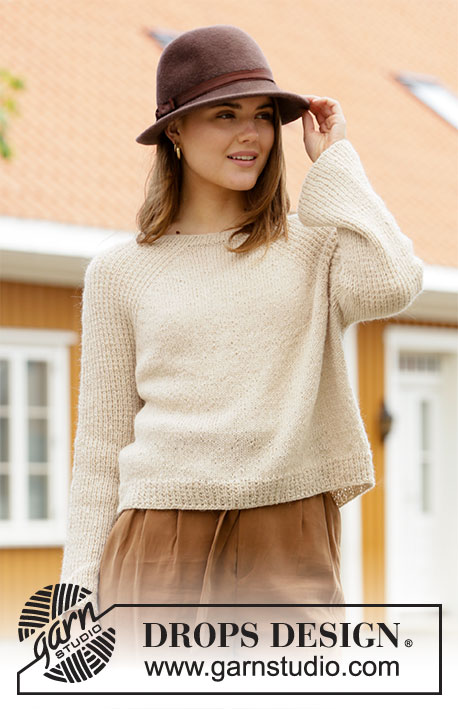
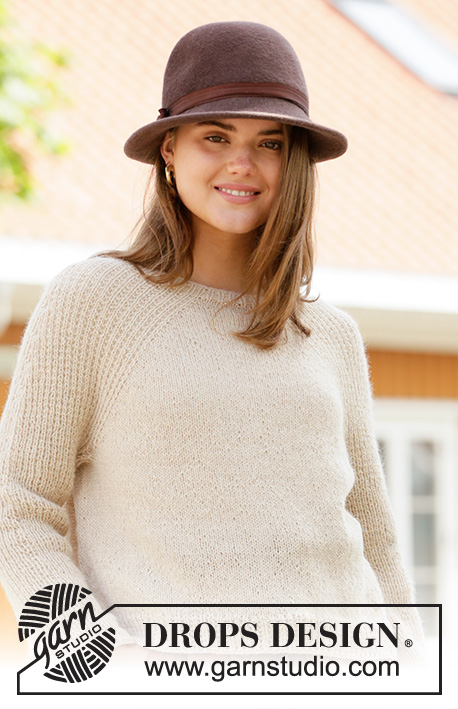
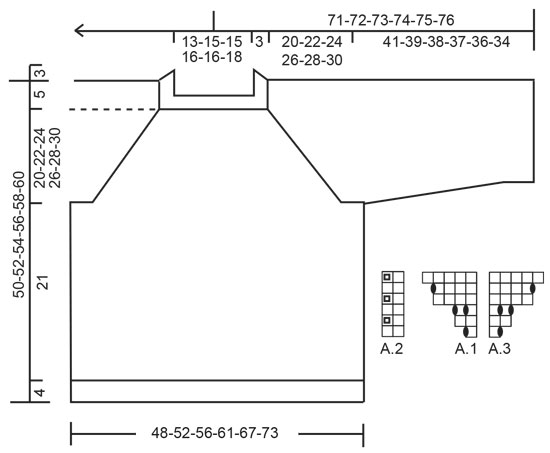
Knitted jumper with raglan in DROPS Puna or DROPS Soft Tweed. The piece is worked top down with textured pattern on the sleeves. Sizes S - XXXL.
DROPS 206-48 |
||||||||||
|
------------------------------------------------------- EXPLANATIONS FOR THE PATTERN: ------------------------------------------------------- PATTERN: See diagrams A.1 to A.3. INCREASE TIP (evenly spaced): To work out how to increase evenly, count the total number of stitches to be increased over (e.g. 4 stitches) and divide by the number of increases to be made (e.g. 4) = 1. In this example, increase by making 1 yarn over after each stitch. On the next round work the yarn overs twisted to avoid holes. INCREASE SLEEVES: Work as far as the mid-stitch on the sleeve (= stitch with marker), * knit 1, make 1 yarn over *, work from*-* a total of 2 times in the same stitch, knit 1 in the same stitch (= 4 stitches increased in the same stitch). Repeat on the other sleeve. The new stitches are worked into pattern A.2. DECREASE TIP (for sleeves): Decrease in the different sizes as follows: Sizes L and XXXL: Work until there are 2 stitches left before the stitch with the marker, knit 2 together, purl 1 (marker in this stitch), slip 1 stitch as if to knit, knit 1 and pass the slipped stitch over (= 2 stitches decreased). Sizes XL and XXL: Work until there are 3 stitches left before the stitch with the marker, knit 2 together, knit 3 (marker in the middle stitch of these 3), slip 1 stitch as if to knit, knit 1 and pass the slipped stitch over (= 2 stitches decreased). ------------------------------------------------------- START THE PIECE HERE: ------------------------------------------------------- JUMPER – SHORT OVERVIEW OF THE PIECE: The piece is worked in the round with circular needle, top down. The sleeves are worked in the round with double pointed needles/short circular needle. Stocking stitch is worked on the front and back pieces, textured pattern on the sleeves. NECK: Cast on 100-108-108-116-116-124 stitches with circular needle size 3 mm and Puna. Knit 1 round then work rib (= knit 1 / purl 1) in the round for 3 cm. Insert a marker here. THE PIECE IS NOW MEASURED FROM HERE! YOKE: Change to circular needle size 4.5 mm and work pattern as follows: Knit the first 4-6-6-8-8-10 stitches and increase at the same time 4-2-4-2-5-4 stitches evenly spaced – read INCREASE TIP, work A.1 over the next stitch, insert a marker thread here (= transition between half back piece and right sleeve), work A.2 over the next 40 stitches, work the first stitch in A.2, insert a marker thread here (= transition between right sleeve and front piece), work A.3 over the next stitch, knit 7-11-11-15-15-19 stitches and increase at the same time 7-4-7-3-9-7 stitches evenly spaced, A.1 over the next stitch, insert a marker thread here (= transition between front piece and left sleeve), work A.2 over the next 40 stitches, work the first stitch in A.2, insert a marker thread here (= transition between left sleeve and half back piece), work A.3 over the next stitch, knit 3-5-5-7-7-9 stitches and increase at the same time 3-2-3-1-4-3 stitches evenly spaced = 118-120-126-126-138-142 stitches on the needle. There is now 1 marker thread in each transition between body and sleeves (= 4 marker threads). Insert 1 marker in the mid-stitch on each sleeve (= knitted stitch). REMEMBER THE KNITTING TENSION! Continue in the round with pattern A.2 between the marker threads on the sleeves and A.1/A.3 + stocking stitch over the stitches on the front and back pieces – AT THE SAME TIME on round 3 in A.1/A.3 start INCREASE SLEEVES – read description above (= 4 stitches increased on each sleeve). Increase like this every 8th-8th-6th-6th-4th-4th round a total of 6-7-10-11-13-14 times. When A.1 and A.3 have been completed in height continue to repeat towards the raglan-lines 7-8-9-10-11-12 more times (a total of 8-9-10-11-12-13 times), then work the first 3-3-1-1-0-0 rounds in the diagrams. When all the increases to sleeves and front and back pieces are finished there are 302-328-366-390-430-458 stitches on the needle (24-28-40-44-52-56 stitches increased on each sleeve and 35-39-41-45-48-52 stitches increased on each side of the front and back pieces). The piece now measures 20-22-24-26-28-30 cm from the marker on the neck. If the piece is shorter than this continue working to the correct length. The next round is worked as follows: Work the first 44-48-52-56-62-67 stitches (= approx. half back piece), place the next 65-69-81-85-93-97 stitches on 1 thread for sleeve and cast on 9-9-9-11-11-13 new stitches on the needle (= in side under the sleeve), work the next 86-95-102-110-122-132 stitches (= front pieces), place the next 65-69-81-85-93-97 stitches on 1 thread for sleeve and cast on 9-9-9-11-11-13 new stitches on the needle (= in side under the sleeve) and work the remaining 42-47-50-54-60-65 stitches (= approx. half back piece). Body and sleeves are finished separately. THE PIECE IS NOW MEASURED FROM HERE! BODY: There are 190-208-222-242-266-290 stitches on the body. Continue in the round with stocking stitch until the piece measures 21 cm. Work an edge with pattern A.2 in the round. When the edge measures 4 cm, Cast off with knit over knit and purl over purl. The jumper measures approx. 50-52-54-56-58-60 cm from the shoulder down. SLEEVE: Place the 65-69-81-85-93-97 stitches from the thread on the one side of the piece on short circular needle size 4.5 mm and knit up 1 stitch in each of the 9-9-9-11-11-13 stitches cast on under the sleeve = 74-78-90-96-104-110 stitches. Work pattern A.2 in the round as before. The pattern should fit on the round. Work as follows in the different sizes: Sizes S, M: Work textured pattern until the sleeve measures 41-39 cm from the division. Cast off with knit over knit and purl over purl. Sizes L, XL, XXL and XXXL: Work textured pattern until the sleeve measures 4 cm from the division. Insert a marker in the middle stitch under the sleeve. On the next round begin to decrease under the sleeve – read DECREASE TIP. Decrease like this every 2nd round a total of 4-4-4-4 times = 82-88-96-102 stitches. Continue with textured pattern until the sleeve measures 38-37-36-34 cm. Cast off with knit over knit and purl over purl. Work the other sleeve in the same way. |
||||||||||
Diagram explanations |
||||||||||
|
||||||||||
 |
||||||||||
Have you finished this pattern?Tag your pictures with #dropspattern #winterwheatsweater or submit them to the #dropsfan gallery. Do you need help with this pattern?You'll find 26 tutorial videos, a Comments/Questions area and more by visiting the pattern on garnstudio.com. © 1982-2026 DROPS Design A/S. We reserve all rights. This document, including all its sub-sections, has copyrights. Read more about what you can do with our patterns at the bottom of each pattern on our site. |
||||||||||


With over 40 years in knitting and crochet design, DROPS Design offers one of the most extensive collections of free patterns on the internet - translated to 17 languages. As of today we count 324 catalogues and 12290 patterns translated into English (UK/cm). 12290
We work hard to bring you the best knitting and crochet have to offer, inspiration and advice as well as great quality yarns at incredible prices! Would you like to use our patterns for other than personal use? You can read what you are allowed to do in the Copyright text at the bottom of all our patterns. Happy crafting!
Post a comment to pattern DROPS 206-48
We would love to hear what you have to say about this pattern!
If you want to leave a question, please make sure you select the correct category in the form below, to speed up the answering process. Required fields are marked *.