Comments / Questions (21)
![]() HOURDEBAIGT wrote:
HOURDEBAIGT wrote:
Bonjour, Pour le jacquard, pour faire suivre le fil quand il y a beaucoup de mailles entre 2 motifs, vaut il mieux croiser les fils toutes les 2 ou toutes les 3 mailles. Merci
27.11.2019 - 18:12DROPS Design answered:
Bonjour Mme Hourdebaigt, on croise en général le fil toutes les 3 mailles (cf vidéo, toutefois, essayez d'éviter de croiser les fils au même niveau à chaque rang, ils seront ainsi moins visibles sur l'endroit. Bon tricot!
28.11.2019 - 09:31
Diamond Delight Cardigan#diamonddelightcardigan |
||||||||||
 |
 |
|||||||||
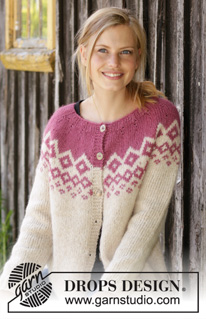
Knitted jacket with round yoke in DROPS Air. Piece is knitted top down with Nordic pattern. Size: S - XXXL
DROPS 196-42 |
||||||||||
|
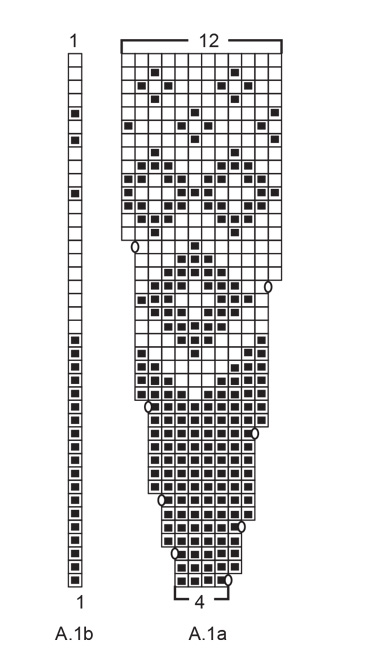
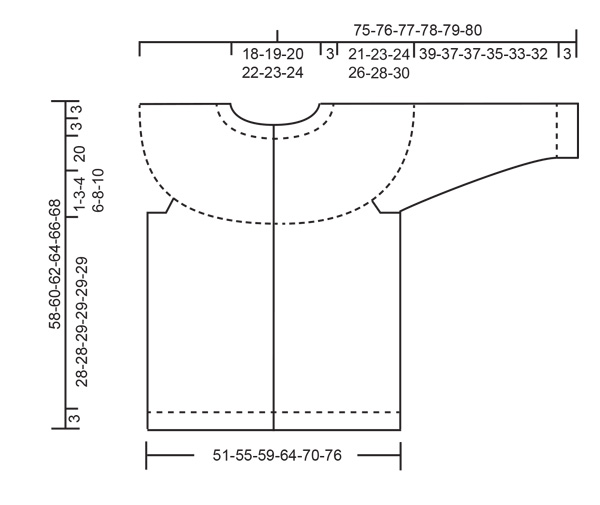
---------------------------------------------------------- EXPLANATION FOR THE PATTERN: ---------------------------------------------------------- GARTER STITCH (back and forth): 1 ridge = knit 2 rows. BUTTONHOLES: Decrease for buttonholes on right band (when garment is worn). Decrease from right side when 3 stitches remain on row as follows: Make 1 yarn over, knit the next 2 stitches together, knit last stitch. On next row knit yarn over to make holes. Decrease first buttonhole when rib in neck measures approx. 1½-2 cm. Then decrease the next 5-5-5-6-6-6 buttonholes, approx. 8½-9-9-8½-8½-9 cm between each. INCREASE TIP (evenly): To calculate how to increase evenly, use the total number of stitches on row (e.g. 88 stitches), minus bands (e.g. 10 stitches) and divide the remaining stitches by number of increases to be done (e.g. 7) = 11.1. In this example increase by making 1 yarn over after approx. every 11th stitch. On next row/round work yarn over twisted to avoid hole. PATTERN: See diagram A.1. Work the entire pattern in stocking stitch. NOTE: Work bands in base colour on pattern stripes. KNITTING TIP: To avoid the garment losing elasticity when working pattern, it is important not to tighten the strands on back side of piece. Switch to a higher needle number when working pattern if the pattern is somewhat tight. RAGLAN: All increases are done from the right side. Increase 1 stitch on each side of the 4 marker threads in every transition between sleeves and body as follows: Work until 1 stitch remains before marker thread, 1 yarn over, knit 2 (marker thread is in the middle of these stitches), 1 yarn over = 8 stitches increased. On next row purl yarn overs twisted to avoid holes. Then work the new stitches in stocking stitch. DECREASE TIP (applies to sleeves): Decrease 1 stitch on each side of marker thread as follows: Work until 3 stitches remain before marker thread and knit 2 together, knit 2 (marker thread is between these stitches), slip 1 stitch knitwise, knit 1, pass slipped stitch over stitch worked. ---------------------------------------------------------- START THE PIECE HERE: ---------------------------------------------------------- JACKET - SHORT OVERVIEW OF THE PIECE: Work back and forth on circular needle from mid front, work top down. Work sleeves in the round on double pointed needles/a short circular needle. NECK EDGE: Cast on 88-92-96-100-104-108 stitches (including 5 band stitches in each side towards mid front) on circular needle size 4.5 mm with heather. Purl 1 row from wrong side. Work next row as follows from right side: 5 band stitches in GARTER STITCH - read explanation above - * knit 2, purl 2 *, repeat from *-* until 7 stitches remain, knit 2 and finish with 5 band stitches on needle in garter stitch. Work rib like this for 3 cm. Remember BUTTONHOLES on right band - read explanation above. Then knit 1 row from right side (with 5 band stitches each side) while increasing 7-7-7-11-11-11 stitches evenly (do not increase over band stitches) - read INCREASE TIP = 95-99-103-111-115-119 stitches. Purl 1 row from wrong side (with 5 band stitches each side). Then work yoke as explained below. YOKE: Switch to circular needle size 5.5 mm. Now work PATTERN – see explanation above, as follows: 5 band stitches in garter stitch, work A.1a until 6 stitches remain on row (= 21-22-23-25-26-27 repetitions of 4 stitches), work A.1b (= 1 stitch) and finish with 5 band stitches in garter stitch - read KNITTING TIP above. Continue pattern like this and increase as shown in diagram. REMEMBER THE KNITTING TENSION! When A.1a and A.1b has been worked, there are 263-275-287-311-323-335 stitches on row and piece measures approx. 23 cm from cast-on edge mid front. SIZE S: Continue with stocking stitch and 5 band stitches in garter stitch towards mid front with wheat and without increases until piece measures 24 cm from cast-on edge mid front. SIZE M - L - XL - XXL - XXXL: Now insert 4 marker threads in the piece without working the stitches first: Insert first marker thread after the first 45-46-50-53-57 stitches (= front piece), insert 2nd marker thread after the next 52-56-60-60-58 stitches (= sleeve), insert 3rd marker thread after the next 81-83-91-97-105 stitches (= back piece), and insert 4th marker thread after the next 52-56-60-60-58 stitches (= sleeve), 45-46-50-53-57 stitches remain on row after last marker (= front piece). Work in stocking stitch with 5 band stitches in garter stitch towards mid front with wheat - AT THE SAME TIME on first row from right side begin increase for RAGLAN – read explanation above. Increase for raglan every 4th row 1-2-2-3-4 times in total. After last increase for raglan there are 283-303-327-347-367 stitches on needle. Continue with stocking stitch and 5 band stitches in garter stitch towards mid front until piece measures 26-27-29-31-33 cm from cast-on edge mid front. ALL SIZES: Then work with wheat until finished measurements. Work next row in stocking stitch as follows: Work 43-46-48-52-56-61 stitches (= front piece), slip the next 50-54-60-64-66-66 stitches on 1 stitch holder for sleeve, cast on 6-6-8-8-10-10 new stitches on needle (= in the side under sleeve), work 77-83-87-95-103-113 stitches (= back piece), slip the next 50-54-60-64-66-66 stitches on 1 stitch holder for sleeve, cast on 6-6-8-8-10-10 new stitches on needle (= in the side under sleeve), work the last 43-46-48-52-56-61 stitches (= front piece). Finish body and sleeves separately. NOW MEASURE PIECE FROM HERE! BODY: = 175-187-199-215-235-255 stitches. Then work in stocking stitch with wheat, continue band stitches in each side as before. When piece measures 28-28-29-29-29-29 cm from division, purl 1 row from wrong side while increasing 29-29-33-33-37-41 stitches evenly = 204-216-232-248-272-296 stitches. Switch to circular needle size 4.5 mm and work next row from right side as follows: 5 band stitches in garter stitch, * knit 2, purl 2 *, repeat from *-* until 7 stitches remain on needle, knit 2 and 5 band stitches in garter stitch. Work rib like this for 3 cm. Cast off with knit over knit and purl over purl (to avoid a tight cast-off edge use needle size 5.5 mm). Jacket measures approx. 58-60-62-64-66-68 cm from shoulder. SLEEVE: Slip the 50-54-60-64-66-66 stitches from stitch holder in one side of piece on circular needle/double pointed needles size 5.5 mm and pick in addition up 1 stitch in each of the 6-6-8-8-10-10 new stitches cast on under sleeve = 56-60-68-72-76-76 stitches. Insert 1 marker thread in the middle of the 6-6-8-8-10-10 stitches under sleeve and begin round here. Work in stocking stitch in the round. When piece measures 2 cm from division, decrease 2 stitches mid under sleeve - read DECREASE TIP. Decrease like this every 3½-3-2-2-1½-1½ cm 10-12-15-16-17-16 times in total = 36-36-38-40-42-44 stitches. Continue until piece measures 39-37-37-35-33-32 cm from division (shorter measurements in the larger sizes because of longer yoke). Knit 1 round while increasing 4-4-2-4-2-4 stitches evenly = 40-40-40-44-44-48 stitches. Switch to double pointed needles size 4.5 mm and work rib = knit 2/purl 2 for 3 cm. Sleeve measures approx. 42-40-40-38-36-35 cm from division. Cast off with knit over knit and purl over purl (to avoid a tight cast-off edge use needle size 5.5 mm). Work the other sleeve the same way. |
||||||||||
Diagram explanations |
||||||||||
|
||||||||||
 |
||||||||||
 |
||||||||||
Have you finished this pattern?Tag your pictures with #dropspattern #diamonddelightcardigan or submit them to the #dropsfan gallery. Do you need help with this pattern?You'll find 27 tutorial videos, a Comments/Questions area and more by visiting the pattern on garnstudio.com. © 1982-2026 DROPS Design A/S. We reserve all rights. This document, including all its sub-sections, has copyrights. Read more about what you can do with our patterns at the bottom of each pattern on our site. |
||||||||||


Post a comment to pattern DROPS 196-42
We would love to hear what you have to say about this pattern!
If you want to leave a question, please make sure you select the correct category in the form below, to speed up the answering process. Required fields are marked *.