DROPS Air
DROPS Air
65% Alpaca, 28% Polyamide, 7% Wool
from 4.80 £ /50g
Get the yarn to make this pattern from 33.60£.

The yarn cost is calculated from the pattern’s smallest size and the yarn’s cheapest product type. Looking for an even better price? You might find it on the DROPS Deals!

DROPS SS24

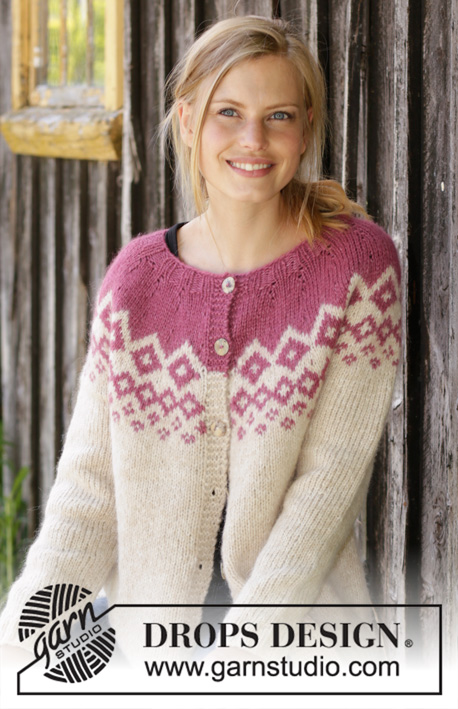
Diamond Delight Cardigan

Knitted jacket with round yoke in DROPS Air. Piece is knitted top down with Nordic pattern. Size: S - XXXL

DROPS 196-42
DROPS design: Pattern ai-125
Yarn group C or A + A
----------------------------------------------------------

SIZE:
S - M - L - XL - XXL – XXXL

MATERIALS:
DROPS AIR from Garnstudio (belongs to yarn group C)
250-300-300-350-350-400 g colour 02, wheat
100-100-100-100-100-100 g colour no 14, heather

KNITTING TENSION:
16 stitches in width and 20 rows vertically in stocking stitch = 10 x 10 cm.

NEEDLES:
DROPS DOUBLE POINTED NEEDLES SIZE 5.5 mm
DROPS CIRCULAR NEEDLE SIZE 5.5 mm, length 80 cm for stocking stitch.
DROPS DOUBLE POINTED NEEDLES SIZE 4.5 mm
DROPS CIRCULAR NEEDLE SIZE 4.5 mm, length 80 cm for rib.
Needle size is only a suggestion! If you have too many stitches on 10 cm switch to larger needles. If you have too few stitches on 10 cm switch to smaller needles.

DROPS MOTHER-OF-PEARL BUTTON ARCHED (white), NO 522: 6-6-6-7-7-7 pieces

-------------------------------------------------------

Alternative Yarn – See how to change yarns here
Yarn Groups A to F – Use the same pattern and change the yarn here
Yarn usage using an alternative yarn – Use our yarn converter here

-------------------------------------------------------

DROPS Air
DROPS Air
65% Alpaca, 28% Polyamide, 7% Wool
from 4.80 £ /50g
Get the yarn to make this pattern from 33.60£.

The yarn cost is calculated from the pattern’s smallest size and the yarn’s cheapest product type. Looking for an even better price? You might find it on the DROPS Deals!

Pattern instructions

NOTE: This pattern is written in British English. All measurements in charts are in cm. For conversion from cm to inches - click here. There are different terms for crocheting in British and American English. If this pattern includes crochet, click for "crochet terms" here. For this pattern in American English, please click here.
----------------------------------------------------------

EXPLANATION FOR THE PATTERN:

----------------------------------------------------------

GARTER STITCH (back and forth):
1 ridge = knit 2 rows.

BUTTONHOLES:
Decrease for buttonholes on right band (when garment is worn). Decrease from right side when 3 stitches remain on row as follows: Make 1 yarn over, knit the next 2 stitches together, knit last stitch. On next row knit yarn over to make holes.
Decrease first buttonhole when rib in neck measures approx. 1½-2 cm. Then decrease the next 5-5-5-6-6-6 buttonholes, approx. 8½-9-9-8½-8½-9 cm between each.

INCREASE TIP (evenly):
To calculate how to increase evenly, use the total number of stitches on row (e.g. 88 stitches), minus bands (e.g. 10 stitches) and divide the remaining stitches by number of increases to be done (e.g. 7) = 11.1.
In this example increase by making 1 yarn over after approx. every 11th stitch. On next row/round work yarn over twisted to avoid hole.

PATTERN:
See diagram A.1. Work the entire pattern in stocking stitch. NOTE: Work bands in base colour on pattern stripes.

KNITTING TIP:
To avoid the garment losing elasticity when working pattern, it is important not to tighten the strands on back side of piece. Switch to a higher needle number when working pattern if the pattern is somewhat tight.

RAGLAN:
All increases are done from the right side.
Increase 1 stitch on each side of the 4 marker threads in every transition between sleeves and body as follows: Work until 1 stitch remains before marker thread, 1 yarn over, knit 2 (marker thread is in the middle of these stitches), 1 yarn over = 8 stitches increased. On next row purl yarn overs twisted to avoid holes. Then work the new stitches in stocking stitch. 

DECREASE TIP (applies to sleeves):
Decrease 1 stitch on each side of marker thread as follows: Work until 3 stitches remain before marker thread and knit 2 together, knit 2 (marker thread is between these stitches), slip 1 stitch knitwise, knit 1, pass slipped stitch over stitch worked.

----------------------------------------------------------

START THE PIECE HERE:

----------------------------------------------------------

JACKET - SHORT OVERVIEW OF THE PIECE:
Work back and forth on circular needle from mid front, work top down. Work sleeves in the round on double pointed needles/a short circular needle.

NECK EDGE:
Cast on 88-92-96-100-104-108 stitches (including 5 band stitches in each side towards mid front) on circular needle size 4.5 mm with heather. Purl 1 row from wrong side. Work next row as follows from right side:
5 band stitches in GARTER STITCH - read explanation above - * knit 2, purl 2 *, repeat from *-* until 7 stitches remain, knit 2 and finish with 5 band stitches on needle in garter stitch. Work rib like this for 3 cm. Remember BUTTONHOLES on right band - read explanation above. Then knit 1 row from right side (with 5 band stitches each side) while increasing 7-7-7-11-11-11 stitches evenly (do not increase over band stitches) - read INCREASE TIP = 95-99-103-111-115-119 stitches. Purl 1 row from wrong side (with 5 band stitches each side). Then work yoke as explained below.

YOKE:
Switch to circular needle size 5.5 mm. Now work PATTERN – see explanation above, as follows: 5 band stitches in garter stitch, work A.1a until 6 stitches remain on row (= 21-22-23-25-26-27 repetitions of 4 stitches), work A.1b (= 1 stitch) and finish with 5 band stitches in garter stitch - read KNITTING TIP above. Continue pattern like this and increase as shown in diagram. REMEMBER THE KNITTING TENSION! When A.1a and A.1b has been worked, there are 263-275-287-311-323-335 stitches on row and piece measures approx. 23 cm from cast-on edge mid front.

SIZE S:
Continue with stocking stitch and 5 band stitches in garter stitch towards mid front with wheat and without increases until piece measures 24 cm from cast-on edge mid front.

SIZE M - L - XL - XXL - XXXL:
Now insert 4 marker threads in the piece without working the stitches first:
Insert first marker thread after the first 45-46-50-53-57 stitches (= front piece), insert 2nd marker thread after the next 52-56-60-60-58 stitches (= sleeve), insert 3rd marker thread after the next 81-83-91-97-105 stitches (= back piece), and insert 4th marker thread after the next 52-56-60-60-58 stitches (= sleeve), 45-46-50-53-57 stitches remain on row after last marker (= front piece). Work in stocking stitch with 5 band stitches in garter stitch towards mid front with wheat - AT THE SAME TIME on first row from right side begin increase for RAGLAN – read explanation above. Increase for raglan every 4th row 1-2-2-3-4 times in total. After last increase for raglan there are 283-303-327-347-367 stitches on needle. Continue with stocking stitch and 5 band stitches in garter stitch towards mid front until piece measures 26-27-29-31-33 cm from cast-on edge mid front.

ALL SIZES:
Then work with wheat until finished measurements. Work next row in stocking stitch as follows: Work 43-46-48-52-56-61 stitches (= front piece), slip the next 50-54-60-64-66-66 stitches on 1 stitch holder for sleeve, cast on 6-6-8-8-10-10 new stitches on needle (= in the side under sleeve), work 77-83-87-95-103-113 stitches (= back piece), slip the next 50-54-60-64-66-66 stitches on 1 stitch holder for sleeve, cast on 6-6-8-8-10-10 new stitches on needle (= in the side under sleeve), work the last 43-46-48-52-56-61 stitches (= front piece). Finish body and sleeves separately. NOW MEASURE PIECE FROM HERE!

BODY:
= 175-187-199-215-235-255 stitches. Then work in stocking stitch with wheat, continue band stitches in each side as before. When piece measures 28-28-29-29-29-29 cm from division, purl 1 row from wrong side while increasing 29-29-33-33-37-41 stitches evenly = 204-216-232-248-272-296 stitches.
Switch to circular needle size 4.5 mm and work next row from right side as follows: 5 band stitches in garter stitch, * knit 2, purl 2 *, repeat from *-* until 7 stitches remain on needle, knit 2 and 5 band stitches in garter stitch. Work rib like this for 3 cm. Cast off with knit over knit and purl over purl (to avoid a tight cast-off edge use needle size 5.5 mm). Jacket measures approx. 58-60-62-64-66-68 cm from shoulder.

SLEEVE:
Slip the 50-54-60-64-66-66 stitches from stitch holder in one side of piece on circular needle/double pointed needles size 5.5 mm and pick in addition up 1 stitch in each of the 6-6-8-8-10-10 new stitches cast on under sleeve = 56-60-68-72-76-76 stitches. Insert 1 marker thread in the middle of the 6-6-8-8-10-10 stitches under sleeve and begin round here. Work in stocking stitch in the round. When piece measures 2 cm from division, decrease 2 stitches mid under sleeve - read DECREASE TIP. Decrease like this every 3½-3-2-2-1½-1½ cm 10-12-15-16-17-16 times in total = 36-36-38-40-42-44 stitches. Continue until piece measures 39-37-37-35-33-32 cm from division (shorter measurements in the larger sizes because of longer yoke). Knit 1 round while increasing 4-4-2-4-2-4 stitches evenly = 40-40-40-44-44-48 stitches. Switch to double pointed needles size 4.5 mm and work rib = knit 2/purl 2 for 3 cm. Sleeve measures approx. 42-40-40-38-36-35 cm from division. Cast off with knit over knit and purl over purl (to avoid a tight cast-off edge use needle size 5.5 mm). Work the other sleeve the same way.

Diagram

symbols = wheat
symbols = heather
symbols = between 2 stitches make 1 yarn over, on next row work yarn over twisted to avoid holes
diagram
diagram

Each of our patterns has specific tutorial videos to help you.

Do you have a question? See a list of frequently asked questions (FAQ)

Knitting tension is what determines the final measurements of your work, and is usually measured per 10 x 10 cm. It is provided like so: number of stitches in width x number of rows in height - eg: 19 stitches x 26 rows = 10 x 10 cm.

The knitting tension is very individual; some people knit/crochet loosely while others work tightly. You adjust the knitting tension with the needle size, which is why the suggested needle size is only meant as a guide! You need to adjust this (up or down) to ensure that YOUR knitting tension matches the knitting tension provided in the pattern. If you work with a different knitting tension than provided you will have a different yarn consumption, and your work will have different measurements than what the pattern suggests.

The knitting tension also determines which yarns can replace each other. As long as you achieve the same knitting tension you can replace one yarn with another.

See DROPS lesson: How to measure your tension/gauge

See DROPS video: How to make a gauge tension swatch

The required amount of yarn is provided in grams, eg: 450 g. To calculate how many balls you’ll need you first need to know how many grams are in 1 ball (25g, 50g or 100g). This information is available if you click on the individual yarn quality on our pages. Divide the amount required with the amount of each ball. For example, if each ball is 50g (the most common amount), the calculation will be as follows: 450 / 50 = 9 balls.

The important thing when changing from one yarn to another is that the knitting/crochet tension remains the same. This is so that the measurements of the finished piece will be the same as on the sketch provided. It is easier to achieve the same knitting tension using yarns from the same yarn group. It is also possible to work with multiple strands of a thinner yarn to achieve the knitting tension of a thicker one. Please try our yarn converter. We recommend you to always work a test swatch.

Please NOTE: when changing yarn the garment might have a different look and feel to the garment in the photo, due to individual properties and qualities of each yarn.

See DROPS lesson: Can I use a different yarn than the one mentioned in the pattern?

All our yarns are categorised into yarn groups (from A to F) according to thickness and knitting tension – group A contains the thinnest yarns and group F the thickest. This makes it easier for you to find alternative yarns to our patterns, should you wish to switch yarn. All yarns within the same group have a similar knitting tension and can easily replace each other. However, different yarn qualities have different structures and properties which will give the finished work a unique look and feel.

Click here for an overview of the yarns in each yarn group

At the top of all our patterns you’ll find a link to our yarn calculator, which is a helpful tool should you wish to use a different yarn than suggested. By filling in the yarn quality you wish to replace, the amount (in your size) and number of strands, the calculator will present good alternative yarns with the same knitting tension. Additionally it will tell you how much you’ll require in the new qualities and whether you’ll need to work with multiple strands. Most skeins are 50g (some are 25g or 100g).

If the pattern is worked with multiple colours, every colour will have to be calculated separately. Similarly, if the pattern is worked with several strands of different yarns (for example 1 strand Alpaca and 1 strand Kid-Silk) you will have to find alternatives for each, individually.

Click here to see our yarn calculator

Since different yarns have different qualities and textures we have chosen to keep the original yarn in our patterns. However, you can easily find options among our available qualities by using our yarn calculator, or simply pick a yarn from the same yarn group.

It is possible that some retailers still have discontinued yarns in stock, or that someone has a few skeins at home that they would like to find patterns for.

The yarn calculator will provide both alternative yarn as well as required amount in the new quality.

If you think it's hard to decide what size to make, it can be a good idea to measure a garment you own already and like the size of. Then you can pick the size by comparing those measures with the ones available in the pattern's size chart.

You'll find the size chart at the bottom of the pattern.

See DROPS lesson: How to read size chart

The needle size provided in the pattern serves only as a guide, the important thing is to follow the knitting tension. And since knitting tension is very individual, you will have to adjust the needle size to ensure that YOUR tension is the same as in the pattern – maybe you’ll have to adjust 1, or even 2 needle sizes, up or down to achieve the correct tension. For this, we recommend that you work test swatches.

Should you work with a different knitting tension than the one provided, the measurements of the finished garment might deviate from the measurement sketch.

See DROPS lesson: How to measure your tension/gauge

See DROPS video: How to make a tension/gauge swatch

Working a garment top-down provides more flexibility and room for personal adjustment. For example it is easier to try the garment on while working, as well as making adjustments to length of yoke and shoulder caps.

The instructions are carefully explaining every step, in the correct order. Diagrams are adjusted to the knitting direction and are worked as usual.

The diagram depicts all rows/rounds, and every stitch seen from the right side. It is read from bottom to top, from right to left. 1 square = 1 stitch.

When working back and forth, every other row is worked from the right side and every other row is worked from the wrong side. When working from the wrong side, the diagram will have to be worked reversed: from left to right, knit stitches are purled, purl stitches are knit etc.

When working in the round every round is worked from the right side and the diagram are worked from right to left on all rounds.

See DROPS lesson: How to read knitting diagrams

The diagram depicts all rows/rounds, and every stitch seen from the right side. It is worked from bottom to top, from right to left.

When working back and forth every other row is worked from the right side: from right to left and every other row is worked from the wrong side: from left to right.

When working in the round, every row in the diagram are worked from the right side, from right to left.

When working a circular diagram you start in the middle and work your way outwards, counter clockwise, row by row.

The rows usually start with a given number of chain stitches (equivalent to the height of the following stitch), this will either be depicted in the diagram or explained in the pattern.

See DROPS lesson: How to read crochet diagrams

Instructions for working several diagrams after each other on the same row/round, will often be written like so: “work A.1, A.2, A.3 a total of 0-0-2-3-4 times". This means you work A.1 once, then A.2 is worked once, and A.3 is repeated (in width) the number of times provided for your size – in this case like so: S = 0 times, M = 0 times, L=2 times, XL= 3 times and XXL = 4 times.

The diagrams are worked as usual: begin with the first row in A.1, then work the first row in A.2 etc.

See DROPS lesson: How to read knitting diagrams

See DROPS lesson: How to read crochet diagrams

The total width of the garment (from wrist-to-wrist) will be larger in the larger sizes, despite the actual sleeves being shorter. The larger sizes have longer sleeve caps and wider shoulders, so there will be a good fit in all sizes.

The measurement sketch/schematic drawing provides information regarding the full length of the garment. If it’s a jumper or a jacket the length is measured from the highest point on the shoulder closest to the neckline, and straight down to the bottom of the garment. It is NOT measured from the tip of shoulder. Similarly, the length of yoke is measured from the highest point on the shoulder and down to where yoke is split into body and sleeves.

On a jacket measures are never taken along bands, unless specifically stated. Always measure inside band stitches when measuring the length.

See DROPS lesson: How to read a schematic drawing

Diagrams are often repeated on the round or in height. 1 repeat is the diagram the way it appears in the pattern. If it says to work 5 repeats of A.1 in the round, then you work A.1 a total of 5 times after/next to each other in the round. If it says to work 2 repeats of A.1 vertically/in height you work the entire diagram once, then begin again at the start and work the entire diagram one more time.

Chain stitches are slightly narrower than other stitches and to avoid working the cast-on edge too tight, we simply chain more stitches to begin with. The stitch count will be adjusted on the following row to fit the pattern and measurement sketch.

The rib edge is more elastic and will contract slightly compared to, for example, stocking stitch. By increasing before the rib edge, you avoid a visible difference in width between the rib edge and the rest of the body.

It’s very easy to cast off too tightly, and by making yarn overs while casting off (and simultaneously casting these off) you avoid a too tight cast off edge.

See DROPS video: How to bind off with yarn overs (yo)

To achieve an even increase (or decrease) you can increase on, for example: every 3rd and 4th row alternately, like so: work 2 rows and increase on the 3rd row, work 3 rows and increase on the 4th. Repeat this until the increase is complete.

See DROPS lesson: Increase or decrease 1 st on every 3rd and 4th row alternately

Should you prefer to work in the round instead of back and forth, you may of course adjust the pattern. You’ll need to add steeks mid-front (usually 5 stitches), and follow the instructions. When you would normally turn and work from the wrong side, simply work across the steek and continue in the round. At the end you’ll cut the piece open, pick up stitches to work bands, and cover the cut edges.

See DROPS video: How to knit steeks and cut open

Should you prefer to work back and forth instead of in the round, you may of course adjust the pattern so you work the pieces separately and then assemble them at the end. Divide the stitches for the body in 2, add 1 edge stitch in each side (for sewing) and work the front and back pieces separately.

See DROPS lesson: Can I adapt a pattern for circular needles into straight needles?

Pattern repeats can vary slightly in the different sizes, in order to get the correct proportions. If you’re not working the exact same size as the garment in the photo, yours might deviate slightly. This has been carefully developed and adjusted so that the complete impression of the garment is the same in all sizes.

Make sure to follow instructions and diagrams for your size!

If you have found a pattern you like which is available in women’s size it’s not very difficult to convert it to men’s size. The biggest difference will be the length of sleeves and body. Start working on the women size that you think would fit across the chest. The additional length will be worked right before you cast off for the armhole/sleeve cap. If the pattern is worked top-down you can add the length right after the armhole or before the first decrease on sleeve.

Regarding additional yarn amount, this will depend on how much length you add, but it is better with a skein too many than too few.

All yarns will have excess fibres (from production) that might come off as lint or shedding. Brushed yarns (ie hairier yarns) have more of these loose, excess fibres, causing more shedding.

Shedding also depends on what is worn under or over the garment, and whether this pulls at the yarn fibres. It’s therefore not possible to guarantee that there will be no shedding

Below are some tips on how to get the best result when working with hairier yarns:

1. When the garment is finished (before you wash it) shake it vigorously so the looser hairs come off. NOTE: do NOT use a lint roller, brush or any method that pulls at the yarn.

2. Place the garment in a plastic bag and put it in your freezer - the temperature will cause the fibres to become less attached to each other, and excess fibres will come off easier.

3. Leave in the freezer for a few hours before taking it out and shaking it again.

4. Wash the garment according to the instructions on the yarn label.

Pilling is a natural process that happens to even the most exclusive of fibers. It's a natural sign of wear and tear that is hard to avoid, and that is most visible in high friction areas of your garment like a sweater's arms and cuffs.

You can make your garment look as new by removing the pilling, using a fabric comb or a pill/lint remover.

Still can't find the answer you need? Then scroll down and leave your question so one of our experts can try to help you. This will be done normally within 5 to 10 working days.
In the meantime, you can read the questions and answers that others have left to this pattern or join the DROPS Workshop on Facebook to get help from fellow knitters/crocheters!

You might also like...

Post a comment to pattern DROPS 196-42

We would love to hear what you have to say about this pattern!

If you want to leave a question, please make sure you select the correct category in the form below, to speed up the answering process. Required fields are marked *.

Comments / Questions (17)

country flag Ingrid Lauryssens wrote:

Het telpatroon is dat de heengaande en teruggaande naald of alleen de heengaande naalden?

13.12.2021 - 12:43

DROPS Design answered:

Dag Ingrid,

Het telpatroon laat alle naalden in het patroon zien, dus zowel de heengaande als de teruggaande naalden.

14.12.2021 - 10:26

country flag Ingrid Lauryssens wrote:

Moet ik na het A.1a patroon afwisselend met A.1b breien of alleen op het einde A.1b doen?

09.12.2021 - 15:50

country flag Ingrid Lauryssens wrote:

Het telpatroon begint met A.1a ,moet ik dan A.1b en terug A.1a enz. breien of is het op het laatste dat ik A.1b maar 1 keer moet breien.

09.12.2021 - 15:48

DROPS Design answered:

Dag Ingid,

Je herhaalt steeds A.1a in de breedte tot er 6 steken over zijn op de naald, Dan brei je A.1b en dan 5 biessteken. Op de verkeerde kant doe je het tegenovergestelde: je begint met 5 biessteken. A.1b en dan A.1a steeds herhalen tot er 5 steken over zijn, deze 5 steken brei je weer in ribbelsteek (=bies)

11.12.2021 - 15:46

country flag Deb Carpenter wrote:

I don't think the cost to knit this model is £23... it's £32.20 for the smallest size....

11.10.2021 - 18:02

country flag Laurie Borde wrote:

J’ai deux mailles de trop… 😢 je vais trouver de l’aide près de chez moi. Merci beaucoup de votre aide!!!

17.09.2021 - 13:30

country flag Laurie Borde wrote:

Bonjour! Je travail sur ce model depuis quelques jours mais j’ai bien l’impression d’avoir fait une erreur quelque part. Dans le diagramme j’en suis au 15e rang. On dirait que j’ai deux mailles en trop. Je me demandais si par hasard quelqu’un connaîtrait le nombre de maille que je devrais avoir à cet endroit pour la taille ‘M’? Je suis novice alors je sais pas quoi faire. Et pour info, j’habite au Québec alors je peux pas me déplacer pour vous montrer mon ouvrage.

17.09.2021 - 02:24

DROPS Design answered:

Bonjour Mme Borde, sauf erreur de ma part, au 15ème rang, vous avez augmenté 6 mailles dans chaque A.1a, autrement dit vous avez: 5 m point mousse + 22 x (6+4= 10) +1 +5 m = 231 m à la fin du 15ème rang. En cas de doute, pensez que vous pouvez envoyer une photo au magasin où vous avez acheté votre laine, ils pourront ainsi mieux visualiser ce que vous avez fait. Bon tricot!

17.09.2021 - 07:28

country flag Marianne wrote:

Bonjour ! En lisant les explications DOS & DEVANT , je vois qu' il faut faire 29 augmentations juste avant les côtes . C' est la 1ere fois que je vois des côtes qui auront plus de mailles que la partie jersey . Est-ce une erreur ? Merci !

31.01.2021 - 16:45

DROPS Design answered:

Bonjour Marianne, la bordure en côtes est plus élastique et contracte légèrement l'ouvrage en largeur par rapport au jersey par exemple. On augmente avant la bordure en côtes pour que la différence entre la bordure côtes et le reste de l'ouvrage soit moins visible. Bon tricot!

31.01.2021 - 18:59

country flag Suzie wrote:

Merci beaucoup, je vais peut-être réussir à tricoter ce joli gilet et bonne journée

20.01.2021 - 17:03

country flag Suzie wrote:

Merci beaucoup. tout fonctionne pour le rang 15 mais arrivé au rang 16, oups!!!! après les 5 mousses pourriez-vous m'éclairer pour continuer le rang jusqu'à la fin ???? Merci beaucoup d'avance. Il y a des chances que j'arrive à faire le reste :-)

19.01.2021 - 16:23

DROPS Design answered:

Bonjour Suzie, sur l'envers, vous lisez les diagrammes de gauche à droite, vous aurez donc au 16ème rang ainsi: 5 m point mousse en bruyère, 1 m bruyère (A.1b), *3 m bruyère, 3 m blé, 4 m bruyère*, répétez de *-* et terminez par 5 m point mousse en bruyère. Continuez ainsi en suivant le diagramme, vous commencerez à tricoter les mailles de bordure devant en blé quand la 1ère m des diagrammes sera à tricoter en blé. Bon tricot!

20.01.2021 - 07:23

country flag Suzie wrote:

Bonjour, bien vouloir m'explique S.V.P. Je suis rendue au rang 15 et je fais mes 5 mailles mousses blé et ensuite je ne comprends plus trop comment continuer le reste du rang ? Et lorsque j'arriverai à la fin du rang j'imagine qu'elle doit être identique au début du rang ???

19.01.2021 - 14:00

DROPS Design answered:

Bonjour Suzie, vous tricotez les diagrammes comme vous avez fait depuis le 1er rang, autrement dit: 5 m point mousse en bruyère (= la même couleur que les premières mailles du diagramme), *5 m bruyère, 1 m blé, 4 m bruyère*, répétez de *-* jusqu'à ce qu'il reste 6 m et terminez par 1 m bruyère (= A.1b), 5 m point mousse en bruyère. Bon tricot!

19.01.2021 - 14:19