
Popular categories
Looking for a yarn?


Comments / Questions (36)
![]() Chiara wrote:
Chiara wrote:
Penso di aver risolto: inizio il motivo A1 con il dritto e non con il rovescio. In qst modo entrami i lati del REGLAN saranno uguali. Speriamo, è la terza volta che disfo.
14.02.2021 - 12:46DROPS Design answered:
Buonasera Chiara, il diagramma A.1 inizia con 1 maglia rovescio: probabilmente sbaglia a lavorare il gettato prima del rovescio. Buon lavoro!
14.02.2021 - 19:44
![]() Chiara wrote:
Chiara wrote:
Anche così il punto di aumento davanti sinistro (guardando frontalmente) è diverso, più largo da quello di destra. Io faccio (dopo il marcapunti che separa spalla destra dal davanti): una maglia dritto gettato girando due volte, poi rovescio e dritto fino alla penultima maglia, poi gettato, lavoro ultima maglia a dritto, passo segnapunti e passo alla spalla sinistra. Facendo così, il primo aumento è più largo del secondo e risultano diversi. Sto facendo corretto? Grazie!
13.02.2021 - 21:16
![]() Chiara wrote:
Chiara wrote:
Buongiorno, ma dopo il primo marcapunti, faccio dritto, un gettato e un rovescio dello schema ma mi si crea un “buco” maggiore a quello che esce se faccio dritto gettato dritto, nonostante al giro successivo il li lavori a dritto ritorto. Forse sbaglio a entrare nel rovescio quando faccio gettato. Spero sia comprensibile la mia problematica
12.02.2021 - 00:54DROPS Design answered:
Buonasera Chiara, sbaglia la lavorazione del gettato prima del rovescio, deve avvolgere 2 volte il filo prima del rovescio. Buon lavoro!
12.02.2021 - 23:06
![]() Ans Wisselink wrote:
Ans Wisselink wrote:
Als ik dit wil breien met enkele draad, hoeveel meter heb ik dan nodig.
13.12.2020 - 11:37DROPS Design answered:
Dag Ans,
Je hebt dan hetzelfde aantal meters nodig. M.a.w.: je kunt één van de draden weg laten. De stekenverhouding verandert dan wel in de stekenverhouding zoals aangegeven bij het betreffende garen, dus zul je het patroon op basis daarvan ook om moeten rekenen.
17.12.2020 - 23:26
![]() Lisbet Hjelmaas wrote:
Lisbet Hjelmaas wrote:
Er det bare på vrangborden det skal brukes dobbel trå, har lest oppdriften noen ganger, ser at det starter med dobbel trå men ser ikke hvor det slutter. En som lurer
07.08.2020 - 11:53DROPS Design answered:
Hei Lisbeth, Hele plagget skal strikkes med 1 tråd av hver kvalitet. God fornøyelse!
10.08.2020 - 06:56
![]() Deb wrote:
Deb wrote:
I would like to knit this sweater with one strand of yarn in a 4-5 weight category.. any suggestions. Also could I add a ribbed band at the bottom of the sleeves to make them less wide? If so any instructions would be appreciated Thank-you
29.04.2020 - 17:15DROPS Design answered:
Dear Deb, sorry not sure what is a 4-5 weight category, but you will find our yarn groups there to help you choosing the right yarn as well as the right tension/pattern. We are unfortunately not able to adjust every pattern to every single request, please contact your yarn store for any individual assistance for special adjustements. Thanks for your comprehension. Happy knitting!
30.04.2020 - 09:48
![]() Jacqueline Behrens wrote:
Jacqueline Behrens wrote:
Hallo, wirklich Garngruppe C+C? Das kommt mir so dick vor? VG
03.02.2020 - 08:17DROPS Design answered:
Liebe Behrens, die Maschenprobe ist hier 11 M x 15 R mit 1 Faden Nepal + 1 Faden Brushed Alpaca Silk = 10 x 10 cm. Hier lesen Sie mehr. Viel Spaß beim stricken!
03.02.2020 - 10:35
![]() Jacqueline Behrens wrote:
Jacqueline Behrens wrote:
Hallo, wirklich Garngruppe C+C? VG
03.02.2020 - 08:15DROPS Design answered:
Liebe Frau Behrens, ja genau, DROPS Nepal und DROPS Brushed Alpaca Silk gehören beide zur Garngruppe C. Viel Spaß beim stricken!
03.02.2020 - 10:33
![]() Nils-olof Täpp wrote:
Nils-olof Täpp wrote:
Hur gör man med dessa extra maskorna 5-9 som ska läggas upp?Sticka de första 53-57-59-65-69-75 maskorna (= bakstycke), sätt de följande 39-43-45-47-47-51 maskorna på en tråd (= ärm), lägg upp 5-5-7-7-9-9 nya maskor på stickan (= i sidan under ärmen), sticka de nästa 53-57-59-65-69-75 maskorna (= framstycke), sätt de följande 39-43-45-47-47-51 maskorna på en tråd (= ärm), lägg upp 5-5-7-7-9-9 nya maskor under ärmen.
01.02.2020 - 09:42
![]() Nils-olof Täpp wrote:
Nils-olof Täpp wrote:
Hej! Skriver till er det som står i er beskrivning angående dom 5 extra maskorna. Sticka de första 53-57-59-65-69-75 maskorna (= bakstycke), sätt de följande 39-43-45-47-47-51 maskorna på en tråd (= ärm), lägg upp 5-5-7-7-9-9 nya maskor på stickan (= i sidan under ärmen), sticka de nästa 53-57-59-65-69-75 maskorna (= framstycke), sätt de följande 39-43-45-47-47-51 maskorna på en tråd (= ärm), lägg upp 5-5-7-7-9-9 nya maskor under ärmen
31.01.2020 - 20:03DROPS Design answered:
Hej. De maskorna under ärmarna blir då en del av fram- & bakstycke fortsättningsvis - se stycke "FRAM- OCH BAKSTYCKE" i mönstret. Lycka till!
05.02.2020 - 07:05
|
|||||||
Remember When#rememberwhensweater |
|||||||
 |
 |
||||||
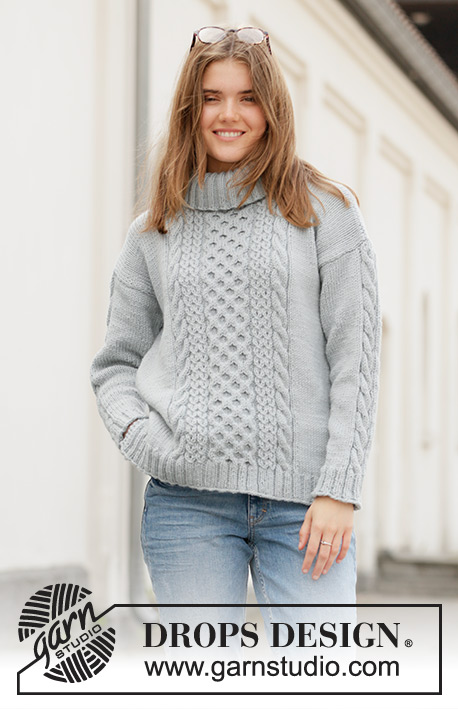
Knitted jumper with raglan and texture in DROPS Nepal and DROPS Brushed Alpaca Silk or 1 strand DROPS Wish. The piece is worked top down with folded neck. Sizes S – XXXL.
DROPS 205-23 |
|||||||
|
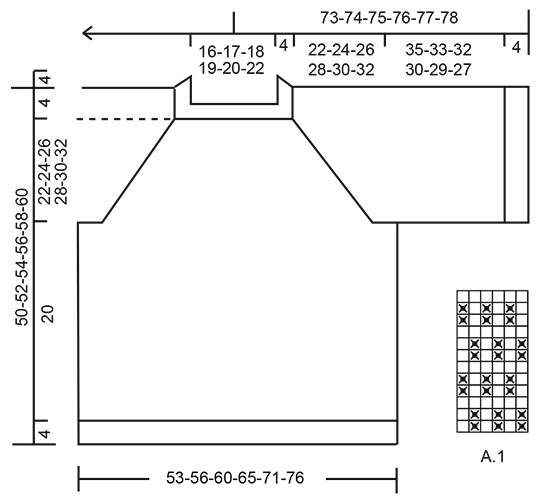
------------------------------------------------------- EXPLANATIONS FOR THE PATTERN: ------------------------------------------------------- PATTERN: See diagram A.1. INCREASE TIP (evenly spaced): To work out how to increase evenly, count the total number of stitches on the needle (e.g. 56 stitches) and divide by the number of increases to be made (e.g. 4) = 14. In this example, increase by making 1 yarn over after each 14th stitch. On the next round work the yarn overs twisted to avoid holes. RAGLAN: Increase to raglan on each side of the marker threads in each transition between body and sleeves as follows: Work until there is 1 stitch left before marker thread, 1 yarn over, knit 2 (marker thread sits between these 2 stitches), 1 yarn over (= 2 stitches increased). On the next round work the yarn overs twisted to avoid holes. Work the new stitches on the sleeves in stocking stitch and on the front/back pieces in pattern A.1. CASTING-OFF TIP: To avoid the cast-off edge being tight you can cast off with a larger size needle. ------------------------------------------------------- START THE PIECE HERE: ------------------------------------------------------- JUMPER – SHORT OVERVIEW OF THE PIECE: The piece is worked in the round with circular needle, top down. The sleeves are worked in the round with short circular needle. JUMPER: NECK: Cast on 56-58-60-64-64-68 stitches with circular needle size 8 mm and 1 strand Nepal + 1 strand Brushed Alpaca Silk (= 2 strands) or 1 strand Wish. Knit 1 round. Change to circular needle size 7 mm and work rib (= knit 1 / purl 1) for 9 cm (= folding neck). Knit 1 round where you increase 4-2-0-0-4-4 stitches evenly spaced – read INCREASE TIP = 60-60-60-64-68-72 stitches. Insert a marker here. THE PIECE IS NOW MEASURED FROM HERE. YOKE: Change to circular needle size 8 mm and work pattern as follows: Insert a marker thread here (= transition between left sleeve and back piece), knit 1, A.1 over the next 19-19-19-21-23-25 stitches, knit 1, insert a marker thread here (= transition between back piece and right sleeve), stocking stitch over the next 9 stitches, insert a marker thread here (= transition between right sleeve and front piece), knit 1, A.1 over the next 19-19-19-21-23-25 stitches, knit 1, insert a marker thread here (= transition between front piece and left sleeve), stocking stitch over the next 9 stitches. REMEMBER THE KNITTING TENSION! There are 4 marker threads in the piece; they follow your work onwards and show the transitions between body and sleeves. Continue this pattern in the round; at the same time on the next round start to increase to RAGLAN – read description above. Increase like this every 2nd round a total of 15-17-18-19-19-21 times = 180-196-204-216-220-240 stitches. Then increase only on front and back pieces (= 4 stitches increased on each increase-round) 1-1-1-2-3-3 more times. You have now increased a total of 16-18-19-21-22-24 times on front and back pieces and 15-17-18-19-19-21 times on the sleeves = 184-200-208-224-232-252 stitches. When all the increases are finished the piece measures approx. 21-24-25-28-29-32 cm from the marker mid front and down. Continue with pattern and stocking stitch until the piece measures 22-24-26-28-30-32 cm. The next round is worked as follows: Work the first 53-57-59-65-69-75 stitches (= back piece), place the next 39-43-45-47-47-51 stitches on a thread (= sleeve), cast on 5-5-7-7-9-9 new stitches on the needle (= in side under sleeve), work the next 53-57-59-65-69-75 stitches (= front piece), place the next 39-43-45-47-47-51 stitches on a thread (= sleeve), cast on 5-5-7-7-9-9 new stitches on the needle (= in side under sleeve). Body and sleeves are finished separately. THE PIECE IS NOW MEASURED FROM HERE! BODY: = 116-124-132-144-156-168 stitches. Work pattern A.1 in the round as before, NOTE: the pattern continues as before over the stitches from the yoke and fits all the way around the body. Continue like this until the piece measures approx. 20 cm. Knit 1 round where you increase 20-24-26-26-30-34 stitches evenly spaced – remember INCREASE TIP = 136-148-158-170-186-202 stitches. Change to circular needle size 7 mm and work rib (= knit 1 / purl 1) for 4 cm. Cast off with knit over knit and purl over purl. Make sure the cast-off edge is not tight – read CASTING OFF TIP. The jumper measures approx. 50-52-54-56-58-60 cm from the shoulder down. SLEEVE: Place the 39-43-45-47-47-51 stitches from the thread on the one side of the piece on short circular needle size 8 mm and knit up 1 stitch in each of the 5-5-7-7-9-9 stitches cast on under the sleeve = 44-48-52-54-56-60 stitches. Work stocking stitch in the round. When the sleeve measures 35-33-32-30-29-27 cm increase 8-8-10-10-10-10 stitches evenly spaced = 52-56-62-64-66-70 stitches. Change to circular needle size 7 mm and work rib (= knit 1 / purl 1) for 4 cm. Cast off with knit over knit and purl over purl. Make sure the cast-off edge is not tight – remember CASTING OFF TIP. The sleeve measures approx. 39-37-36-34-33-31 cm (shorter sleeve in the larger sizes due to longer yoke). Work the other sleeve in the same way. ASSEMBLY: Fold the top half of the neck to the inside and sew down so the neck is double. To avoid the neck being tight it is important that the seam is elastic and not tight. |
|||||||
Diagram explanations |
|||||||
|
|||||||
 |
|||||||
Have you finished this pattern?Tag your pictures with #dropspattern #rememberwhensweater or submit them to the #dropsfan gallery. Do you need help with this pattern?You'll find 20 tutorial videos, a Comments/Questions area and more by visiting the pattern on garnstudio.com. © 1982-2026 DROPS Design A/S. We reserve all rights. This document, including all its sub-sections, has copyrights. Read more about what you can do with our patterns at the bottom of each pattern on our site. |
|||||||


With over 40 years in knitting and crochet design, DROPS Design offers one of the most extensive collections of free patterns on the internet - translated to 17 languages. As of today we count 324 catalogues and 12290 patterns translated into English (UK/cm). 12290
We work hard to bring you the best knitting and crochet have to offer, inspiration and advice as well as great quality yarns at incredible prices! Would you like to use our patterns for other than personal use? You can read what you are allowed to do in the Copyright text at the bottom of all our patterns. Happy crafting!
Post a comment to pattern DROPS 205-23
We would love to hear what you have to say about this pattern!
If you want to leave a question, please make sure you select the correct category in the form below, to speed up the answering process. Required fields are marked *.