
Popular categories
Looking for a yarn?


Comments / Questions (38)
![]() Maria Kassalia wrote:
Maria Kassalia wrote:
Was heißt 10 maschen unter denn arm glatt rechts stricken muß ich die 10 maschen zunehmen ich habe nach denn 82 stillegente maschen weitere 10 maschen rechts geschtrickt aber das kommt am ende nicht hin. vielen dank
26.09.2019 - 23:20DROPS Design answered:
Liebe Frau Kassalia, Das Rumpftteil wird so aufgeteilt: stricken Sie die ersten 51 Maschen glatt rechts, dann legen Sie die nächsten 82 Maschen still und schlagen Sie 10 neuen Maschen (= unter dem Arm), dann stricken Sie die nächsten 102 Maschen gallt rechts, legen Sie die nächsten 82 M still und schlagen Sie 10 neuen Maschen an (= unter dem Arm) und stricken Sie die letzten 51 Maschen glatt rechts. Siehe auch dieses Video ab 6:52. Viel Spaß beim stricken!
27.09.2019 - 08:21
![]() Katrin wrote:
Katrin wrote:
Hei har alkurat begynt å strikke men det er noe som ikke stemmer . På bildet ser det ut som om det bare er 2 riller før A1 begynner men når jeg følger oppskriften får jeg 3 riller før jeg begynner med A1 er det en feil i oppskriften for den kanten jeg får er bredere
24.09.2019 - 19:06DROPS Design answered:
Hej Katrin, du har ret, du strikker kun 1 rille, det er rettet i opskriften - tak for info :)
26.09.2019 - 08:20
![]() Maria Kassalia wrote:
Maria Kassalia wrote:
Hallo ich versuche das kleid zu stricken bei der 2 und 3 zunahme ist es richtig A1 zu wiederholen oder A3.
05.09.2019 - 20:54DROPS Design answered:
Liebe Frau Kassalia, die 3Zunahmenrunden werden in A.1 gestrickt und zwar in jeder der 3 Runden mit einem Pfeil; nach der 2. Zunahmen, haben Sie jetzt genügend Maschen um A.1 25-34 x (siehe Grösse) in der Breite zu stricken, nach dem 3. Pfeil/Zunahmen haben Sie genügend Maschen um A.1 26-36 x in der Breite zu stricken. Nach A.1 stricken Sie A.2. Viel Spaß beim stricken!
06.09.2019 - 07:52
![]() Yvonne wrote:
Yvonne wrote:
Volgens mij staat er in de 21nld van patroon A2 een fout hier hou ik op het laatst 7 steken over ipv 5 steken.
18.08.2019 - 15:58DROPS Design answered:
Dag Yvonne,
Het aantal steken op de naald zou gelijk moeten blijven nadat je naald 21 uit telpatroon A.2 hebt gebreid. (De omslagen en minderingen compenseren elkaar.)
01.09.2019 - 13:57
![]() Line wrote:
Line wrote:
Inspiration tout à fait divine
30.07.2019 - 01:53
![]() Yvonne wrote:
Yvonne wrote:
Heel mooi jurk. Hopelijk komt de beschrijving snel zou hem graag willen maken
09.07.2019 - 14:43
![]() Beata wrote:
Beata wrote:
Piękna sukienka!
08.07.2019 - 17:29
![]() Stefania wrote:
Stefania wrote:
Non vedo l'ora di fare questo abito ai ferri!
18.06.2019 - 13:25
![]() Claire wrote:
Claire wrote:
Amo este vestido
17.06.2019 - 20:57
![]() Kerstin Strand wrote:
Kerstin Strand wrote:
En varm o skön klänning till vintern
16.06.2019 - 14:10
|
||||||||||||||||||||||||||||
Date Night#datenightdress |
||||||||||||||||||||||||||||
 |
 |
|||||||||||||||||||||||||||
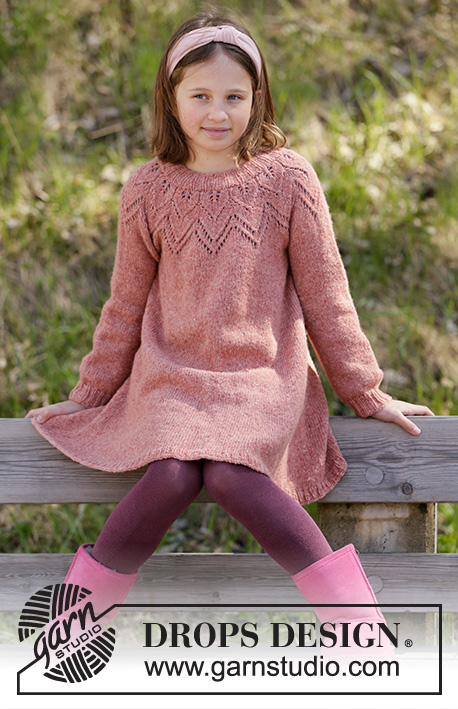
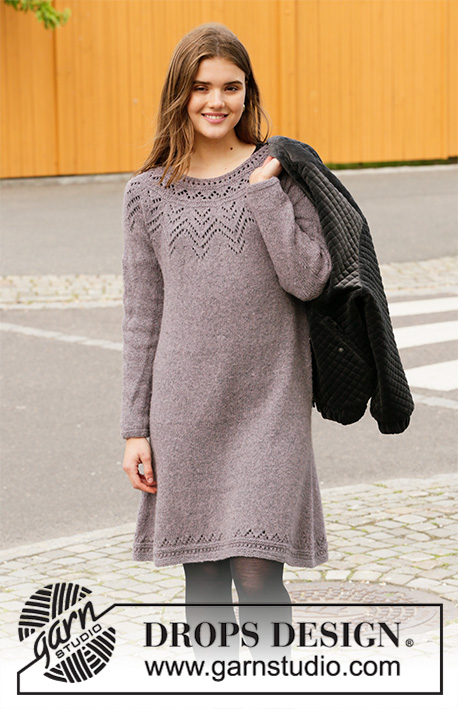
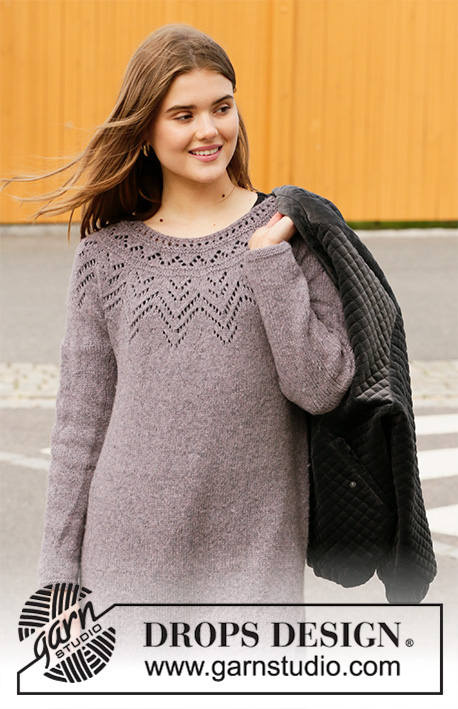
Knitted dress with round yoke in DROPS Sky. The piece is worked top down with lace pattern. Sizes S - XXXL.
DROPS 206-8 |
||||||||||||||||||||||||||||
|
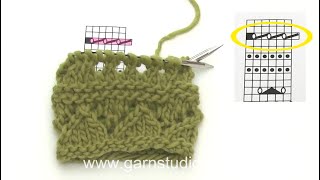
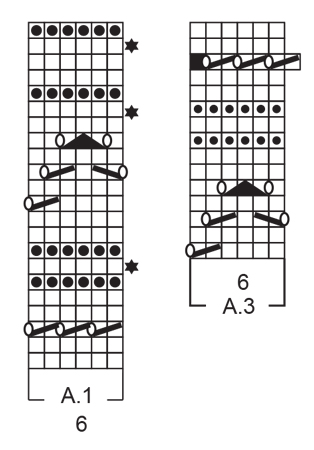
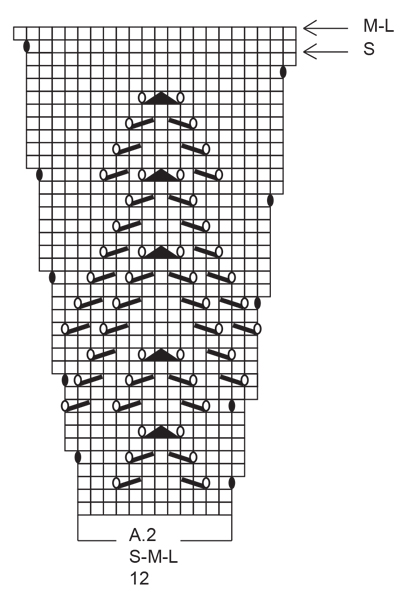
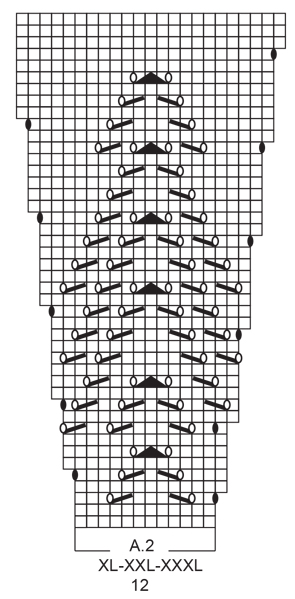
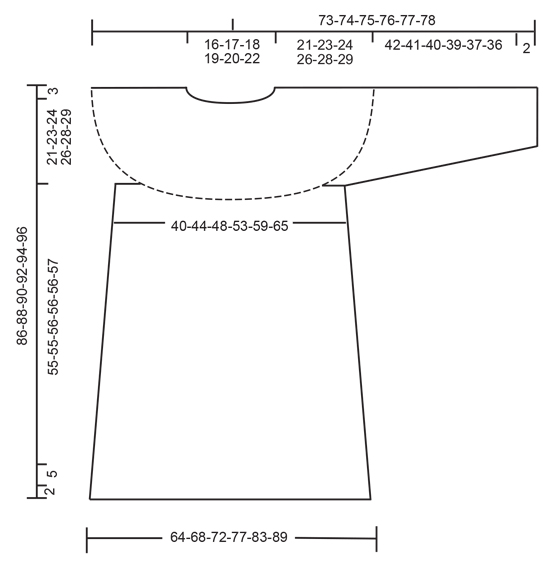
------------------------------------------------------- EXPLANATIONS FOR THE PATTERN: ------------------------------------------------------- RIDGE/GARTER STITCH (worked in the round): 1 ridge in height = 2 rounds; Knit 1 round and purl 1 round. PATTERN: See diagrams A.1 to A.3. Choose diagram for your size. ELEVATION (back of neck): The elevation is worked in garter stitch. Insert 1 marker thread at the beginning of the round (= mid back). Start from the right side and knit 7-8-8-9-9-10 stitches past the marker thread, turn tighten the strand and knit 14-16-16-18-18-20 back. Turn tighten the strand and knit 21-24-24-27-27-30, turn tighten the strand and knit 28-32-32-36-36-40 back. Turn tighten the strand and knit 35-40-40-45-45-50, turn tighten the strand and knit 42-48-48-54-54-60 back. Turn tighten the strand and knit 49-56-56-63-63-70, turn tighten the strand and knit 56-64-64-72-72-80 stitches, turn tighten strand and knit back to the marker thread. INCREASE TIP-1 (evenly spaced): To work out how to increase evenly, count the total number of stitches on the needle (e.g. 92 stitches) and divide by the number of increases to be made (e.g. 22) = 4.2. In this example, increase by making 1 yarn over after approx. each 4th stitch. On the next round work the yarn overs twisted to avoid holes. INCREASE TIP-2 (for sides of body): Work until there are 2 stitches left before the marker thread, make 1 yarn over, knit 4 (marker thread sits between these 4 stitches) make 1 yarn over (= 2 stitches increased at each marker thread; 4 stitches increased on round). On the next round work the yarn overs twisted to avoid holes. Then work the new stitches in stocking stitch. DECREASE TIP-1 (for sleeves): Decrease 1 stitch on each side of the marker thread as follows: Work until there are 3 stitches left before the marker thread, knit 2 together, knit 2 (marker thread sits between these 2 stitches), slip 1 stitch as if to knit, knit 1 and pass the slipped stitch over the knitted stitch. ------------------------------------------------------- START THE PIECE HERE: ------------------------------------------------------- DRESS – SHORT OVERVIEW OF THE PIECE: The piece is worked in the round with circular needle, top down. Then it is divided for body and sleeves and the body continued in the round with circular needle. The sleeves are worked in the round with short circular needle/double pointed needles. YOKE: Cast on 92-96-100-108-112-118 stitches with short circular needle size 3.5 mm and Sky. Work 1 RIDGE – read description above. Knit 1 round and increase 22-24-26-24-26-26 stitches evenly spaced – read INCREASE TIP-1 = 114-120-126-132-138-144 stitches. Purl 1 round. Change to circular needle size 4 mm. For a better fit you can now work an elevation at the back of the neck; makes the neck slightly higher – read ELEVATION. This elevation can be left out, which leaves the neck the same front and back. Work A.1 (= 6 stitches) over all stitches (= a total of 19-20-21-22-23-24 times in width). REMEMBER THE KNITTING TENSION! On each round with a star (= increase-round) increase as follows: INCREASE 1: Increase 24-24-24-24-30-30 stitches evenly spaced = 138-144-150-156-168-174 stitches. A.1 repeats 23-24-25-26-28-29 times in width. INCREASE 2: Increase 12-18-24-24-24-30 stitches evenly spaced = 150-162-174-180-192-204 stitches. A.1 repeats 25-27-29-30-32-34 times in width. INCREASE 3: Increase 6-6-6-12-12-12 stitches evenly spaced = 156-168-180-192-204-216 stitches. A.1 repeats 26-28-30-32-34-36 times in width. When A.1 has been completed 1 time in height the piece measures approx. 8 cm from the cast-on edge. Work A.2 (= 12 stitches) over all stitches (= 13-14-15-16-17-18 times in width). When A.2 has been worked 1 time in height there are 273-308-330-368-391-414 stitches on the round. On the next round increase 7-4-8-0-1-12 stitches evenly spaced = 280-312-338-368-392-426 stitches. The piece measures approx. 21-22-22-24-24-24 cm. Continue with stocking stitch in the round until the piece measures 21-23-24-26-28-29 cm from the cast-on edge. Now divide the piece for body and sleeves as follows: Work stocking stitch over the first 38-42-45-51-56-62 stitches, place the next 64-72-78-82-84-88 stitches on a thread for sleeve and cast on 8-8-10-10-12-12 stitches under the sleeve, work stocking stitch over the next 76-84-91-102-112-125 stitches, place the next 64-72-78-82-84-88 stitches on a thread for sleeve and cast on 8-8-10-10-12-12 stitches under the sleeve, work stocking stitch over the last 38-42-46-51-56-63 stitches. Body and sleeves are finished separately. THE PIECE IS NOW MEASURED FROM HERE. BODY: There are 168-184-202-224-248-274 stitches for the body. Insert 1 marker thread on each side of the body, in the middle of the 8-8-10-10-12-12 new stitches cast on under the sleeves; allow them to follow your work onwards, they will be used when increasing in the sides. When the piece measures 3 cm, increase 1 stitch on each side of both marker threads – read INCREASE TIP-2. Increase like this every 2nd cm a total of 25 times = 268-284-302-324-348-374 stitches. Continue with stocking stitch until the piece measures 55-55-56-56-56-57 cm. Work 1 round where you increase 2-4-4-0-0-4 stitches evenly spaced = 270-288-306-324-348-378 stitches. Work A.3 (= 6 stitches) the whole round. When A.3 is finished in height change to circular needle size 3.5 mm and work garter stitch for 2 cm. Cast off with knit. The piece measures approx. 86-88-90-92-94-96 cm from the shoulder down. SLEEVE: Place the 64-72-78-82-84-88 stitches from the thread on the one side of the piece on double pointed needles or short circular needle size 4 mm and knit up 1 stitch in each of the 8-8-10-10-12-12 stitches under the sleeve = 72-80-88-92-96-100 stitches. Insert 1 marker thread in the middle of the 8-8-10-10-12-12 stitches under the sleeve. Work stocking stitch in the round. When the piece measures 3 cm, decrease 1 stitch on each side of the marker thread - read DECREASE TIP-1. Decrease like this every 2½-2-1½-1½-1½-1½ cm a total of 13-16-19-19-20-21 times = 46-48-50-54-56-58 stitches. When the sleeve measures 42-41-40-39-37-36 cm (short measurements in larger sizes due to longer yoke), change to double pointed needles size 3.5 mm. Work garter stitch for 2 cm then cast off with knit. The sleeve measures approx. 44-43-42-41-39-38 cm from the division. Work the other sleeve in the same way. |
||||||||||||||||||||||||||||
Diagram explanations |
||||||||||||||||||||||||||||
|
||||||||||||||||||||||||||||
 |
||||||||||||||||||||||||||||
 |
||||||||||||||||||||||||||||
 |
||||||||||||||||||||||||||||
 |
||||||||||||||||||||||||||||
Have you finished this pattern?Tag your pictures with #dropspattern #datenightdress or submit them to the #dropsfan gallery. Do you need help with this pattern?You'll find 28 tutorial videos, a Comments/Questions area and more by visiting the pattern on garnstudio.com. © 1982-2026 DROPS Design A/S. We reserve all rights. This document, including all its sub-sections, has copyrights. Read more about what you can do with our patterns at the bottom of each pattern on our site. |
||||||||||||||||||||||||||||


With over 40 years in knitting and crochet design, DROPS Design offers one of the most extensive collections of free patterns on the internet - translated to 17 languages. As of today we count 324 catalogues and 12290 patterns translated into English (UK/cm). 12290
We work hard to bring you the best knitting and crochet have to offer, inspiration and advice as well as great quality yarns at incredible prices! Would you like to use our patterns for other than personal use? You can read what you are allowed to do in the Copyright text at the bottom of all our patterns. Happy crafting!
Post a comment to pattern DROPS 206-8
We would love to hear what you have to say about this pattern!
If you want to leave a question, please make sure you select the correct category in the form below, to speed up the answering process. Required fields are marked *.