
Popular categories
Looking for a yarn?


Comments / Questions (37)
![]() Anaïs wrote:
Anaïs wrote:
Merci pour votre réponse !
25.01.2021 - 10:05
![]() Anaïs wrote:
Anaïs wrote:
Bonjour, merci beaucoup pour ce magnifique modèle ! J'aurais une petite question. Je viens de finir l'empiècement au niveau de la flèche (L). Je me demandais si après avois fait glisser les mailles de la manche il fallait reprendre le motif de A4, A5, A6, A7, A8 pour le terminer ou si on reprenait directement à A9, A10, etc. ? Je vous remercie. Bonne journée.
24.01.2021 - 00:49DROPS Design answered:
Bonjour Anaïs, lorsque vous avez glissé les mailles des manches en attente, vous tricotez de suite A.9, A.10 etc.. mais choisissez bien votre rang pour continuer le motif après l'empiècement. Bon tricot!
25.01.2021 - 09:21
![]() Charlotte Dokkedal wrote:
Charlotte Dokkedal wrote:
Rigtig flot trøje, men vil gerne anvende Drops alpaka silk. Kan opskriften anvendes direkte med dette garn.?
29.07.2020 - 13:33DROPS Design answered:
Hej Charlotte, ja du kan bruge DROPS Brushed Alpaca Silk, prøv vores garnomregner, så ser du hvor meget du skal bruge :)
29.07.2020 - 15:28
![]() Meri Crescenzi wrote:
Meri Crescenzi wrote:
Molto bella la lavorazione, il modello e il colore.
20.03.2020 - 23:30
![]() Criss wrote:
Criss wrote:
C’est ok, j’ai trouvé :) je continue le tricot ! Merci pour votre patience :)
22.02.2020 - 13:04
![]() Criss wrote:
Criss wrote:
Cela je comprends ... C’est le premier rang que je ne sais pas comment commencer . En tricotant la taille L, après le rang envers de séparation des manches, Je dois commencer directement le premier rang par le point fantaisie de la flèche : 2 m ensemble, 1 jeté, 11 mailles ? Ou par tout un rang endroit sans motif? Je ne sais pas où me positionner sur la grille A.9a après le rang de séparation sur l’envers.
21.02.2020 - 16:25DROPS Design answered:
Bonjour Criss, dans tous les diagrammes vous commencez par 2 rangs jersey (= vous commencez au 1er rang de A.9a/A.10a = 2 rangs jersey), puis vous tricotez le point fantaisie comme avant d'après le rang 3, ex au rang 3 de A.9a: 1 m end, 1 jeté, 1 dim, 4 m end. Bon tricot!
24.02.2020 - 07:48
![]() Criss wrote:
Criss wrote:
Bonjour, je commence le dos & devants. Faut il tricoter le 1 er rang endroit une seconde fois en commençant par le rang avec la flèche de la taille ? (L) en ajoutant les mailles raglans où faire tout un rang à l’endroit sans motif ? Je ne comprends pas à quel endroit je dois commencé ce rang .... j’ai déjà monté les mailles supplémentaires et mis les marqueurs au milieu des 10 mailles. Je ne comprends pas la suite ... Merci beaucoup pour votre aide.
21.02.2020 - 11:50DROPS Design answered:
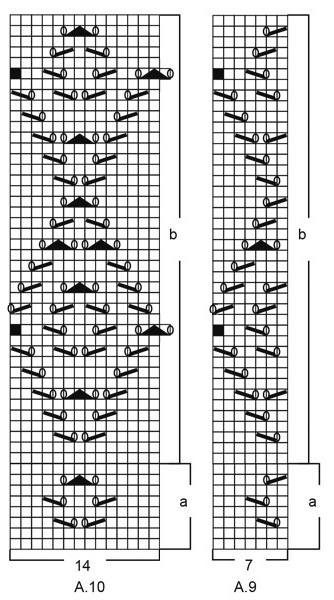
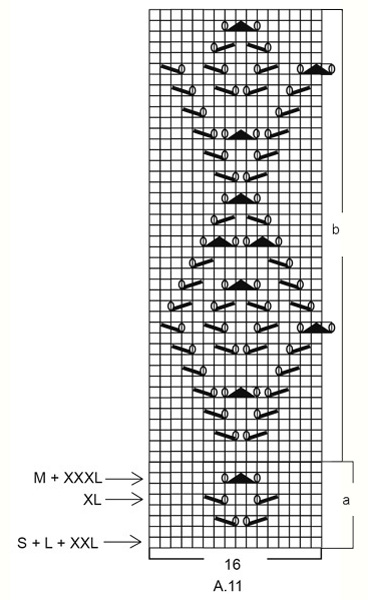
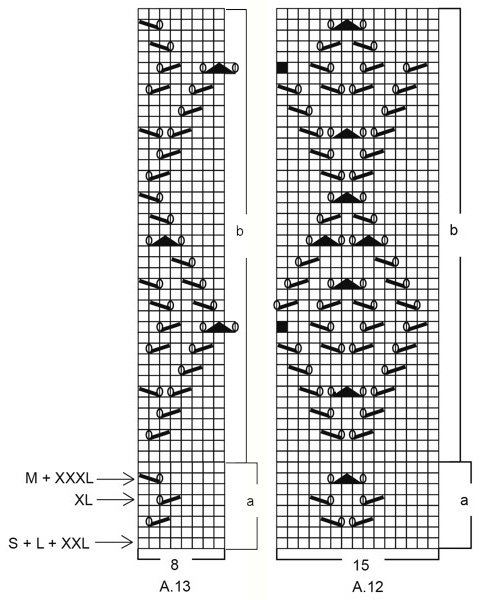
Bonjour Criss, le rang de division a été tricoté sur l'envers et vous avez maintenant 193 mailles au total, tricotez ces mailles ainsi - en commençant au 1er rang de chacun des diagrammes dans cette taille: 5 m point mousse, A.9a (= 7 m), A.10a (= 14 m), A.11a (= 16 m), 18 m jersey (le marqueur du côté est au milieu de ces 18 m), A.12a (15 m), 33 fois les 14 m de A.10a, A.11a (= 16 m), 18 m jersey (le 2ème marqueur est au milieu de ces 18 m), A.12a (15 m), A.10a (= 14 m), A.13a (8 m), 5 m point mousse. Bon tricot!
21.02.2020 - 13:23
![]() Chris wrote:
Chris wrote:
Je tricote la taille L ... Donc normalement il y a 14 mailles pour le raglan et manches. Les 16 mailles ne sont-elles pas pour la taille XL? Car en respectant les explications et le diagramme je termine bien avec a113 mailles mais comme expliqué avant, je commence avec 5+15 mais je termine avec 19+5. Pourtant le diagramme au milieu est correct....
17.02.2020 - 17:14DROPS Design answered:
Bonjour Chris, en taille L, vous commencez bien avec 14 m pour les manches + 1 jeté de chaque côté = vous avez donc 16 m pour chacune des manches. Vous avez 16 mailles dans A.1 et A.3 et 31 m dans A.2 = vous avez augmenté et avez donc maintenant 113 mailles, tout me semble absolument juste tel que vous le décrivez. Bon tricot!
18.02.2020 - 09:17
![]() Chris wrote:
Chris wrote:
Merci pour votre retour, le problème c'est qu'en suivant le diagramme, les 4 mailles de plus se trouvent en fin d'aiguille... Donc je ne termine pas avec 15+5 mais avec 19+5. Il y a donc un décalage d'un côté à l'autre... car de l'autre coté, je commence avec 5 + 15... D'où vient l'erreur ? Merci
17.02.2020 - 16:18DROPS Design answered:
Bonjour Chris, après le 1er rang, vous devez avoir: 5 m de bordure, 16 m de A.1, 2 m de raglan, 16 m de manche, etc... placez bien un marqueur à chaque transition pour bien visualiser chaque diagramme et que votre décompte soit juste pour que la suite des diagrammes soit juste également. Bon tricot!
17.02.2020 - 16:55
![]() Chris wrote:
Chris wrote:
Bonjour, j'ai commencé le tricot en taille L. (96 mailles + 9 augmentations=105 mailles). Ensuite je continue comme détaillé avec le motif : 105 mailles + 5+15+2+1+14+1+2+29+2+1+14+1+2+15+5= 109 mailles pourtant au final j'ai 113 mailles ...? Je me retrouve avec 4 mailles en trop à la fin de l'aiguille. J'ai défais et refais, toujours le même résultat... Pouvez vous m'aider ? Merci beaucoup !
17.02.2020 - 15:45DROPS Design answered:
Bonjour Chris, à la fin du 1er rang, vous devez bien avoir 113 mailles car vous avez augmenté 8 mailles au total: 2 pour chaque manche, 1 pour chaque devant et 1 m pour le dos, soit: 105 m + 8 = 113 m. Dans vos 109 mailles décomptées il doit manquer les jetés faits dans les diagrammes. Bon tricot!
17.02.2020 - 16:02
|
|||||||||||||||||||||||||
Berry Diamond Cardigan#berrydiamondcardigan |
|||||||||||||||||||||||||
 |
 |
||||||||||||||||||||||||
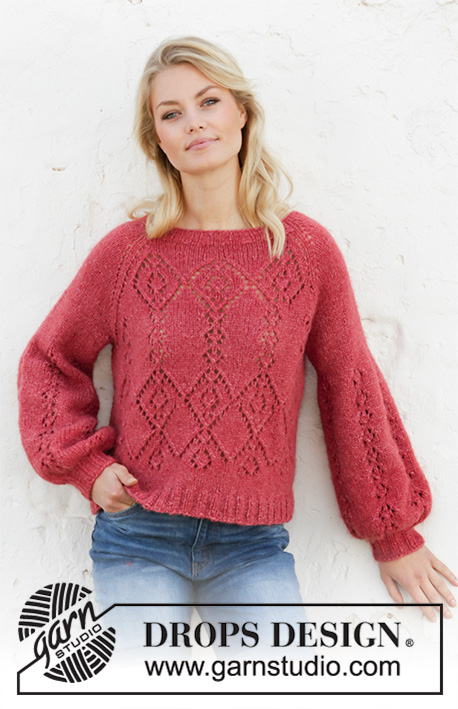
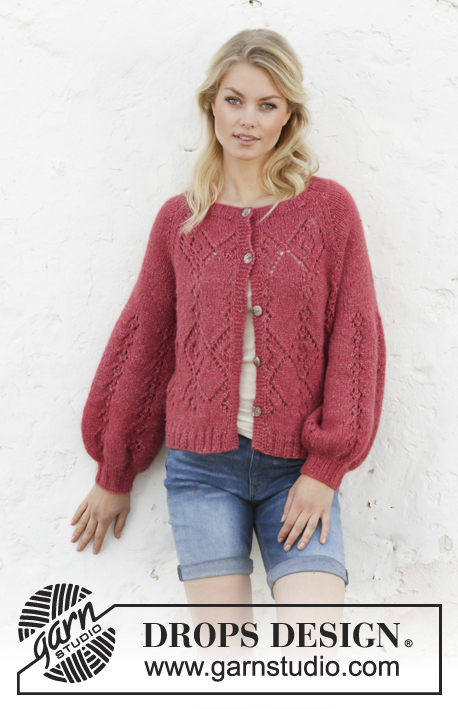
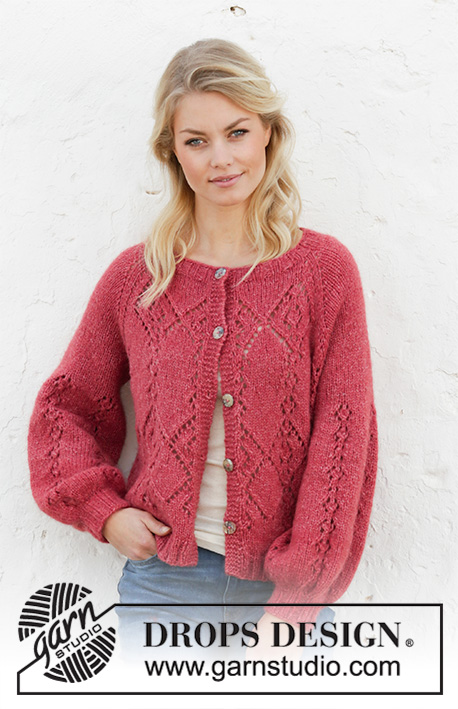
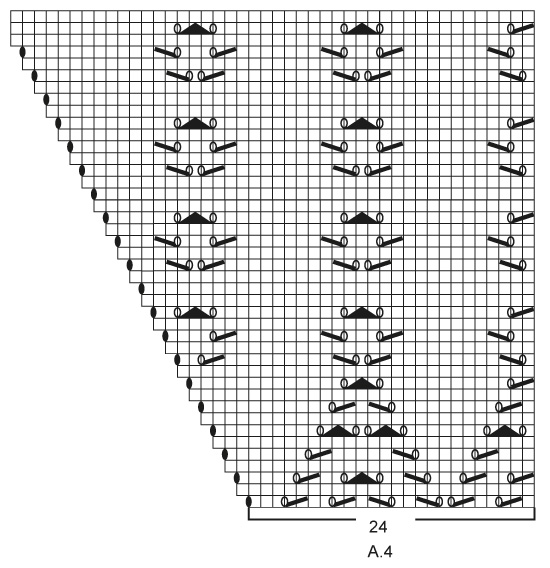
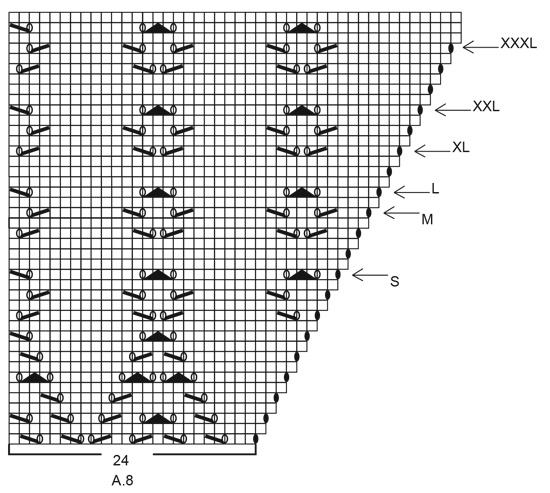
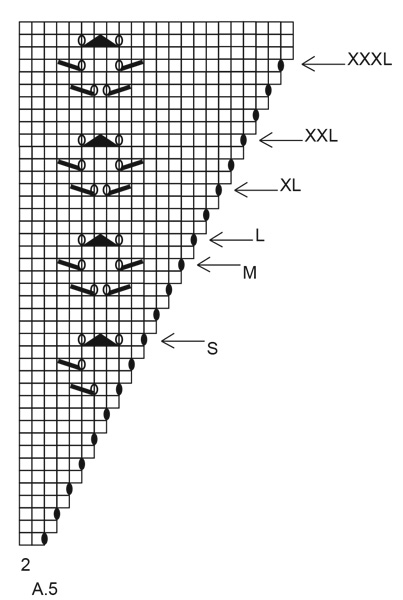
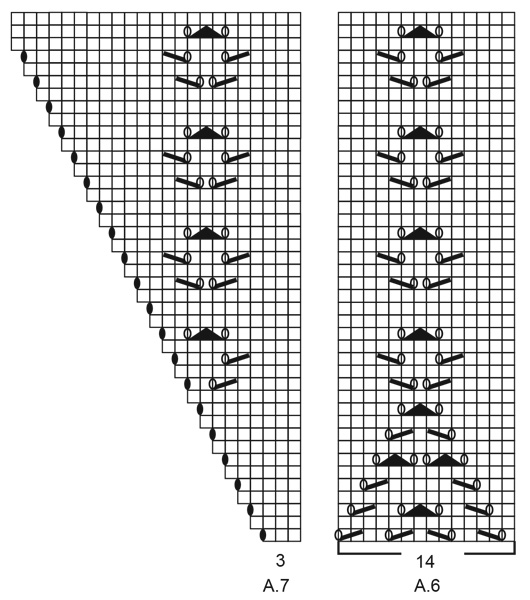
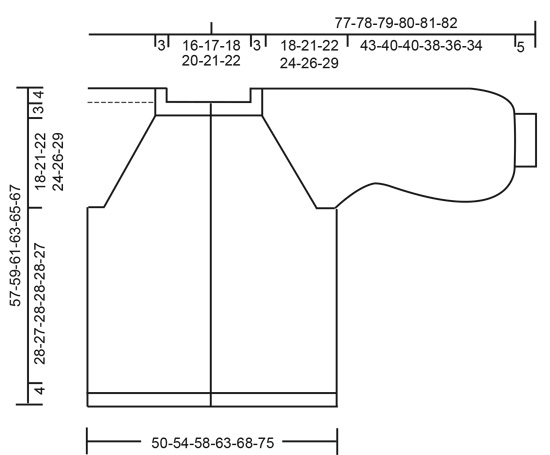
Knitted jacket with raglan and balloon sleeves in DROPS Air. Piece is knitted top down with lace pattern. Size: S - XXXL
DROPS 202-17 |
|||||||||||||||||||||||||
|
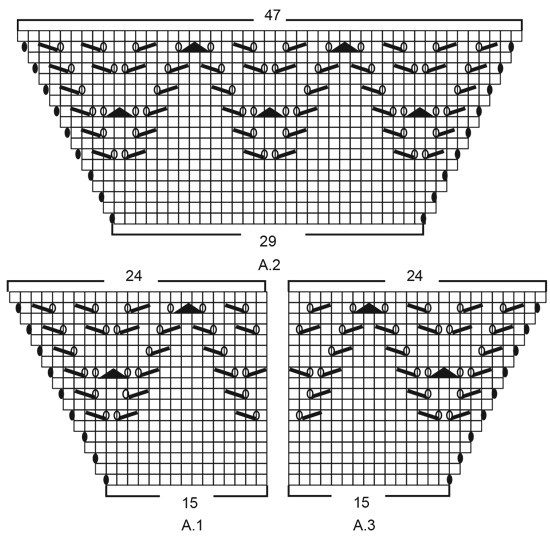
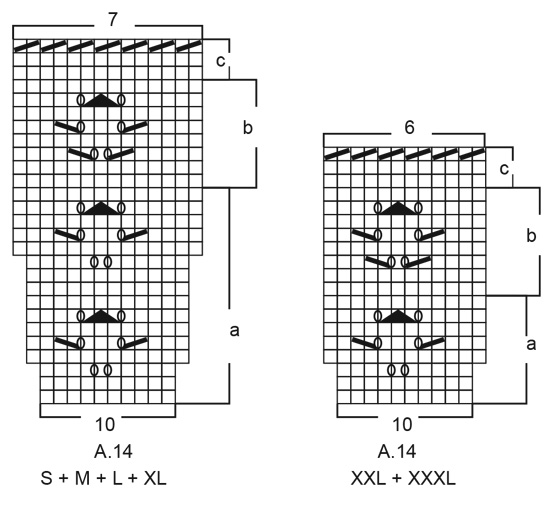
---------------------------------------------------------- EXPLANATION FOR THE PATTERN: ---------------------------------------------------------- GARTER STITCH (back and forth): K all rows. 1 ridge vertically = knit 2 rows. INCREASE/DECREASE TIP (evenly): To calculate how to increase/decrease evenly, use the total number of stitches on row (e.g. 88 stitches), minus bands (e.g. 10 stitches) and divide the remaining stitches by number of increases/decreases to be done (e.g. 9) = 8.7. In this example increase by making 1 yarn over after approx. every 9th stitch. On next row (wrong side) purl yarn overs twisted to avoid holes. Do not increase over bands. To decrease evenly in this example knit every 8th and 9th stitch together. PATTERN: See diagrams A.1 to A.14. Choose diagram for your size (applies to A.14). Diagrams show all rows in pattern seen from the right side. BUTTONHOLES: Decrease for buttonholes on right band (when garment is worn). Decrease from right side when 3 stitches remain on row as follows: Make 1 yarn over, knit the next 2 stitches together, knit last stitch. On next row knit yarn over to make holes. Decrease first buttonhole when rib in neck measures approx. 1½-2 cm. Then decrease the next 4-4-4-5-5-5 buttonholes, approx. 9½-10-10-9-9½-10 cm between each. DECREASE TIP (applies to sleeves): Decrease 1 stitch on each side of marker thread as follows: Work until 3 stitches remain before marker thread and knit 2 together, knit 2 (marker thread is between these stitches), slip 1 stitch knitwise, knit 1, pass slipped stitch over stitch worked. ---------------------------------------------------------- START THE PIECE HERE: ---------------------------------------------------------- JACKET - SHORT OVERVIEW OF THE PIECE: Work neck edge, yoke and body back and forth on circular needle from mid front, work top down. Work sleeves in the round on double pointed needles/a short circular needle, top down. NECK EDGE: Cast on 88-92-96-100-104-108 stitches (including 5 band stitches in each side towards mid front) on circular needle size 4.5 mm with Air. Purl 1 row from wrong side. Then work as follows from right side: 5 band stitches in GARTER STITCH - see explanation above - * knit 2, purl 2 *, repeat from *-* until 7 stitches remain, knit 2 and finish with 5 band stitches in garter stitch. Work rib like this for 3 cm. Knit 1 row from right side while increasing 8 stitches evenly in all sizes - read INCREASE/DECREASE TIP = 97-101-105-109-113-117 stitches. Switch to circular needle size 5.5 mm. Purl 1 row from wrong side inside 5 band stitches in garter stitch in each side. Then work yoke as explained below. YOKE: Work first row as follows from right side: 5 band stitches in garter stitch, work A.1 (= 15 stitches), work 2 stitches in stocking stitch (= raglan line), make 1 yarn over, work 10-12-14-16-18-20 stitches in stocking stitch (= sleeve), make 1 yarn over, work 2 stitches in stocking stitch (= raglan line), work A.2 (= 29 stitches), work 2 stitches in stocking stitch (= raglan line), make 1 yarn over, work 10-12-14-16-18-20 stitches in stocking stitch (= sleeve), make 1 yarn over, work 2 stitches in stocking stitch (= raglan line), work A.3 (= 15 stitches) and finish with 5 band stitches in garter stitch. There are now 105-109-113-117-121-125 stitches on needle. Continue pattern like this. I.e. on front and back piece increase in each side as shown in A.1, A.2 and A.3. On sleeves increase in each side with yarn over on each side of stitches in stocking stitch. Raglan line is always on 2 stitches in stocking stitch. Increase like this on every other row (i.e. every row from right side). On next row (wrong side) purl yarn overs twisted to avoid holes. On sleeves work the increased stitches in stocking stitch. On front and back piece work the increased stitches in pattern as shown in A.1, A.2 and A.3. REMEMBER THE KNITTING TENSION and remember BUTTONHOLES on right band - see explanation above. When A.1, A.2 and A3 have been worked vertically, there are 169-173-177-181-185-189 stitches on needle. Continue increases on sleeves and front and back piece as before but now work pattern A.4 to A.8 over A.1 to A.3 as follows: Then work A.4 (= 24 stitches) over A.1. Over the 47 stitches in A.2 work as follows: Work A.5 (= 2 stitches), work A.6 over 42 stitches (= 3 repetitions of 14 stitches) and work A.7 (= 3 stitches). Work A.8 (= 24 stitches) over A.3. Work band stitches, raglan line and sleeves as before. When row marked with arrow for your size has been worked, you have increased a total of 18-21-22-24-26-29 times from beginning of yoke, and there are now 241-269-281-301-321-349 stitches on needle. Piece measures approx. 21-24-25-27-29-32 cm from cast-on edge mid front. Work next row as follows from wrong side: Work 41-44-46-50-54-59 stitches as before (= front piece), slip the next 44-52-54-56-58-62 stitches on 1 stitch holder for sleeve, cast on 8-8-10-10-12-12 new stitches on row (= in the side under sleeve), work 71-77-81-89-97-107 stitches as before (= back piece), slip the next 44-52-54-56-58-62 stitches on 1 stitch holder for sleeve, cast on 8-8-10-10-12-12 new stitches on row (= in the side under sleeve) and work the 41-44-46-50-54-59 stitches as before (= front piece). Finish body and sleeves separately. NOW MEASURE THE PIECE FROM HERE! BODY: = 169-181-193-209-229-249 stitches. Insert 1 marker thread in each side, in the middle of the 8-8-10-10-12-12 stitches that were cast on under each sleeve. Move marker threads upwards when working, they mark the sides. Work first row as follows from right side (begin with row marked with arrow in your size to continue the pattern): 5 band stitches in garter stitch, work A.9a (= 7 stitches), work A.10a over the next 14-14-14-14-28-28 stitches (= 1-1-1-1-2-2 repetitions of 14 stitches), work A.11a (= 16 stitches), work 6-12-18-26-8-18 stitches in stocking stitch (marker thread is in the middle of these stitches), work A.12a (= 15 stitches), work A.10a over the next 42-42-42-42-70-70 stitches (= 3-3-3-3-5-5 repetitions of 14 stitches), work A.11a (= 16 stitches), work 6-12-18-26-8-18 stitches in stocking stitch (marker thread is in the middle of these stitches), work A.12a (= 15 stitches), work A.10a over the next 14-14-14-14-28-28 stitches (= 1-1-1-1-2-2 repetitions of 14 stitches), work A.13a (= 8 stitches) and finish with 5 band stitches in garter stitch. Repeat A.9a to A.13a vertically (work the remaining stitches as before) until piece measures approx. 4-5-4-6-4-4 cm from division – adjust to finish after a whole repetition vertically. Then continue on A.9b to A.13b, work the remaining stitches as before. Work until A.9b to A.13b have been worked 1 time vertically. then work in stocking stitch with 5 band stitches in garter stitch towards each side towards mid front. When piece measures 28-27-28-28-28-27 cm from division, knit 1 row from wrong side while increasing 31-35-39-39-43-51 stitches evenly = 200-216-232-248-272-300 stitches. Switch to circular needle size 4.5 mm. Work next row from right side as follows: 5 band stitches in garter stitch, * knit 2, purl 2 *, repeat from *-* until 7 stitches remain, knit 2 and finish with 5 band stitches in garter stitch. Continue rib like this for 4 cm. Cast off with knit over knit and purl over purl (to avoid a tight cast-off edge use circular needle size 5.5 mm). SLEEVE: Slip the 44-52-54-56-58-62 stitches from stitch holder in one side of piece on a short circular needle/double pointed needles size 5.5 mm and pick in addition up 1 stitch in each of the 8-8-10-10-12-12 stitches cast on under sleeve = 52-60-64-66-70-74 stitches. Insert 1 marker thread in the middle of the 8-8-10-10-12-12 stitches under sleeve and move the marker thread upwards while working, this is later used for decreasing. Begin round at the marker thread and work stocking stitch in the round. When piece measures 2 cm from division, decrease 2 stitches mid under sleeve - read DECREASE TIP. Decrease like this every other round 1-5-2-3-0-2 times in total = 50-50-60-60-70-70 stitches. When piece measures 7-8-8-6-8-6 cm, work pattern in the round as follows: Work A.14a over all stitches (= 5-5-6-6-7-7 repetitions of 10 stitches). When A.14a has been worked, there are 70-70-84-84-84-84 stitches on needle. Continue on A.14b. Repeat A.14b vertically until piece measures approx. 41-38-38-36-34-32 cm from division (shorter measurements in the larger sizes because of wider shoulders and longer sleeve cap) – adjust to finish after a whole repetition vertically. Continue on A.14c. When A.14c has been worked, there are 35-35-42-42-42-42 stitches on needle. Knit 1 round while decreasing 3-3-6-6-2-2 stitches evenly = 32-32-36-36-40-40 stitches. Switch to double pointed needles size 4.5 mm. Work rib = knit 2/purl 2 for 5 cm. Cast off with knit over knit and purl over purl (to avoid a tight cast-off edge use double pointed needles size 5.5 mm). Sleeve measures approx. 48-45-45-43-41-39 cm from division. Work the other sleeve the same way. ASSEMBLY: Sew the buttons on to the left band. |
|||||||||||||||||||||||||
Diagram explanations |
|||||||||||||||||||||||||
|
|||||||||||||||||||||||||
 |
|||||||||||||||||||||||||
 |
|||||||||||||||||||||||||
 |
|||||||||||||||||||||||||
 |
|||||||||||||||||||||||||
 |
|||||||||||||||||||||||||
 |
|||||||||||||||||||||||||
 |
|||||||||||||||||||||||||
 |
|||||||||||||||||||||||||
 |
|||||||||||||||||||||||||
 |
|||||||||||||||||||||||||
Have you finished this pattern?Tag your pictures with #dropspattern #berrydiamondcardigan or submit them to the #dropsfan gallery. Do you need help with this pattern?You'll find 25 tutorial videos, a Comments/Questions area and more by visiting the pattern on garnstudio.com. © 1982-2026 DROPS Design A/S. We reserve all rights. This document, including all its sub-sections, has copyrights. Read more about what you can do with our patterns at the bottom of each pattern on our site. |
|||||||||||||||||||||||||


With over 40 years in knitting and crochet design, DROPS Design offers one of the most extensive collections of free patterns on the internet - translated to 17 languages. As of today we count 324 catalogues and 12290 patterns translated into English (UK/cm). 12290
We work hard to bring you the best knitting and crochet have to offer, inspiration and advice as well as great quality yarns at incredible prices! Would you like to use our patterns for other than personal use? You can read what you are allowed to do in the Copyright text at the bottom of all our patterns. Happy crafting!
Post a comment to pattern DROPS 202-17
We would love to hear what you have to say about this pattern!
If you want to leave a question, please make sure you select the correct category in the form below, to speed up the answering process. Required fields are marked *.