
Popular categories
Looking for a yarn?


Comments / Questions (37)
![]() Maria Jose Rocha wrote:
Maria Jose Rocha wrote:
Muito gostava de fazer este modelo "Sweet Jasmine" mas bão entendo os pontos. seria possivel explicar me melhor o esquema? Muito obrigada
07.05.2024 - 12:18DROPS Design answered:
Bom dia, Pode sempre ver o separador com os tutoriais em vídeo, onde encontra vídeos que explicam a fazer os pontos. Bons crochés!
10.05.2024 - 10:51
![]() Marion wrote:
Marion wrote:
Goedemiddag, ik ben bezig met de poncho en het eerste deel is af. Tweede deel moet nog. Als ik verder lees snap ik niet hoe deze twee delen aan elkaar moeten worden gemaakt. Het aan elkaar haken zal vast wel lukken maar welke kanten moeten aan elkaar? Het lijkt meer op een omslagdoek dan een poncho. Ik wil het graag over mijn hoofd aan kunnen doen (zo lijkt het ook op de foto)en niet omslaan. Hopelijk kunt u me hier antwoord op geven. Alvast bedankt
30.01.2024 - 12:54DROPS Design answered:
Dag Marion,
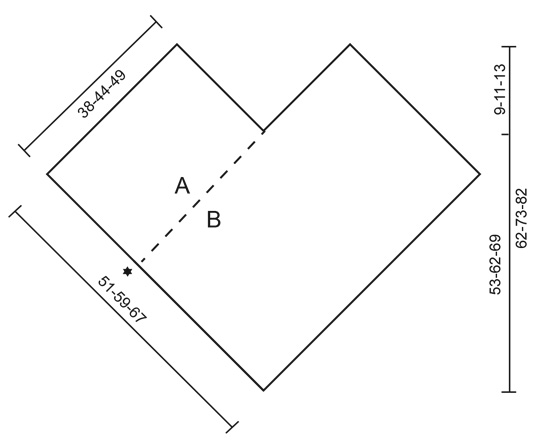
Als het goed is heb je nu een rechthoekige lap. Voor het tweede deel maak je nog zo'n rechthoekige lap. Vervolgens leg je een korte kant van lap 1 tegen het einde van een lange kant van lap 2 en deze naai je in elkaar. (Deze naad is de stippellijn A/B in de tekening). Daarna leg je de korte kant van lap 2 tegen de lange kant van lap 1 en deze zet je ook in elkaar.
31.01.2024 - 19:56
![]() Sinead Doyle wrote:
Sinead Doyle wrote:
Hi, I just finished the 2 panels and pinned them together. It seems a little tight. How do I make the short side longer. Thank you,
02.07.2023 - 23:56DROPS Design answered:
Dear Mrs Doyle, we are unfortunately not able to adjust every pattern to every single request; please contact your yarn store or any knitting forum for any further individual assistance. Thanks for your comprehension.
03.07.2023 - 11:06
![]() Edna P Nazareno wrote:
Edna P Nazareno wrote:
I'm still confused Are the 2 sections exactly the same size? The assembly says lay the "short side" A on the one section towards the bottom of other section B. Do u have photo lay out of assembly?
20.08.2022 - 01:09DROPS Design answered:
Dear Edna, both pieces are identical rectangles. You can see how to assemble them here: https://www.garnstudio.com/video.php?id=504&lang=en. Happy crocheting!
21.08.2022 - 20:57
![]() Edna P Nazareno wrote:
Edna P Nazareno wrote:
Hi This pattern mentioned 2 sections. Does that mean making front and back as sections of Row 1 to 6. I'm confused.
18.08.2022 - 01:42DROPS Design answered:
Dear Edna, yes, you make 2 similar pieces (sections). So make row 1-6 + Edge one time, than make new piece: row 1-6 + Edge again. Finally, you put the two parts (sections) together. Happy crocheting!
18.08.2022 - 05:42
![]() Edna P Nazareno wrote:
Edna P Nazareno wrote:
Hi! Where can I find the video link for the assembly / putting it together. Can u email me the link/video? That would be very helpful. I appreciate your help, thanks.
17.08.2022 - 21:48DROPS Design answered:
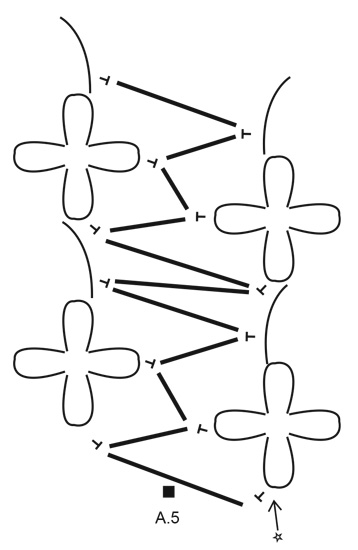
Dear Mrs Nazareno, we only have diagrams and written pattern to the assembly, see A.5 or follow the written explanation. Happy crocheting!
18.08.2022 - 09:10
![]() Edna P Nazareno wrote:
Edna P Nazareno wrote:
Hi! I saw a video for Drops 152-35 Is that video also for Drops 200-38? If it is, do u have video from Row 1 to 6? I'm having difficulty following the pattern first time. I can almost do project with pattern. Looking forward to ur reply
14.08.2022 - 02:30DROPS Design answered:
Dear Edna, you can see all available videos for this pattern under the pattern instructions, including the 152-35 A.1 chart video. We have no other videos step-by-step for this pattern. Happy crocheting!
14.08.2022 - 20:27
![]() Edna P Nazareno wrote:
Edna P Nazareno wrote:
What is a total of 5-6-7 times on Row 1? Do I have have to repeat A.2 7 times? I would appreciate your reply/help
12.08.2022 - 21:33DROPS Design answered:
Dear Mrs. Nazareno, yes, you have to repeat A.2 5-6-7 times on Row 1. Happy crocheting!
13.08.2022 - 17:02
![]() Gabrielle wrote:
Gabrielle wrote:
Hello. This is about the edge along side. At the very end, after making the last petal of the last flower, do I chain 7 stitches and then slip stitch in the starting stitch? Thank you for your help.
01.02.2022 - 09:21DROPS Design answered:
Dear Gabrielle, corrrect, you end the edge with 1 slip stitch in the first chain stitch at the bottom of piece (= 1st chain stitch in A.1). Happy crocheting!
01.02.2022 - 11:42
![]() Laura Pedersen wrote:
Laura Pedersen wrote:
Jeg har problemer med monteringen. Har I ikke en video, der kan hjælpe mig. Jeg kan ikke forstå forskrifter og kan derfor ikke montere de to dele. På forhånd mange tak
14.07.2021 - 16:34DROPS Design answered:
Hej Laura. Den streckade linjen på bilden är kortsidan på del 1 som du lägger mot den nedersta del på del2. I denna video kan du se hur du ska göra, i videon är det gjort med kun 1 del (och spegelvänt), men du gör samma sak bag på ponchoen. Hoppas det är till hjälp. Mvh DROPS Design
15.07.2021 - 08:24
|
||||||||||||||||||||||||||||
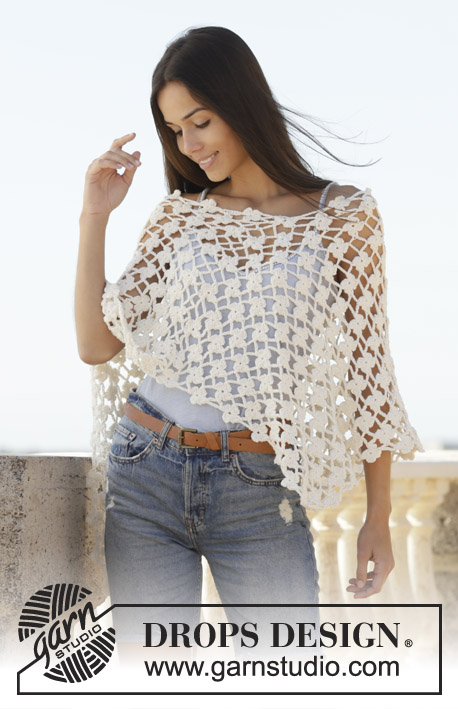
Sweet Jasmine#sweetjasmineponcho |
||||||||||||||||||||||||||||
 |
 |
|||||||||||||||||||||||||||
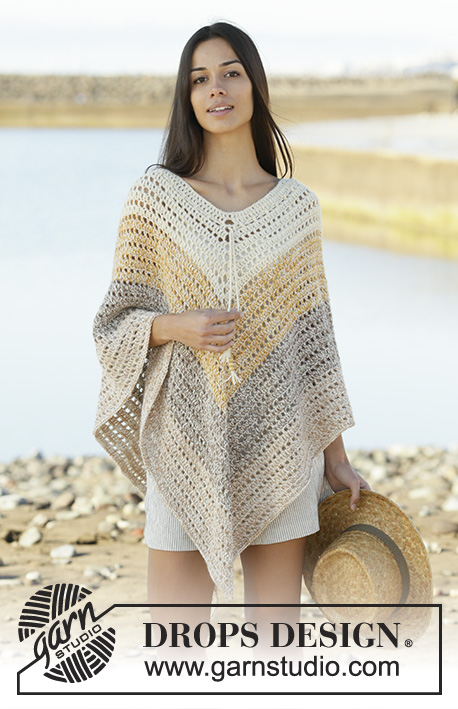
Crocheted poncho in DROPS Merino Extra Fine. The piece is worked with flower pattern. Sizes S - XXXL.
DROPS 200-38 |
||||||||||||||||||||||||||||
|
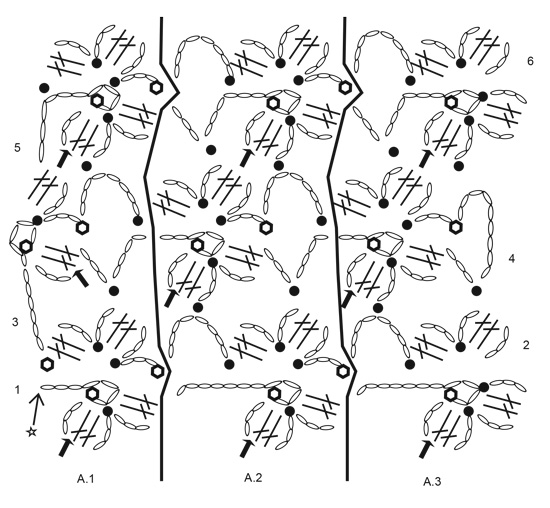
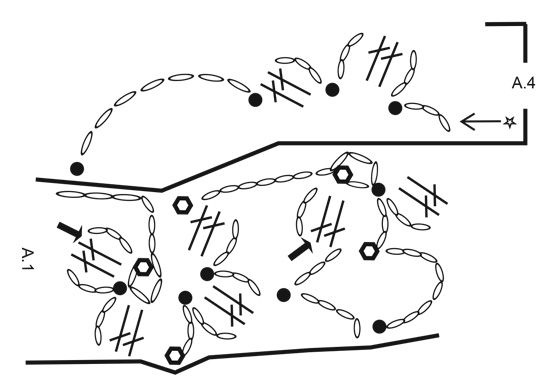
------------------------------------------------------- EXPLANATIONS FOR THE PATTERN: ------------------------------------------------------- PATTERN: See diagrams A.1 to A.5 (A.5 shows how to crochet the 2 sections together). ------------------------------------------------------- START THE PIECE HERE: ------------------------------------------------------- PONCHO - SHORT OVERVIEW OF THE PIECE: The piece is worked back and forth in 2 sections which are worked together to finish. There are 2 different patterns for the poncho: One with diagrams and one with further explanation to the diagrams. PONCHO (pattern with diagrams): Start with hook size 4.5 mm and Merino Extra Fine and work pattern as follows: Work A.1, A.2 a total of 5-6-7 times, A.3. Continue back and forth like this. REMEMBER THE CROCHET TENSION! When A.1 to A.3 have been completed in height, repeat rows 3 to 6 until the piece measures approx. 64-74-84 cm – adjust so you finish after row 4. Do not cut the strand! Continue from EDGE ALONG SIDE (further down the pattern)! PONCHO (pattern with explanations to the diagrams): Start with hook size 4 .5 mm and Merino Extra Fine and work pattern as follows: ROW 1: Work A.1 as follows: 7 chain stitches, 1 slip stitch in 4th chain stitch from hook (= chain-stitch ring), 3 chain stitches, turn the piece. Around the chain-stitch ring work (2 treble crochets, 3 chain stitches, 1 slip stitch, 3 chain stitches, 2 treble crochets). Work A.2 as follows: * 11 chain stitches, 1 slip stitch in 4th chain stitch from hook (=chain-stitch ring), 3 chain stitches, turn the piece. Around chain-stitch ring work (2 treble crochets, 3 chain stitches, 1 slip stitch, 3 chain stitches, 2 treble crochets) *, work from *-* a total of 5-6-7 times. Work A.3 as follows: 11 chain stitches, 1 slip stitch in 4th chain stitch from hook (=chain-stitch ring), 3 chain stitches, turn the piece. Around the chain-stitch ring work (2 treble crochets, 3 chain stitches, 1 slip stitch, 3 chain stitches, 2 treble crochets, 3 chain stitches, 1 slip stitch). REMEMBER THE CROCHET TENSION! ROW 2: Work A.3 as follows: 3 chain stitches, around first chain-stitch ring work (2 treble crochets, 3 chain stitches, 1 slip stitch, 3 chain stitches, 2 treble crochets). Work 1 slip stitch around first chain-space in A.3 on row below, 8 chain stitches. Work A.2 as follows: * 1 slip stitch in last chain stitch on same chain-space, 3 chain stitches. Around next chain-stitch ring work (1 slip stitch, 3 chain stitches, 2 treble crochets, 3 chain stitches, 1 slip stitch, 3 chain stitches, 2 treble crochets). Work 1 slip stitch around next chain-space on row below, 8 chain stitches *, work from *-* a total of 5-6-7 times. Work A.1 as follows: 1 slip stitch in last chain stitch on same chain-space, 3 chain stitches. Around next chain-stitch ring work (1 slip stitch, 3 chain stitches, 2 treble crochets, 3 chain stitches, 1 slip stitch, 3 chain stitches, 2 treble crochets). Work 1 slip stitch in last chain stitch on row below. ROW 3: Work A.1 as follows: 11 chain stitches, 1 slip stitch in 4th chain stitch from hook (=chain-stitch ring), 3 chain stitches, turn the piece. Around the chain-stitch ring work 2 treble crochets. Work 3 chain stitches, skip 1 chain-space on row below, 1 slip stitch around next chain-space, 4 chain stitches. Work A.2 as follows: * 6 chain stitches, 1 slip stitch in 4th chain stitch from hook (= chain-stitch ring), 3 chain stitches, turn the piece. Around the chain-stitch ring work 2 treble crochets, skip 2 chain-spaces on row below, 1 slip stitch around next chain-space, 3 chain stitches. Around the same chain-stitch ring work (1 slip stitch, 3 chain stitches, 2 treble crochets). Work 3 chain stitches, skip 1 chain-space on row below, 1 slip stitch around the same chain-space, 4 chain stitches *, work from *-* a total of 5-6-7 times. Work A.3 as follows: 6 chain stitches, 1 slip stitch in 4th chain stitch from hook (= chain-stitch ring), 3 chain stitches, turn the piece. Around the chain-stitch ring work 2 treble crochets, skip 2 chain-spaces on row below, 1 slip stitch around the next chain-space, 3 chain stitches. Around the same chain-stitch ring work (1 slip stitch, 3 chain stitches, 2 treble crochets, 3 chain stitches). Skip 1 chain-space on the row below, 1 slip stitch around the next chain-space. ROW 4: Work A.3 as follows: 9 chain stitches, skip 2 chain stitches on row below, 1 slip stitch in next chain stitch, 3 chain stitches. Around first chain-stitch ring work (1 slip stitch, 3 chain stitches, 2 treble crochets, 3 chain stitches, 1 slip stitch, 3 chain stitches, 2 treble crochets). Work A.2 as follows: * 1 slip stitch around next chain-space on row below, 8 chain stitches, skip 1 slip stitch + 2 chain stitches on row below, 1 slip stitch in next chain stitch, 3 chain stitches. Around next chain-stitch ring work (1 slip stitch, 3 chain stitches, 2 treble crochets, 3 chain stitches, 1 slip stitch, 3 chain stitches, 2 treble crochets) *, work from *-* a total of 5-6-7 times. Work A.1 as follows: 1 slip stitch around next chain-space on row below, 8 chain stitches, skip 1 slip stitch + 2 chain stitches on row below, 1 slip stitch in next chain stitch, 3 chain stitches. Around the last chain-stitch ring work (1 slip stitch, 3 chain stitches, 2 treble crochets). ROW 5: Work A.1 as follows: 10 chain stitches, 1 slip stitch in 4th chain stitch from hook (=chain-stitch ring), 3 chain stitches, turn the piece. Around the chain-stitch ring work 2 treble crochets, skip 2 chain-spaces on row below, 1 slip stitch around next chain-space, 3 chain stitches. Around the same chain-stitch ring work (1 slip stitch, 3 chain stitches, 2 treble crochets). Work A.2 as follows: * 3 chain stitches, skip 1 chain-space from row below, 1 slip stitch around next chain-space, 10 chain stitches, 1 slip stitch in 4th chain stitch from hook (=chain-stitch ring), 3 chain stitches, turn the piece. Around the chain-stitch ring work 2 treble crochets, skip 2 chain-spaces on row below, 1 slip stitch around next chain-space, 3 chain stitches. Around the same chain-stitch ring work (1 slip stitch, 3 chain stitches, 2 treble crochets) *, work from *-* a total of 5-6-7 times. Work A.3 as follows: 3 chain stitches, skip 1 chain-space on row below, 1 slip stitch around next chain-space, 10 chain stitches, 1 slip stitch in 4th chain stitch from the hook (=chain-stitch ring), 3 chain stitches, turn the piece. Around the chain-stitch ring work 2 treble crochets, skip 2 chain-spaces on row below, 1 slip stitch around next chain-space, 3 chain stitches. Around the same chain-stitch ring work (1 slip stitch, 3 chain stitches, 2 treble crochets, 3 chain stitches, 1 slip stitch). ROW 6: Work A.3 as follows: 3 chain stitches, around the first chain-stitch ring work (2 treble crochets, 3 chain stitches, 1 slip stitch, 3 chain stitches, 2 treble crochets). Work 1 slip stitch around the next chain-space on row below, 8 chain stitches. Work A.2 as follows: * skip 1 slip stitch + 2 chain stitches on row below, 1 slip stitch in next chain stitch, 3 chain stitches. Around the next chain-stitch ring work (1 slip stitch, 3 chain stitches, 2 treble crochets, 3 chain stitches, 1 slip stitch, 3 chain stitches, 2 treble crochets). Work 1 slip stitch around the next chain-space on row below, 8 chain stitches *, work from *-* a total of 5-6-7 times. Work A.1 as follows: Skip 1 slip stitch + 2 chain stitches on row below, 1 slip stitch in next chain stitch, 3 chain stitches. Around the last chain-stitch ring work (1 slip stitch, 3 chain stitches, 2 treble crochets, 3 chain stitches, 1 slip stitch, 3 chain stitches, 2 treble crochets), 1 slip stitch around the next chain-space. Repeat rows 3 to 6 until the piece measures approx. 64-74-84 cm – adjust so that you finish after row 4. Do not cut the strand! Continue with EDGE ALONG SIDE – read description below! EDGE ALONG SIDE: From here you continue working along the one side of the piece so there is a complete flower along the side with A.1. Work pattern according to diagram A.4 as follows: * Work 3 chain stitches. Around the chain-stitch ring work (1 slip stitch, 3 chain stitches, 2 treble crochets, 3 chain stitches, 1 slip stitch, 3 chain stitches, 2 treble crochets), 1 slip stitch around the next chain-space, 7 chain stitches, skip 1 slip stitch, work 1 slip stitch around the next chain-space *, work from *-* down the side. Finish with 1 slip stitch in first stitch worked on piece (= first chain stitch in A.1). Cut and fasten the strand. Work the second section in the same way. ASSEMBLY: Lay the short side (A) on the one section towards the bottom of the other section (B) - see illustration with black star – lay the sides so the flowers on the one section lie between the flowers on the other section. Work the 2 sections together as shown in A.5 and described below: NOTE: When working slip stitches in the petals, work in the spaces between 2 treble crochets. Fasten the strand with 1 slip stitch in the first petal on section B, * work 3 chain stitches, 1 slip stitch in the next petal on section A, work 3 chain stitches, 1 slip stitch in the next petal on section B, 3 chain stitches, 1 slip stitch in the next petal on section A, 3 chain stitches, 1 slip stitch around the next chain-space in section B, 3 chain stitches, 1 slip stitch around the chain-space in section A, 3 chain stitches, 1 slip stitch in next petal on section B *, work from *-* along the whole side. Cut and fasten strand. Repeat on back of poncho so the front and back are the same. |
||||||||||||||||||||||||||||
Diagram explanations |
||||||||||||||||||||||||||||
|
||||||||||||||||||||||||||||
 |
||||||||||||||||||||||||||||
 |
||||||||||||||||||||||||||||
 |
||||||||||||||||||||||||||||
 |
||||||||||||||||||||||||||||
Have you finished this pattern?Tag your pictures with #dropspattern #sweetjasmineponcho or submit them to the #dropsfan gallery. Do you need help with this pattern?You'll find 6 tutorial videos, a Comments/Questions area and more by visiting the pattern on garnstudio.com. © 1982-2026 DROPS Design A/S. We reserve all rights. This document, including all its sub-sections, has copyrights. Read more about what you can do with our patterns at the bottom of each pattern on our site. |
||||||||||||||||||||||||||||


With over 40 years in knitting and crochet design, DROPS Design offers one of the most extensive collections of free patterns on the internet - translated to 17 languages. As of today we count 324 catalogues and 12290 patterns translated into English (UK/cm). 12290
We work hard to bring you the best knitting and crochet have to offer, inspiration and advice as well as great quality yarns at incredible prices! Would you like to use our patterns for other than personal use? You can read what you are allowed to do in the Copyright text at the bottom of all our patterns. Happy crafting!
Post a comment to pattern DROPS 200-38
We would love to hear what you have to say about this pattern!
If you want to leave a question, please make sure you select the correct category in the form below, to speed up the answering process. Required fields are marked *.