
Popular categories
Looking for a yarn?


Comments / Questions (13)
![]() Dorte Christensen wrote:
Dorte Christensen wrote:
Hej det er den vanskeligste opskrift jeg har fulgt at det skifter mellem A2/og A 3 og tilsodst A1 og at du skriver halve for og bagstykke når man kun er nået til raglanærmerrene . Jeg giver op. Kh Dorte
17.05.2022 - 14:23
![]() Anna wrote:
Anna wrote:
Czy kropki wyrabiane są na przodzie i tyle? Nie widać tyłu bluzki.
21.02.2022 - 22:47DROPS Design answered:
Witaj Aniu, ażurowe kropki są zarówno na przodzie jak i na tyle. Oczywiście jeśli chcesz możesz je wykonać tylko na przodzie. Pozdrawiamy!
22.02.2022 - 08:45
![]() Clàudia wrote:
Clàudia wrote:
En concreto, esto no tiene sentido: RAGLÁN:Aumentar 1 punto a cada lado de 2 puntos derechos en cada transición entre la pieza del frente/espalda y las mangas (= 8 puntos aumentados en la vuelta). No entiendo dónde aumentar. ¿Tengo que seguir el esquema entre * * de A.1 + A. 2 etc.?
08.10.2021 - 13:29DROPS Design answered:
Hola Clàudia, A.1, A.2 y A.3 se trabajan como se indica en los diagramas, los aumentos se trabajan aparte. Los puntos de derecho a cada lado del marcapuntos no entran en los diagramas, van aparte. Hay que aumentar 1 punto antes de los puntos de derecho y después de ellos, por lo que al aumentar en las 4 transiciones se aumentan 8 puntos.
10.10.2021 - 23:13
![]() Clàudia wrote:
Clàudia wrote:
Hola, llegados a este punto no entiendo cómo continuar: Se ha aumentado 8 puntos para el RAGLÁN – leer explicación arriba. Continuar el patrón en redondo así y aumentar a cada 2 vueltas ¿Dónde tengo que aumentar y cómo? No entiendo, si se aumenta cada dos vueltas, ¿ tengo que tejer todo del derecho y a la siguiente aumentar?
08.10.2021 - 11:26
![]() Désirée Delsing wrote:
Désirée Delsing wrote:
När oket är klart står det att jag ska sticka från avigsidan. Varför ska jag sticka från avigsidan och hur ska jag bära mig åt för att göra detta?
12.07.2021 - 21:10DROPS Design answered:
Hej Desiree, det stemmer, det behøver du ikke gøre. Vi har taget bort det fra mönsteret. God fornøjelse!
14.07.2021 - 09:37
![]() Kristin Bergmann wrote:
Kristin Bergmann wrote:
Hvor mange masker skal det være på bærestykke mellom raglan fra A2? Skjønner ikkevoppskriften
17.03.2020 - 20:18DROPS Design answered:
Hej Kristin, Du starter midt bagpå med 10 masker inden det antal masker du skal strikke i din størrelse i A.2. Det vil sige at du da får 20 masker imellem A2 både foran og bagpå. God fornøjelse!
19.03.2020 - 14:19
![]() Christa wrote:
Christa wrote:
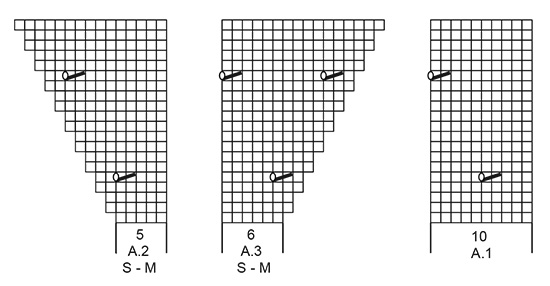
Ich möchte den Pulli in M stricken. Welches Diagramm wähle ich für das Lochmuster, nachdem ich die 1. R. des Musters wie angegeben gestrickt habe (mit Markierung etc.)? A2 mit 5 M. oder A3 mit 6 M.? Und welche Rolle spielt dann A1? Danke!
08.12.2019 - 16:14DROPS Design answered:
Liebe Christa, A.1 ist dasselbe für alle Grösse, A.2 und A.3 sollen Sie wählen je nach Ihre Grösse, dh S- M gilt für beide ersten Größen. A.1 = Lochmuster zwische A.2 und A.3 ; A.2 und A.3 = Lochmuster mit der Zunahmen für Raglan (= wie man diese Zunahmen strickt im Lochmuster). Viel Spaß bei stricken!
09.12.2019 - 09:31
![]() Francesca wrote:
Francesca wrote:
Scusate, era rimasta la mia domanda nel modulo preposto e pensavo che non avesse funzionato l’invio. Se vi è possibile e per non appesantire la navigazione degli altri utenti con messaggi inutili, potreste rimuovere sia questa richiesta che il messaggio doppio che ho inviato? Grazie mille!
25.09.2019 - 16:34
![]() Francesca wrote:
Francesca wrote:
Salve, sto lavorando la taglia M di questo graziosissimo golf, ma temo che ci sia un errore nella parte finale della descrizione dello sprone. Infatti io non ho 43 maglie nella prima parte del dietro, bensì 39; e il totale con le 79 maglie del davanti + le 40 dell’altra metà dietro più le 20 dei due sottomanica dà un totale di 178, come da voi indicato nella spiegazione relativa al corpo. Quindi credo che siano sbagliate le indicazioni del numero di maglie della prima parte del dietro
25.09.2019 - 16:28
![]() Francesca wrote:
Francesca wrote:
Salve, sto lavorando la taglia M di questo graziosissimo golf, ma temo che ci sia un errore nella parte finale della descrizione dello sprone. Infatti io non ho 43 maglie nella prima parte del dietro, bensì 39; e il totale con le 79 maglie del davanti + le 40 dell’altra metà dietro più le 20 dei due sottomanica dà un totale di 178, come da voi indicato nella spiegazione relativa al corpo. Quindi credo che siano sbagliate le indicazioni del numero di maglie della prima parte del dietro
22.09.2019 - 19:09DROPS Design answered:
Buongiorno Francesca. Abbiamo corretto il numero delle maglie nella parte da lei indicata. Per la taglia M, le maglie sono 39. La ringraziamo per la segnalazione. Buon lavoro!
22.09.2019 - 22:30
|
||||||||||
Awakening Spring#awakeningspringsweater |
||||||||||
 |
 |
|||||||||
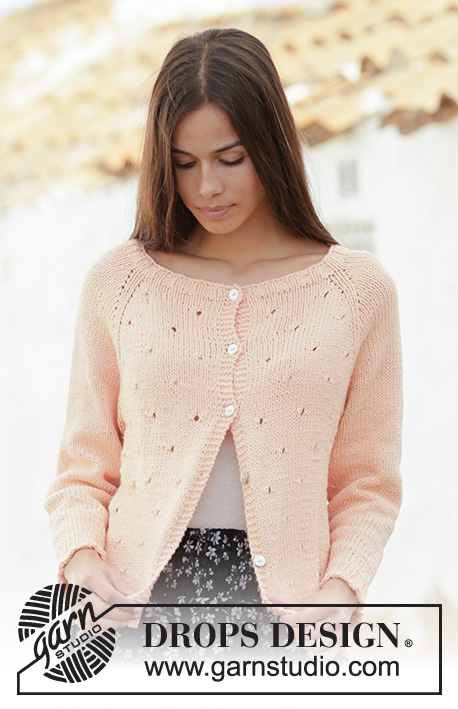
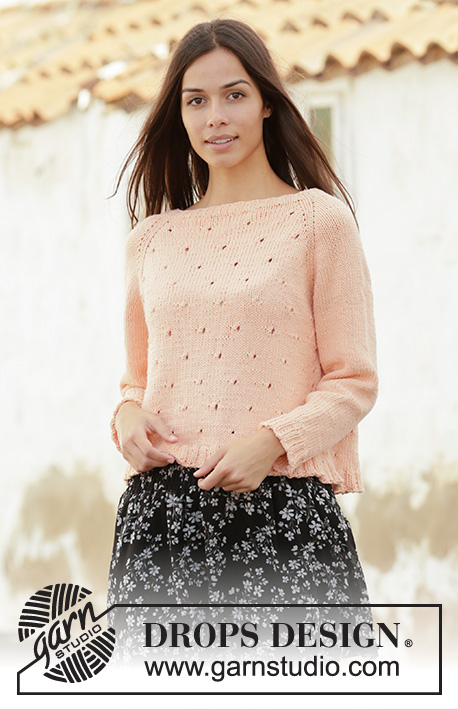
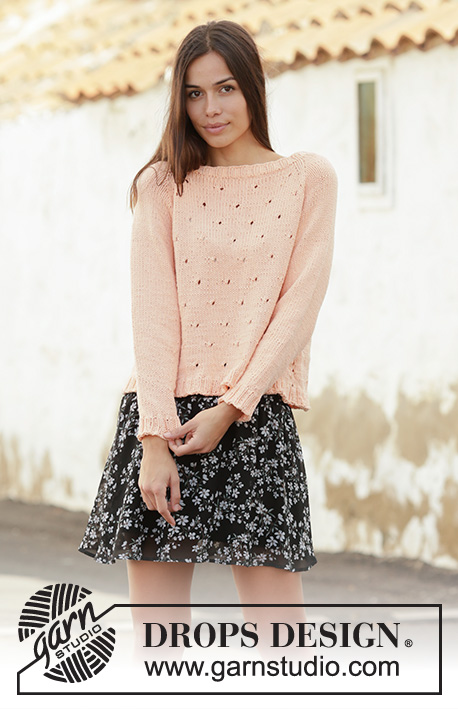
Knitted jumper with raglan in DROPS Paris. Piece is knitted top down with lace pattern. Size: S - XXXL
DROPS 202-32 |
||||||||||
|
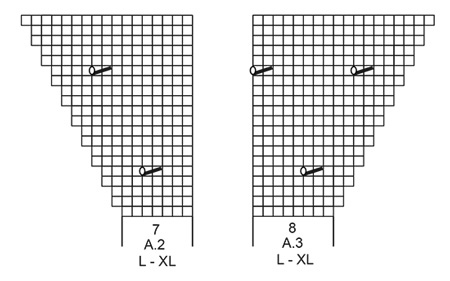
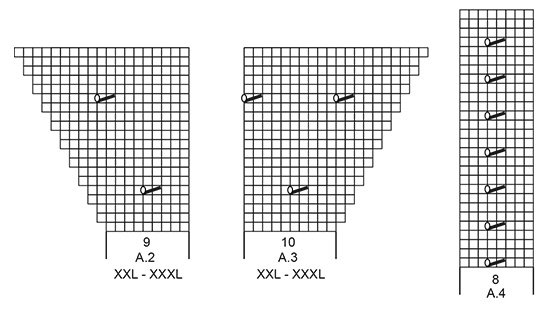
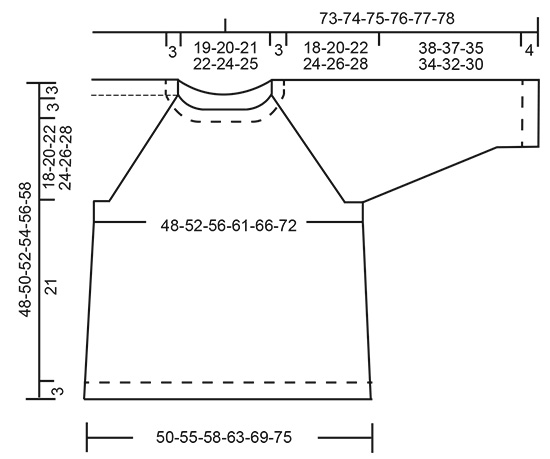
---------------------------------------------------------- EXPLANATION FOR THE PATTERN: ---------------------------------------------------------- PATTERN: See diagrams A.1 to A.4. Choose diagram for your size. DECREASE TIP-1 (evenly): To calculate how to decrease evenly, use the total number of stitches on row (e.g. 92 stitches) and divide stitches by number of decreases to be done (e.g. 6) = 15.3. In this example decrease by knitting approx. every 14th and 15th stitch together. DECREASE TIP-2 (applies to sleeves): Decrease 1 stitch on each side of A.4 as follows: Work until 2 stitches remain before A.4 and knit 2 together, knit A.4, slip 1 stitch knitwise, knit 1, pass slipped stitch over stitch worked. INCREASE TIP-1 (applies to sides of body): Increase 1 stitch on each side of A.4 by making 1 yarn over. On next round knit yarn overs twisted to avoid holes. Work the new stitches in stocking stitch. INCREASE TIP-2 (evenly): To calculate how to increase evenly, use the total number of stitches on row (e.g. 170 stitches) and divide stitches by number of increases to be done (e.g. 34) = 5. In this example increase by making 1 yarn over after every 5th stitch. On next row (wrong side) work yarn overs twisted to avoid holes. RAGLAN: Increase 1 stitch in each side of 2 knit stitches in every transition between front/back piece and sleeves (= 8 stitches increased on round). Increase 1 stitch by making 1 yarn over. On next round knit yarn overs twisted to avoid holes. Then work the new stitch in stocking stitch on sleeves and work pattern on front and back piece. ---------------------------------------------------------- START THE PIECE HERE: ---------------------------------------------------------- JUMPER - SHORT OVERVIEW OF THE PIECE: Worked in the round on circular needle, top down. Work sleeves in the round on double pointed needles/a short circular needle, top down. NECK EDGE: Cast on 92-96-104-108-116-120 stitches on circular needle size 4 mm with Paris. Knit 1 round. Then work rib (= knit 2/purl 2) for 2½ cm. Knit 1 round while decreasing 6-10-10-14-14-18 stitches evenly - read DECREASE TIP-1 (evenly) = 86-86-94-94-102-102 stitches. Knit 1 round. YOKE: Switch to circular needle size 5 mm. Work PATTERN - read explanation above, as follows (round begins mid back): * A.1 over the first/next 10 stitches, A.2 – choose diagram for your size, over the next 5-5-7-7-9-9 stitches, make 1 yarn over, knit 1, insert a marker thread here (= half back piece/front piece), knit 1, make 1 yarn over, knit 8, make 1 yarn over, knit 1, insert a marker thread here (= sleeve), knit 1, make 1 yarn over, A.3 – choose diagram for your size, over the next 6-6-8-8-10-10 stitches, A.1 over the next 10 stitches (= half front piece/back piece) *, work from *-* 1 more time on round. 8 stitches have been increased for RAGLAN - read explanation above. Continue pattern in the round like this and increase every other round 18-22-23-26-28-30 times in total = 230-262-278-302-326-342 stitches. REMEMBER THE KNITTING TENSION. When diagrams have been worked vertically, continue pattern the same way. I.e. work according to A.2/A.3 towards raglan line on front piece and back piece, and there is now from for 2 more repetition of A.1 between A.2 and A.3 on front pieces and back piece. Continue sleeves in stocking stitch. When all increases for raglan are done, piece measures approx. 21-23-25-27-29-31 cm from cast-on edge and down mid front. NOTE: Work some of the stitches (= 1-1-0-1-1-3 stitches) on sleeves on to needle for body, so that the transition between body and sleeves are now longer at the marker threads. Work the first 35-39-41-45-49-53 stitches (= half back piece), slip the next 44-52-56-60-64-64 stitches on a stitch holder (= sleeve), cast on 10-10-12-12-14-16 new stitches on needle (= in the side under sleeve), work the next 71-79-83-91-99-107 stitches (= front piece), slip the next 44-52-56-60-64-64 stitches on a stitch holder (= sleeve), cast on 10-10-12-12-14-16 new stitches on needle (= in the side under sleeve), work the remaining 36-40-42-46-50-54 stitches (= half back piece). NOW MEASURE PIECE FROM HERE! BODY: = 162-178-190-206-226-246 stitches. Work A.4 (= 8 stitches) over the middle 8 stitches under sleeves, and work as many repetitions lace pattern that will fit out towards each side (pattern should fit pattern on yoke!), work the remaining stitches in stocking stitch. When piece measures 4 cm, increase 1 stitch on each side of A.4 in each side - READ INCREASE TIP-1. Increase like this every 6 cm 2 times in total in all sizes = 170-186-198-214-234-254 stitches. Continue until piece measures 21 cm (adjust to finish after a lace pattern vertically + some rounds in stocking stitch). Now increase 34-38-42-46-46-50 stitches evenly – read INCREASE TIP-2 = 204-224-240-260-280-304 stitches. Switch to circular needle size 4 mm. Work rib (knit 2/purl 2) for 3 cm. Cast off stitches with knit over knit and purl over purl. Make sure that the cast-off edge is not too tight. Use a larger needle size when casting off. Jumper measures approx. 48-50-52-54-56-58 cm from shoulder and down. SLEEVE: Slip the 44-52-56-60-64-64 stitches from stitch holder in one side back on a short circular needle/double pointed needles size 5 mm. Pick in addition up 1 stitch in each of the 10-10-12-12-14-16 stitches under sleeve = 54-62-68-72-78-80 stitches. Continue in the round with stocking stitch and work A.4 over the middle 8 stitches under sleeve. When piece measures 4 cm, decrease 2 stitches under sleeves - read DECREASE TIP-2. Decrease in the different sizes as follows: Size S: Decrease like this every 3 cm 5 times and every 4 cm 4 times (= 9 decreases in total). Size M: Decrease like this every 2 cm 6 times and every 3 cm 6 times (= 12 decreases in total). Size L: Decrease like this every 2 cm 14 times in total. Size XL: Decrease like this every cm 8 times and every 2 cm 8 times (= 16 decreases in total). Size XXL: Decrease like this every cm 9 times and every 2 cm 9 times (= 18 times in total). Size XXXL: Decrease like this every cm 10 times and every 2 cm 8 times (= 18 decreases in total). When all decreases on sleeve are done there are 36-38-40-40-42-44 stitches on round. Continue until sleeve measures 38-37-35-34-32-30 cm (shorter measurements in the larger sizes because of longer yoke). Now increase 8-6-8-8-10-8 stitches evenly – remember INCREASE TIP-2 = 44-44-48-48-52-52 stitches. Switch to double pointed needles size 4 mm. Work rib (knit 2/purl 2) for 4 cm. Cast off stitches with knit over knit and purl over purl. Make sure that the cast-off edge is not too tight. Use a larger needle size when casting off. Sleeve measures approx. 42-41-39-38-36-34 cm. Work the other sleeve the same way. |
||||||||||
Diagram explanations |
||||||||||
|
||||||||||
 |
||||||||||
 |
||||||||||
 |
||||||||||
 |
||||||||||
Have you finished this pattern?Tag your pictures with #dropspattern #awakeningspringsweater or submit them to the #dropsfan gallery. Do you need help with this pattern?You'll find 22 tutorial videos, a Comments/Questions area and more by visiting the pattern on garnstudio.com. © 1982-2026 DROPS Design A/S. We reserve all rights. This document, including all its sub-sections, has copyrights. Read more about what you can do with our patterns at the bottom of each pattern on our site. |
||||||||||


With over 40 years in knitting and crochet design, DROPS Design offers one of the most extensive collections of free patterns on the internet - translated to 17 languages. As of today we count 324 catalogues and 12290 patterns translated into English (UK/cm). 12290
We work hard to bring you the best knitting and crochet have to offer, inspiration and advice as well as great quality yarns at incredible prices! Would you like to use our patterns for other than personal use? You can read what you are allowed to do in the Copyright text at the bottom of all our patterns. Happy crafting!
Post a comment to pattern DROPS 202-32
We would love to hear what you have to say about this pattern!
If you want to leave a question, please make sure you select the correct category in the form below, to speed up the answering process. Required fields are marked *.