Comments / Questions (72)
![]() Diana wrote:
Diana wrote:
Buongiorno. Sono arrivata al giro a diritto dopo il collo in cui fare i gettati per gli aumenti. Non ci dovrebbe essere dopo di questo un giro a diritto per lavorare gli aumenti? O si comincia subito con gli schemi A1, A2, ecc. ? Grazie per la risposta
26.10.2023 - 22:29DROPS Design answered:
Buonasera Diana, dopo gli aumenti sul collo, si cambiano i ferri e si inizia la lavorazione dello sprone. Buon lavoro!
29.10.2023 - 23:14
![]() Merete Wøhlk wrote:
Merete Wøhlk wrote:
Fejl i str l Ryg og forstykke 290 masker. 145 til ryg Der skal tages 2 masker ind jævnt fordelt. Det er 143 masker, men der skal være 147 masker. I str large skal de to masker tages ud i stedet. Så passer ribben også Venlig hilsen Merete
13.07.2023 - 15:55
![]() Elodie wrote:
Elodie wrote:
Bonjour je fais la taille XXL , j’ai fait toute mes augmentations mais je n’ai pas les 35 cms. Je n’arrive pas a centré mes motifs en faisant 4 mailles Jersey puis A2 (16 fois) et 5 mailles pour finir. Pourriez-vous m’aider je suis désespérée. Merci
25.03.2023 - 18:27DROPS Design answered:
Bonjour Élodie, tricotez les 2 mailles au début de chaque manche en suivant A.6 (ainsi vous avez toujours 1 jeté comme les augmentations du raglan auparavant, mais en diminuant 1 maille aussitôt, on évite d'augmenter, on conserver juste le motif ajouré); et, lorsqu'il reste 2 mailles à la fin de la manche, avant les 2 mailles du raglan, tricotez A.7, (ainsi vous avez un motif ajouré comme les augmentations du raglan, mais sans augmenter). Bon tricot!
27.03.2023 - 09:10
![]() Joanna wrote:
Joanna wrote:
Dzień dobry, nie ppotrafię zrozumieć opisu , jak ze 110 oczek ma być 122 oczka, żadne wyjaśnienie mi nie pomogło. Liczyłam i nic, co robię żle. Proszę o pomoc. Joanna.
29.01.2023 - 17:45DROPS Design answered:
Witaj Joanno, w pierwszym okrążeniu schematów dodasz 4 narzuty w wyznaczonych miejscach (patrz opis; dodane 4 oczka) oraz dodajesz po 2 oczka w każdym schemacie A.1 i A.3 (8 dodanych oczek). 110+4+8=122 oczka. Pozdrawiamy!
30.01.2023 - 08:54
![]() Noëlle wrote:
Noëlle wrote:
Je ne comprends pas, est ce choses différentes ou les mêmes augmentations? \"Continuer ainsi. Autrement dit, on augmente pour le dos et le devant de chaque côté comme indiqué dans A.1 et A.3. On augmente pour les manches de chaque côté, après/avant les 2 mailles jersey. On a toujours 2 mailles jersey à chaque raglan\" merci
01.12.2022 - 16:34DROPS Design answered:
Bonjour Noëlle, vous continuez à augmenter comme avant, autrement dit de chaque côté des 2 mailles jersey de chaque raglan - les augmentations du devant et du dos figurent dans les diagrammes A.1 et A.3, celles des manches se font après les 2 m jersey du raglan (au début de la manche) avant les 2 m jersey du raglan (à la fin de la manche). Bon tricot!
02.12.2022 - 08:23
![]() Joanna wrote:
Joanna wrote:
Dzień dobry, zaczynam karczek, jestem po pierwszym okrążeniu, nie wiem jak przerabiać narzuty, wszystkie z dziurką, czy krzyżować oczka? Na zdjęciu widać tylko dziurki w reglanie. Dziękuję kolejny raz. Wdzięczna Joanna.
09.01.2022 - 12:52DROPS Design answered:
Witaj Joasiu, patrz symbole schematów A.1 i A.3. Tam przy brzegu schematu gdzie są dodawane oczka masz 2 symbole, które oznaczają narzut: jeden to taka czarna kropeczka (owal z czarnym środkiem) - w następnym okrążeniu przerobisz oczko przekręcone w miejscu tego narzutu, aby uniknąć dziur. Jeżeli jest kropeczka pusta w środku (na skraju i w środku schematu), oznacza to narzut, który w następnym okrążeniu jest przerabiany normalnie tak jak schodzi z drutu, tutaj będzie dziurka. Pozdrawiamy i miłej pracy!
09.01.2022 - 15:41
![]() Joanna wrote:
Joanna wrote:
Dzień dobry, z tego co zrozumiałam schemat A1 przerobić po 1x, schemat A2 powtórzyć 3X i dopiero potem schemat A3 itd? Z góry dziękuję. Pozdrawiam.
06.01.2022 - 11:31DROPS Design answered:
Witaj Joanno, tak jest. Trzymaj się ściśle opisu. Powodzenia!
06.01.2022 - 12:36
![]() Joanna wrote:
Joanna wrote:
Dzień dobry,\\r\\nNie mogę zrozumieć tych schematów, zaczynam karczek Sch, Przerobić 1-sze okrążenie następująco: schemat A.1 (= 8 oczek), powtarzać schemat A.2 ponad 30-30-30-40-40-40 następnymi oczkami (= 3-3-3-4-4-4 motywy po 10 o czek), A.3 (= 3 oczka), 2 oczka dżersejem (= reglan), to znaczy,że przerabiać w 1 okrążeniu sch. A1 ? Kiedy A22 i co znaczy 30? 3 motywy po 10 oczek. Wybaczcie, bardzo bym chciała zrobić ten sweterek, pomóżcie mi. Pozdrawiam.
02.01.2022 - 11:59DROPS Design answered:
Witaj Joanno, w rozmiarze M mamy: A.1 (przerabiasz ponad 8 o., po 2 narzutach w 1-szym rzędzie będzie 10 o.), A.2 ponad 30 o. (czyli powt. ten schemat 3 razy), A.3 (3 o.> po narzutach w 1-szym rzędzie będzie 5 o.), 2 o. dżersejem (reglan), 1 narzut, 10 o. dżersejem (rękaw), 1 narzut, 2 o. dżersejem, A.1 (8>10 o.), A.2 ponad 30 oczkami, A.3 (3>5 o.), 2 o. dżersejem (reglan), 1 narzut, 10 o. dżersejem (rękaw), 1 narzut, 2 o. dżersejem = 122 o. Jak czytać schematy w robótce na drutach znajdziesz TUTAJ (patrz fragment dotyczący robótki przerabianej na okrągło). Pozdrawiamy!
02.01.2022 - 19:07
![]() Joanna wrote:
Joanna wrote:
Przerobić 1 okrążenie na prawo, w tym samym czasie równomiernie dodając 8-2-2-16 -10-4 oczka - patrz DODAWANIE/ZAMYKANIE OCZEK = 110-110-110-130-130-130 oczek. Dalej przerabiać na drutach z żyłką na samym początku utknęłam. Sweter rozm. M , nie rozumiem ile oczek i gdzie dodać w 1 okr. 2, ale gdzie? Proszę o wyjaśnienie
01.01.2022 - 14:41DROPS Design answered:
Witaj Joanno, równomiernie dodajesz 2 oczka w 1-szym okrążeniu na prawo za ściągaczem wykończenia dekoltu (czyli np. za 1-szym i 54-tym oczkiem wykonasz 1 narzut). W następnym okrążeniu należy przerobić oczka przekręcone w miejscu narzutów, aby uniknąć dziur. Pozdrawiamy!
01.01.2022 - 23:19
![]() Annette wrote:
Annette wrote:
Ich scheitere leider schon in der 1. Runde der Passe. Es ist mir ein Rätsel wie ich von 110 angeschlagenen Maschen in dieser ersten Reihe auf 122 Maschen kommen soll. Was übersehe ich?
08.12.2021 - 21:18DROPS Design answered:
Liebe Annette, es wird bei der 1. Runde der Passe in A.1 und A.3 (Vorder- und Rückenteil = 2 Zunahmen x 4 = 8) je 2 Maschen zugenommen + 4 Umschläge (Ärmel) = 12 Maschen insgesamt werden zugenommen + 110 = 122 Maschen. Diese Lektion erklärt, wie man Diagramme strickt, und kann Ihnen sicher damit helfen. Viel Spaß beim stricken!
09.12.2021 - 07:29
Strawberry Swing#strawberryswingsweater |
|||||||||||||||||||
 |
 |
||||||||||||||||||
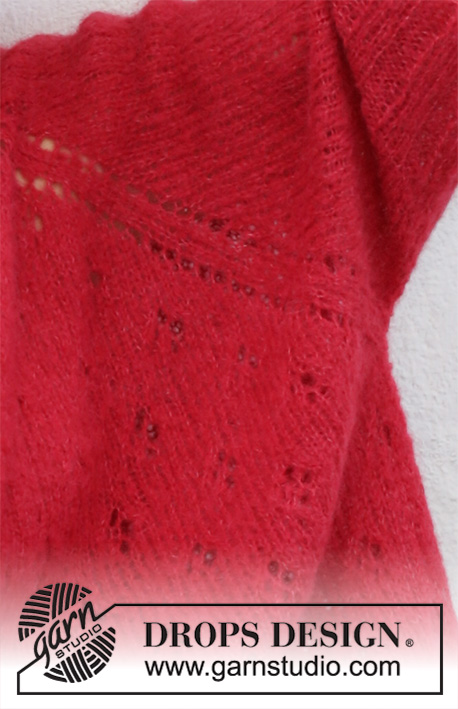
Knitted poncho jumper with raglan in DROPS Brushed Alpaca Silk. Piece is knitted top down with lace pattern. Size: S - XXXL
DROPS 202-19 |
|||||||||||||||||||
|
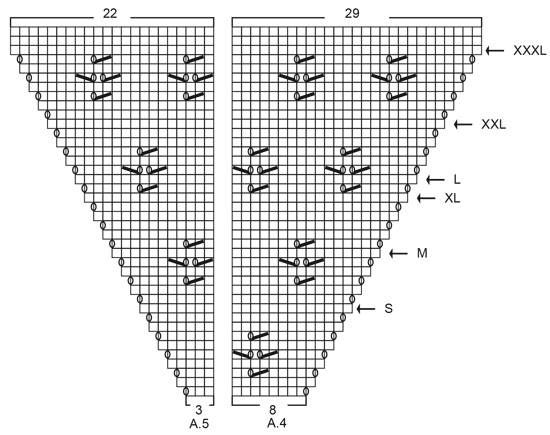
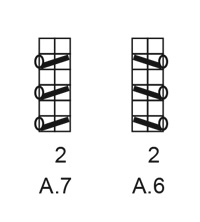
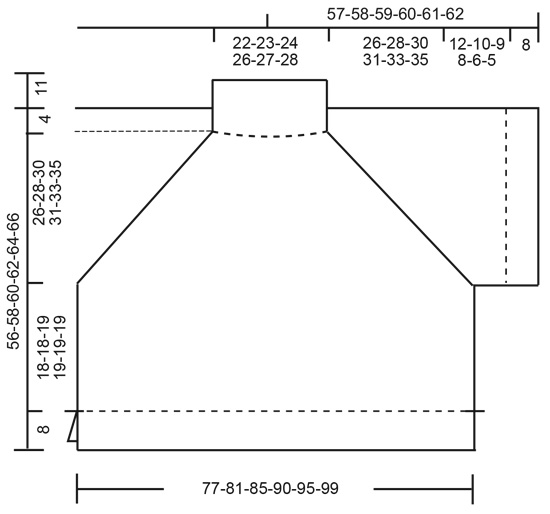
---------------------------------------------------------- EXPLANATION FOR THE PATTERN: ---------------------------------------------------------- INCREASE/DECREASE TIP (evenly): To calculate how to increase/decrease evenly, use the total number of stitches on row (e.g. 102 stitches) and divide stitches by number of increases/decreases to be done (e.g. 8) = 12.8. In this example increase by making 1 yarn over after approx. every 13th stitch. On next round work yarn overs twisted to avoid holes. If decreasing knit approx. every 12th and 13th stitch together. PATTERN: See diagrams A.1 to A.7. Find your size in diagrams (applies to A.4 and A.5). GARTER STITCH (back and forth): Knit all rows. 1 ridge vertically = knit 2 rows. ---------------------------------------------------------- START THE PIECE HERE: ---------------------------------------------------------- PONCHO JUMPER - SHORT OVERVIEW OF THE PIECE: Worked top down. Work neck and yoke in the round. Work body in the round down to vent, then work front piece and back piece back and forth on circular needle. Work sleeves in the round on double pointed needles/a short circular needle. NECK: Cast on 102-108-108-114-120-126 stitches on circular needle size 4 mm with Brushed Alpaca Silk. Knit 1 round. Then work rib (= knit 3/purl 3) for 11 cm. Knit 1 round while increasing 8-2-2-16-10-4 stitches evenly - read INCREASE/DECREASE TIP = 110-110-110-130-130-130 stitches. Switch to circular needle size 5 mm and work yoke as explained below. NOW MEASURE THE PIECE FROM HERE! YOKE: Work first round as follows: Work A.1 (= 8 stitches), work A.2 over the next 30-30-30-40-40-40 stitches (= 3-3-3-4-4-4 repetitions of 10 stitches), work A.3 (= 3 stitches), work 2 stitches in stocking stitch (= raglan line), make 1 yarn over, work 10 stitches in stocking stitch (= sleeve), make 1 yarn over, work 2 stitches in stocking stitch (= raglan line), work A.1 (= 8 stitches), work A.2 over the next 30-30-30-40-40-40 stitches (= 3-3-3-4-4-4 repetitions of 10 stitches), work A.3 (= 3 stitches), work 2 stitches in stocking stitch (= raglan line), make 1 yarn over, work 10 stitches in stocking stitch (= sleeve), make 1 yarn over, work 2 stitches in stocking stitch (= raglan line). There are now 122-122-122-142-142-142 stitches on needle. Continue pattern like this. I.e. on front and back piece increase in each side as shown in A.1 and A.3. On sleeves increase in each side with yarn over on each side of stitches in stocking stitch. Raglan line is always on 2 stitches in stocking stitch. Increase like this every other round 25-29-30-32-34-35 times in total, on next round knit yarn overs on sleeves (= holes) and work the increased stitches in stocking stitch. REMEMBER THE KNITTING TENSION! When A.1 to A.3 have been worked 1 time vertically, there are 350-350-350-370-370-370 stitches on needle. Then work as follows over the 121-121-121-131-131-131 stitches in A.1 to A.3: Work A.4 (= 8 stitches), work A.2 over the next 110-110-110-120-120-120 stitches (= 11-11-11-12-12-12 repetitions of 10 stitches) and work A.5 (= 3 stitches). Continue sleeves as before but when increase is done finish sleeves without increase. To continue the eyelet row along raglan line after increases on sleeves are done, work A.6 (= 2 stitches) over the first 2 stitches after raglan linen and A.7 over the last 2 stitches before raglan line towards sleeve. When you have worked up to round marked with arrow in your size, there are 390-418-438-462-486-506 stitches on needle and piece measures approx. 23-26-29-28-32-35 cm. Continue with pattern and stocking stitch as before but without increases until piece measures 26-28-30-31-33-35 cm. To continue the eyelet row along raglan line after all increases are done work A.6 and A.7 the same way as on sleeve. Work next round as follows: Work 131-137-145-153-161-169 stitches as before (= back piece), slip the next 64-72-74-78-82-84 stitches on 1 stitch holder for sleeve, work 131-137-145-153-161-169 stitches as before (front piece), slip the last 64-72-74-78-82-84 stitches on 1 stitch holder for sleeve. Finish body and sleeves separately. NOW MEASURE THE PIECE FROM HERE. BODY: = 262-274-290-306-322-338 stitches. Insert 1 marker thread at the beginning of round, insert 1 marker thread after 131-137-145-153-161-169 stitches. Marker threads mark the sides. Work 0-3-2-1-0-4 stitches in stocking stitch, repeat A.2 until 1-4-3-2-1-5 stitches remain before marker thread (= 13-13-14-15-16-16 repetitions of 10 stitches) – adjust to continue pattern on correct row, work 1-7-5-3-1-9 stitches in stocking stitch (marker thread is between these stitches), repeat A.2 until 1-4-3-2-1-5 stitches remain at beginning of round (= 13-13-14-15-16-16 repetitions of 10 stitches) and work the remaining 1-4-3-2-1-5 stitches in stocking stitch. Continue pattern like this until piece measures 18-18-18-19-19-19 cm from division – adjust to finish after a round between 2 lace patterns vertically. Now divide the piece at the markers and finish front and back piece separately. BACK PIECE: = 131-137-145-153-161-169 stitches. Knit 1 row from right side while decreasing 2-2-2-0-2-4 stitches evenly - read INCREASE/DECREASE TIP = 129-135-147-153-159-165 stitches. Switch to circular needle size 4 mm. Work next row from wrong side as follows: 3 stitches in GARTER STITCH - read explanation above - * purl 3, knit 3 *, repeat from *-* until 6 stitches remain on needle, finish with purl 3 and 3 stitches in garter stitch. Continue rib like this for 8 cm. Cast off with knit over knit and purl over purl (to avoid a tight cast-off edge use circular needle size 5 mm). FRONT PIECE: Work as on back piece. SLEEVE: Slip the 64-72-74-78-82-84 stitches from stitch holder in one side of piece on a short circular needle/double pointed needles size 5 mm. Continue in stocking stitch until piece measures 12-10-9-8-6-5 cm from division (shorter measurements in the larger sizes because of wider shoulders and longer sleeve cap). Knit 1 round while increasing 2-0-4-0-2-0 stitches evenly = 66-72-78-78-84-84 stitches. Switch to double pointed needles size 4 mm. Work rib = knit 3/purl 3 for 8 cm. Cast off with knit over knit and purl over purl (to avoid a tight cast-off edge use needle size 5 mm). Work the other sleeve the same way. |
|||||||||||||||||||
Diagram explanations |
|||||||||||||||||||
|
|||||||||||||||||||
 |
|||||||||||||||||||
 |
|||||||||||||||||||
 |
|||||||||||||||||||
 |
|||||||||||||||||||
 |
|||||||||||||||||||
Have you finished this pattern?Tag your pictures with #dropspattern #strawberryswingsweater or submit them to the #dropsfan gallery. Do you need help with this pattern?You'll find 26 tutorial videos, a Comments/Questions area and more by visiting the pattern on garnstudio.com. © 1982-2025 DROPS Design A/S. We reserve all rights. This document, including all its sub-sections, has copyrights. Read more about what you can do with our patterns at the bottom of each pattern on our site. |
|||||||||||||||||||


Post a comment to pattern DROPS 202-19
We would love to hear what you have to say about this pattern!
If you want to leave a question, please make sure you select the correct category in the form below, to speed up the answering process. Required fields are marked *.