
Popular categories
Looking for a yarn?


Comments / Questions (88)
![]() Cinzia wrote:
Cinzia wrote:
Scusate, quando scrivete: "finire con 1 maglia diritto e 1 maglia a maglia legaccio" mi spiegate la differenza tra 1 maglia a diritto e 1 maglia a legaccio. Non dovrebbe essere la stessa cosa? (O meglio, il legaccio non dovrebbero essere 1 ferro diritto e 1 ferro a rovescio sui circolari?). Grazie e scusate da subito l'ignoranza.
13.01.2020 - 08:44DROPS Design answered:
Buongiorno Cinzia. Il maglione viene lavorato avanti e indietro. La prima e l'ultima maglia sui ferri vengono lavorate a legaccio, quindi sempre a diritto. Invece la maglia che lavora a diritto (la penultima), al ferro successivo verrà lavorata seguendo le indicazioni riportate per il ferro successivo. Buon lavoro!
13.01.2020 - 12:15
![]() Sabina wrote:
Sabina wrote:
Hi. I'm about to cast on new stitches for the below section _"loosely cast on stitches on both sides at the end of each row as follows: 2 stitches 2 times, 4 stitches 6 times and then 30-30-32-32-36-36 stitches 1 time." Can you please explain row by row how the new stitches are being worked on in each row? How many rows altogether for this section - is it 4 + 12+2? Thanks
01.01.2020 - 21:39DROPS Design answered:
Dear Sabina, simply work the new stitches on each side in pattern so that you keep the English rib from the sleeve as well as on new stitches. Happy knitting!
02.01.2020 - 15:47
![]() Alessia wrote:
Alessia wrote:
Buonasera. Di solito i campioni mi tornano sempre con le vostre misure. Questa volta per il campione a legaccio con i ferri 4 per 10 cm mi vengono 20 maglie! È corretta la vostra misurazione?
21.12.2019 - 18:11DROPS Design answered:
Buonasera Alessia, abbiamo corretto il testo: il campione è a coste inglesi. Provi a rifarlo con i ferri 4,5 mm. Buon lavoro!
21.12.2019 - 18:55
![]() Bruna wrote:
Bruna wrote:
Volevo sapere esattamente a quanti punoi devo inserire il segnapunti A da dove devo prendere le misure ? Io l'ho inserito dopo 30 maglie
19.12.2019 - 17:49DROPS Design answered:
Buonasera Bruna, abbiamo leggermente modificato il testo, deve inserire il segnapunti al centro dell'ultimo gruppo di maglie avviate. Buon lavoro!
19.12.2019 - 22:32
![]() Madeleine Gagnon wrote:
Madeleine Gagnon wrote:
À propos de l'échantillon. J'ai cru comprendre que l'échantillon est en côte anglaise. Je tricote des côtes anglaises avec des aiguilles de 4,5 mm . Si je compte les mailles j'ai au moins 24 mailles (sans compter les jetés). Je ne peux imaginer que je doivent augmenter la taille des aiguilles à ce point. Merci de m'éclairer.
10.12.2019 - 22:55DROPS Design answered:
Bonjour Mme Gagnon, tricotez-vous bien les côtes anglaises comme dans cette vidéo? L'échantillon est très important - cf FAQ - vous pouvez bloquer votre échantillon (= le laver et le faire sécher bien à plat), pour vérifier les mesures après lavage (= comme vous laverez le pull). Votre magasin DROPS aura probablement d'autres astuces pour vous, n'hésitez pas à le contacter, même par mail ou téléphone. Bon tricot!
11.12.2019 - 08:24
![]() Mia Bissmarck wrote:
Mia Bissmarck wrote:
Vad menas med att man inte ska räkna med omslaget när man mäter stickfastheten när man stickar i patenstickning?
21.11.2019 - 22:32
![]() Marcella wrote:
Marcella wrote:
Er klopt echt helemaal, maar dan ook helemaal niks van de stekenverhouding. En de cm’s voor de mouwlengte staan volgens mij in de verkeerde volgorde, of moeten we dan ineens van links naar rechts lezen? Ik heb al heel veel gebreid, en nooit problemen gehad. Ik zie ook heel veel opmerkingen en vragen die over de stekenverhouding gaan. Hoe kan je nu volhouden (in de reacties van Drops) dat het patroon klopt????
26.10.2019 - 19:51
![]() Bente wrote:
Bente wrote:
Hej, jeg har strikket 40 cm! Jeg har fundet en anden opskrift strikket i sky, (model »regn«) strikket i 2 tråde på pinde 6. og her er strikkefastheden 14 m på 10 cm. Hvordan kan strik med kun en tråd på pinde 4,5 give stort set det samme????? Er i sikre på at opskriften kun er med en tråd?
12.09.2019 - 12:45DROPS Design answered:
Hej Bente, det er 2 helt forskellige teknikker. Du må ikke sammenligne patentstrik og glatstrik og husk at du må ikke strikke patentstrik for stramt!
17.09.2019 - 14:56
![]() Bente wrote:
Bente wrote:
Hej igen. Jeg har faktisk målt uden at tælle omslagene med, og jeg får mere end 20 masker på 10 cm. jeg har strikket så løst jeg kan, uden at stramme garnet overhovedet. Min tanke er, at der måske er tale om en fejl i opskriften, eller at den passer til et andet garn....??
10.09.2019 - 18:10DROPS Design answered:
Hej Bente, nej den er god nok. Vi får nøjagtig 15 m på 10 cm på pinde 4,5 i én tråd DROPS Sky, men du kan først måle strikkefastheden, når du har 5-6 cm. :)
12.09.2019 - 12:26
![]() Bente wrote:
Bente wrote:
Hej Drops. Jeg kan ikke få 10 cm på 15 masker i bredden, uanset hvor tykke pinde jeg bruger. Kun ved at strække strikketøjet kan jeg nå målet. Men der står, at der skal måles når det ligger fladt. Synes også at det er lidt underlidt, da strikkefasthed i glatstrikning er 20 cm. Og patentstrik trækker sig mere sammen. Så burde maskeantallet jo være større og ikke mindre...??
10.09.2019 - 12:56DROPS Design answered:
Hej Bente, Husk at omslaget ikke tælles med i de 15 masker, det vil sige at i og med omslaget så vil maskerne strikkes dobbelt og fylde mere... Prøv at strikke en prøve på nogle cm inden du måler strikkefastheden. God fornøjelse!
10.09.2019 - 15:57
|
||||||||||
Daily Wonder#dailywondersweater |
||||||||||
 |
 |
|||||||||
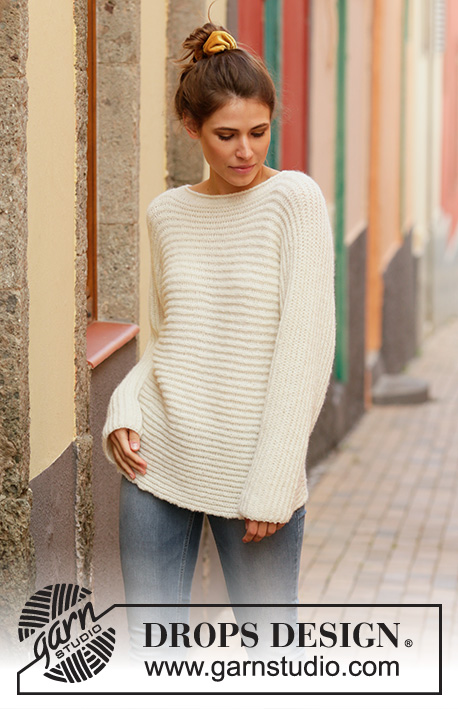
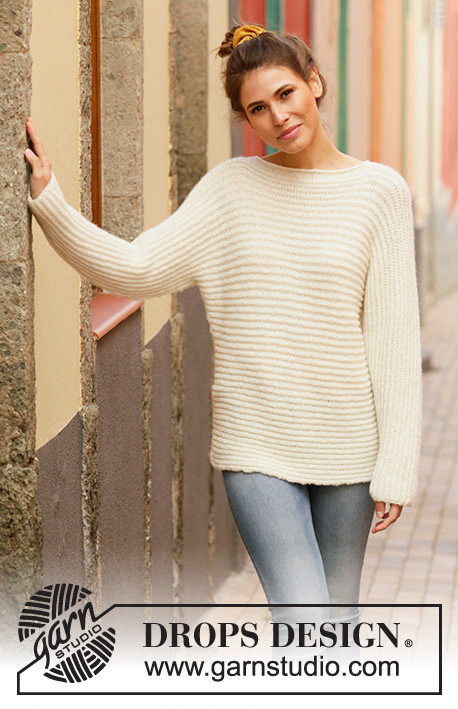
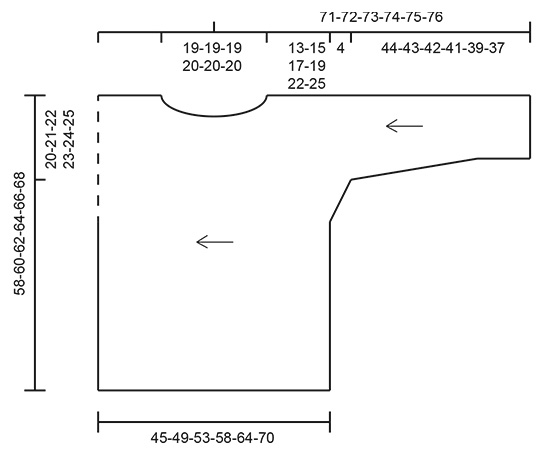
Jumper knitted sideways in DROPS Sky. The piece is worked in English rib. Sizes S - XXXL.
DROPS 201-7 |
||||||||||
|
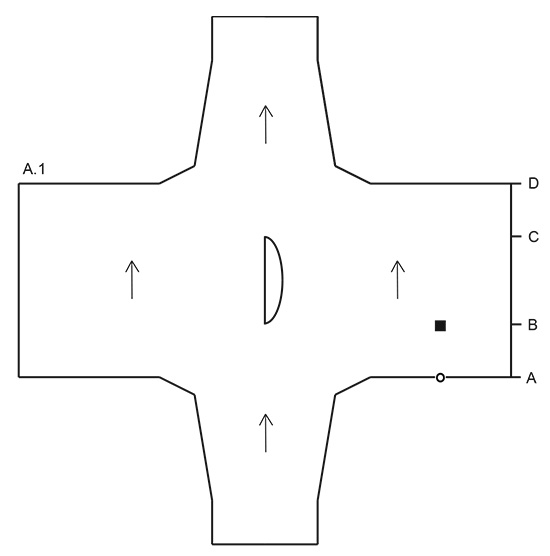
------------------------------------------------------- EXPLANATIONS FOR THE PATTERN: ------------------------------------------------------- KNITTING TIP: Make sure the garment lies flat when measuring. As this garment is worked sideways it is even more important than usual that the measurements are exact and taken on the suggested part of the garment. See sketch and Figure A.1. Figure A.1 has marks where the body should be and where the marker thread for the neck should be. All measurements for body and neck are taken in middle of garment and not by the neck, to avoid the neck/width of body being wrong. ENGLISH RIB: ROW 1 (= right side): 1 stitch in garter stitch, * knit 1, 1 yarn over, slip 1 stitch as if to purl *, work from *-* until there are 2 stitches left on the row and finish with knit 1 and 1 stitch in garter stitch. ROW 2 (= wrong side): 1 stitch in garter stitch, * 1 yarn over, slip 1 stitch as if to purl, knit together next stitch and yarn over *, work from *-* until there are 2 stitches left on row and finish with 1 yarn over, slip 1 stitch as if to purl and 1 stitch in garter stitch. ROW 3 (= right side): 1 stitch in garter stitch, * knit together next stitch and yarn over, 1 yarn over, slip 1 stitch as if to purl *, work from *-* until there are 2 stitches left on row, knit together next stitch and yarn over and 1 stitch in garter stitch. Repeat ROWS 2-3 - NOTE: From ROW 2 the stitches with yarn overs are always knitted. The yarn over lies over the stitch and is knitted together with the stitch. ------------------------------------------------------- START THE PIECE HERE: ------------------------------------------------------- JUMPER - SHORT OVERVIEW OF THE PIECE: The piece is worked back and forth with circular needle in one piece from the sleeve to the neck. It is then divided and front and back pieces are worked separately until the neck is finished. The piece is joined again and continued in one piece. It is very important to get the correct measurements as you work, read KNITTING TIP in description above. JUMPER: Cast on 39-41-43-43-45-45 stitches with circular needle size 4.5 mm and Sky (= bottom of sleeve). Work ENGLISH RIB - see description above. When the piece measures 12 cm increase 1 stitch in each side inside the 1 stitch every 3-2½-2½-2-2-1½ cm a total of 10-11-11-13-13-15 times = 59-63-65-69-71-75 stitches - the increased stitches are worked into the English rib as you go. REMEMBER THE KNITTING TENSION! When the piece measures 44-43-42-41-39-37 cm, loosely cast on stitches on both sides at the end of each row as follows: 2 stitches 2 times, 4 stitches 6 times and then 30-30-32-32-36-36 stitches 1 time. You have now cast on stitches for the body; insert a marker in the middle of the last stitches cast on - this is the side of the body and you now measure from here - read KNITTING TIP in description above and see Figure A.1 point A! There are 175-179-185-189-199-203 stitches on the needle. Continue with English rib. When the piece measures 13-15-17-19-22-25 cm from the marker in the side (from point A to point B in Figure A.1), work the next row as follows (make sure this row is worked from the wrong side): Work 87-89-92-94-99-101 stitches (= back piece) and then place these stitches on a thread, cast off 5 stitches for neck, work 83-85-88-90-95-97 stitches (= front piece). Insert a marker thread in the middle of the piece here; the neck is measured from here (position the marker thread so that it is directly over the marker in the side, see Figure A.1, there is 13-15-17-19-22-25 cm between the marker (point A) and the marker thread (point B)). Now continue by working the front piece at the same time as you decrease for neck. FRONT PIECE: There are 83-85-88-90-95-97 stitches on the needle. Decrease to neck on every row from the neck as follows: 1 stitch 8 times = 75-77-80-82-87-89 stitches. Work until the piece measures 15-15-15-16-16-16 cm from the marker thread (point B) and 28-30-32-35-38-41 cm from the marker in the side of body (point A). Loosely cast on for neck, at the end of each row towards the neck as follows: 1 stitch 8 times and 5 stitches 1 time = 88-90-93-95-100-102 stitches. The neck measures approx. 19-19-19-20-20-20 cm from the marker thread (from point B to point C). Then place all stitches on a thread and continue with the back piece. Cut the strand. BACK PIECE: Place the 87-89-92-94-99-101 stitches from the thread on the circular needle. Continue with the back piece until the neck measures 19-19-19-20-20-20 cm (see Figure A.1 point C) - adjust so that you have worked the same length as on the front piece. Both pieces can now be placed on the same needle and you continue working in one piece. FRONT AND BACK PIECE: Place the 88-90-93-95-100-102 stitches from the thread on the same circular needle as the back piece = 175-179-185-189-199-203 stitches. Continue working until the front/back pieces measures 45-49-53-58-64-70 cm from the marker in the side of the body (from point A to point D). Now loosely cast off on each side, at the beginning of each row as follows: 30-30-32-32-36-36 stitches 1 time, 4 stitches 6 times and 2 stitches 2 times = 59-63-65-69-71-75 stitches. Insert 1 new marker here and now measure from here. Work the same length over the stitches as on the other sleeve after the last increase, then decrease 1 stitch on each side inside the 1 stitch every 3-2½-2½-2-2-1½ cm a total of 10-11-11-13-13-15 times = 39-41-43-43-45-45 stitches. Work until the piece measures 44-43-42-41-39-37 cm from the marker and loosely cast off. NOTE! When casting off, work the yarn overs together with their stitches below AT THE SAME TIME as you cast off. ASSEMBLY: Fold the piece, wrong side to wrong side. Start sewing outermost on sleeve. Sew in the outermost loop of the outermost stitch along the whole sleeve and then down the side of front/back piece. Repeat on other side. NECK: Knit up stitches around the whole neck inside the 1 edge stitch (make sure you knit up in purled stitches mid front and along the neck on the back piece). Knit up approx. 90-106 stitches from the right side with short circular needle size 4.5 mm and Sky. Work 8 rounds of stocking stitch and then loosely cast off. The edge should roll. |
||||||||||
Diagram explanations |
||||||||||
|
||||||||||
 |
||||||||||
 |
||||||||||
Have you finished this pattern?Tag your pictures with #dropspattern #dailywondersweater or submit them to the #dropsfan gallery. Do you need help with this pattern?You'll find 21 tutorial videos, a Comments/Questions area and more by visiting the pattern on garnstudio.com. © 1982-2026 DROPS Design A/S. We reserve all rights. This document, including all its sub-sections, has copyrights. Read more about what you can do with our patterns at the bottom of each pattern on our site. |
||||||||||


With over 40 years in knitting and crochet design, DROPS Design offers one of the most extensive collections of free patterns on the internet - translated to 17 languages. As of today we count 324 catalogues and 12290 patterns translated into English (UK/cm). 12290
We work hard to bring you the best knitting and crochet have to offer, inspiration and advice as well as great quality yarns at incredible prices! Would you like to use our patterns for other than personal use? You can read what you are allowed to do in the Copyright text at the bottom of all our patterns. Happy crafting!
Post a comment to pattern DROPS 201-7
We would love to hear what you have to say about this pattern!
If you want to leave a question, please make sure you select the correct category in the form below, to speed up the answering process. Required fields are marked *.