
Popular categories
Looking for a yarn?


Comments / Questions (38)
![]() Sylvia wrote:
Sylvia wrote:
Guten Tag, ich kämpfe mit der Anweisung zu den Diagrammen: Jede zweite Reihe ist ja eine "Rückreihe" (aber der Pulli wird doch in Runden gestrickt???) und soll von links nach rechts gelesen werden - das passt absolut nicht. Sollten nicht besser in den "Rückreihen" die als links eingezeichneten Maschen rechts gestrickt werden und vice versa, außerdem immer von rechts nach links gelesen werden - weil der Pulli in Runden gestrickt wird?
29.09.2019 - 12:43DROPS Design answered:
Liebe Sylvia, Vielen Dank für den Hinweis. In dieser Anleitung gibt es keine Rück-Reihen, daher wird der Satz in der Anleitung entfernt. Viel Spaß beim stricken!
01.10.2019 - 09:26
![]() Reidun Buvig wrote:
Reidun Buvig wrote:
DROPS Design: Modell li-097. Her må det være feil i oppskriften. Jeg strikker A 1-M. Allerede På første pinne med mønster blir det feil. Jeg får 15 hele mønster raporter og da står det 7 masker igjen på omgangen.Jeg har strikket mye, men aldri hatt problemer med mønster tidligere, og her må det være feil.Har begynt på nytt 3-4 ganger med samme resultat.Mvh Reidun Buvig
20.08.2019 - 23:13DROPS Design answered:
Hej. Du har 216 m och A.1 i storlek M består av 12 maskor. Du ska sticka rapport A.1 18 gånger, 18 x 12 = 216 m. Lycka till!
23.08.2019 - 11:18
![]() Petra wrote:
Petra wrote:
Ska det inte vara mönsterstickning på fram- och bakstycket före delningen? Hur passar det annars med ärmarna?
17.07.2019 - 20:15DROPS Design answered:
Hej Petra, den här stickas nerifrån och upp, och du börjar först med diagram A.3 när du har alla maskor på oket. Lycka till :)
30.09.2019 - 09:03
![]() Marie Thörne wrote:
Marie Thörne wrote:
Hej, jag har nu kommit till att jag ska börja med A3, fram och bakstycke och ärmarna sitter på en rundsticka. Var på varvet ska jag börja med A3 och hur minskar jag från 18 maskor på rapporten till 16 och 14? Hälsningar / Marie
14.07.2019 - 08:07DROPS Design answered:
Hej Marie, Du minskar enligt diagrammet, när du kommer till varv 15 stickar du ihop utant att göra omslag på varje sida. Det gör du varvet runt och minskar då diagrammet från 18 till 16 maskor. Lycka till :)
30.09.2019 - 08:38
![]() Carolina wrote:
Carolina wrote:
For some reason when I attach the sleeves the pattern A3 does not fit into the pattern in the sleeves... Did I do something wrong?
26.05.2019 - 22:06DROPS Design answered:
Dear Carolina, you should stop the sleeves and the body at the same row of the pattern repeat, so it would match. If it is the stitches that do not match, are you sure, you did the same sized pattern for the body and the sleeves as well? However, when you will do the decreases inevitably there will be stitches that do not fit, these should be knitted as stocking stitches. I hope this helps. Happy Knitting!
27.05.2019 - 01:41
![]() Nicole Barrière-Jahan wrote:
Nicole Barrière-Jahan wrote:
Merci pour votre réponse très rapide ! :) mais est-ce que le dos va vraiment être comme sur le schéma ou est-ce qu'il sera échancré de la même façon que le devant ... désolée de vous questionner encore sur le même sujet ... bonne journée à vous
11.03.2019 - 13:49DROPS Design answered:
Bonjour Mme Barrière-Jahan, le schéma est ici standard - comme on ne fait pas de réhausse dans le dos, l'encolure dos et devant seront identiques. Bon tricot!
11.03.2019 - 14:57
![]() Nicole Barrière-Jahan wrote:
Nicole Barrière-Jahan wrote:
Bonsoir, je ne comprends pas que la hauteur finale du pull soit de 58 cm pour la taille M ..; Je vois le dos devant qui mesure 30 cm , auquel s'ajoute 22 cm d'empiècement, puis 3 cm de hauteur de col, que ce soit pour le devant ou le dos ... Pas de réhausse pour le dos ? et cela ne fait que 55 cm .. ou ai-je raté une explication ? Merci d'avance pour votre aide, Nicole
10.03.2019 - 23:30DROPS Design answered:
Bonjour Mme Barrière-Jahan, il faut également compter les 3 cm d'épaules: l'empiècement arrondi couvre la totalité des mailles du tour, pas seulement le col, il y aura quelques mailles qui vont compter pour les épaules, d'où les 58 cm de hauteur totale. Bon tricot!
11.03.2019 - 11:13
![]() Pascale wrote:
Pascale wrote:
Impossible de monter les manches, pas assez de place, trop serré, comment faire ?
08.03.2019 - 13:14DROPS Design answered:
Bonjour Pascale, cette vidéo montre comment procéder, les premiers tours peuvent être un peu compliqués, aidez-vous d'une autre aiguille circulaire ou laissez les mailles des manches sur les doubles pointes le temps de faire quelques tours, ce sera ensuite plus simple. Bon tricot!
08.03.2019 - 14:18
![]() Silvia wrote:
Silvia wrote:
Creo que he tejido un poco demasiado tenso el punto musgo de las cuatro primeras vueltas, con lo que los bajos del jersey parece que me quedarán un poco ondulados. Querría evitar volver a empezar. Me gustaria saber si en el acabado final se puede mejorar. Quizás mojando y estirando. ¿Qué opinais? Pero no lo he hecho nunca y no sé con qué materiales caseros podría hacerlo.
01.03.2019 - 12:49DROPS Design answered:
Hola Silvia. Debido a que no podemos ver exactamente cómo queda, sería mejor que consultases con tu tienda más cercana de Drops. No se puede garantizar que la prenda te quede bien después de ese tipo de arreglos.
17.10.2019 - 18:57
![]() Anna wrote:
Anna wrote:
Buongiorno. Ho un dubbio sullo schema A1 se vengono diminuiti 2 punti al centro dei 7 punti a rovescio non dovrebbero rimanere 3 cioè 7-2-1per parte fa 3.Spero di essermi spiegata bene e grazie per la risposta.
18.02.2019 - 09:55DROPS Design answered:
Buongiorno Anna, se abbiamo capito bene la sua domanda, su ogni ferro di A.1 con il triangolo nero in cui vengono diminuite 2 maglie, si lavorano 2 gettati ai lati, per cui il numero delle maglie non cambia. Ci riscriva se non è chiaro. Buon lavoro!
18.02.2019 - 14:42
|
|||||||||||||||||||
Golden Fairy#goldenfairysweater |
|||||||||||||||||||
 |
 |
||||||||||||||||||
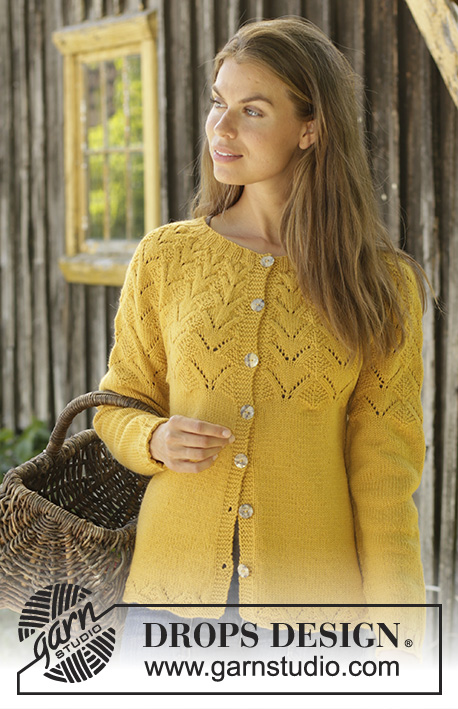
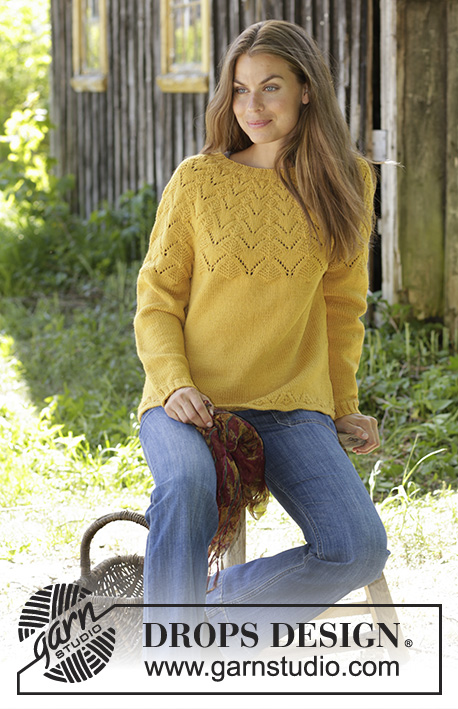
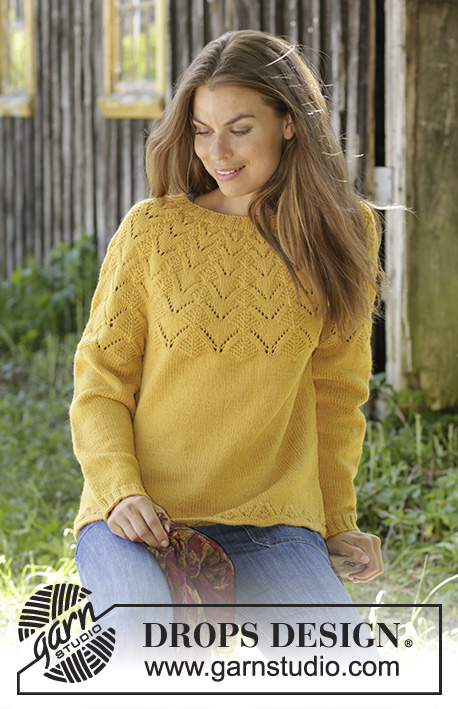
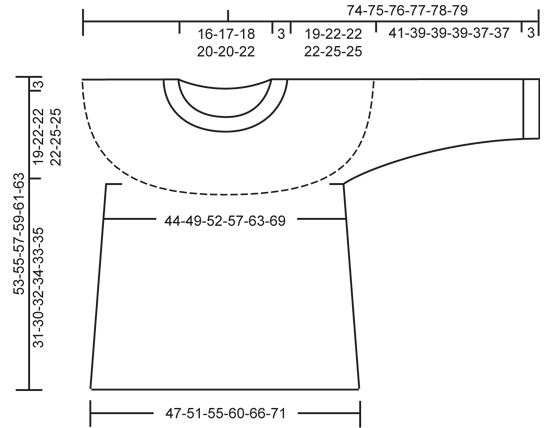
Knitted jumper in DROPS Lima or DROPS Cotton Merino. The piece is worked with round yoke and lace pattern. Sizes S - XXXL.
DROPS 195-22 |
|||||||||||||||||||
|
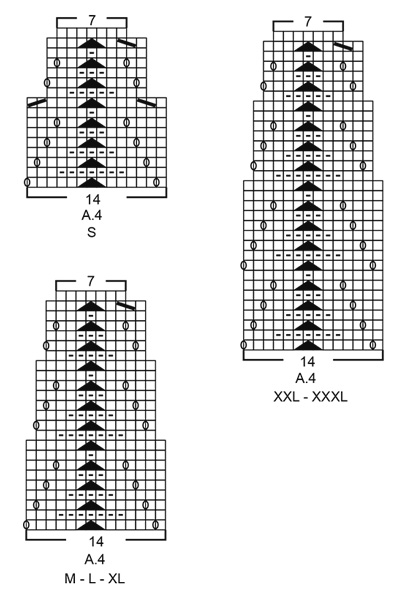
EXPLANATIONS FOR THE PATTERN: ------------------------------------------------------- RIDGE/GARTER STITCH (worked in the round): 1 ridge = 2 rounds. Knit 1 round and purl 1 round. PATTERN: See diagrams A.1 to A.4. Choose diagram for your size (applies to A.1 and A.4). The diagrams show all the rows in the pattern seen from the right side. DECREASE/INCREASE TIP (evenly spaced): To work out how to decrease/increase evenly, count the total number of stitches on the needle (e.g. 216 stitches) and divide by the number of decreases/increases to be made (e.g. 4) = 54. In this example, decrease by knitting together each 53rd and 54th stitch. If increasing, make 1 yarn over after each 54th stitch. On the next round knit the yarn overs twisted to avoid holes. DECREASE TIP (for sides of body): Start 3 stitches before the marker thread in the side, knit 2 together, knit 2 (the marker thread sits in the middle of these 2 stitches), slip 1 stitch as if to knit, knit 1 and pass the slipped stitch over the knitted stitch (= 2 stitches decreased). INCREASE TIP (for mid under sleeve): Start 1 stitch before the marker thread, make 1 yarn over, knit 2 (the marker thread sits in the middle of these 2 stitches), make 1 yarn over (= 2 stitches increased). On the next round knit the yarn overs twisted to avoid holes. Then work the increased stitches in stocking stitch. ------------------------------------------------------- START THE PIECE HERE: ------------------------------------------------------- JUMPER - SHORT OVERVIEW OF THE PIECE: The piece is worked in the round with circular needle, bottom up as far as the armholes. The sleeves are worked in the round with double pointed needles/short circular needle, bottom up. Then the body and sleeves are placed together and the yoke is worked in the round with circular needle to finished length. BODY: Cast on 196-216-238-252-280-300 stitches with circular needle size 4 mm and Lima. Change to circular needle size 3.5 mm and work 2 RIDGES – read description above. Change back to circular needle size 4 mm and work 2 rounds stocking stitch. Then work A.1 in the round (= 14-18-17-21-20-25 repeats of 14-12-14-12-14-12 stitches). Continue this pattern. When A.1 has been completed, continue with stocking stitch. AT THE SAME TIME on the first round decrease 0-0-6-0-4-0 stitches evenly on round – read DECREASE/INCREASE TIP = 196-216-232-252-276-300 stitches REMEMBER THE KNITTING TENSION! When the piece measures 8-8-8-8-10-10 cm insert 1 marker thread at the beginning of the round and 1 marker thread after 98-108-116-126-138-150 stitches (= sides). Allow the marker threads to follow your work upwards; they will be used when you decrease in the sides. On the next round decrease 1 stitch on each side of both marker threads - read DECREASE TIP (= 4 stitches decreased). Decrease like this every 8-8-8-9-9-9 cm a total of 3 times in each side = 184-204-220-240-264-288 stitches. Continue working until the piece measures approx. 31-30-32-34-33-35 cm (measured from the bottom of one of the waves in A.1). The next round is worked as follows: Cast off 2-3-3-3-5-6 stitches for the armhole, knit the next 88-96-104-114-122-132 stitches and increase AT THE SAME TIME 2-12-4-12-4-12 stitches evenly over these stitches – remember DECREASE/INCREASE TIP (= front piece), cast off 4-6-6-6-10-12 stitches for armhole, knit the next 88-96-104-114-122-132 stitches and increase AT THE SAME TIME 2-12-4-12-4-12 stitches evenly over these stitches (= back piece), cast off the remaining 2-3-3-3-5-6 stitches for armhole. There are now 90-108-108-126-126-144 stitches on front and back pieces. Lay the piece to one side and work sleeves as described below. SLEEVE: Cast on 48-52-56-56-60-60 stitches with double pointed needles size 3.5 mm and Lima. Knit 1 round. Then work rib in the round (= knit 2 / purl 2) for 3 cm. Knit 1 round where you decrease 6-8-10-10-10-8 stitches evenly on round = 42-44-46-46-50-52 stitches. Change to double pointed needles size 4 mm and work stocking stitch in the round. When the piece measures 10-8-11-11-9-9 cm insert 1 marker thread at the beginning of the round (= mid under sleeve). This marker thread is used when increasing mid under sleeve. On the next round increase 2 stitches mid under sleeve - read INCREASE TIP. Increase like this every 2½-2½-1½-1½-1½-1½ cm a total of 13-13-19-19-19-19 times = 68-70-84-84-88-90 stitches (change to short circular needle when necessary). Continue working until the sleeve measures 40-38-38-38-36-36 cm (increases mid under sleeve should now be finished and there are shorter measurements for larger sizes due to longer yoke). Knit 1 round where you increase 8-8-12-12-12-12 stitches evenly on round – read DECREASE/INCREASE TIP = 76-78-96-96-100-102 stitches. The next round is worked as follows: Work 2-3-3-3-5-6 stitches stocking stitch, work A.2 over the next 72-72-90-90-90-90 stitches (= 4-4-5-5-5-5 repeats of 18 stitches) and finish with 2-3-3-3-5-6 stitches stocking stitch. Continue this pattern until only the last round in A.2 is left. The last round is worked as follows: cast off 2-3-3-3-5-6 stitches for armhole, work the last row in A.2 over the next 72-72-90-90-90-90 stitches and cast off the remaining 2-3-3-3-5-6 stitches for armhole. The sleeve measures approx. 44-42-42-42-40-40 cm from top down. Lay the piece to one side and work the other sleeve in the same way. YOKE: Place the sleeves on the same circular needle size 4 mm as the body, where you cast off stitches for the armholes (without working the stitches) = 324-360-396-432-432-468 stitches on needle. Work A.3 in the round (= 18-20-22-24-24-26 repeats of 18 stitches). When A.3 has been completed there are 252-280-308-336-336-364 stitches on the needle. Work A.4 in the round (= 18-20-22-24-24-26 repeats of 14 stitches). Continue this pattern. When A.4 has been completed there are 126-140-154-168-168-182 stitches on the needle. Knit 1 round where you decrease 30-40-50-56-56-62 stitches evenly on round = 96-100-104-112-112-120 stitches left on needle. The yoke now measures approx. 19-22-22-22-25-25 cm from where body and sleeves were placed together. Then work neck as described below. NECK: Change to short circular needle size 3.5 mm. Work rib in the round (= knit 2 / purl 2) for 3 cm. Then loosely cast off with knit over knit and purl over purl, but to avoid the cast-off edge being tight you can cast off with needle size 4 mm. The jumper measures approx. 56-58-60-62-64-66 cm from the shoulder down. ASSEMBLY: Sew openings under sleeves. |
|||||||||||||||||||
Diagram explanations |
|||||||||||||||||||
|
|||||||||||||||||||
 |
|||||||||||||||||||
 |
|||||||||||||||||||
 |
|||||||||||||||||||
Have you finished this pattern?Tag your pictures with #dropspattern #goldenfairysweater or submit them to the #dropsfan gallery. Do you need help with this pattern?You'll find 27 tutorial videos, a Comments/Questions area and more by visiting the pattern on garnstudio.com. © 1982-2026 DROPS Design A/S. We reserve all rights. This document, including all its sub-sections, has copyrights. Read more about what you can do with our patterns at the bottom of each pattern on our site. |
|||||||||||||||||||


With over 40 years in knitting and crochet design, DROPS Design offers one of the most extensive collections of free patterns on the internet - translated to 17 languages. As of today we count 324 catalogues and 12290 patterns translated into English (UK/cm). 12290
We work hard to bring you the best knitting and crochet have to offer, inspiration and advice as well as great quality yarns at incredible prices! Would you like to use our patterns for other than personal use? You can read what you are allowed to do in the Copyright text at the bottom of all our patterns. Happy crafting!
Post a comment to pattern DROPS 195-22
We would love to hear what you have to say about this pattern!
If you want to leave a question, please make sure you select the correct category in the form below, to speed up the answering process. Required fields are marked *.