DROPS Lima
DROPS Lima
65% Wool, 35% Alpaca
from 2.40 £ /50g
Get the yarn to make this pattern from 26.40£.

The yarn cost is calculated from the pattern’s smallest size and the yarn’s cheapest product type. Looking for an even better price? You might find it on the DROPS Deals!

DROPS SS24

Golden Fairy

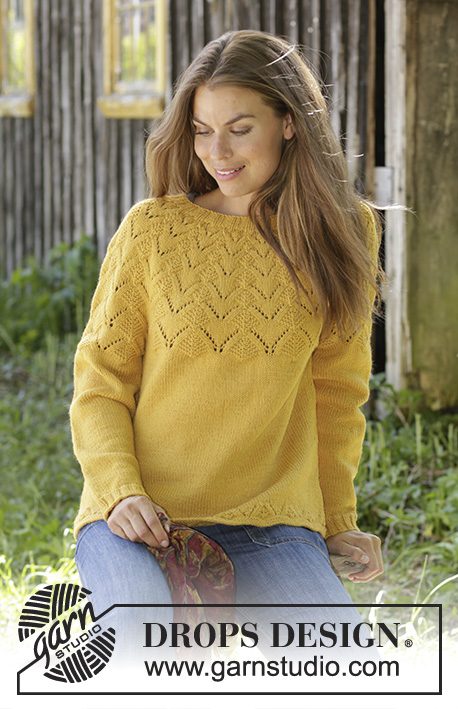
Knitted jumper in DROPS Lima or DROPS Cotton Merino. The piece is worked with round yoke and lace pattern. Sizes S - XXXL.

DROPS 195-22
DROPS Design: Pattern no li-097
Yarn group B
-------------------------------------------------------

Sizes: S - M - L - XL - XXL - XXXL
Materials:
DROPS LIMA from Garnstudio (belongs to yarn group B)
550-600-650-700-800-850 g colour 2923, goldenrod

Or use:
DROPS COTTON MERINO from Garnstudio (belongs to yarn group B)
500-550-600-650-700-800 g colour 15, mustard

-------------------------------------------------------
ACCESSORIES FOR THE PIECE:

KNITTING TENSION:
21 stitches in width and 28 rows in height with stocking stitch = 10 x 10 cm.
1 repeat of A.2 (18 stitches) measures approx. 7½ cm in width.

NEEDLES:
DROPS DOUBLE POINTED NEEDLES SIZE 4 MM.
DROPS CIRCULAR NEEDLE SIZE 4 MM: length 40 cm and 80 cm for stocking stitch and lace pattern.
DROPS DOUBLE POINTED NEEDLES SIZE 3.5 MM.
DROPS CIRCULAR NEEDLE SIZE 3.5 MM: length 40 cm and 80 cm for rib and garter stitch edge.
The needle size is only a guide. If you get too many stitches on 10 cm, change to a larger needle size. If you get too few stitches on 10 cm, change to a smaller needle size.

-------------------------------------------------------

-------------------------------------------------------

Alternative Yarn – See how to change yarns here
Yarn Groups A to F – Use the same pattern and change the yarn here
Yarn usage using an alternative yarn – Use our yarn converter here

-------------------------------------------------------

DROPS Lima
DROPS Lima
65% Wool, 35% Alpaca
from 2.40 £ /50g
Get the yarn to make this pattern from 26.40£.

The yarn cost is calculated from the pattern’s smallest size and the yarn’s cheapest product type. Looking for an even better price? You might find it on the DROPS Deals!

Pattern instructions

NOTE: This pattern is written in British English. All measurements in charts are in cm. For conversion from cm to inches - click here. There are different terms for crocheting in British and American English. If this pattern includes crochet, click for "crochet terms" here. For this pattern in American English, please click here.
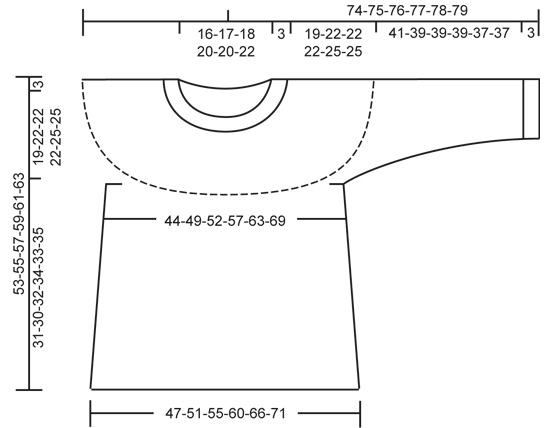
EXPLANATIONS FOR THE PATTERN:

-------------------------------------------------------

RIDGE/GARTER STITCH (worked in the round):
1 ridge = 2 rounds. Knit 1 round and purl 1 round.

PATTERN: 
See diagrams A.1 to A.4. Choose diagram for your size (applies to A.1 and A.4).
The diagrams show all the rows in the pattern seen from the right side.

DECREASE/INCREASE TIP (evenly spaced):
To work out how to decrease/increase evenly, count the total number of stitches on the needle (e.g. 216 stitches) and divide by the number of decreases/increases to be made (e.g. 4) = 54. 
In this example, decrease by knitting together each 53rd and 54th stitch.
If increasing, make 1 yarn over after each 54th stitch. On the next round knit the yarn overs twisted to avoid holes.

DECREASE TIP (for sides of body):
Start 3 stitches before the marker thread in the side, knit 2 together, knit 2 (the marker thread sits in the middle of these 2 stitches), slip 1 stitch as if to knit, knit 1 and pass the slipped stitch over the knitted stitch (= 2 stitches decreased).

INCREASE TIP (for mid under sleeve):
Start 1 stitch before the marker thread, make 1 yarn over, knit 2 (the marker thread sits in the middle of these 2 stitches), make 1 yarn over (= 2 stitches increased). On the next round knit the yarn overs twisted to avoid holes. Then work the increased stitches in stocking stitch

-------------------------------------------------------

START THE PIECE HERE:

-------------------------------------------------------

JUMPER - SHORT OVERVIEW OF THE PIECE:
The piece is worked in the round with circular needle, bottom up as far as the armholes. The sleeves are worked in the round with double pointed needles/short circular needle, bottom up. Then the body and sleeves are placed together and the yoke is worked in the round with circular needle to finished length.

BODY:
Cast on 196-216-238-252-280-300 stitches with circular needle size 4 mm and Lima. Change to circular needle size 3.5 mm and work 2 RIDGES – read description above. Change back to circular needle size 4 mm and work 2 rounds stocking stitch. Then work A.1 in the round (= 14-18-17-21-20-25 repeats of 14-12-14-12-14-12 stitches). Continue this pattern. When A.1 has been completed, continue with stocking stitch. AT THE SAME TIME on the first round decrease 0-0-6-0-4-0 stitches evenly on round – read DECREASE/INCREASE TIP = 196-216-232-252-276-300 stitches REMEMBER THE KNITTING TENSION!
When the piece measures 8-8-8-8-10-10 cm insert 1 marker thread at the beginning of the round and 1 marker thread after 98-108-116-126-138-150 stitches (= sides). Allow the marker threads to follow your work upwards; they will be used when you decrease in the sides.
On the next round decrease 1 stitch on each side of both marker threads - read DECREASE TIP (= 4 stitches decreased). Decrease like this every 8-8-8-9-9-9 cm a total of 3 times in each side = 184-204-220-240-264-288 stitches. Continue working until the piece measures approx. 31-30-32-34-33-35 cm (measured from the bottom of one of the waves in A.1).
The next round is worked as follows: Cast off 2-3-3-3-5-6 stitches for the armhole, knit the next 88-96-104-114-122-132 stitches and increase AT THE SAME TIME 2-12-4-12-4-12 stitches evenly over these stitches – remember DECREASE/INCREASE TIP (= front piece), cast off 4-6-6-6-10-12 stitches for armhole, knit the next 88-96-104-114-122-132 stitches and increase AT THE SAME TIME 2-12-4-12-4-12 stitches evenly over these stitches (= back piece), cast off the remaining 2-3-3-3-5-6 stitches for armhole. There are now 90-108-108-126-126-144 stitches on front and back pieces. Lay the piece to one side and work sleeves as described below.

SLEEVE:
Cast on 48-52-56-56-60-60 stitches with double pointed needles size 3.5 mm and Lima. Knit 1 round. Then work rib in the round (= knit 2 / purl 2) for 3 cm. Knit 1 round where you decrease 6-8-10-10-10-8 stitches evenly on round = 42-44-46-46-50-52 stitches. Change to double pointed needles size 4 mm and work stocking stitch in the round. When the piece measures 10-8-11-11-9-9 cm insert 1 marker thread at the beginning of the round (= mid under sleeve). This marker thread is used when increasing mid under sleeve.
On the next round increase 2 stitches mid under sleeve - read INCREASE TIP. Increase like this every 2½-2½-1½-1½-1½-1½ cm a total of 13-13-19-19-19-19 times = 68-70-84-84-88-90 stitches (change to short circular needle when necessary). Continue working until the sleeve measures 40-38-38-38-36-36 cm (increases mid under sleeve should now be finished and there are shorter measurements for larger sizes due to longer yoke). Knit 1 round where you increase 8-8-12-12-12-12 stitches evenly on round – read DECREASE/INCREASE TIP = 76-78-96-96-100-102 stitches. The next round is worked as follows: Work 2-3-3-3-5-6 stitches stocking stitch, work A.2 over the next 72-72-90-90-90-90 stitches (= 4-4-5-5-5-5 repeats of 18 stitches) and finish with 2-3-3-3-5-6 stitches stocking stitch. Continue this pattern until only the last round in A.2 is left. The last round is worked as follows: cast off 2-3-3-3-5-6 stitches for armhole, work the last row in A.2 over the next 72-72-90-90-90-90 stitches and cast off the remaining 2-3-3-3-5-6 stitches for armhole. The sleeve measures approx. 44-42-42-42-40-40 cm from top down. Lay the piece to one side and work the other sleeve in the same way.

YOKE:
Place the sleeves on the same circular needle size 4 mm as the body, where you cast off stitches for the armholes (without working the stitches) = 324-360-396-432-432-468 stitches on needle. Work A.3 in the round (= 18-20-22-24-24-26 repeats of 18 stitches). When A.3 has been completed there are 252-280-308-336-336-364 stitches on the needle. Work A.4 in the round (= 18-20-22-24-24-26 repeats of 14 stitches). Continue this pattern. When A.4 has been completed there are 126-140-154-168-168-182 stitches on the needle.
Knit 1 round where you decrease 30-40-50-56-56-62 stitches evenly on round = 96-100-104-112-112-120 stitches left on needle. The yoke now measures approx. 19-22-22-22-25-25 cm from where body and sleeves were placed together. Then work neck as described below.

NECK:
Change to short circular needle size 3.5 mm. Work rib in the round (= knit 2 / purl 2) for 3 cm.
Then loosely cast off with knit over knit and purl over purl, but to avoid the cast-off edge being tight you can cast off with needle size 4 mm. The jumper measures approx. 56-58-60-62-64-66 cm from the shoulder down.

ASSEMBLY:
Sew openings under sleeves.

This pattern has been corrected.

Updated online: 05.12.2019
Schematic drawing updated.

Diagram

symbols = knit
symbols = purl
symbols = between 2 stitches make 1 yarn over
symbols = knit 2 together
symbols = slip 1 stitch as if to knit, knit 1 and pass the slipped stitch over the knitted stitch
symbols = slip 1 stitch as if to knit, knit 2 together and pass the slipped stitch over the knitted together stitches
diagram
diagram
diagram

Each of our patterns has specific tutorial videos to help you.

Do you have a question? See a list of frequently asked questions (FAQ)

Knitting tension is what determines the final measurements of your work, and is usually measured per 10 x 10 cm. It is provided like so: number of stitches in width x number of rows in height - eg: 19 stitches x 26 rows = 10 x 10 cm.

The knitting tension is very individual; some people knit/crochet loosely while others work tightly. You adjust the knitting tension with the needle size, which is why the suggested needle size is only meant as a guide! You need to adjust this (up or down) to ensure that YOUR knitting tension matches the knitting tension provided in the pattern. If you work with a different knitting tension than provided you will have a different yarn consumption, and your work will have different measurements than what the pattern suggests.

The knitting tension also determines which yarns can replace each other. As long as you achieve the same knitting tension you can replace one yarn with another.

See DROPS lesson: How to measure your tension/gauge

See DROPS video: How to make a gauge tension swatch

The required amount of yarn is provided in grams, eg: 450 g. To calculate how many balls you’ll need you first need to know how many grams are in 1 ball (25g, 50g or 100g). This information is available if you click on the individual yarn quality on our pages. Divide the amount required with the amount of each ball. For example, if each ball is 50g (the most common amount), the calculation will be as follows: 450 / 50 = 9 balls.

The important thing when changing from one yarn to another is that the knitting/crochet tension remains the same. This is so that the measurements of the finished piece will be the same as on the sketch provided. It is easier to achieve the same knitting tension using yarns from the same yarn group. It is also possible to work with multiple strands of a thinner yarn to achieve the knitting tension of a thicker one. Please try our yarn converter. We recommend you to always work a test swatch.

Please NOTE: when changing yarn the garment might have a different look and feel to the garment in the photo, due to individual properties and qualities of each yarn.

See DROPS lesson: Can I use a different yarn than the one mentioned in the pattern?

All our yarns are categorised into yarn groups (from A to F) according to thickness and knitting tension – group A contains the thinnest yarns and group F the thickest. This makes it easier for you to find alternative yarns to our patterns, should you wish to switch yarn. All yarns within the same group have a similar knitting tension and can easily replace each other. However, different yarn qualities have different structures and properties which will give the finished work a unique look and feel.

Click here for an overview of the yarns in each yarn group

At the top of all our patterns you’ll find a link to our yarn calculator, which is a helpful tool should you wish to use a different yarn than suggested. By filling in the yarn quality you wish to replace, the amount (in your size) and number of strands, the calculator will present good alternative yarns with the same knitting tension. Additionally it will tell you how much you’ll require in the new qualities and whether you’ll need to work with multiple strands. Most skeins are 50g (some are 25g or 100g).

If the pattern is worked with multiple colours, every colour will have to be calculated separately. Similarly, if the pattern is worked with several strands of different yarns (for example 1 strand Alpaca and 1 strand Kid-Silk) you will have to find alternatives for each, individually.

Click here to see our yarn calculator

Since different yarns have different qualities and textures we have chosen to keep the original yarn in our patterns. However, you can easily find options among our available qualities by using our yarn calculator, or simply pick a yarn from the same yarn group.

It is possible that some retailers still have discontinued yarns in stock, or that someone has a few skeins at home that they would like to find patterns for.

The yarn calculator will provide both alternative yarn as well as required amount in the new quality.

If you think it's hard to decide what size to make, it can be a good idea to measure a garment you own already and like the size of. Then you can pick the size by comparing those measures with the ones available in the pattern's size chart.

You'll find the size chart at the bottom of the pattern.

See DROPS lesson: How to read size chart

The needle size provided in the pattern serves only as a guide, the important thing is to follow the knitting tension. And since knitting tension is very individual, you will have to adjust the needle size to ensure that YOUR tension is the same as in the pattern – maybe you’ll have to adjust 1, or even 2 needle sizes, up or down to achieve the correct tension. For this, we recommend that you work test swatches.

Should you work with a different knitting tension than the one provided, the measurements of the finished garment might deviate from the measurement sketch.

See DROPS lesson: How to measure your tension/gauge

See DROPS video: How to make a tension/gauge swatch

Working a garment top-down provides more flexibility and room for personal adjustment. For example it is easier to try the garment on while working, as well as making adjustments to length of yoke and shoulder caps.

The instructions are carefully explaining every step, in the correct order. Diagrams are adjusted to the knitting direction and are worked as usual.

The diagram depicts all rows/rounds, and every stitch seen from the right side. It is read from bottom to top, from right to left. 1 square = 1 stitch.

When working back and forth, every other row is worked from the right side and every other row is worked from the wrong side. When working from the wrong side, the diagram will have to be worked reversed: from left to right, knit stitches are purled, purl stitches are knit etc.

When working in the round every round is worked from the right side and the diagram are worked from right to left on all rounds.

See DROPS lesson: How to read knitting diagrams

The diagram depicts all rows/rounds, and every stitch seen from the right side. It is worked from bottom to top, from right to left.

When working back and forth every other row is worked from the right side: from right to left and every other row is worked from the wrong side: from left to right.

When working in the round, every row in the diagram are worked from the right side, from right to left.

When working a circular diagram you start in the middle and work your way outwards, counter clockwise, row by row.

The rows usually start with a given number of chain stitches (equivalent to the height of the following stitch), this will either be depicted in the diagram or explained in the pattern.

See DROPS lesson: How to read crochet diagrams

Instructions for working several diagrams after each other on the same row/round, will often be written like so: “work A.1, A.2, A.3 a total of 0-0-2-3-4 times". This means you work A.1 once, then A.2 is worked once, and A.3 is repeated (in width) the number of times provided for your size – in this case like so: S = 0 times, M = 0 times, L=2 times, XL= 3 times and XXL = 4 times.

The diagrams are worked as usual: begin with the first row in A.1, then work the first row in A.2 etc.

See DROPS lesson: How to read knitting diagrams

See DROPS lesson: How to read crochet diagrams

The total width of the garment (from wrist-to-wrist) will be larger in the larger sizes, despite the actual sleeves being shorter. The larger sizes have longer sleeve caps and wider shoulders, so there will be a good fit in all sizes.

The measurement sketch/schematic drawing provides information regarding the full length of the garment. If it’s a jumper or a jacket the length is measured from the highest point on the shoulder closest to the neckline, and straight down to the bottom of the garment. It is NOT measured from the tip of shoulder. Similarly, the length of yoke is measured from the highest point on the shoulder and down to where yoke is split into body and sleeves.

On a jacket measures are never taken along bands, unless specifically stated. Always measure inside band stitches when measuring the length.

See DROPS lesson: How to read a schematic drawing

Diagrams are often repeated on the round or in height. 1 repeat is the diagram the way it appears in the pattern. If it says to work 5 repeats of A.1 in the round, then you work A.1 a total of 5 times after/next to each other in the round. If it says to work 2 repeats of A.1 vertically/in height you work the entire diagram once, then begin again at the start and work the entire diagram one more time.

Chain stitches are slightly narrower than other stitches and to avoid working the cast-on edge too tight, we simply chain more stitches to begin with. The stitch count will be adjusted on the following row to fit the pattern and measurement sketch.

The rib edge is more elastic and will contract slightly compared to, for example, stocking stitch. By increasing before the rib edge, you avoid a visible difference in width between the rib edge and the rest of the body.

It’s very easy to cast off too tightly, and by making yarn overs while casting off (and simultaneously casting these off) you avoid a too tight cast off edge.

See DROPS video: How to bind off with yarn overs (yo)

To achieve an even increase (or decrease) you can increase on, for example: every 3rd and 4th row alternately, like so: work 2 rows and increase on the 3rd row, work 3 rows and increase on the 4th. Repeat this until the increase is complete.

See DROPS lesson: Increase or decrease 1 st on every 3rd and 4th row alternately

Should you prefer to work in the round instead of back and forth, you may of course adjust the pattern. You’ll need to add steeks mid-front (usually 5 stitches), and follow the instructions. When you would normally turn and work from the wrong side, simply work across the steek and continue in the round. At the end you’ll cut the piece open, pick up stitches to work bands, and cover the cut edges.

See DROPS video: How to knit steeks and cut open

Should you prefer to work back and forth instead of in the round, you may of course adjust the pattern so you work the pieces separately and then assemble them at the end. Divide the stitches for the body in 2, add 1 edge stitch in each side (for sewing) and work the front and back pieces separately.

See DROPS lesson: Can I adapt a pattern for circular needles into straight needles?

Pattern repeats can vary slightly in the different sizes, in order to get the correct proportions. If you’re not working the exact same size as the garment in the photo, yours might deviate slightly. This has been carefully developed and adjusted so that the complete impression of the garment is the same in all sizes.

Make sure to follow instructions and diagrams for your size!

If you have found a pattern you like which is available in women’s size it’s not very difficult to convert it to men’s size. The biggest difference will be the length of sleeves and body. Start working on the women size that you think would fit across the chest. The additional length will be worked right before you cast off for the armhole/sleeve cap. If the pattern is worked top-down you can add the length right after the armhole or before the first decrease on sleeve.

Regarding additional yarn amount, this will depend on how much length you add, but it is better with a skein too many than too few.

All yarns will have excess fibres (from production) that might come off as lint or shedding. Brushed yarns (ie hairier yarns) have more of these loose, excess fibres, causing more shedding.

Shedding also depends on what is worn under or over the garment, and whether this pulls at the yarn fibres. It’s therefore not possible to guarantee that there will be no shedding

Below are some tips on how to get the best result when working with hairier yarns:

1. When the garment is finished (before you wash it) shake it vigorously so the looser hairs come off. NOTE: do NOT use a lint roller, brush or any method that pulls at the yarn.

2. Place the garment in a plastic bag and put it in your freezer - the temperature will cause the fibres to become less attached to each other, and excess fibres will come off easier.

3. Leave in the freezer for a few hours before taking it out and shaking it again.

4. Wash the garment according to the instructions on the yarn label.

Pilling is a natural process that happens to even the most exclusive of fibers. It's a natural sign of wear and tear that is hard to avoid, and that is most visible in high friction areas of your garment like a sweater's arms and cuffs.

You can make your garment look as new by removing the pilling, using a fabric comb or a pill/lint remover.

Still can't find the answer you need? Then scroll down and leave your question so one of our experts can try to help you. This will be done normally within 5 to 10 working days.
In the meantime, you can read the questions and answers that others have left to this pattern or join the DROPS Workshop on Facebook to get help from fellow knitters/crocheters!

You might also like...

Golden Fairy

@ms_blueberry, Germany

Golden Fairy

Jill, United Kingdom

Post a comment to pattern DROPS 195-22

We would love to hear what you have to say about this pattern!

If you want to leave a question, please make sure you select the correct category in the form below, to speed up the answering process. Required fields are marked *.

Comments / Questions (31)

country flag Christine PRADEL wrote:

Bonjour, j'ai juste besoin d'une petite mise au point. Dans la légende des diagrammes, vous dites que le triangle noir correspond à : glisser 1 m à l'endroit, tricoter 2 m ensemble à l'endroit et passer la m glissée par dessus les m tricotées ensemble. ok. Classique. Sauf que dans les commentaires (21/01/2020 Mme Marterer) vous dites q ce serait plutôt : glisser 2 m ensemble, tricoter la 3eme à l'endroit puis rabattre les 2 m glissées sur la 3eme. Je dois faire quoi ? Merciiii bcp

19.04.2024 - 12:22

DROPS Design answered:

Bonjour Mme Pradel, il semble que la réponse de 2020 était erronée, conformément aux explications originales, on a bien ici un surjet double: on glisse 1 m à l'endroit, on tricote les 2 m suivantes ensemble à l'endroit et on passe la maille glissée par-dessus les mailles tricotées ensemble. Bon tricot!

19.04.2024 - 12:37

country flag Jan Steele wrote:

I have joined the sleeves to the body of the garment (second size 360 stitches. I am about to commence the pattern at \"Work A.3 in the round..... When A.3 has been completed thee ae 280 stiches on the needle.\" \r\nAs I read A.3 graph I can\'t see where I am required to make reductions. Can you please explain the process as in A.4 I can clearly see reductions in stitches .\r\nregards Jan

20.12.2023 - 11:08

DROPS Design answered:

Dear Mrs Steele, if you look at diagram A.3 you start with 18 sts and work the lace pattern (2 yarn overs compensated by one double decrease in the middle of diagram), but on row 15 and on next ot last row in diagram you will only decrease without making the both yarn overs, this means the number of sts in each A.3 decrease first to 16 sts then 14 sts in each A.3 x 20 repeats in 2nd size = 280 sts. Work then 20 repeats of A.4 (14 sts), and again decrease just as shown in diagram on rows 9, 17 and 23 , there are now 7 sts in each A.4 x 20 repeats = 140 sts left. Happy knitting!

20.12.2023 - 16:03

country flag Margaret wrote:

Hi, Prachtige sweater! ik begrijp niet hoe er word er geminderd in de pas van 432 naar 336 steken? Patron drops 195-22

19.12.2023 - 14:46

DROPS Design answered:

Dag Margaret,

Als je het telpatroon gewoon volt, minder je automatisch, want daarin zijn de minderingen al opgenomen.

20.12.2023 - 18:57

country flag Hannie Weststrate wrote:

Klopt het dat A2 wel op de mouwen maar niet op het lijf gebreid wordt?

01.03.2023 - 14:17

DROPS Design answered:

Dag Hannie,

Ja, dat klopt; A.2 wordt alleen op de mouwen gebreid.

01.03.2023 - 20:22

country flag Golden Fairy 195-22 wrote:

Eg lurer på om det er rett i oppskriften. På armen så står det at ein skal strikka vrangbord, men etter vrangborden så skal ein fella 10 maskar. Er det rett? Ein bruker jo heller å øke maskar då. Mitt spørsmål

24.10.2022 - 11:04

DROPS Design answered:

Hei Golden Fairy, Vi anbefaler flere masker i vrangborden slik at den ikke er stram. Disse er felt av når man begynner på resten av ermet. God fornøyelse!

25.10.2022 - 07:11

country flag Susanne wrote:

Hej jeg er i gang med at strik model nr 097 i Lima garn jeg kan ikke få mønste til at passer jeg har pille op i gen igen jeg slut med to m hvor jeg skal have 4 m til bage

19.06.2020 - 08:01

DROPS Design answered:

Hei Susanne. Vi skal hjlpe deg så god vi kan, men hvilken størrelse strikker du og hvor i diagrammet mener du mønstret ikke passer? mvh DROPS design

22.06.2020 - 11:18

country flag LOPEZ Marie Claude wrote:

Je ne vois pas à quel endroit tricoter le diagramme numéro 2 ?

07.03.2020 - 18:56

DROPS Design answered:

Bonjour Mme Lopez, le diagramme A.2 se tricote en haut de la manche, après avoir ajusté le nombre de mailles à 76-102 (cf taille). Bon tricot!

09.03.2020 - 10:52

country flag Louise wrote:

I have knitted this pattern but the yoke part looks like a bigger size than the bottom half. The patterned yoke is much fuller and looks like it’s been gathered. What have I done wrong? I’m thinking of re-knitting from the patterned part on a smaller needle and size - what do you think? I can send a photo.

31.01.2020 - 15:00

DROPS Design answered:

Dear Louise, lace patterns , with yarnovers can become a little looser, than stockinett stitch. Everyone knits differently, if the difference is too big and bothers you, it is a good idea to knit it with smaller needles. Happy Crafting!

31.01.2020 - 15:24

country flag Danielle Marterer wrote:

Je viens d’envoyer une question et puis j’ai vu les photos en bas de page... j’ai pu agrandir ces photos et voir le détail du point : c'est juste parfait ! Ce modèle est vraiment superbe . Je le réalise en Alpaca drops coloris jean mix (vu que le fil est chiné on voit peut-être moins le point). Merci en tout cas pour votre site : c’est une vraie mine pour une tricoteuse au long cours dans mon genre : j’ai 73 ans et j’ai dû commencer vers 7-8 ans ! Cordialement

21.01.2020 - 23:18

DROPS Design answered:

Bonjour Mme Marterer, oups la réponse est partie avant la lecture de votre deuxième message, merci encore et bonne continuation!

22.01.2020 - 09:42

country flag Danielle Marterer wrote:

Dans le diagramme le point figuré par un triangle noir : ne serait -ce pas plutôt : glisser 2m ensemble, tricoter la 3eme endroit, rabattre les 2m glissée sur la 3eme ? Il me semble que cela ferait plus une « lugne » verticale (on ne voit pas bien le motif sur la photo - on ne peut pas l’agrandir) merci de votre avis !

21.01.2020 - 23:08

DROPS Design answered:

Bonjour Mme Marterer, c'est bien ainsi que cette diminution doit être faite, mais si vous préférez la faire autrement, vous pouvez tout à fait, vous pouvez essayer les deux techniques sur un échantillon pour bien voir la différence avant de vous décider. Bon tricot!

22.01.2020 - 09:17