
Popular categories
Looking for a yarn?


Comments / Questions (47)
![]() Sigrun wrote:
Sigrun wrote:
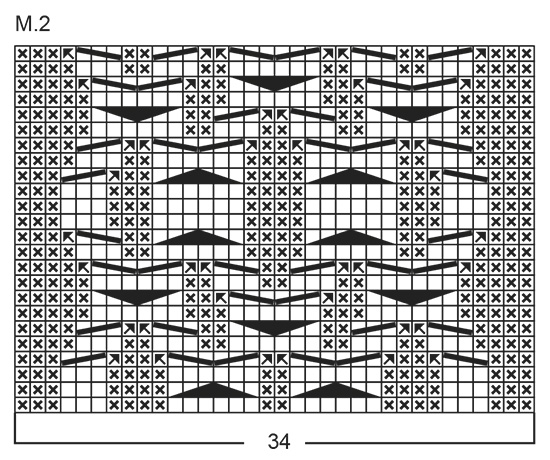
Ich meine natürlich umgekehrt! Da sieht man mal , wie irreführend dieses Muster ist. Macht mich verrückt...
14.11.2019 - 20:08
![]() Sigrun wrote:
Sigrun wrote:
Ich finde schon, dass in dem Diagramm auch erklärt werden sollte, dass das Kreuz nur in der Rückreihe links, in den Hinreihen aber sehr wohl rechts gestrickt werden muss. Und auch das weiße Kästchen muss nur in den Rückreihen rechts, in den Hinreihen dafür links gestrickt werden. Ich kenne das auch aus anderen Anleitungen so, das ist nicht immer für jeden sofort ersichtlich.
14.11.2019 - 19:36
![]() Dicky De Vlaming wrote:
Dicky De Vlaming wrote:
Begin ik als ik 52 steken heb opgezet gelijk met het patroon of ????? en dan de eerst naald van het patroon van rechts naar links. Weet dat ik iets verkeerd doe heb het werk nu al 5 keer opnieuw geprobeerd maar begrijp er niets van. Misschien toch te hoog gegrepen. Groetjes
14.11.2019 - 15:58DROPS Design answered:
Dag Dicky,
Ja, dat klopt, je begint vanaf de eerste naald met het patroon. Je breit eerst 1 ribbelsteek, 5 averecht, 3 recht, 3 averecht, dan telpatroon M.2 len daarna weer 5 averecht en 1 ribbelsteek. Je begint het telpatroon rechts onder en je breit de eerste naald van rechts naar links lezend.
15.11.2019 - 12:13
![]() Sigrun wrote:
Sigrun wrote:
Hallo, wie ist es denn nun richtig mit der ersten Reihe? Von rechts nach links oder von links nach rechts? Für gewöhnlich fängt man doch von rechts nach links an und dann umgekehrt. Bei mir sieht das Muster auch nicht aus wie auf dem Bild.Die vorhergehenden Erklärungen haben mich nur noch mehr verwirrt.Eine exakte Angabe, ob das Diagramm nun in der ersten Reihe von links nach rechts od umgekehrt gestrickt werden soll, würde helfen. Danke und Gruß
11.11.2019 - 21:00DROPS Design answered:
Liebe Sigrun, Arbeit beginnt hier mit einer Rück-Reihe -siehe "Stirnband: 1. R = Rück-R". So wird die erste Reihe in M.2 links nach rechts gestrickt und die 2. Reihe wird eine Hinreihe sein, und so weiter stricken. Viel Spaß beim stricken!
12.11.2019 - 08:23
![]() Pia wrote:
Pia wrote:
Hallo, jetzt habe ich mit viel Elan das Muster gestrickt für die Mütze , aber das Muster auf der sogenannten Vorderseite sieht nicht so aus wie auf dem Bild , nach der strickschrift werden die matschender Rückseite nicht gestrickt wie sie erscheinen und deshalb ist das Rautenmuster nicht rechts gestrickt , also ich werde da nicht schlau , sehr schade liebe Grüsse aus der Schweiz Pia
10.11.2019 - 16:37DROPS Design answered:
Liebe Pia, bei den Hinreihen stricken Sie das Diagram rechts nach links, und bei den Rückreihen stricken Sie das Diagram links nach rechts. Hier lesen Sie mehr. Viel Spaß beim stricken!
11.11.2019 - 12:14
![]() Neeloo wrote:
Neeloo wrote:
There seems to be more of the border (12 stitches) on the left side of the pattern than the right side (6 stitches). Which is the top and which is the bottom of the hat? Thanks.
22.10.2019 - 18:14DROPS Design answered:
Dear Neeloo, top of band will be the right side of piece (seen from RS) ie where you worked K1, P5, K3, P3 and bottom will be the left side of piece, ie where you worked P5, K1. Happy knitting!
23.10.2019 - 08:16
![]() Barbara wrote:
Barbara wrote:
Es nervt, wenn der mustersatz gestrickt ist fange ich wieder unten an. Es passt nicht
26.01.2019 - 18:10DROPS Design answered:
Liebe Barbara, am Ende M.2 sollen die Maschen wie beim 1. Reihen gestrickt werden - siehe 3. und 4. Diagram symbol. Viel Spaß beim stricken!
28.01.2019 - 10:46
![]() Barbara wrote:
Barbara wrote:
Moin leider ich verstehe das Diagramm nicht. Nach dem mustersatz geht es nicht auf,.
26.01.2019 - 16:05DROPS Design answered:
Liebe Barbara, die erste Reihe im Diagram lesen Sie von links nach rechts (=Rückreihe), dann stricken Sie alle Hinreihen (ab der 2. Reihe) rechts nach links, die Rückreihen werden immer links nach rechts gestrickt. Viel Spaß beim stricken!
28.01.2019 - 10:33
![]() Christine wrote:
Christine wrote:
Bonjour, Je pense qu'il y a un problème car qu'on lise le diagramme de gauche à droite ou de droite à gauche selon les rangs pairs ou impairs, les mailles endroites sont tricotées à l'envers le rang suivant. je pense qu'il faudrait écrire dans les instructions du schéma que les petites croix veulent dire une maille envers sur l'endroit et une maille endroit sur l'envers. N'est-ce pas ? Merci pour la confirmation
07.01.2019 - 21:29DROPS Design answered:
Bonjour Christine, les diagrammes montrent les motifs vu sur l'endroit, donc effectivement, les petites croix sont des mailles envers vu sur l'endroit que l'on va tricoter à l'endroit sur l'envers (= jersey envers). Bon tricot!
08.01.2019 - 09:03
![]() FABIENNE wrote:
FABIENNE wrote:
Bonjour, je débute en tricot et je trouve génial que vous fournissiez des modèles. On peut se faire la main faire des essais avant de craquer pour vos fabuleuses laines.
05.01.2019 - 07:31
|
|||||||||||||||||||
Elaine Hat |
|||||||||||||||||||
 |
 |
||||||||||||||||||
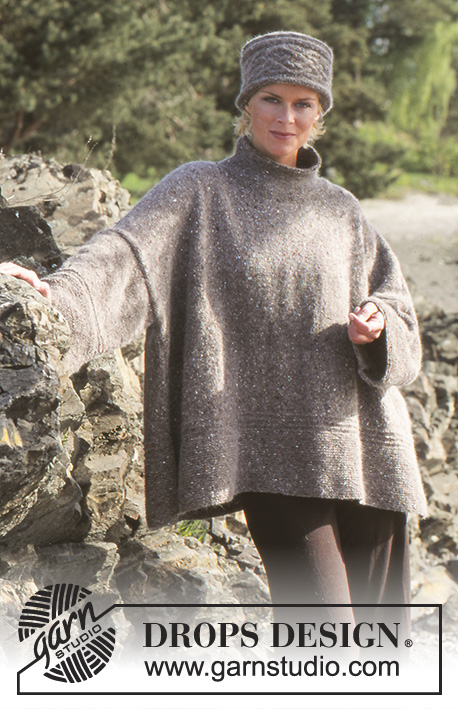
Knitted Hat/Headband with cable pattern in DROPS Alpaca and DROPS Kid-Silk. Size: Head measurements approx. 54-56 cm.
DROPS 66-25 |
|||||||||||||||||||
|
Garter st, when knitting flat: Knit all sts, all rows. Pattern: See the chart. (1 chart = 1 repeat). The pattern is seen from right side. -------------------------------------------------------- HAT: First knit the headband, which is then sewn together at the center back. Then pick up stitches around the edge of the headband to knit the top of the hat. HEAD BAND: With 1 strand of each yarn held together cast on 52 sts and establish pattern as follows: 1st row (WS): K1 (edge st knit in garter st throughout), P 5, K 3, P 3, Pattern 2 (= K3, P3, K4, P6, K2, P6, K4, P3, K3), P 5, K 1 (edge st knit in garter st throughout). 2nd row (RS): K 1, K 5, Pattern 2 (= P3, K3, P4, put 3 sts on st holder in back of work, K 3, K 3 from st holder, P2, put 3 sts on st holder in back of work, K 3, K 3 from st holder, P4, K3, P3), K 3, P 3, K 5, K 1. Work pattern as established until piece measures approx. 54 - 56 cm - adjust so you finish after a whole or half repeat of the pattern. Bind off. Sew together the headband at center back. Fold the outermost 6 sts at each side against the wrong side and stitch down (rolled edge). Top: Pick up 120 sts on double-pointed needles on the inside of the rolled edge in the sts of the headband – but be sure the picked up sts are not visible from the right side. Join and put 10 markers in work with 12 sts in between each marker. Knit stocking st. After 3 rows dec 1 st on the left side of every marker = 110 sts. Repeat decs every third row 4 times and then every other row 5 times = 20 sts. Pull a double strand of yarn through the remaining sts and pull tight to close. |
|||||||||||||||||||
Diagram explanations |
|||||||||||||||||||
|
|||||||||||||||||||
 |
|||||||||||||||||||
Have you finished this pattern?Tag your pictures with #dropspattern or submit them to the #dropsfan gallery. Do you need help with this pattern?You'll find 18 tutorial videos, a Comments/Questions area and more by visiting the pattern on garnstudio.com. © 1982-2026 DROPS Design A/S. We reserve all rights. This document, including all its sub-sections, has copyrights. Read more about what you can do with our patterns at the bottom of each pattern on our site. |
|||||||||||||||||||


With over 40 years in knitting and crochet design, DROPS Design offers one of the most extensive collections of free patterns on the internet - translated to 17 languages. As of today we count 324 catalogues and 12290 patterns translated into English (UK/cm). 12290
We work hard to bring you the best knitting and crochet have to offer, inspiration and advice as well as great quality yarns at incredible prices! Would you like to use our patterns for other than personal use? You can read what you are allowed to do in the Copyright text at the bottom of all our patterns. Happy crafting!
Post a comment to pattern DROPS 66-25
We would love to hear what you have to say about this pattern!
If you want to leave a question, please make sure you select the correct category in the form below, to speed up the answering process. Required fields are marked *.