
Popular categories
Looking for a yarn?


Comments / Questions (46)
![]() Gisela Hohn wrote:
Gisela Hohn wrote:
Hallo, ich habe dieses Modell schon einmal gestrickt, und es wurde aber nur ein Stirnband. Jetzt versuche ich es wieder, diesmal aber als Mütze. Ich stehe aber vor einem Rätsel, denn das Muster M2 wird ja auch in jeder 2. Reihe von links gelesen....das bringt mich zur Verzweiflung, denn dann heißt es: links wird rechts, und wie verhält es sich mit dem Zopf? Ich weiß jetzt grad nicht mehr weiter....
26.02.2025 - 16:25DROPS Design answered:
Liebe Frau Hohn, die 1. Reihe M.2 ist hier eine Rückreihe = links nach rechts gelesen; die erste Hinreihe ist so die 2. Reihe, die rechts nach links gestrickt wird; damit die Zöpfe auf die Aussenseite sichtbar sind. 1 Leeres Kästchen stricken Sie rechts bei den Hinreihen und links bei den Rückreihen, die Kreuzen stricken Sie links bei den Hinreihen und rechts bei den Rückreihen. Viel Spaß beim Stricken!
27.02.2025 - 10:19
![]() Michele wrote:
Michele wrote:
Pas difficile du tout ! Un bonheur à tricoter et tient bien chaud à la tête ! Je l’ai faite en rose foncé
24.01.2025 - 17:33
![]() Deborah Flack wrote:
Deborah Flack wrote:
Re:Elaine Hat headband. I don’t understand the pattern. I’ve cast on 52 st, however description for 1st row and second row doesn’t have 52 st. Also chart below is different from Row 1 & 2 desc. And also doesn’t cover 52 stitches. Very confused as to headband instructions.
23.10.2024 - 17:27DROPS Design answered:
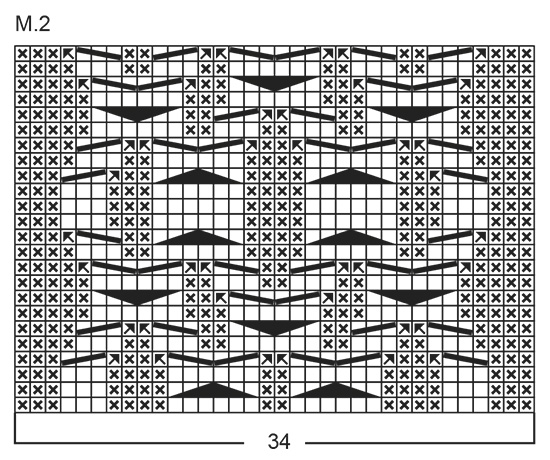
Dear Mrs Flack, on each side of diagram M.2 you will work the remaining stitches, ie M.1 doesn't cover all stitches; work 1st row (wrong side) as follows: K1, P 5, K 3, P 3, now work the 34 sts in diagram (= K3, P3, K4, P6, K2, P6, K4, P3, K3),then work the remaining sts: P 5, K 1. From RS, work: K1 (edge st in garter stitch), K5, work now 2nd row diagram reading from the right towards the left and finish wit K3, P3, K5, K1 (edge st in garter stitch). A white square = stocking stitch, a x = reversed stocking stitch. Continue diagram to the desired length. Happy knitting!
24.10.2024 - 09:07
![]() Loredana wrote:
Loredana wrote:
Is possible to have pattern in English or Italia Thank you
22.10.2024 - 21:59DROPS Design answered:
Hi Loredana, Click on the arrow, to the right and below the photograph, where it says "Norsk". The drop-down menu will allow you to choose the pattern language of your choice. Happy crafting!
23.10.2024 - 06:39
![]() Brigitte Kardas wrote:
Brigitte Kardas wrote:
Hallo, ich h hab eine Frage und zwar, das Diagram M2 zeigt nur rechte Seite und linke Seite stricken wie die Maschen erscheinen. Also zeigt der Diagram Reihe 2,4,6 ,8 usw. oder 2,3 4,5,6, ?????
13.10.2024 - 21:50DROPS Design answered:
Liebe Frau Kardas, das Diagram zeigt alle Reihen, die Hin- sowie die Rückreihen; die Rückreihen lesen Sie links nach rechts. Viel Spaß beim Stricken!
14.10.2024 - 09:17
![]() Tiziana wrote:
Tiziana wrote:
Non è chiaro nel primo ferro l'ultima maglia è a rov ma se il vivagno deve essere a legaccio dovrebbe essere un diritto. È un errore?
13.02.2023 - 13:57DROPS Design answered:
Buongiorno Tiziana, abbiamo corretto il testo,: la maglia di vivagno è sempre a diritto. Buon lavoro!
13.02.2023 - 16:11
![]() Myriam DEVAUCHELLE wrote:
Myriam DEVAUCHELLE wrote:
Je vais commencer ce modèle, je ne comprends pas très bien la technique de la bordure roulottée. est ce en réalité un simple ourlet sur l'envers? merci d'avance
13.01.2023 - 09:21DROPS Design answered:
Bonjour Mme Devauchelle, les 6 mailles de chaque côté seront pliées sur l'envers comme pour un ourlet, puis vous relèverez les mailles sur l'envers (à l'intérieur du bandeau) au niveau de la couture de l'ourlet en veillant bien à ce que les mailles relevées ne soient pas visibles sur l'endroit. Bon tricot!
13.01.2023 - 09:42
![]() Marie-france Binder wrote:
Marie-france Binder wrote:
Je n'obtiens pas comme sur le modèle au dernier rang et il ne s'accorde pas avec le départ au 1er rang. N'y a t il pas une erreur sur le diagramme . Vous remerciant, Cordialeme
14.12.2022 - 04:25DROPS Design answered:
Bonjour Mme Binder, suivez bien les torsades du dernier rang de M.2, vous devez avoir la même configuration de mailles qu'au 1er rang pour recommencer le motif (vous décalez la 1ère torsade à droite, la 2èmme à gauche, la 3ème à droite, la 4ème à gauche, la 5ème à droite et la 6ème à gauche). Bon tricot!
14.12.2022 - 08:17
![]() Genevieve wrote:
Genevieve wrote:
Merci pour votre réponse ultra rapide Bien cordialement
13.12.2022 - 17:11
![]() Genevieve wrote:
Genevieve wrote:
Bonjour, Une question au sujet des aiguilles à utiliser pour ce modèle, alpaca et kid silk font partie du groupe A, or selon votre tableau 2 fils groupe A se tricotent avec des aiguilles n°5 correspondant à 1 fil du groupe C . Je vous remercie de bien vouloir m'éclairer. Bien cordialement Geneviève
13.12.2022 - 11:06DROPS Design answered:
Bonjour Geneviève, c'est exact, c'est la règle de base, toutefois, en fonction de la texture souhaitée, l'échantillon sera différent et la taille des aiguilles à adapter, autrement dit, ici, on doit avoir 22 m x 30 rangs jersey avec 2 fils du groupe A = 10 x10 cm pour une texture plus épaisse (et plus chaude). Bon tricot!
13.12.2022 - 13:35
|
|||||||||||||||||||
Elaine Hat |
|||||||||||||||||||
 |
 |
||||||||||||||||||
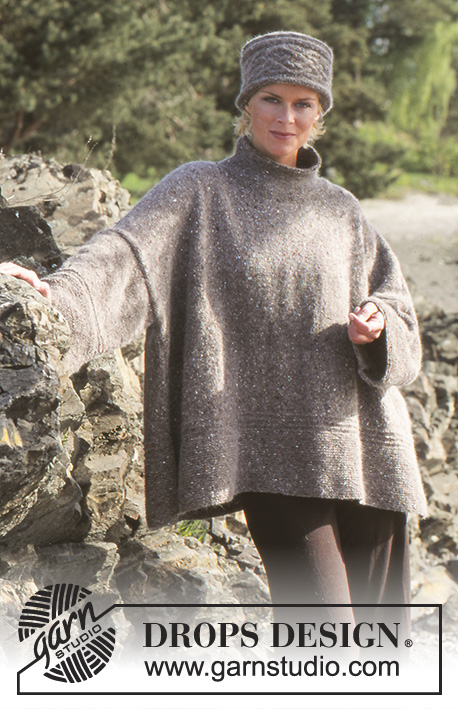
Knitted Hat/Headband with cable pattern in DROPS Alpaca and DROPS Kid-Silk. Size: Head measurements approx. 54-56 cm.
DROPS 66-25 |
|||||||||||||||||||
|
Garter st, when knitting flat: Knit all sts, all rows. Pattern: See the chart. (1 chart = 1 repeat). The pattern is seen from right side. -------------------------------------------------------- HAT: First knit the headband, which is then sewn together at the center back. Then pick up stitches around the edge of the headband to knit the top of the hat. HEAD BAND: With 1 strand of each yarn held together cast on 52 sts and establish pattern as follows: 1st row (WS): K1 (edge st knit in garter st throughout), P 5, K 3, P 3, Pattern 2 (= K3, P3, K4, P6, K2, P6, K4, P3, K3), P 5, K 1 (edge st knit in garter st throughout). 2nd row (RS): K 1, K 5, Pattern 2 (= P3, K3, P4, put 3 sts on st holder in back of work, K 3, K 3 from st holder, P2, put 3 sts on st holder in back of work, K 3, K 3 from st holder, P4, K3, P3), K 3, P 3, K 5, K 1. Work pattern as established until piece measures approx. 54 - 56 cm - adjust so you finish after a whole or half repeat of the pattern. Bind off. Sew together the headband at center back. Fold the outermost 6 sts at each side against the wrong side and stitch down (rolled edge). Top: Pick up 120 sts on double-pointed needles on the inside of the rolled edge in the sts of the headband – but be sure the picked up sts are not visible from the right side. Join and put 10 markers in work with 12 sts in between each marker. Knit stocking st. After 3 rows dec 1 st on the left side of every marker = 110 sts. Repeat decs every third row 4 times and then every other row 5 times = 20 sts. Pull a double strand of yarn through the remaining sts and pull tight to close. |
|||||||||||||||||||
Diagram explanations |
|||||||||||||||||||
|
|||||||||||||||||||
|
|||||||||||||||||||
Have you finished this pattern?Tag your pictures with #dropspattern or submit them to the #dropsfan gallery. Do you need help with this pattern?You'll find 18 tutorial videos, a Comments/Questions area and more by visiting the pattern on garnstudio.com. © 1982-2025 DROPS Design A/S. We reserve all rights. This document, including all its sub-sections, has copyrights. Read more about what you can do with our patterns at the bottom of each pattern on our site. |
|||||||||||||||||||


With over 40 years in knitting and crochet design, DROPS Design offers one of the most extensive collections of free patterns on the internet - translated to 17 languages. As of today we count 314 catalogues and 11822 patterns translated into English (UK/cm).
We work hard to bring you the best knitting and crochet have to offer, inspiration and advice as well as great quality yarns at incredible prices! Would you like to use our patterns for other than personal use? You can read what you are allowed to do in the Copyright text at the bottom of all our patterns. Happy crafting!
Post a comment to pattern DROPS 66-25
We would love to hear what you have to say about this pattern!
If you want to leave a question, please make sure you select the correct category in the form below, to speed up the answering process. Required fields are marked *.