
Popular categories
Looking for a yarn?


Comments / Questions (38)
![]() Mary wrote:
Mary wrote:
Hello, should I start the decreasing for the neck immediately after the cast on or after making the butter hole ? Please give me how many rows should I work before start dec for neck. Thank you
03.06.2020 - 13:42DROPS Design answered:
Dear Mary, the buttonhole is worked on the left back piece, when piece measures 1,5 cm - see BUTTONHOLE. Happy knitting!
03.06.2020 - 15:57
![]() Karen wrote:
Karen wrote:
Good day, I was wondering why the pattern does not switch to a circular needle after the last increase for the armholes? Would this not alleviate the need for assembly under each arm hole? Am I missing something?
22.04.2020 - 13:54DROPS Design answered:
Dear Karen, the whole section in garter stitch is worked with smaller needle - you will change to larger needle when working body (then again switch to smaller needles for the 2 ridges at the bottom edge). Happy knitting!
22.04.2020 - 14:13
![]() Ribault Martine wrote:
Ribault Martine wrote:
Bonjour, j'envisage de réaliser ce modèle de top, point mousse et ajouré. Le fil de coton recommandé pour ce modèle est Cotton light 50 % coton, 50 % polyester. Ce fil n'ai pas proposé par la boutique "laine et soie" de Vence (06). Peut être que ce fil n'est plus commercialisé. Si tel est le cas par fil puis-je le remplacer ?? Je vous remercie de bien vouloir me répondre. Cdlt.
09.04.2020 - 22:17DROPS Design answered:
Bonjour Mme Ribault, vous pouvez réaliser ce fil soit en Cotton Light soit avec un autre fil du groupe B, essayez notre convertisseur si besoin, et surtout, n'hésitez pas à contacter votre magasin DROPS qui pourra vous renseigner sur ses réelles disponibilités. Bon tricot!
14.04.2020 - 10:02
![]() Lone wrote:
Lone wrote:
Sød top, som jeg vil prøve at strikke. Jeg vil dog gerne ha mindre ærmegab, således at udtagning til ærme starter før. Har I et tip til hvordan jeg gør?
22.05.2019 - 21:16DROPS Design answered:
Hei Lone. Ja dette er en flott modell. Om du vil ha mindre ermhull kan du enten øke fler ganger hver 2. pinne, og ferre ganger hver 4. pinne. Eventuelt kan du vurdere om du vil øke 2 masker isteden for 1 over de siste økningene. Nå vet ikke jeg hvilken størrelse du strikker eller hvor mye mindre du ønsker ermhullet, men du kan regne sammen hvor mange omganger økningene går over. Dette kan sammenlignes med hvor mange omganger du ønsker at ermhullet skal strikkes over, og så avgjøre om det holder å øke oftere, eller om du vil øke fler masker. Prøv deg frem. God fornøyelse
23.05.2019 - 07:33
![]() Rita wrote:
Rita wrote:
Scusate...non riesco a capire ma l’asola mi viene direttamente sopra lo scalfo...nella parte dx del lavoro...e quelle 14 maglie avviate per il collo sono a sx ...su queste maglie devo lavorare lo spacco?....io non capisco proprio in che modo incominciare...paragonando il mio lavoro all’immagine viene completamente diversa....
31.03.2019 - 22:52DROPS Design answered:
Buongiorno Rita. Gli aumenti per lo scalfo vanno fatti all'inizio del ferro sul diritto del lavoro (dopo le 3 m legaccio). Gli aumenti per lo scollo sono alla fine del ferro, sul diritto del lavoro. L'asola va fatta anche lei alla fine del ferro sul diritto del lavoro. Più avanti le diminuzioni e gli aumenti per lo spacco (l'apertura al centro sul dietro) verranno fatti alla fine del ferro sul diritto del lavoro. Buon lavoro!
01.04.2019 - 08:56
![]() Rita wrote:
Rita wrote:
Ho incominciato tre volte il dietro sinistro e non riesco a capire dove sto sbagliando...quando faccio l’asola...lavoro la terza e quarta maglia insieme dal bordo....ma bordo dx o sx... Provo a rivedere il percorso dall’ inizio per capire dove sbaglio...le spiegazioni per il dietro sinistro le trovo complicate...grazie
31.03.2019 - 11:17DROPS Design answered:
Buongiorno Rita. Deve aprire l'asola sul bordo più vicino al centro della schiena. Buon lavoro!
31.03.2019 - 15:35
![]() Grandet wrote:
Grandet wrote:
Bonjour, je voudrais vous poser ma deuxième question : comment faire pour que le passage à l'augmentation pour l'encolure soit joli (entre le tricot et les nouvelles 14 mailles montées) ? Un grand merci.
30.03.2019 - 16:28DROPS Design answered:
Bonjour Mme Grandet, cette vidéo montre comment monter des mailles sur le côté, veillez à bien avoir la même tension lorsque vous montez ces nouvelles mailles pour que l'arrondi soit plus joli. Vous pourrez éventuellement terminer par une petite bordure au crochet si besoin (type 1 ms, 1 ou plusieurs ml) le long de l'encolure pour ajouter une bordure de finition. Bon tricot!
01.04.2019 - 12:25
![]() Grander wrote:
Grander wrote:
Bonjour, je viens de commencer ce tricot et il me semble que la boutonnière ne doit pas se trouver à 1,5 du du début de l'ouvrage mais là où commence l'encolure. Ou bien, je ne lis pas bien l'explication ? Merci de votre réponse.
30.03.2019 - 16:18DROPS Design answered:
Bonjour Mme Grander, le top se tricote de haut en bas, on va ouvrir la boutonnière à 1,5 cm sur le demi-dos gauche côté encolure (mesurez à partir des mailles montées pour l'encolure, pas à partir du rang de montage de l'épaule). Bon tricot!
01.04.2019 - 12:23
![]() Rosie wrote:
Rosie wrote:
At the end of Vent Mid Back, do you measure it at the end (17cm) from the original 10 cast on stitches? Or from where the extra stitches were cast on for the neck? Also, do you cast off these stitches or put them on a holder for the left and right back pieces?
20.07.2018 - 20:48DROPS Design answered:
Dear Rosie, measure from cast-on edge, it's the length of armhole (see also measurement chart). Don't cast off the sts from left back piece, they will be worked together with the sts from right back piece after it has been worked the same way (reversed). Happy knitting!
23.07.2018 - 07:28Hana wrote:
Hello. I like this top very much and I want to try to make it. I have one problem, my english is not that good. Are you planning to translate it to czech? Thank you for your answer.
10.03.2018 - 08:49
|
||||||||||||||||
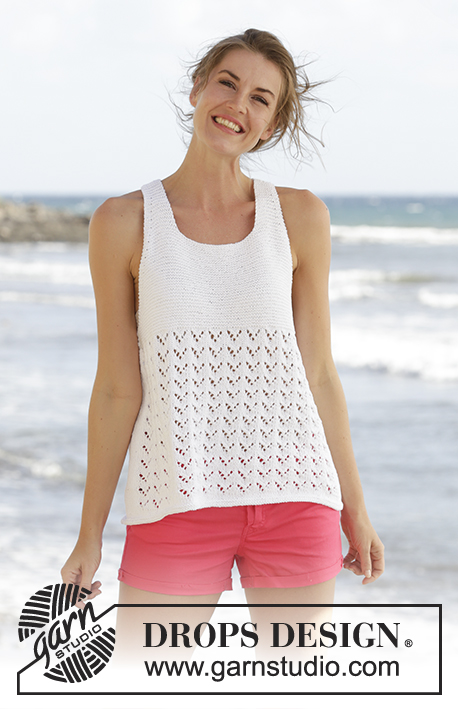
Holiday Bliss#holidayblisstop |
||||||||||||||||
 |
 |
|||||||||||||||
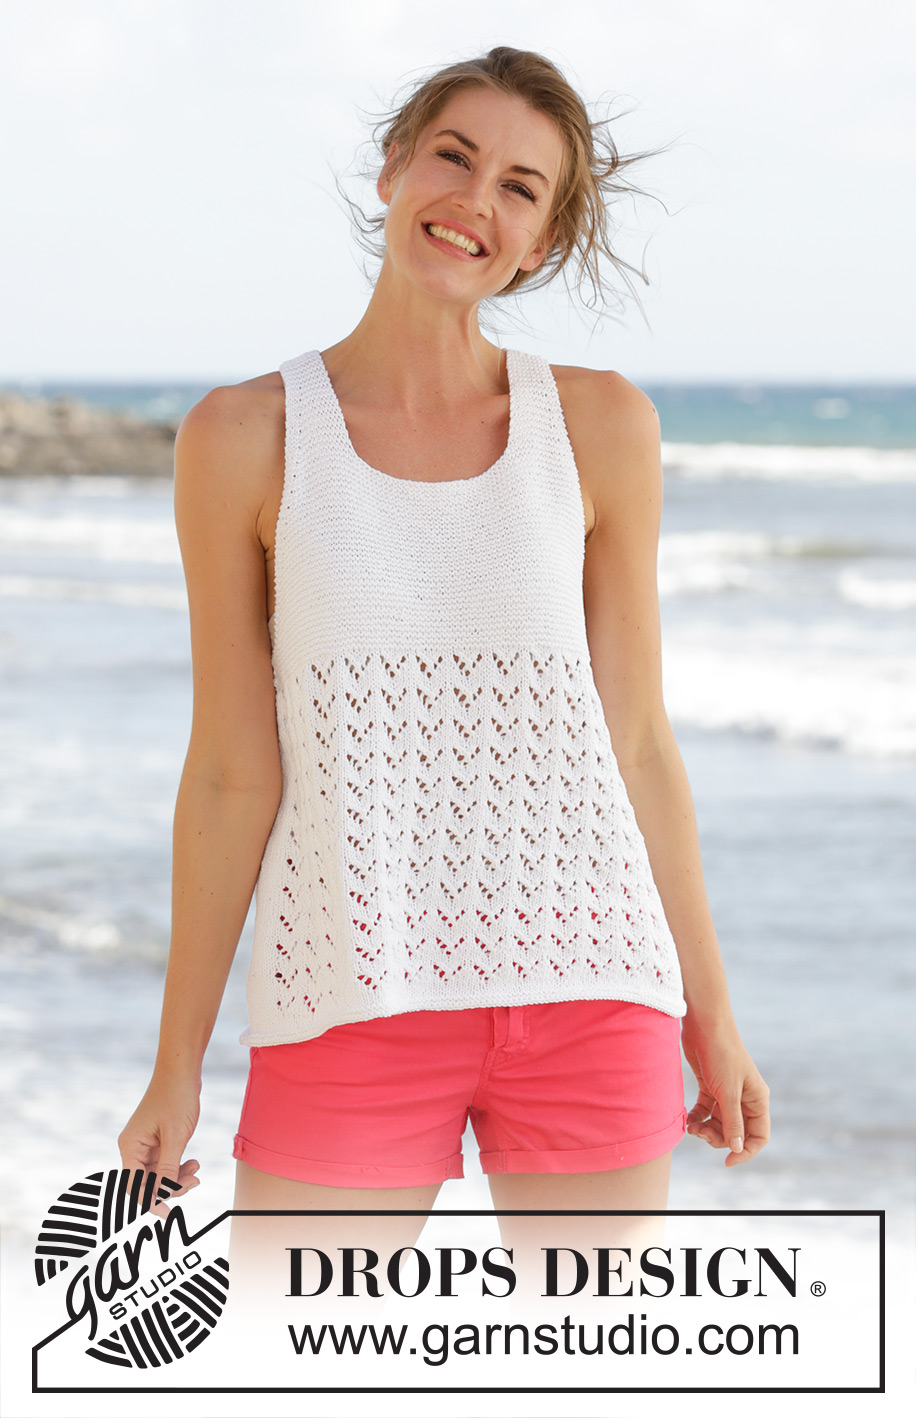
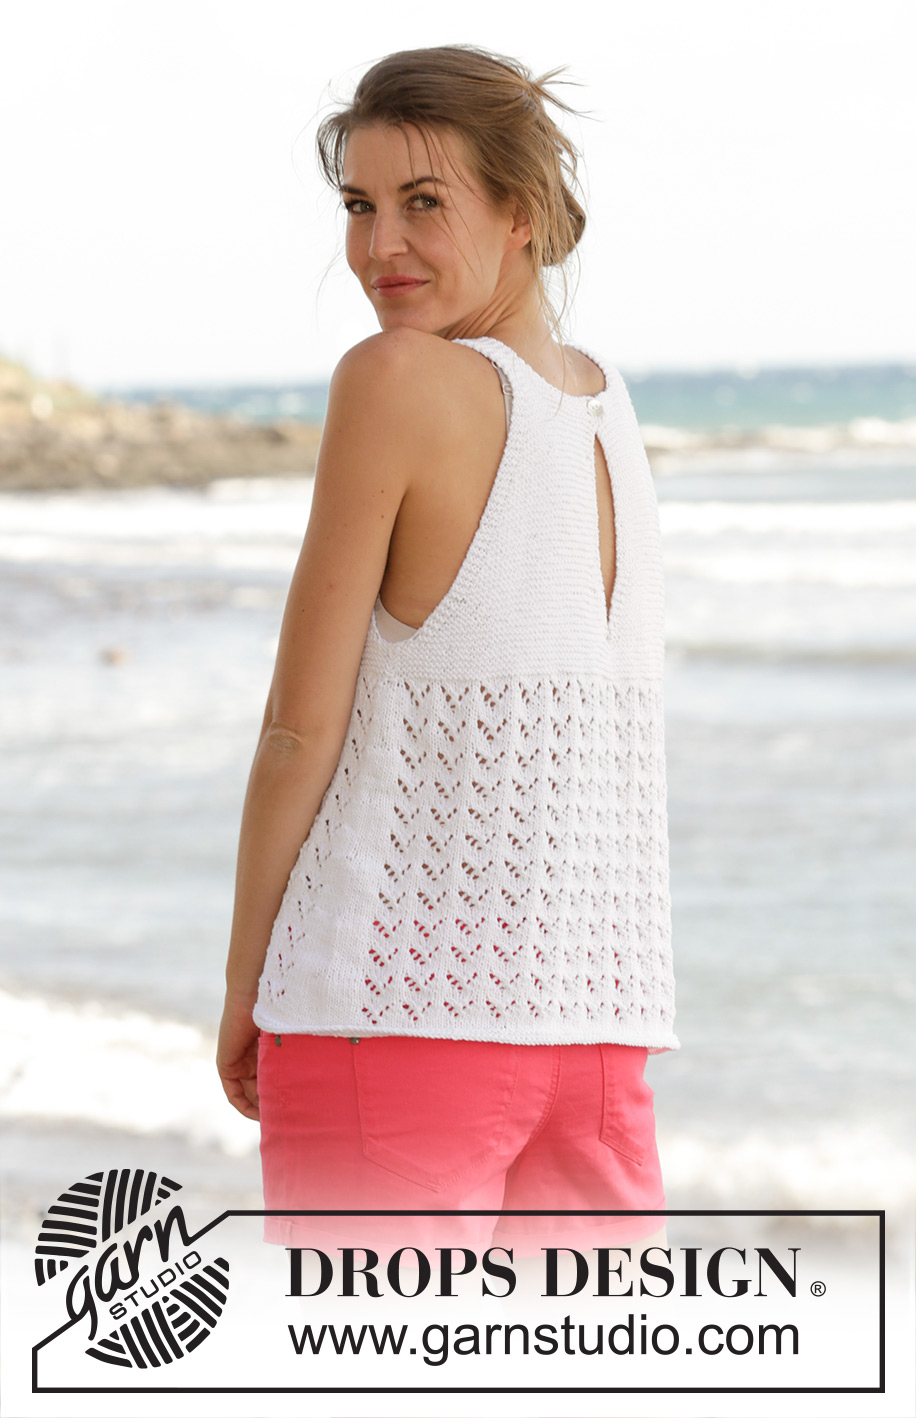
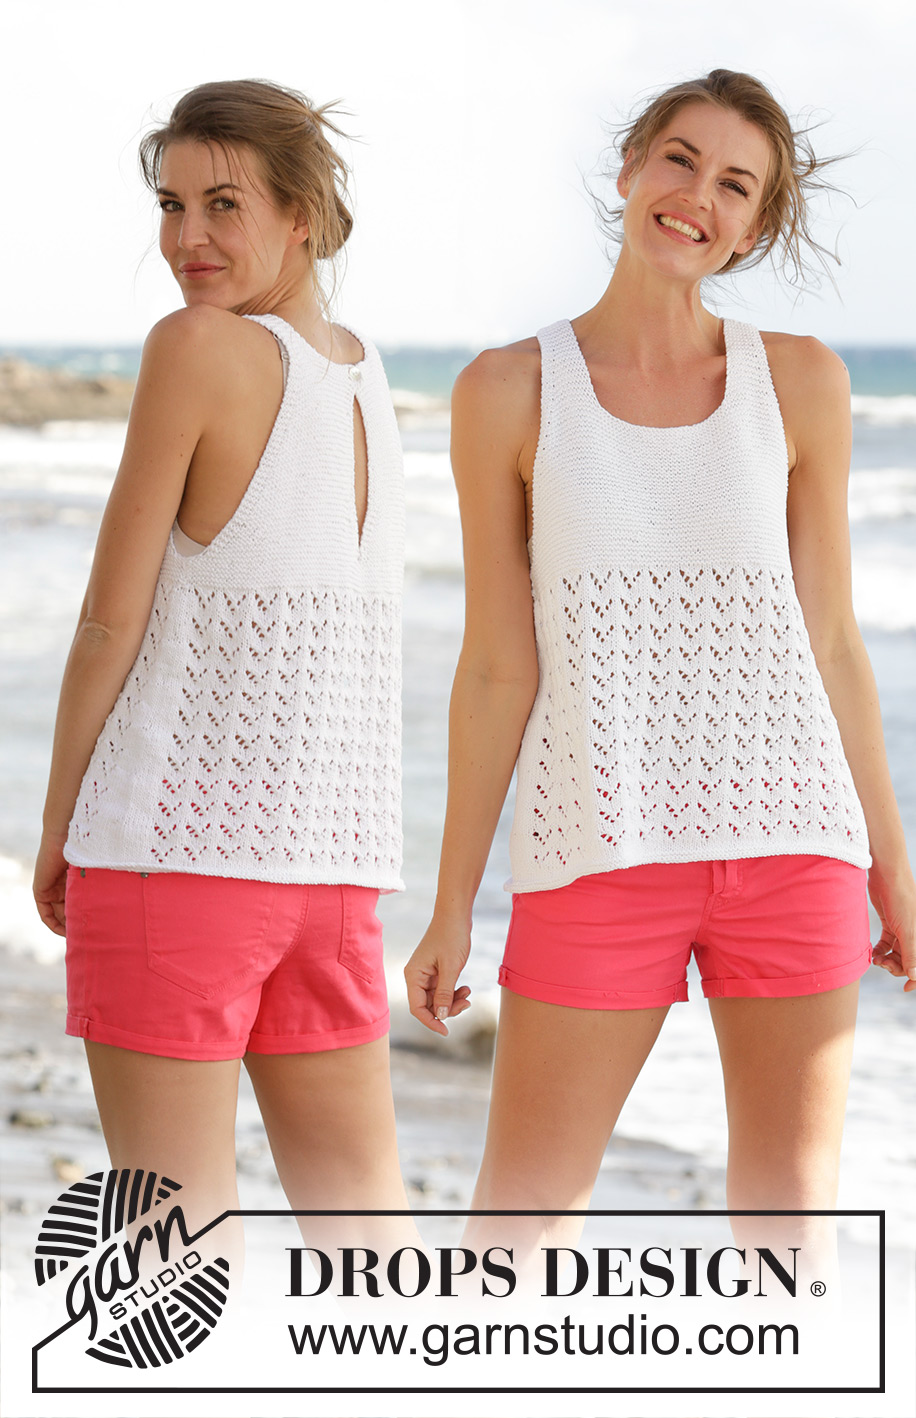
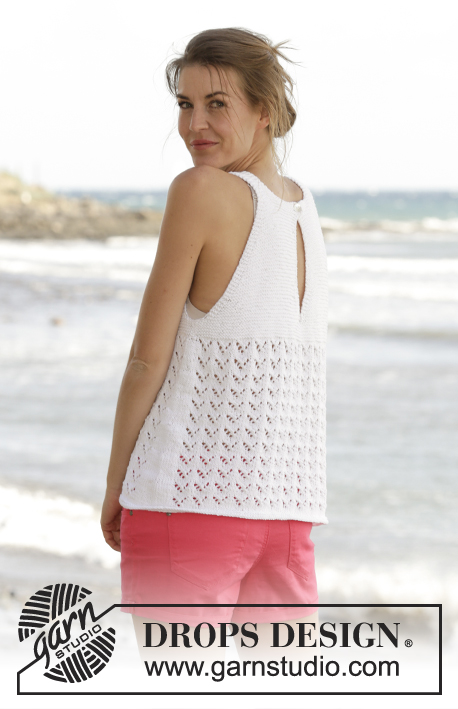
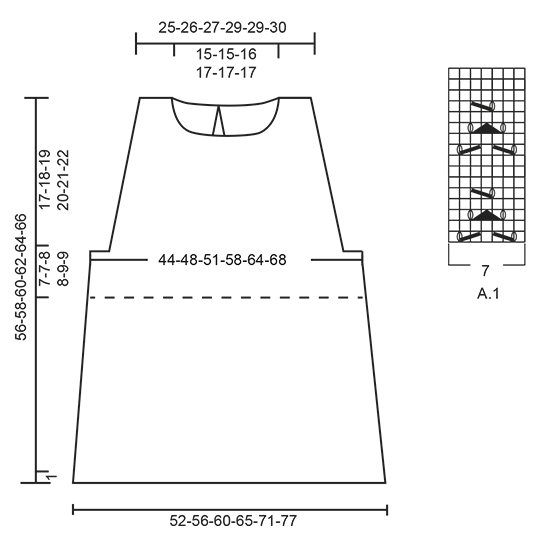
Knitted DROPS top in garter st with lace pattern and vent mid back in ”Cotton Light”. Worked top down. Size S-XXXL.
DROPS 170-24 |
||||||||||||||||
|
GARTER ST (back and forth): K all rows. 1 ridge = 2 rows K. GARTER ST (worked in the round): 1 ridge = 2 rounds. * K 1 round and P 1 round *, repeat from *-*. PATTERN: See diagram A.1. INCREASE TIP-1: Inc 1 st by making a YO. On next row K YO twisted to avoid holes. INCREASE TIP-2: Work until 1 st remains before marker, 1 YO, work 2 sts in garter st (marker is between these 2 sts), 1 YO. On next round K YOs twisted to avoid holes. Then work the new sts in stocking st. BUTTONHOLE: Dec for 1 buttonhole on left back piece at the top in vent mid back when piece measures 1½ cm as follows: K tog 3rd and 4th st from edge and make 1 YO. ---------------------------------------------------------- TOP: First worked back and forth on needle in parts, then work pattern in the round. The piece is worked top down. LEFT BACK PIECE: Cast on 10-12-12-13-13-14 sts on circular needle size 3.5 mm with Cotton Light. Work in GARTER ST - see explanation above. Remember BUTTONHOLE - see explanation above. When piece measures 4 cm, inc for armhole as follows from RS: Work 3 sts in garter st, 1 YO (= 1 st inc) – READ INCREASE TIP-1, work in garter st over the remaining 7-9-9-10-10-11 sts and cast on 1 new st for neck at the end of row. Work 1 row. At the end of the next row from RS, cast on 14-15-15-16-16-17 new sts for neck = 26-29-29-31-31-33 sts. REMEMBER THE KNITTING TENSION Then continue inc for armhole AT THE SAME TIME dec and inc for vent mid back as follows: ARMHOLE: Repeat inc for armhole every 4th row 10-12-13-11-6-6 more times and then every other row 7-5-6-12-24-26 times. VENT MID BACK: Dec for vent as follows (from RS): Work until 5 sts remain, K 2 tog, work 3 sts in garter st. Repeat this dec every 4th row 3 more times. Then when piece measures 9-10-11-12-13-14 cm from the new sts cast on for neck, inc as follows (from RS): Work until 3 sts, 1 YO, work 3 sts in garter st. K YO twisted on next row to avoid hole. Repeat inc every 4th row 3 more times. When all inc for armholes are done, there are 43-46-48-54-61-65 sts on left back piece. Work last row from RS. Piece measures approx. 17-18-19-20-21-22 cm. Put piece aside and knit right back piece. RIGHT BACK PIECE: Cast on and work as left back piece but reversed. I.e. inc for armhole inside 3 sts in garter st at the end of row from RS and cast on for neck at the end of row from WS. When all inc are done there are 43-46-48-54-61-65 sts on right back piece. Adjust according to left back piece. Work last row from RS, cast on 3-4-5-6-6-6 sts at the end of this row, turn piece and work as follows from WS: Work in garter st over the new 3-4-5-6-6-6 sts, in garter st over the 43-46-48-54-61-65 sts from right back piece, cast on 1-0-1-1-1-0 new sts, then work in garter sts over the next 43-46-48-54-61-65 sts from left back piece from WS, cast on 3-4-5-6-6-6 sts at the end of row. There are now 93-100-107-121-135-142 sts on back piece. Continue in garter st until piece measures 24-25-27-28-30-31 cm from shoulder – adjust so that the last row is worked from WS. Slip all sts on a stitch holder and work the front piece. FRONT PIECE: Left shoulder: Cast on 10-12-12-13-13-14 sts on circular needle size 3.5 mm with Cotton Light. Work in garter st. When piece measures 4 cm, work as follows on next row from RS: Work until 3 sts, 1 YO (= 1 st inc), work 3 sts in garter st. Now continue inc for armhole the same way as on right back piece, AT THE SAME TIME when piece measures 8-8-10-10-12-12 cm - adjust so that last row is worked from WS, slip sts on a stitch holder and work right shoulder. Right shoulder: Cast on and work as left shoulder but reversed. Inc sts for armhole the same way as on left back piece (i.e. inside 3 sts in garter st at beg of row from RS). When piece measures 8-8-10-10-12-12 cm, cast on 31-32-33-35-35-36 sts for neck at the end of row from RS, then work sts from stitch holder (= left shoulder) on to needle. Continue back and forth in garter st. NOTE: Continue inc for armhole as before. When all inc for armholes are done, there are 87-92-97-109-123-130 sts on needle. Adjust so that last row is from WS, cast on 3-4-5-6-6-6 sts at the end of row, turn and K over all sts, cast on 3-4-5-6-6-6 sts at the end of row = 93-100-107-121-135-142 sts on front piece. Piece measures approx. 17-18-19-20-21-22 cm. Continue in garter st until piece measures 24-25-27-28-30-31 cm from shoulder – adjust according to back piece (last row is worked from WS). BODY: Now work in the round. Insert 1 marker in piece, NOW MEASURE PIECE FROM HERE. Switch to circular needle size 4 mm. Work as follows from RS: K the 93-100-107-121-135-142 sts on front piece, then work sts from stitch holder on back piece on to same circular needle = 186-200-214-242-270-284 sts on needle. Insert a marker in transition between front and back piece (= 93-100-107-121-135-142 sts between each marker). First marker is beg of round. K 1 round. Then work pattern as follows: 1 st in stocking st, work A.1 (= 7 sts) 13-14-15-17-19-20 times in width, 1 st in stocking st, (marker is here), 1 st in stocking st, A.1 13-14-15-17-19-20 times in width, 1 st in stocking st. Continue as follows. When piece measures 2 cm, inc 1 st on each side of marker in each side of piece - READ INCREASE TIP-2 (= 4 sts inc). Repeat inc every 3½-3-2½-3½-4-3 cm 7-8-9-7-6-9 more times = 218-236-254-274-298-324 sts. When piece measures 31-32-32-33-33-34 cm (adjust to finish nicely according to pattern), switch to circular needle size 3.5 mm. Work 2 ridges in GARTER ST - see explanation above. Cast off. The whole piece measures approx. 56-58-60-62-64-66 cm. ASSEMBLY: Sew the shoulder seams. Sew tog ridges under each armhole in outer loops of edge sts (= side seams). Sew on button at the top of vent on right back piece. |
||||||||||||||||
Diagram explanations |
||||||||||||||||
|
||||||||||||||||
 |
||||||||||||||||
Have you finished this pattern?Tag your pictures with #dropspattern #holidayblisstop or submit them to the #dropsfan gallery. Do you need help with this pattern?You'll find 25 tutorial videos, a Comments/Questions area and more by visiting the pattern on garnstudio.com. © 1982-2026 DROPS Design A/S. We reserve all rights. This document, including all its sub-sections, has copyrights. Read more about what you can do with our patterns at the bottom of each pattern on our site. |
||||||||||||||||


With over 40 years in knitting and crochet design, DROPS Design offers one of the most extensive collections of free patterns on the internet - translated to 17 languages. As of today we count 324 catalogues and 12290 patterns translated into English (UK/cm). 12290
We work hard to bring you the best knitting and crochet have to offer, inspiration and advice as well as great quality yarns at incredible prices! Would you like to use our patterns for other than personal use? You can read what you are allowed to do in the Copyright text at the bottom of all our patterns. Happy crafting!
Post a comment to pattern DROPS 170-24
We would love to hear what you have to say about this pattern!
If you want to leave a question, please make sure you select the correct category in the form below, to speed up the answering process. Required fields are marked *.