
Popular categories
Looking for a yarn?


Comments / Questions (38)
![]() Lisa wrote:
Lisa wrote:
Je ne comprends pas où placer la boutonnière ? Si je la fais à 1,5cm du début du tricot, elle ne sera pas placée en haut de la fente milieu dos... Pouvez-vous m'apporter plus de précisions ? D'avance merci
10.07.2025 - 16:43
![]() Kinou wrote:
Kinou wrote:
En fait ce qui nous trompe c’est votre commentaire : ne pas oublier la boutonnière. Il est mal placé dans le déroulé des explications. À mon avis, il faudrait le descendre et le mettre juste après et au début de : Fente milieu dos. Ce serait beaucoup plus clair pour nous :)) merci !!
09.07.2025 - 10:03DROPS Design answered:
Bonjour Mme Kinou,ou ns vous remercions de votre commenraire. Nous en tiendrons compte. Bon tricot!
19.07.2025 - 23:07
![]() Kinou wrote:
Kinou wrote:
Bonjour, est ce que les diminutions et augmentations de la fente 1/2 dos gauche doivent aussi être faites pour le 1/2 dos droit ? Désolée mais comme vous précisez pour le 1/2 dos droit les augmentations de l’emmanchure je me demandais s’il fallait aussi appliquer à droite les explications de la fente. Merci beaucoup pour tous vos beaux modèles et vos réponses toujours rapides et précises :)
09.07.2025 - 09:59DROPS Design answered:
Bonjour Mme Kinou, les diminutions et augmentations de la fente 1/2 dos gauche doivent aussi être faites pour le 1/2 dos droit (c'est symetrique). Bon tricot!
20.07.2025 - 09:38
![]() Paola Pedroni wrote:
Paola Pedroni wrote:
Lamentablemente, estoy reinventando este modelo, he hecho varios modelos de vuestra página, pero este me ha sido imposible seguirlo, estoy haciendo la talla M pero la sisa no me convence, es muy pequeña si se le compara con la foto de la modelo. En las tiendas la sisa para la talla M es por lo menos 21 cms. Ojalá me resulte porque me gusta mucho. Saludos desde Chile.
03.05.2025 - 23:46
![]() Antonietta wrote:
Antonietta wrote:
Il modello che vien fuori non corrisponde perfettamente a quello in foto, e ci sono alcuni errori nelle spiegazioni, forse son da rivedere.
10.05.2023 - 22:45DROPS Design answered:
Buonasera Antonietta, può indicarci gli errori che ha riscontrato? Buon lavoro!
11.05.2023 - 21:34
![]() Marie-José Musters wrote:
Marie-José Musters wrote:
Goed passend en bijzonder patroon; mijn zomertop is erg mooi geworden!
01.03.2023 - 18:17
![]() Martine Perrin wrote:
Martine Perrin wrote:
Dear Sirs i have brought wool for DROPS design: Pattern no cl-059 i am an experienced knitter and this pattern is one of the most frustrating and difficult i have ever come across, please advise if there is an error in the first left hand side of this pattern regards Martine
27.04.2022 - 12:44DROPS Design answered:
Dear Martine, on the left back piece you will increase for armhole after the first 3 sts from RS and then cast on new stitches towards neck (= end of row from RS) = shoulder - you will then cast on new sts for neck (towards split mid back) at the end of next row from RS. And then continue increasing for armhole (beg of row from RS) and decreasing then increasing (end of row from RS) torwards mid back. Can this help?
27.04.2022 - 15:44
![]() Monico wrote:
Monico wrote:
Bonjour. Pourriez vous me dire pourquoi pour l'échantillon il faut utiliser une aiguille 4 et ensuite dans la conception vous utilisez une aiguille 3,5..... Je ne comprends pas ??
26.04.2021 - 16:48DROPS Design answered:
Bonjour Mme Monico, le haut des demi-dos et du devant se tricotent au point mousse avec l'aiguille 3,5 mais vous tricoterez ensuite le point fantaisie avec l'aiguille 4 quand vous réunirez toutes les pièces ensemble - cf DOS & DEVANT. Bon tricot!
27.04.2021 - 07:22
![]() Mary wrote:
Mary wrote:
Sorry maybe I wasn’t very clear. Left back piece..”cast 14 sts for the neck. Dec for vent as follows...” I understand the buttonhole is when piece measures 1,5cm but my question is if I start the dec after making the buttonhole or immediately after the 14 sts cast on . I hope is clear now . Thanks
03.06.2020 - 19:21DROPS Design answered:
Dear Mary, the buttonhole should be worked after you have worked 1,5 cm after the 14 new sts cast on: cast on the 14 new sts, increase for armhole and decrease for vent and when piece measures 1,5 cm from the new 14 st cast on, knit the buttonhole. Happy knitting!
04.06.2020 - 08:34
![]() Mary wrote:
Mary wrote:
Sorry , buttonhole
03.06.2020 - 13:46
|
||||||||||||||||
Holiday Bliss#holidayblisstop |
||||||||||||||||
 |
 |
|||||||||||||||
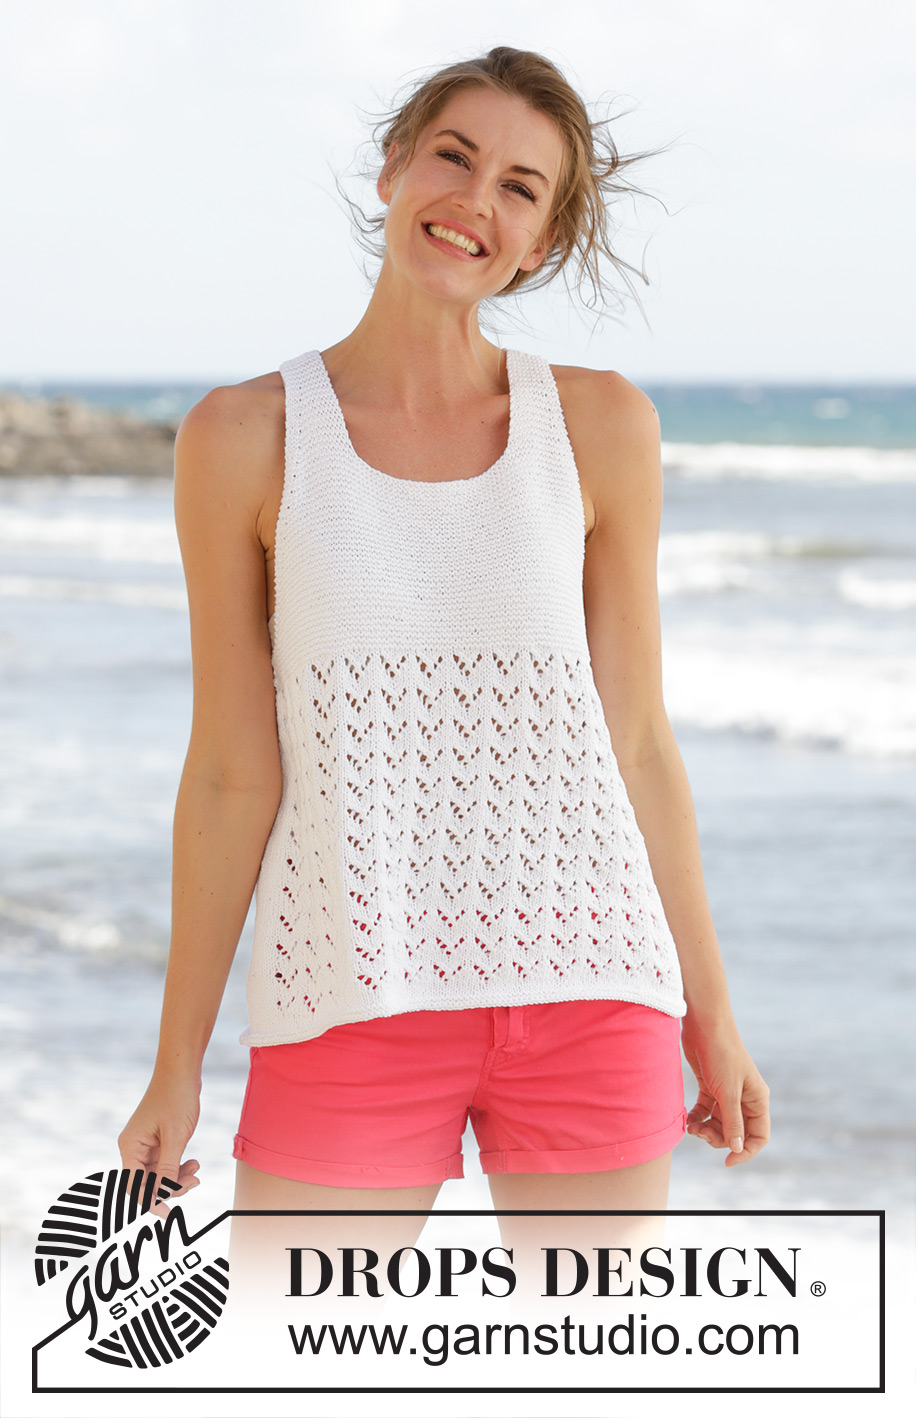
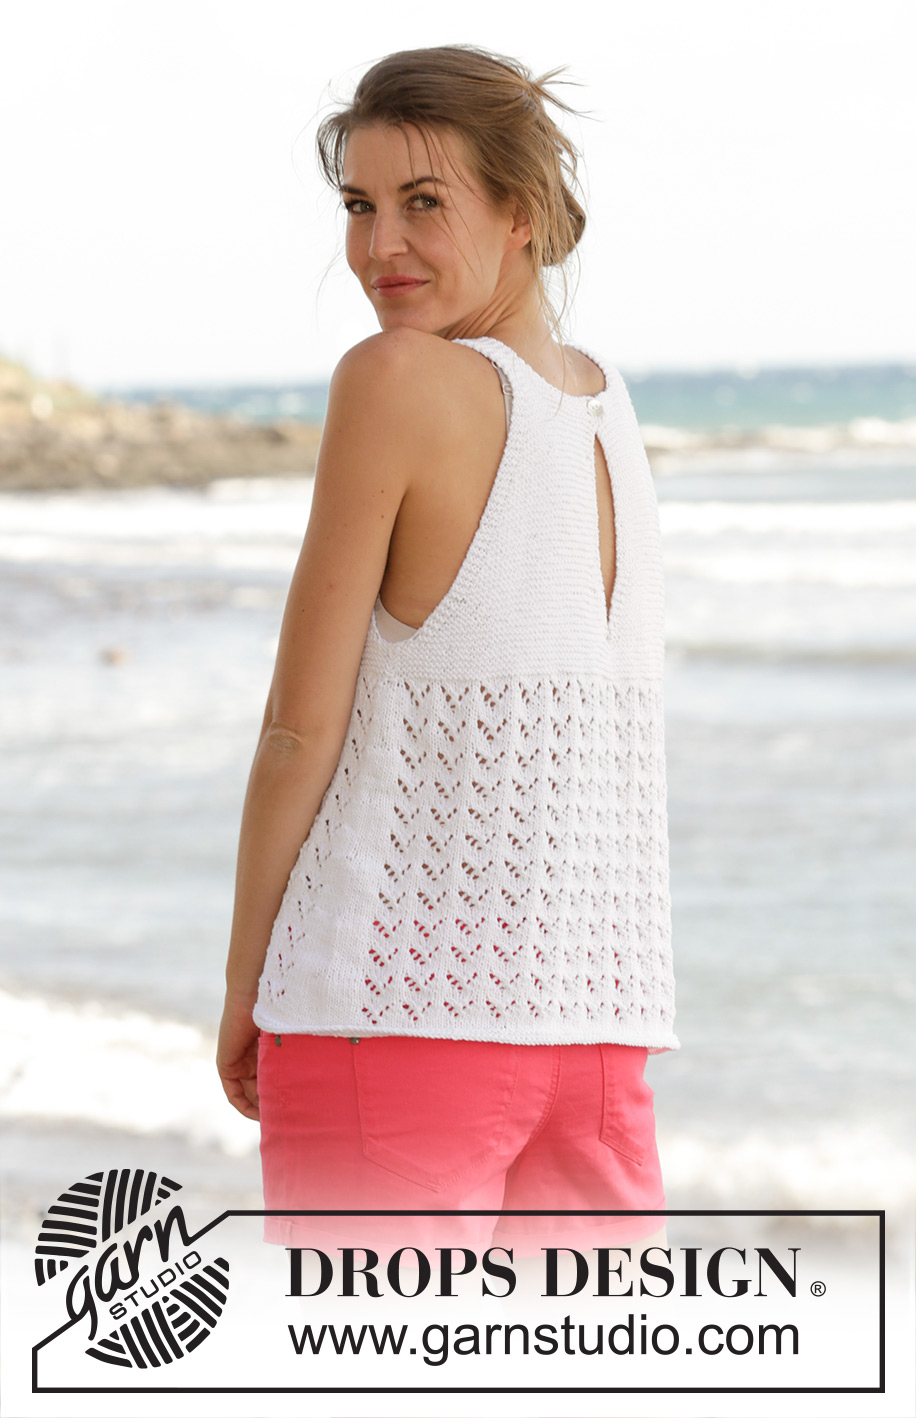
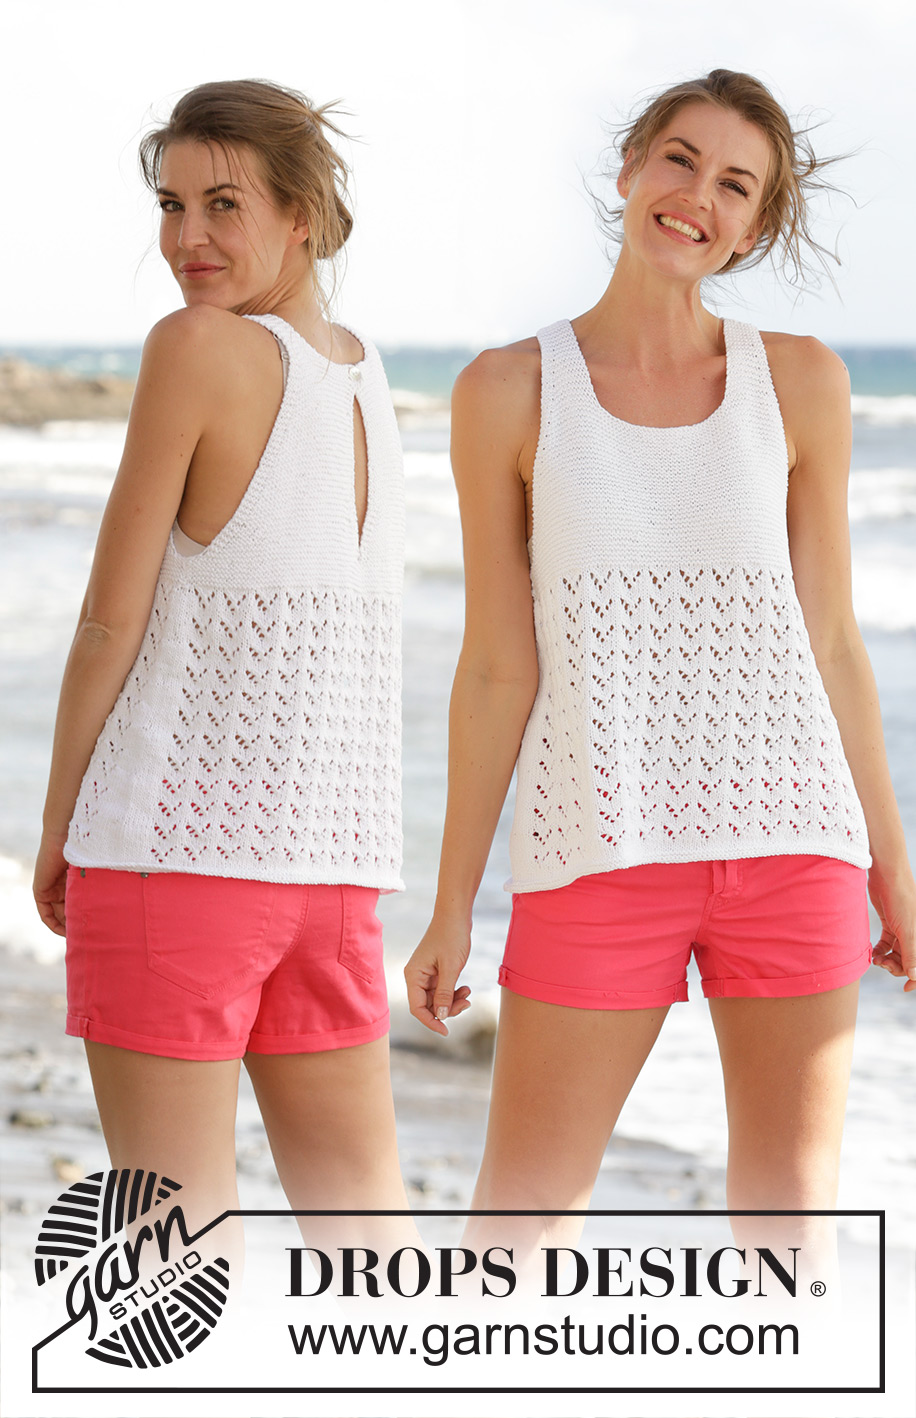
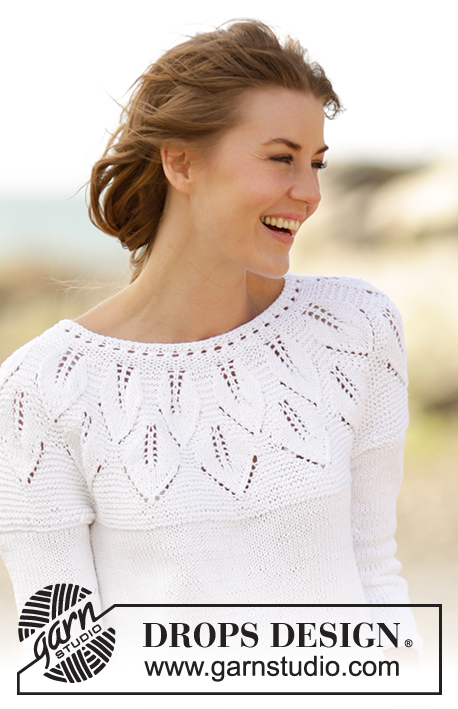
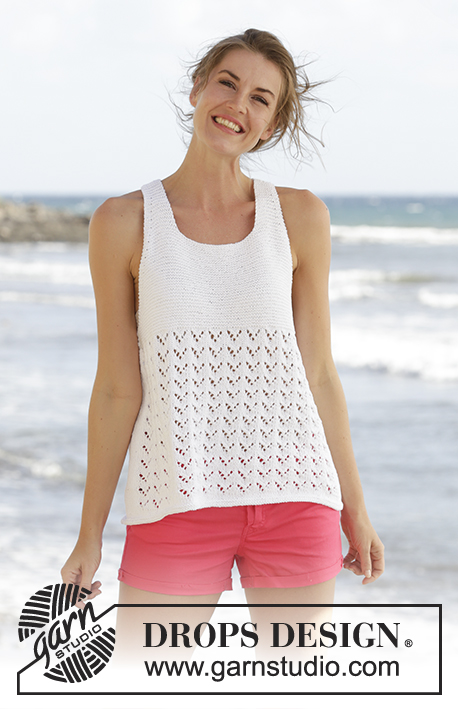
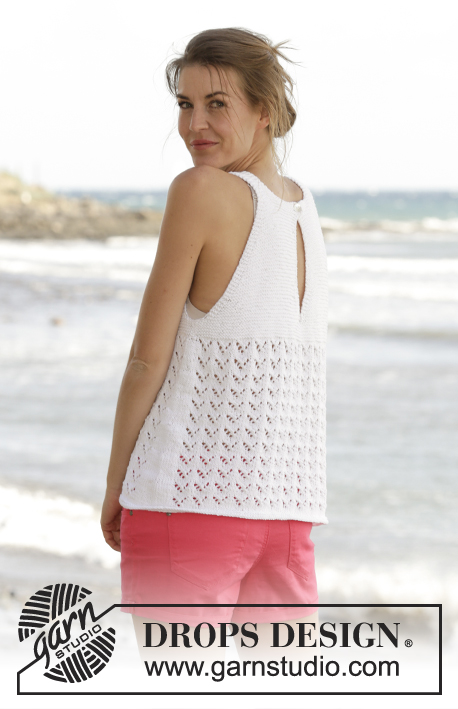
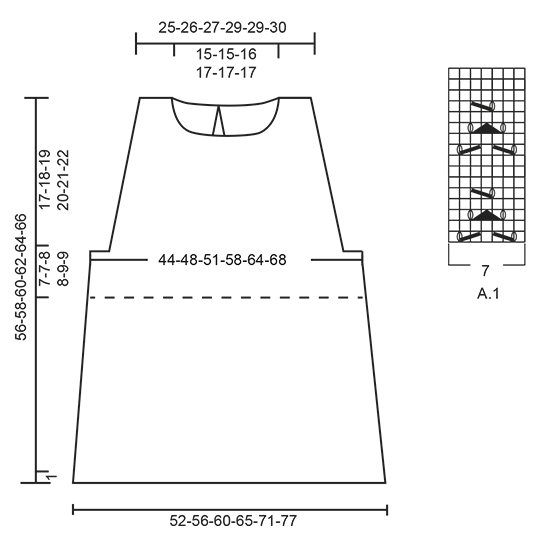
Knitted DROPS top in garter st with lace pattern and vent mid back in ”Cotton Light”. Worked top down. Size S-XXXL.
DROPS 170-24 |
||||||||||||||||
|
GARTER ST (back and forth): K all rows. 1 ridge = 2 rows K. GARTER ST (worked in the round): 1 ridge = 2 rounds. * K 1 round and P 1 round *, repeat from *-*. PATTERN: See diagram A.1. INCREASE TIP-1: Inc 1 st by making a YO. On next row K YO twisted to avoid holes. INCREASE TIP-2: Work until 1 st remains before marker, 1 YO, work 2 sts in garter st (marker is between these 2 sts), 1 YO. On next round K YOs twisted to avoid holes. Then work the new sts in stocking st. BUTTONHOLE: Dec for 1 buttonhole on left back piece at the top in vent mid back when piece measures 1½ cm as follows: K tog 3rd and 4th st from edge and make 1 YO. ---------------------------------------------------------- TOP: First worked back and forth on needle in parts, then work pattern in the round. The piece is worked top down. LEFT BACK PIECE: Cast on 10-12-12-13-13-14 sts on circular needle size 3.5 mm with Cotton Light. Work in GARTER ST - see explanation above. Remember BUTTONHOLE - see explanation above. When piece measures 4 cm, inc for armhole as follows from RS: Work 3 sts in garter st, 1 YO (= 1 st inc) – READ INCREASE TIP-1, work in garter st over the remaining 7-9-9-10-10-11 sts and cast on 1 new st for neck at the end of row. Work 1 row. At the end of the next row from RS, cast on 14-15-15-16-16-17 new sts for neck = 26-29-29-31-31-33 sts. REMEMBER THE KNITTING TENSION Then continue inc for armhole AT THE SAME TIME dec and inc for vent mid back as follows: ARMHOLE: Repeat inc for armhole every 4th row 10-12-13-11-6-6 more times and then every other row 7-5-6-12-24-26 times. VENT MID BACK: Dec for vent as follows (from RS): Work until 5 sts remain, K 2 tog, work 3 sts in garter st. Repeat this dec every 4th row 3 more times. Then when piece measures 9-10-11-12-13-14 cm from the new sts cast on for neck, inc as follows (from RS): Work until 3 sts, 1 YO, work 3 sts in garter st. K YO twisted on next row to avoid hole. Repeat inc every 4th row 3 more times. When all inc for armholes are done, there are 43-46-48-54-61-65 sts on left back piece. Work last row from RS. Piece measures approx. 17-18-19-20-21-22 cm. Put piece aside and knit right back piece. RIGHT BACK PIECE: Cast on and work as left back piece but reversed. I.e. inc for armhole inside 3 sts in garter st at the end of row from RS and cast on for neck at the end of row from WS. When all inc are done there are 43-46-48-54-61-65 sts on right back piece. Adjust according to left back piece. Work last row from RS, cast on 3-4-5-6-6-6 sts at the end of this row, turn piece and work as follows from WS: Work in garter st over the new 3-4-5-6-6-6 sts, in garter st over the 43-46-48-54-61-65 sts from right back piece, cast on 1-0-1-1-1-0 new sts, then work in garter sts over the next 43-46-48-54-61-65 sts from left back piece from WS, cast on 3-4-5-6-6-6 sts at the end of row. There are now 93-100-107-121-135-142 sts on back piece. Continue in garter st until piece measures 24-25-27-28-30-31 cm from shoulder – adjust so that the last row is worked from WS. Slip all sts on a stitch holder and work the front piece. FRONT PIECE: Left shoulder: Cast on 10-12-12-13-13-14 sts on circular needle size 3.5 mm with Cotton Light. Work in garter st. When piece measures 4 cm, work as follows on next row from RS: Work until 3 sts, 1 YO (= 1 st inc), work 3 sts in garter st. Now continue inc for armhole the same way as on right back piece, AT THE SAME TIME when piece measures 8-8-10-10-12-12 cm - adjust so that last row is worked from WS, slip sts on a stitch holder and work right shoulder. Right shoulder: Cast on and work as left shoulder but reversed. Inc sts for armhole the same way as on left back piece (i.e. inside 3 sts in garter st at beg of row from RS). When piece measures 8-8-10-10-12-12 cm, cast on 31-32-33-35-35-36 sts for neck at the end of row from RS, then work sts from stitch holder (= left shoulder) on to needle. Continue back and forth in garter st. NOTE: Continue inc for armhole as before. When all inc for armholes are done, there are 87-92-97-109-123-130 sts on needle. Adjust so that last row is from WS, cast on 3-4-5-6-6-6 sts at the end of row, turn and K over all sts, cast on 3-4-5-6-6-6 sts at the end of row = 93-100-107-121-135-142 sts on front piece. Piece measures approx. 17-18-19-20-21-22 cm. Continue in garter st until piece measures 24-25-27-28-30-31 cm from shoulder – adjust according to back piece (last row is worked from WS). BODY: Now work in the round. Insert 1 marker in piece, NOW MEASURE PIECE FROM HERE. Switch to circular needle size 4 mm. Work as follows from RS: K the 93-100-107-121-135-142 sts on front piece, then work sts from stitch holder on back piece on to same circular needle = 186-200-214-242-270-284 sts on needle. Insert a marker in transition between front and back piece (= 93-100-107-121-135-142 sts between each marker). First marker is beg of round. K 1 round. Then work pattern as follows: 1 st in stocking st, work A.1 (= 7 sts) 13-14-15-17-19-20 times in width, 1 st in stocking st, (marker is here), 1 st in stocking st, A.1 13-14-15-17-19-20 times in width, 1 st in stocking st. Continue as follows. When piece measures 2 cm, inc 1 st on each side of marker in each side of piece - READ INCREASE TIP-2 (= 4 sts inc). Repeat inc every 3½-3-2½-3½-4-3 cm 7-8-9-7-6-9 more times = 218-236-254-274-298-324 sts. When piece measures 31-32-32-33-33-34 cm (adjust to finish nicely according to pattern), switch to circular needle size 3.5 mm. Work 2 ridges in GARTER ST - see explanation above. Cast off. The whole piece measures approx. 56-58-60-62-64-66 cm. ASSEMBLY: Sew the shoulder seams. Sew tog ridges under each armhole in outer loops of edge sts (= side seams). Sew on button at the top of vent on right back piece. |
||||||||||||||||
Diagram explanations |
||||||||||||||||
|
||||||||||||||||
 |
||||||||||||||||
Have you finished this pattern?Tag your pictures with #dropspattern #holidayblisstop or submit them to the #dropsfan gallery. Do you need help with this pattern?You'll find 25 tutorial videos, a Comments/Questions area and more by visiting the pattern on garnstudio.com. © 1982-2026 DROPS Design A/S. We reserve all rights. This document, including all its sub-sections, has copyrights. Read more about what you can do with our patterns at the bottom of each pattern on our site. |
||||||||||||||||


With over 40 years in knitting and crochet design, DROPS Design offers one of the most extensive collections of free patterns on the internet - translated to 17 languages. As of today we count 324 catalogues and 12290 patterns translated into English (UK/cm). 12290
We work hard to bring you the best knitting and crochet have to offer, inspiration and advice as well as great quality yarns at incredible prices! Would you like to use our patterns for other than personal use? You can read what you are allowed to do in the Copyright text at the bottom of all our patterns. Happy crafting!
Post a comment to pattern DROPS 170-24
We would love to hear what you have to say about this pattern!
If you want to leave a question, please make sure you select the correct category in the form below, to speed up the answering process. Required fields are marked *.